
Option 1: Using a Website Builder
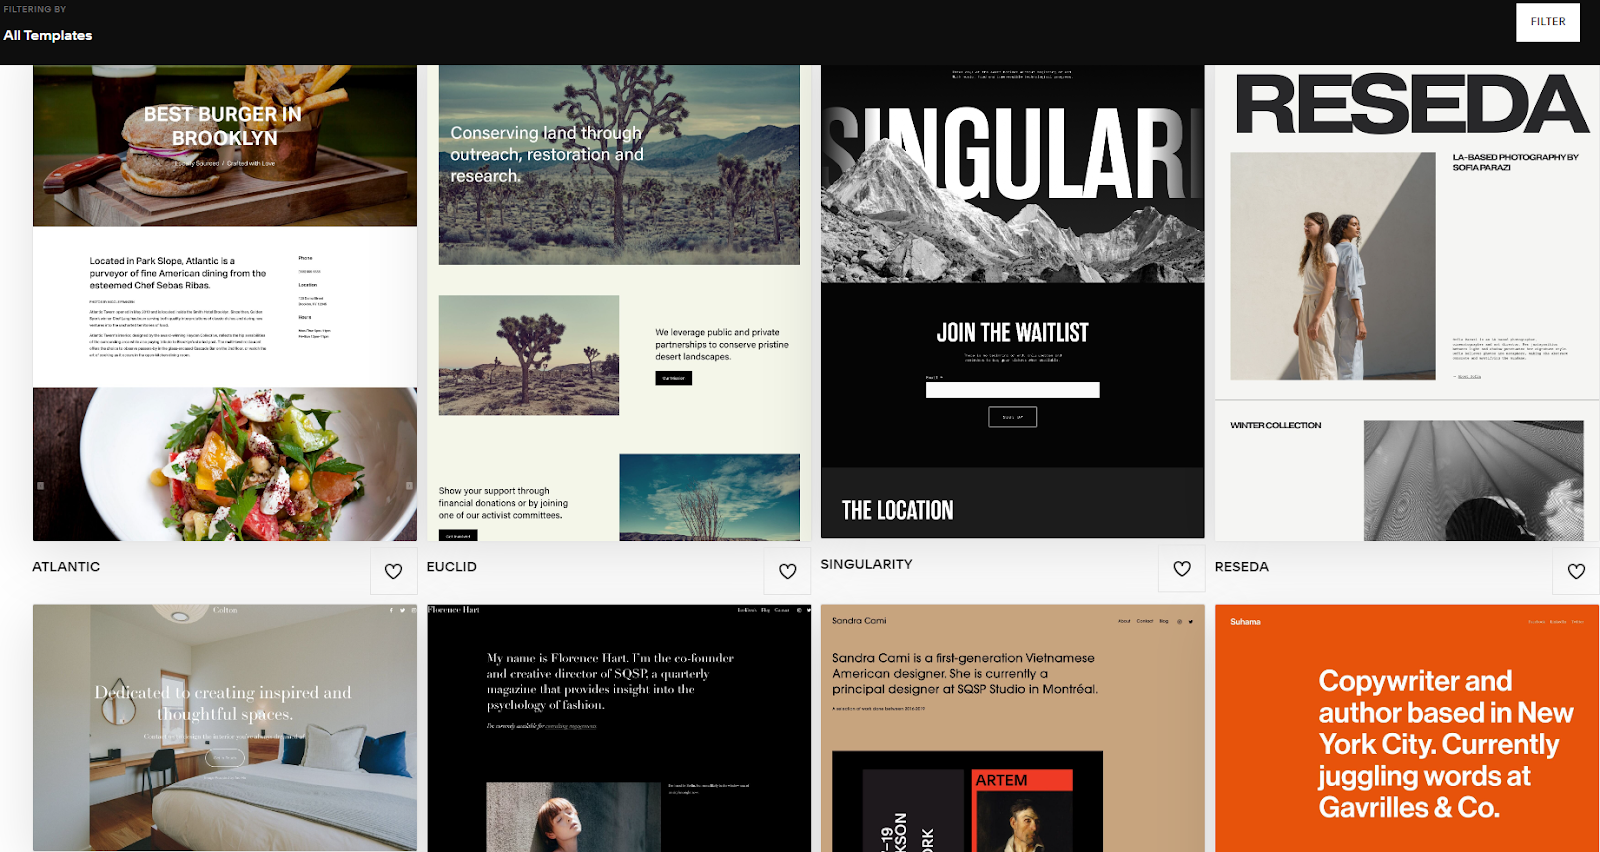
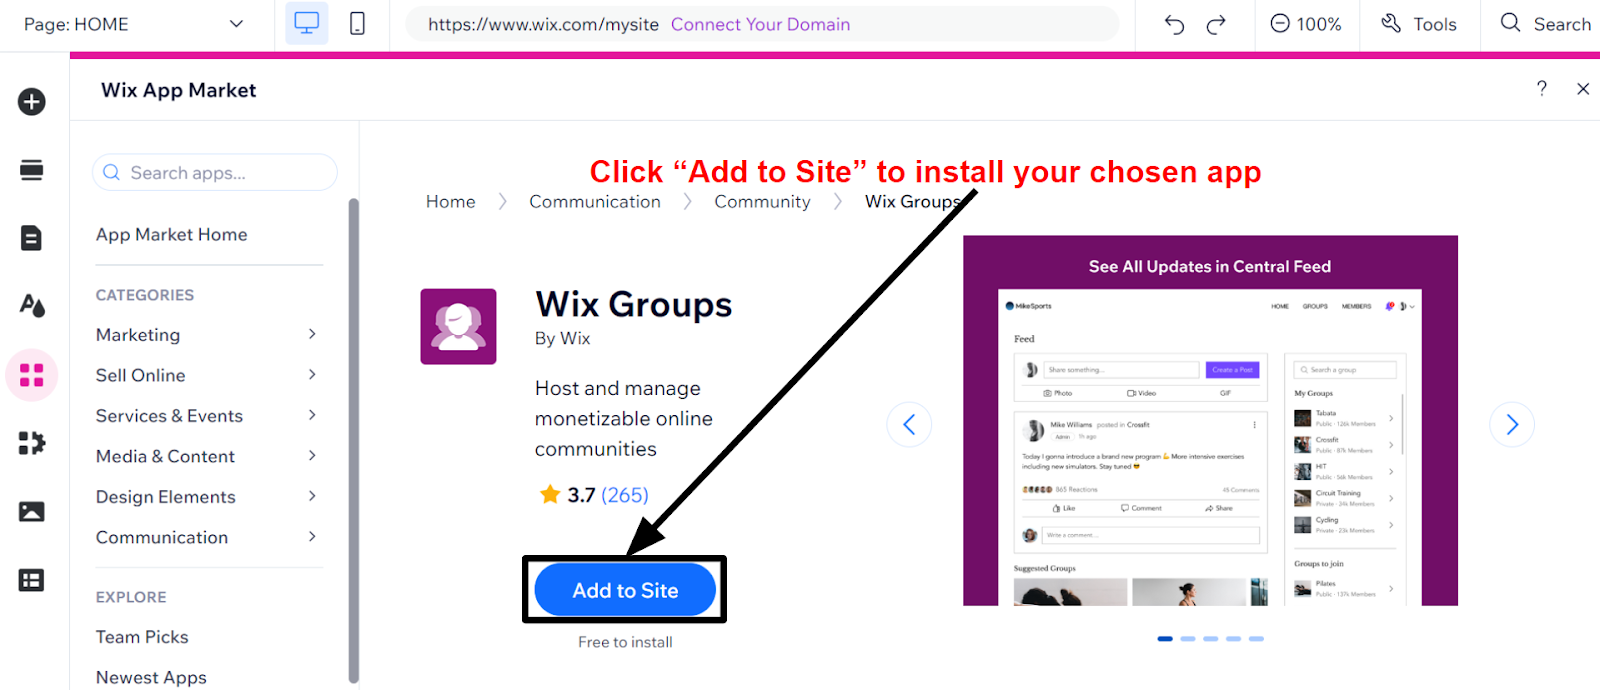
A website builder is an online tool that makes it super easy to build a website. Website builders can be quite powerful but require no coding or technical skills, which makes them accessible to beginners and useful for professionals. Their intuitive interface and flexible features mean that you can use a builder to create a website that looks great in a matter of hours – or even minutes. Most website builders are budget-friendly, and many of them offer free plans or free trials, so you can get started without having to spend a dime. Website builders come with pre-designed templates that set the style, layout, and color scheme of your site. All you have to do is pick one add your own content and images, and personalize it with your own branding. Depending on the builder, you’ll have access to different methods of building and editing your site. I personally prefer drag-and-drop editing, as it gives you more control over the layout while keeping the process pretty simple. You can position elements wherever you like, or add new elements by simply dragging them into place. Some builders offer a selection of apps to choose from. This is an easy way to add functionality to your site or integrate it with another service. You can add a mailing list, an appointment booking system, a live chat box, or pretty much anything you can imagine, usually at no added cost. Though there are plenty of website builders out there, their quality greatly varies. My personal favorite is Wix, as it offers hundreds of templates and great flexibility, with lots of free (and paid) apps. Check out our guide to the best website builders for some other excellent choices.Using a Website Builder: Step-by-Step Guide
1. Decide what kind of website you want to build With most website builders, you can create just about any type of website you can imagine. You may want to create a personal website, a blog, an online portfolio, or interactive a resumé/CV. If you’re an entrepreneur, you might need a website for your business, or an online store to sell your products or services. You don’t even need to limit your site to a single purpose. For instance, you might want to create a website for your business that also has a portfolio of your work and an online store. With the right builder, the possibilities are only limited by your imagination. 2. Choose the right website builder for your needs Builders will have different strengths and features, so you need to choose the right builder for your needs. For example, while most builders come with some sort of online store feature or add-on, a builder like Shopify is specifically designed for e-commerce. On the other hand, its general-purpose features, such as blogging, are very limited. For my money, the most flexible website builder is Wix. It has excellent e-commerce features, tons of apps, and its drag-and-drop editor gives you complete control over how your website looks. Wix sits at the top spot of our best website builders list, and I’ll be using it to demonstrate the steps to building your website in this guide. That’s not to say that it’s your only option though – you should be able to follow these steps with most quality website builders.Our Website Builder Recommendations
Not sure which builder to choose? Here are some recommendations for different purposes.
- If you’re looking for full design freedom and easy editing capabilities, Wix is my go-to recommendation because of its flexibility and functionality. The free plan is outstanding, and it allows you to build a fully functional website (notwithstanding some limitations). Even with a free plan, you can enjoy reliable web hosting and around-the-clock maintenance and security.
- The most beginner-friendly builder on this list, SITE123 offers easy and quick website building.
- If you do creative work – photography, design, writing – then Squarespace is the top choice. Its high-quality templates are perfect for showcasing your creative talent.
- If you need to create a site for your agency that attracts clients and invites confidence, IONOS offers simple design with professional results. It also comes with easy-to-use tools for e-commerce.
- If you need a dazzling online store with advanced e-commerce functionalities like inventory tracking, product variations, and business analytics, you can’t go wrong with Shopify. It has hundreds of apps and tons of tools to help you boost your sales.
- If you want to sell online, you’ll probably want to go for a designated business plan (or, at the very least, a plan with the necessary tools for e-commerce). Wix has general and business/e-commerce plans to choose from, but you can only accept online payments on the business/e-commerce plans.
- If you want to showcase your work by hosting a lot of videos or high-resolution images on your website, you’ll need a plan with a lot of storage and bandwidth. For instance, Squarespace gives you unlimited photo storage on every plan, including its cheapest.
Changing fonts
Changing the fonts on Wix is simply a matter of clicking on the text you want to change and hitting the Edit Text button. You can edit each text box separately or use the Save Theme option to apply your font changes across your whole website. With Wix, you can choose different fonts for different text types – for instance, you can choose one font for Heading 1 to use as your main heading (like in the template I’m demonstrating below), and another font for your sub-headings. You can even have a different font for paragraph styles, if you like.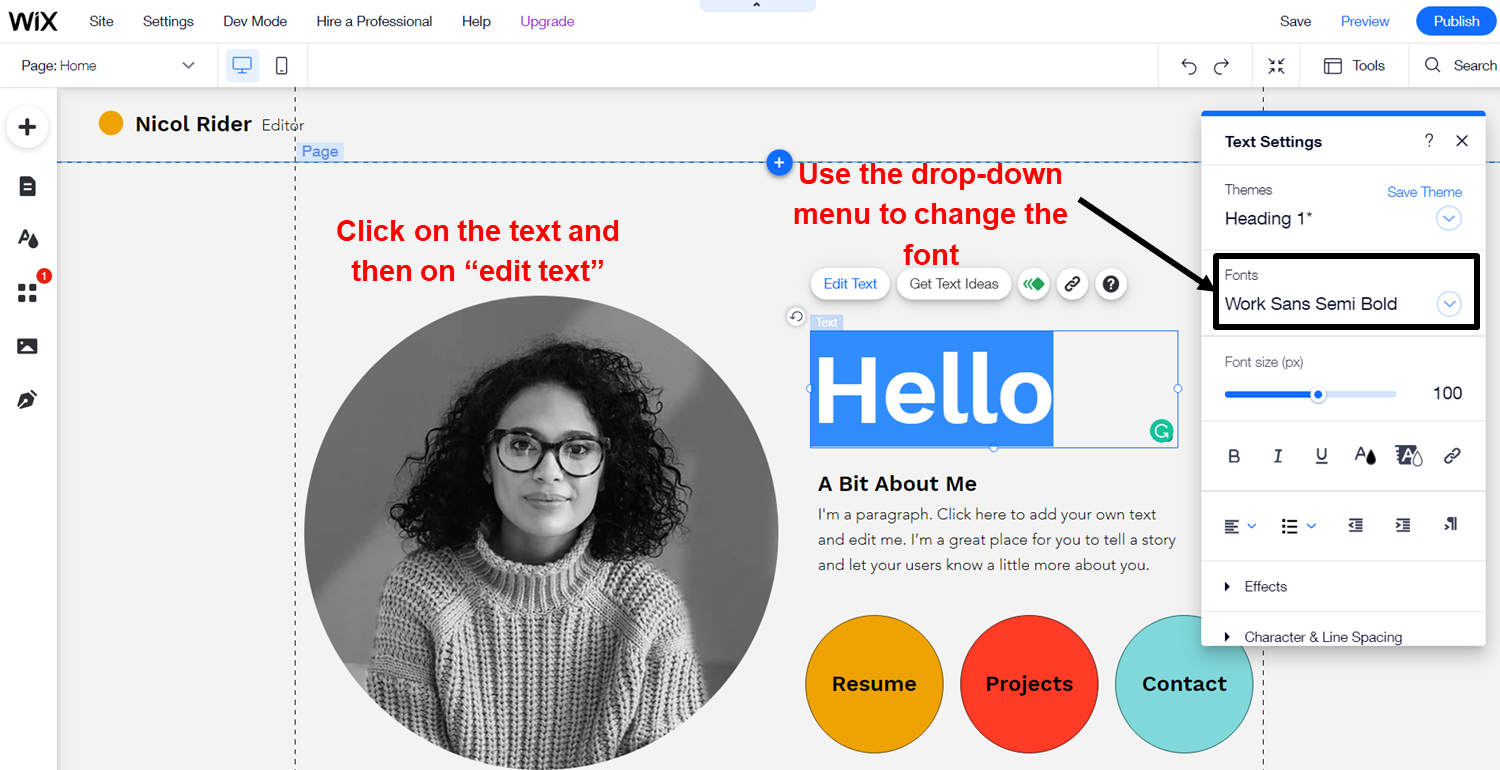
Changing colors
You can easily change the color of your fonts in the text settings box, but it’s just as easy to change the color of other elements, like backgrounds of columns. For example, you can use a solid color background using the color picker tool as demonstrated in the screenshot below. Wix automatically creates complementary color palettes to match your theme, but you can change the palettes by using the “change your site colors” option. You can also add your own colors to match your branding.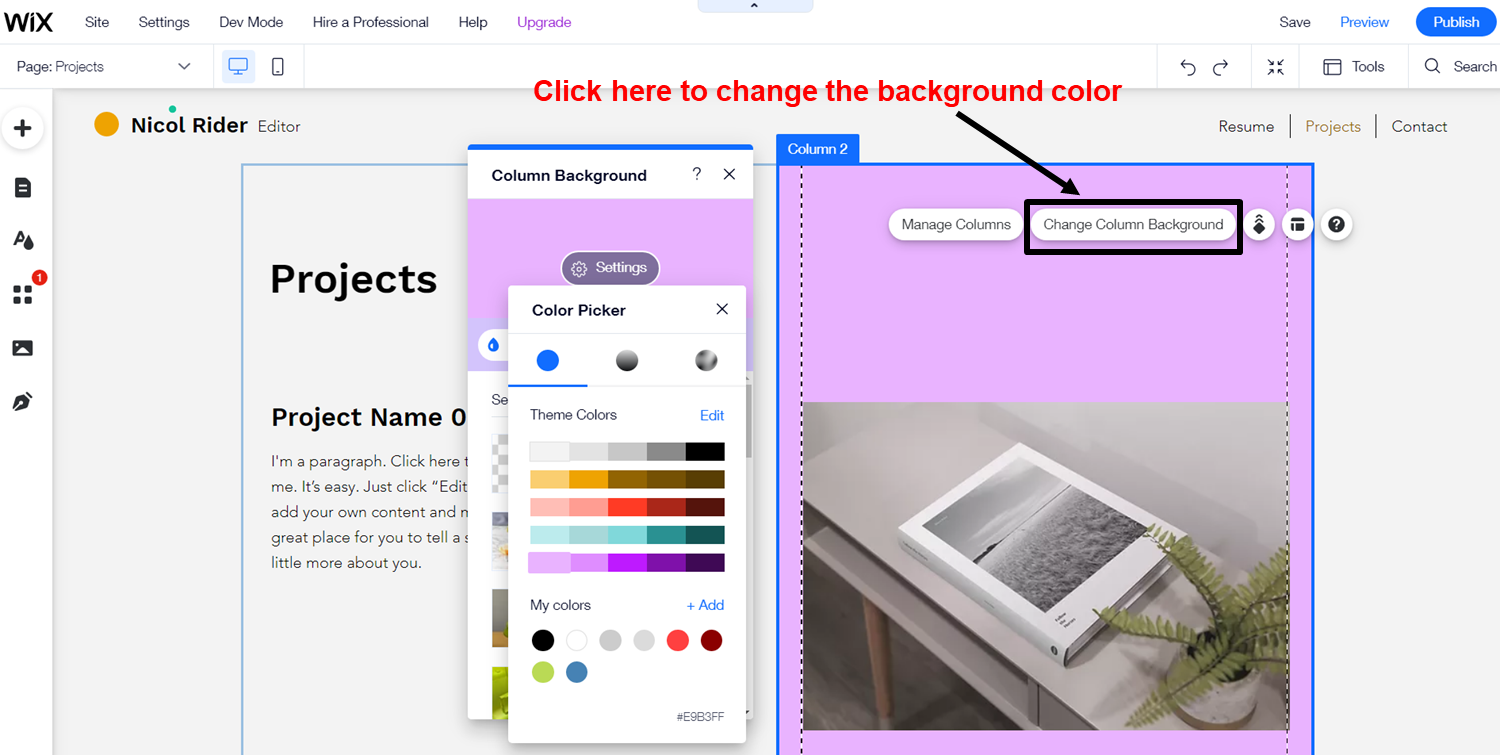
Moving elements around on your pages
Drag-and-drop editors make rearranging your page’s content a simple matter of, well, dragging it from one place to another. Wix is unique in the amount of control it gives you over arranging your page’s layout, but other drag-and-drop editors will give you similar features. Other editors may offer an up/down button method for moving sections around on your web page. Block editors work like a middle point between the two, with pre-made blocks (text, image, video, columns, etc.) that you can arrange in a grid, giving you more flexibility than just moving content up or down, but not as much room to play around with as a drag-and-drop editor. One thing that I particularly like about Wix is the Zoom Out and Reorder function. This allows you to view your whole web page and easily move sections and/or elements around on the page. Below, you can see how easy it is to move content using this tool.
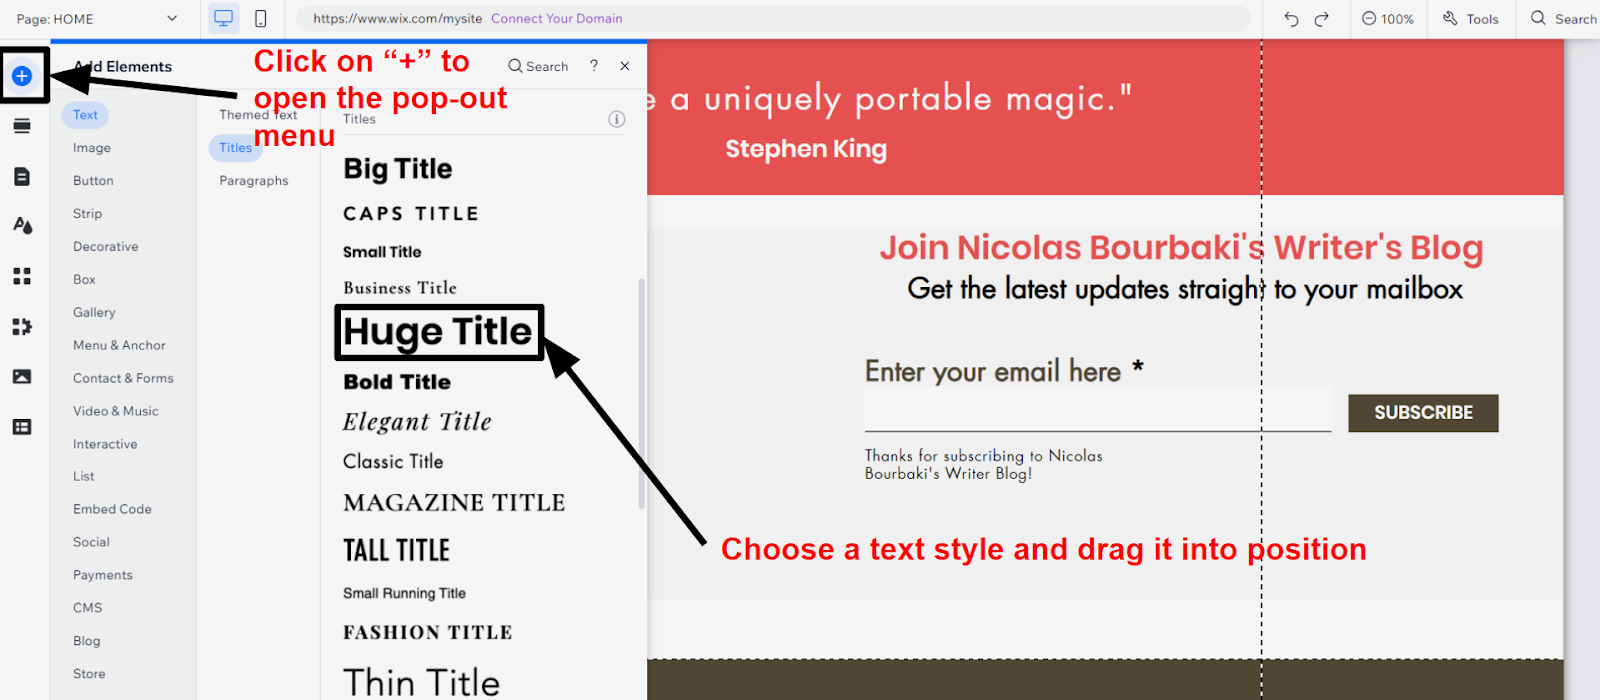
How to add text
You can add new text sections to your web pages in just a few clicks. In Wix, you use the Add tool in the toolbar on the left and then select Text in the pop-out menu.
How to add an image
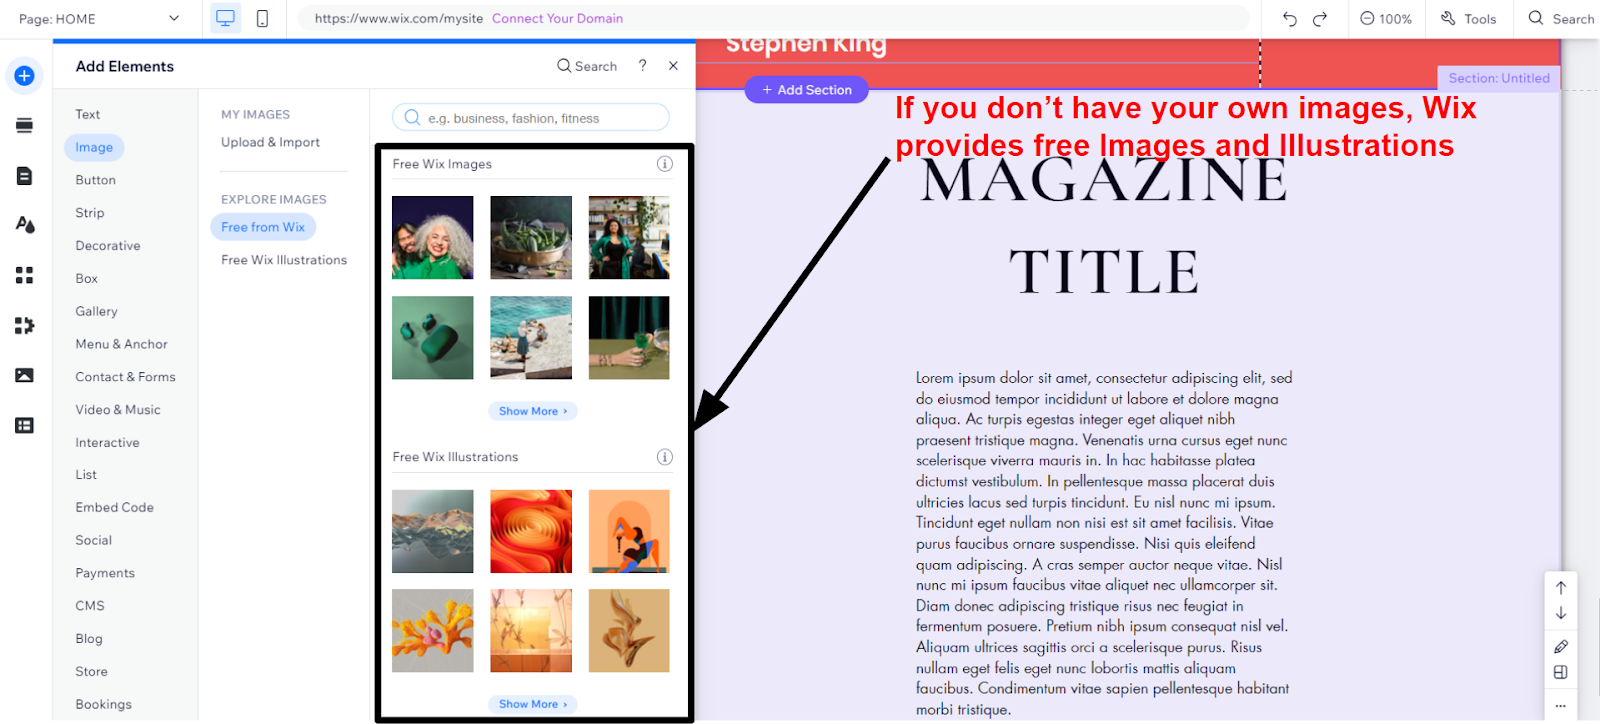
Like adding text to your website, adding images is incredibly easy. In Wix, open the Add menu, select Image (directly below Text), and choose from the range of image sources. You can upload your own images, use free Wix images and illustrations, search the Unsplash images database, or choose premium stock images from Shutterstock (for an added fee). Then, all you have to do is place the image where you want it on your page.
How to add a page to your website
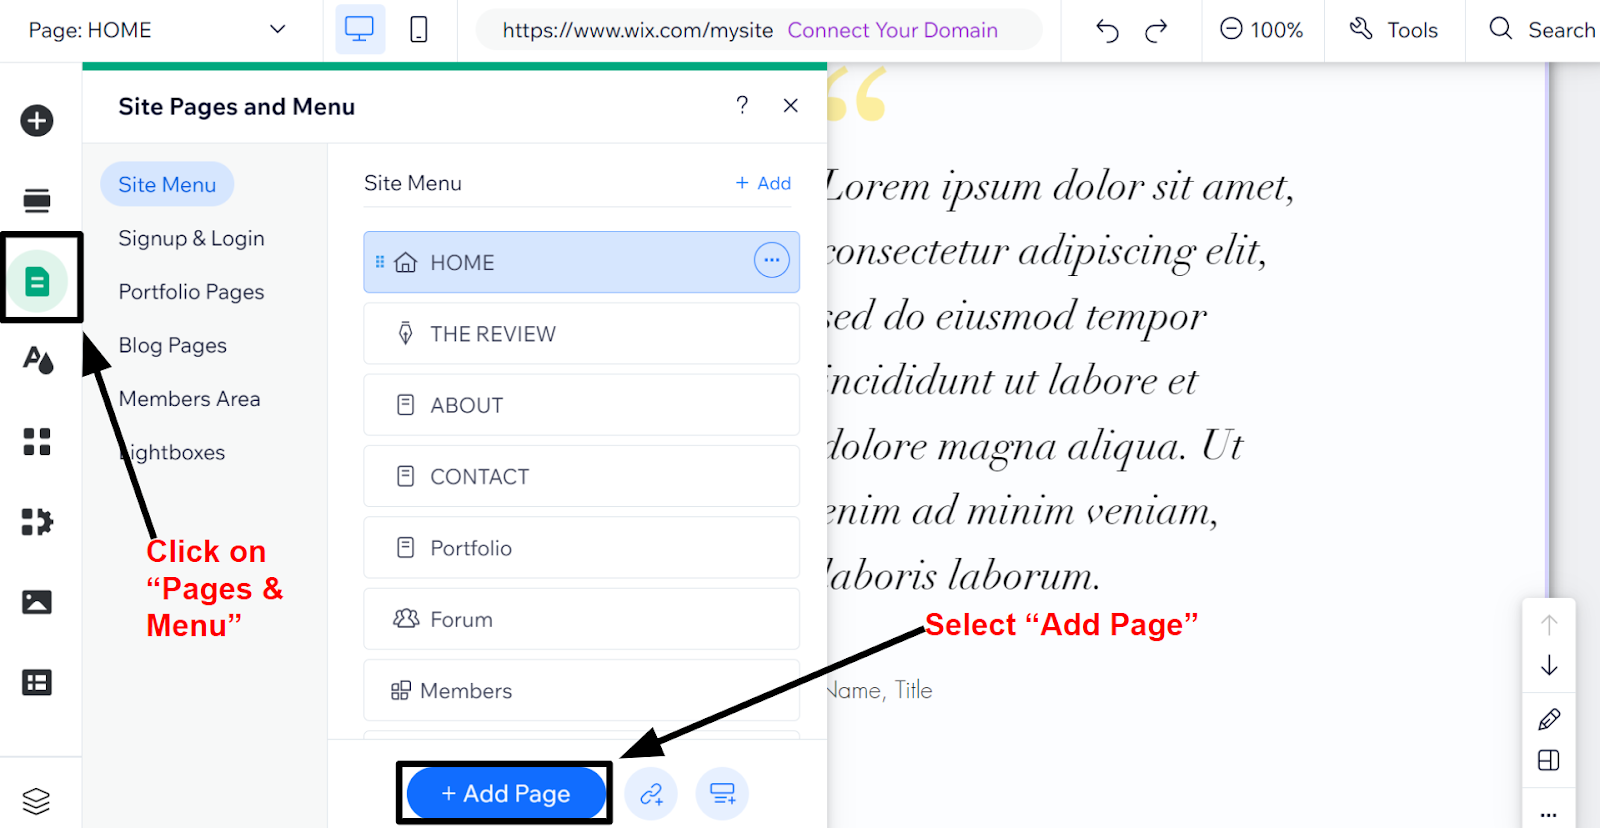
Most templates will come with several pre-designed pages, such as Home, About Us, and Contact. If you want to add more pages – a Services or My Work page, for example – you can do this by clicking the Menus and Pages button on the left toolbar and selecting the Add Page button at the bottom of the pop-out menu.


Website Builder Comparison Table
| Website Builder | Free Plan | Drag & Drop | Apps/ Integrations | Templates | Starting Price | |
| Wix | ✔ | ✔ | ✔ | 900+ | $0 | Read Review |
| Squarespace | ✘ | ✔ | ✔ | 140+ | $16.00 | Read Review |
| Hostinger Website Builder | ✘ | ✔ | ✔ | 100+ | $2.49 | Read Review |
| IONOS | ✘ | ✔ | ✘ | 18 | $6.00 | Read Review |
| SITE123 | ✔ | ✘ | ✔ | 240+ | $0 | Read Review |
| WordPress.com | ✔ | ✘ | ✔ | 140+ native Thousands of third-party templates | $4.00 | Read Review |
| Webnode | ✔ | ✔ | ✘ | 110+ | $3.90 | Read Review |
| Shopify | ✘ | ✘ | ✔ | 70+ | $29.00 | Read Review |
| BigCommerce | ✘ | ✘ | ✔ | 200+ | $29.00 | Read Review |
| Square Online |
✔ | ✘ | ✔ | 1 | $0 | Read Review |
Website Builder FAQ
Which website builder is the easiest to use?
There are several website builders that are very easy to use, such as IONOS and SITE123. However, Wix is my top choice because it manages to give you a ton of design freedom while still being impressively easy to use. Not only is it incredibly intuitive, but it also has more features than almost any other builder.Will my site appear on Google and other search engines?
Yes, your website will show up in search engine results. But it’s not enough to just show up – you also want your site to rank as highly as possible. All website builders offer SEO (search engine optimization) features to help improve your search result ranking. In some cases, you’re limited to adding your own meta titles and descriptions. Other website builders, however, will give you more advanced SEO features. For example, Wix offers an SEO Wiz, which gives you personalized SEO recommendations and step-by-step instructions on how to get your website noticed.Will my site look good on mobile devices?
The simple answer to this question is ‘yes.’ Most website builders either give you options for mobile-responsive templates (meaning your site will automatically adjust to the screen size of mobile devices) or have a mobile view editor so you can edit the mobile version of your website separately. If you want to check that your website is mobile-responsive, you can use our free Responsive Checker Tool.Do I need a dedicated e-commerce builder?
It really depends on how many products you plan on selling and the main purpose of your website. For a regular blog that sells merchandise on the side, a regular website builder with e-commerce features is more than enough. That’s because e-commerce builders are generally so focused on selling that their blogging tools aren’t all that great. Wix gives you the best of both worlds, with great tools for creating content and a strong set of e-commerce tools. However, if you’re planning to sell a lot of products through your own online store, then I’d definitely recommend a dedicated e-commerce builder like Shopify. E-commerce builders have more powerful sales management tools, and some even let you sell via Instagram and Facebook as well.Can I hire someone to build my site for me?
Yes, you certainly can! If you don’t have the time to build your own website or you’d just rather have a professional take care of it for you, you can hire a web designer for as little as $5 on Fiverr, the best marketplace for finding low-cost freelancers.Option 2: Using WordPress
Website builders are absolutely the easiest way to get your website online, but they can be a little more expensive than using WordPress with a web hosting plan. If you’re looking for a budget-friendly option and you don’t mind a slightly more technical site-building process, then WordPress might be the choice for you. Now, there are two versions of WordPress: WordPress.com, which is a simplified version, and self-hosted WordPress.org. In this section, I’ll be discussing self-hosted WordPress. WordPress isn’t quite as simple to use as a website builder, but it’s still pretty easy to get started with – and its massive range of free templates and plugins give you almost limitless options for customizing your website. Though the process is a bit more technical, you don’t need to know how to code or have a lot of experience to build a great-looking website with WordPress.Step-by-Step Guide
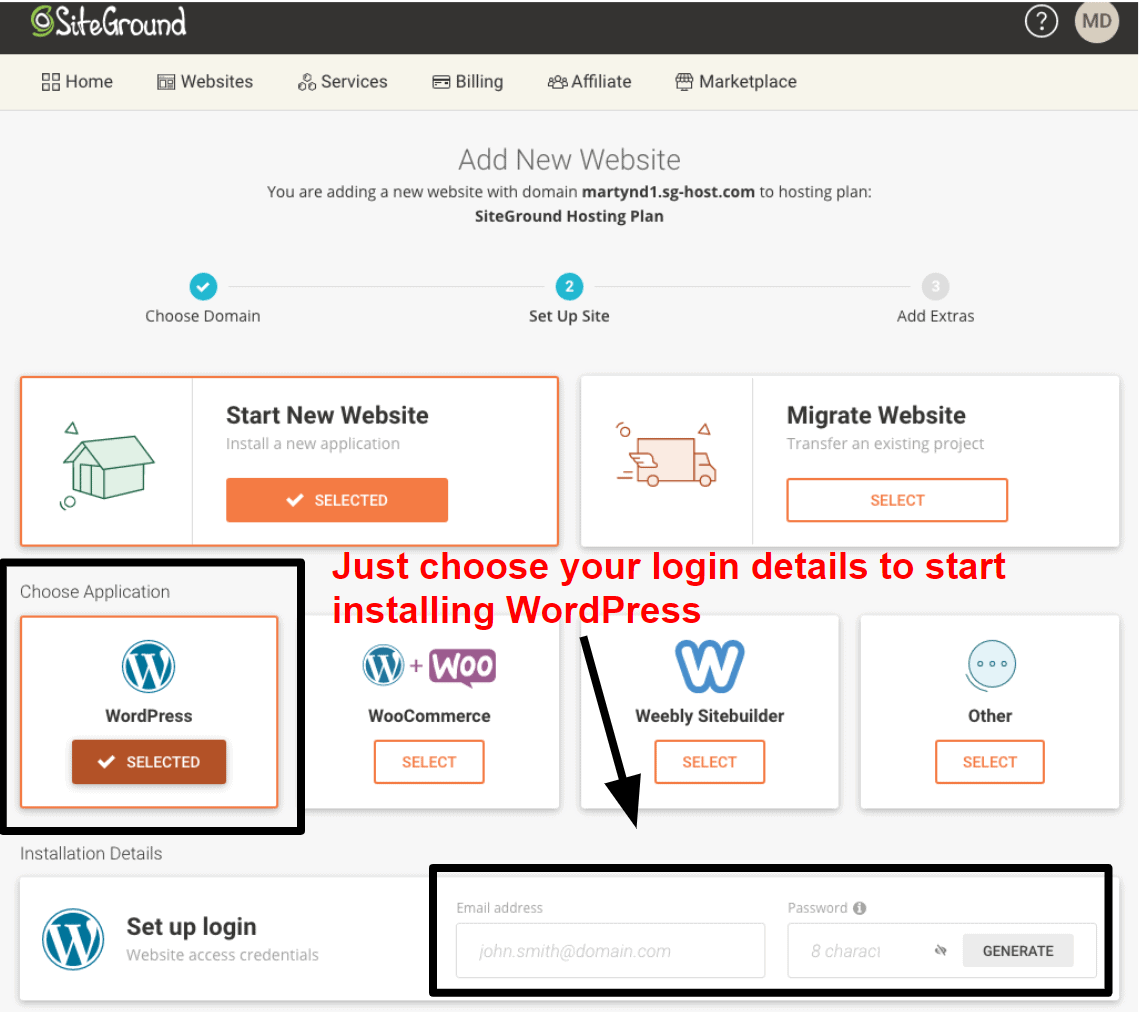
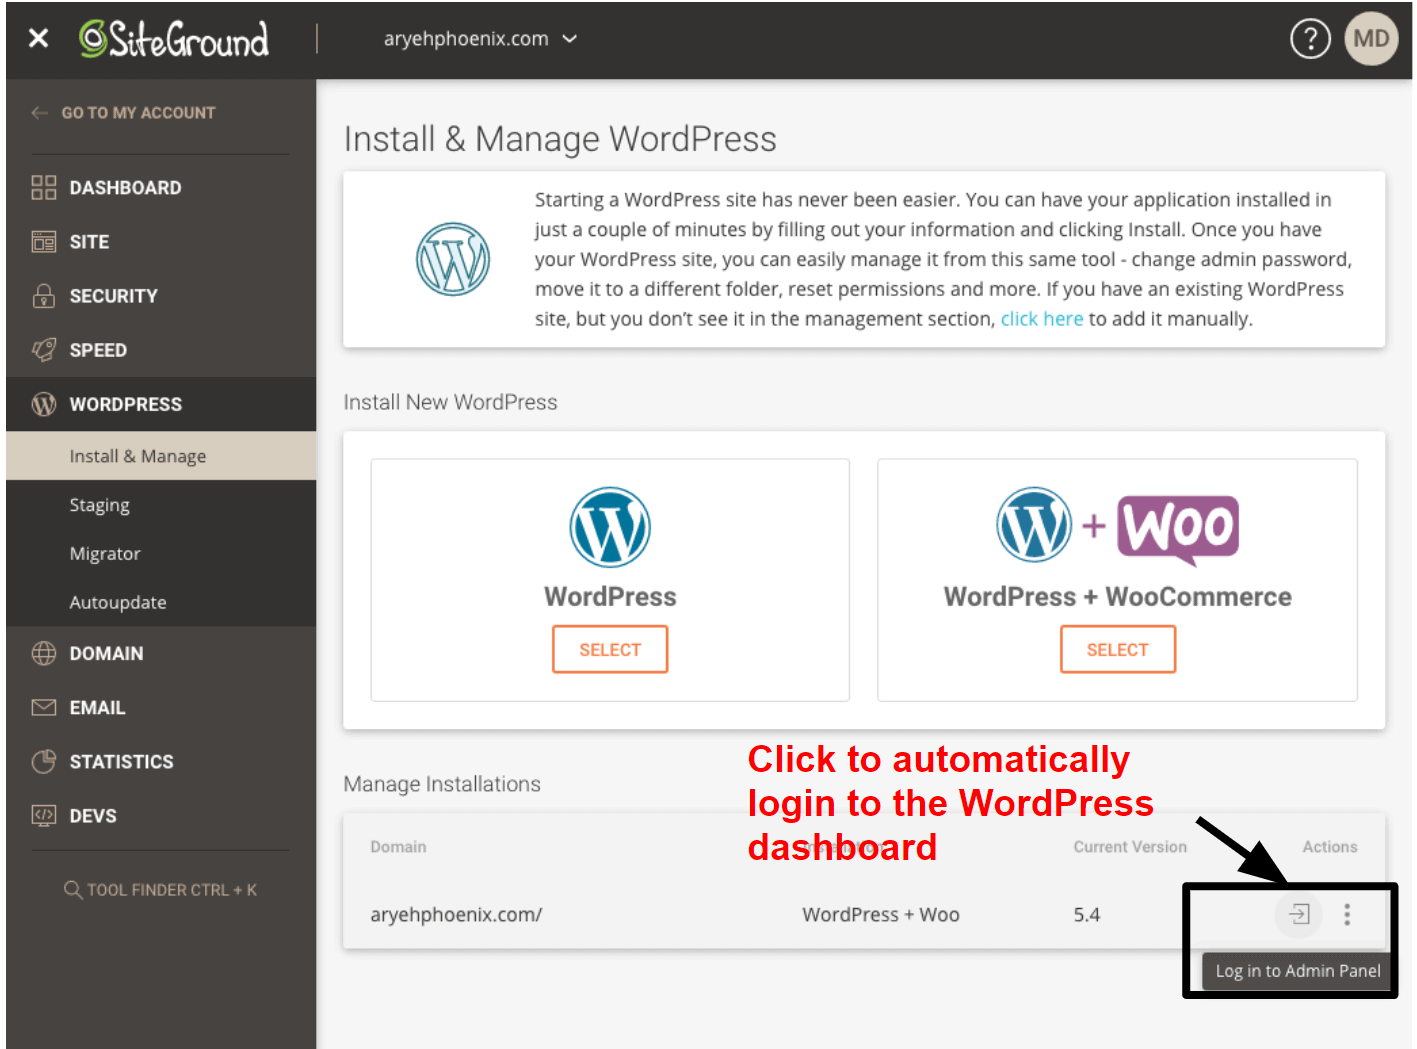
1. Choose a hosting plan Although WordPress itself is 100% free, you’ll have to sign up for web hosting to make your website available online (unlike with website builders that provide hosting with their plans). For a more in-depth look, you can check out our shortlist of the best web hosts in 2024. There are lots of web hosting options available – but here are the ones that consistently top our recommendations.Our Top Web Host Recommendations for WordPress Websites
- Hostinger – One of the cheapest hosting providers around, Hostinger is ideal if you’re on a budget. Its excellent loading speeds (that we’ve tested thoroughly) and simple 1-click WordPress installer make it our overall best choice. If you opt for managed WordPress hosting, you’ll benefit from enhanced security and servers that are optimized for WordPress.
- InterServer – With its low monthly hosting price and unlimited storage, InterServer is an excellent solution if you’re a growing business. Because its servers are located in the US, it can provide great loading speeds for a US-based target audience.
- A2 Hosting – Offering standard shared hosting or managed WordPress hosting, A2 Hosting is a ‘green’ hosting company that works to reduce its carbon footprint. It delivers great speeds, and it’s also great for security, with its own HackScan threat detection and removal tool that’s included free.
- Nexcess – If you don’t mind going for a more costly option – so long as you get premium managed hosting in return – Nexcess could be the best hosting option for running your WordPress website. With Nexcess, you can rest assured that every part of the hosting process is being taken care of by consummate professionals
- Kinsta – Managed hosting (i.e., all the hard work comes pre-done) and lighting fast speeds make Kinsta a fantastic choice in almost any regard, so long as you don’t mind a lighter wallet. Despite its fantastic value, Kinsta is still quite pricey, but rest assured, you’re paying premium prices for a premium service.
- InMotion Hosting – Another top-tier choice for US-based hosting, InMotion Hosting sacrifices some (though not that much) of InterServer’s speed in exchange for top-tier support. If you’re looking for great hosting within the US, and dependability is on the top of your list, InMotion might just be the choice for you.
- SSL certificate. An SSL certificate makes your website secure, ensuring your site has the little padlock icon in the address bar of web browsers. Most web hosts will include one for free. Once your website is live, you can check that the SSL certificate on your website is working properly with the SSL Checker Tool.
- WordPress optimization. The best web hosts for WordPress have specially optimized servers to improve performance, so your web pages load faster.
- Security features. Some web hosts charge you extra for essential security, so you should try to find one that includes important features such as malware protection, firewalls, and automatic backups.
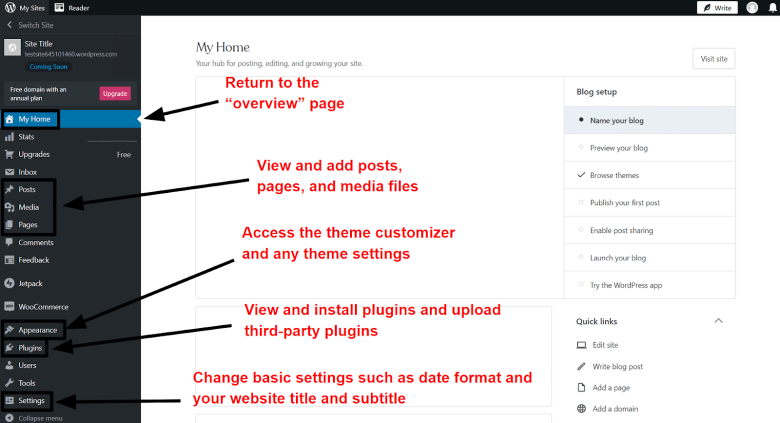
| WordPress Element | What It Does | Website Builder Equivalent |
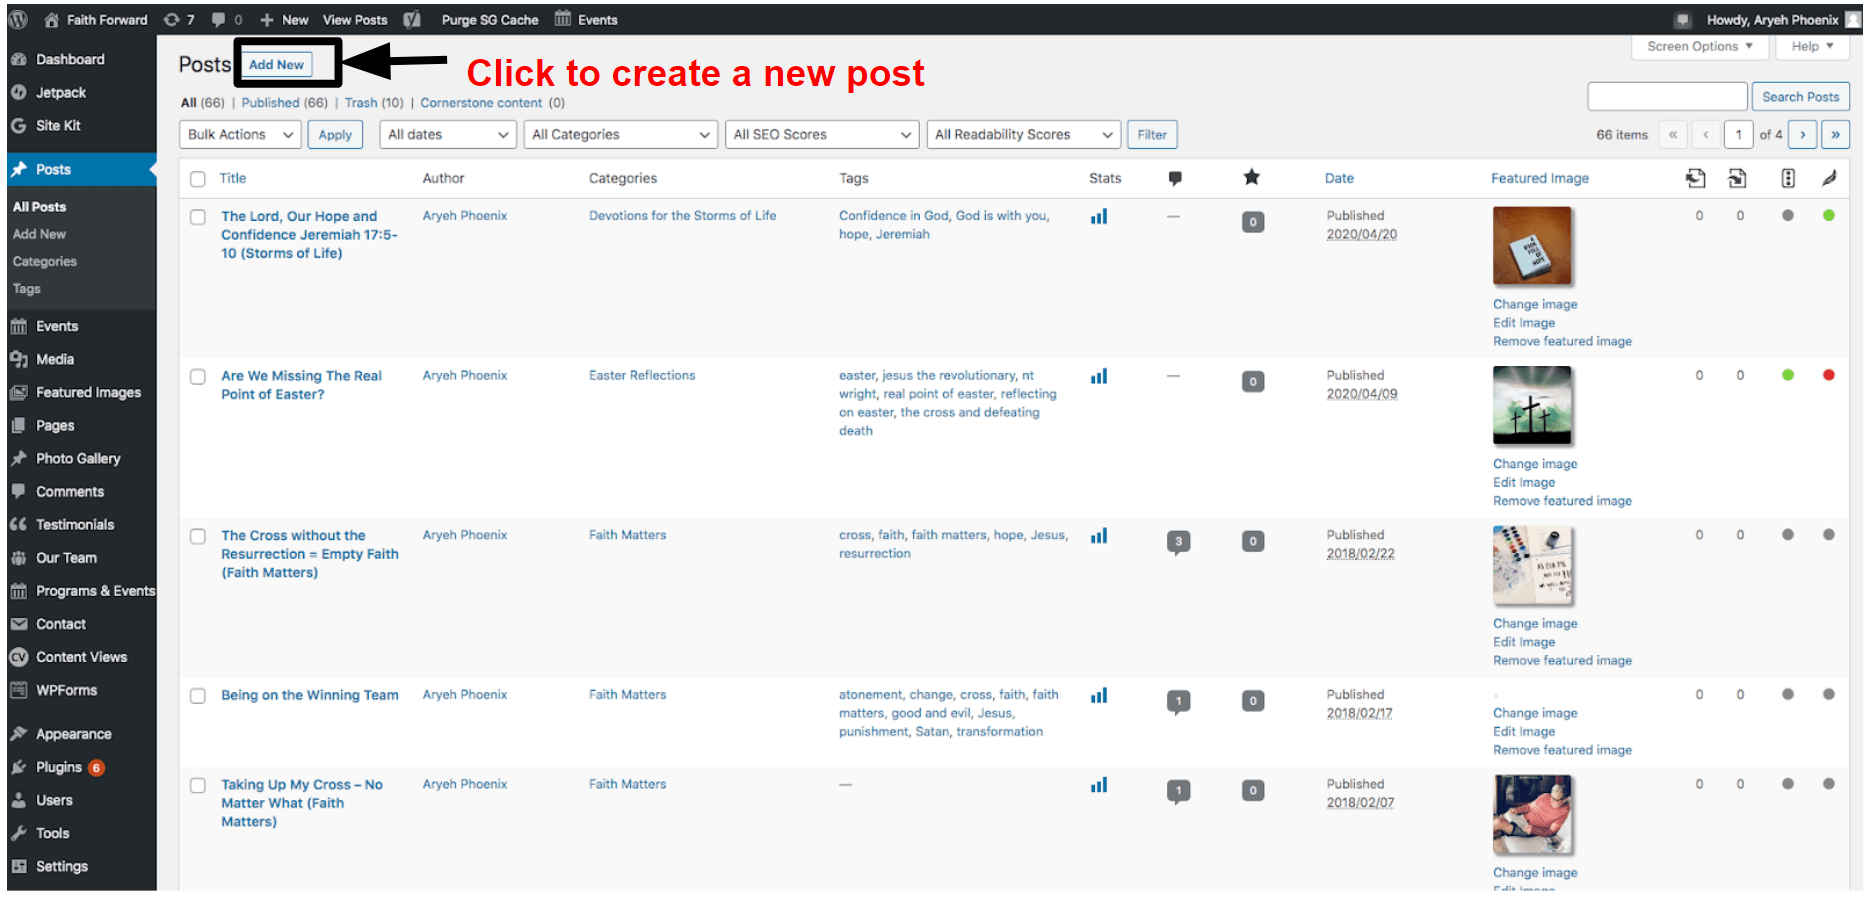
| Posts | View, edit, and add new posts to your website (see below for more about posts and pages) | Blog |
| Media | View, edit, and upload new images and other media types (e.g., videos) | Gallery |
| Pages | View, edit, and add new pages to your website | Pages |
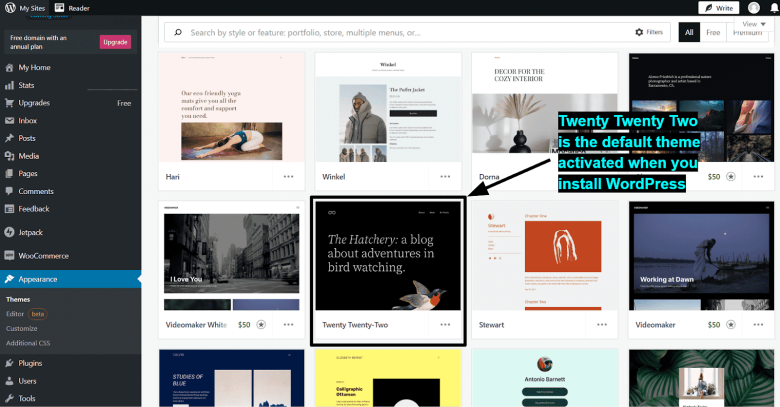
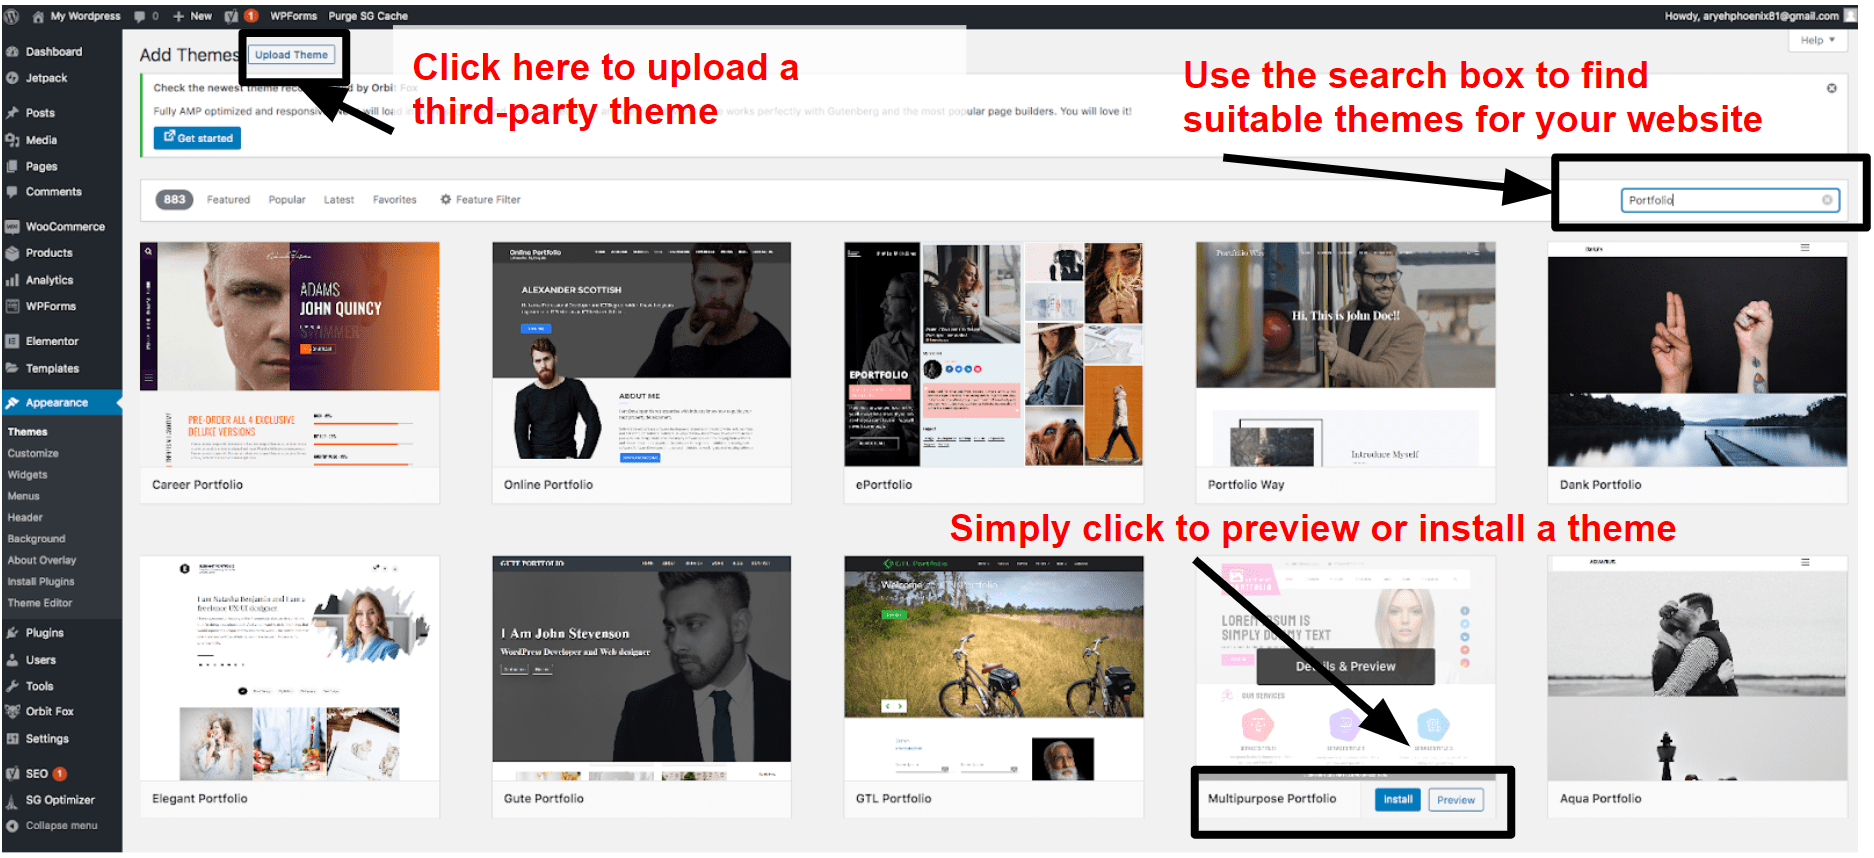
| Theme Installer | View existing themes, search for free themes from the WordPress repository, and add third-party themes | Templates |
| Customizer | Customize your website colors, fonts, layouts, and more (depending on the theme), with a live preview of how your changes will look | Design |
| Theme Settings | Not all themes include this section, but premium themes tend to have a larger range of settings that aren’t available in the customizer view | N/A |
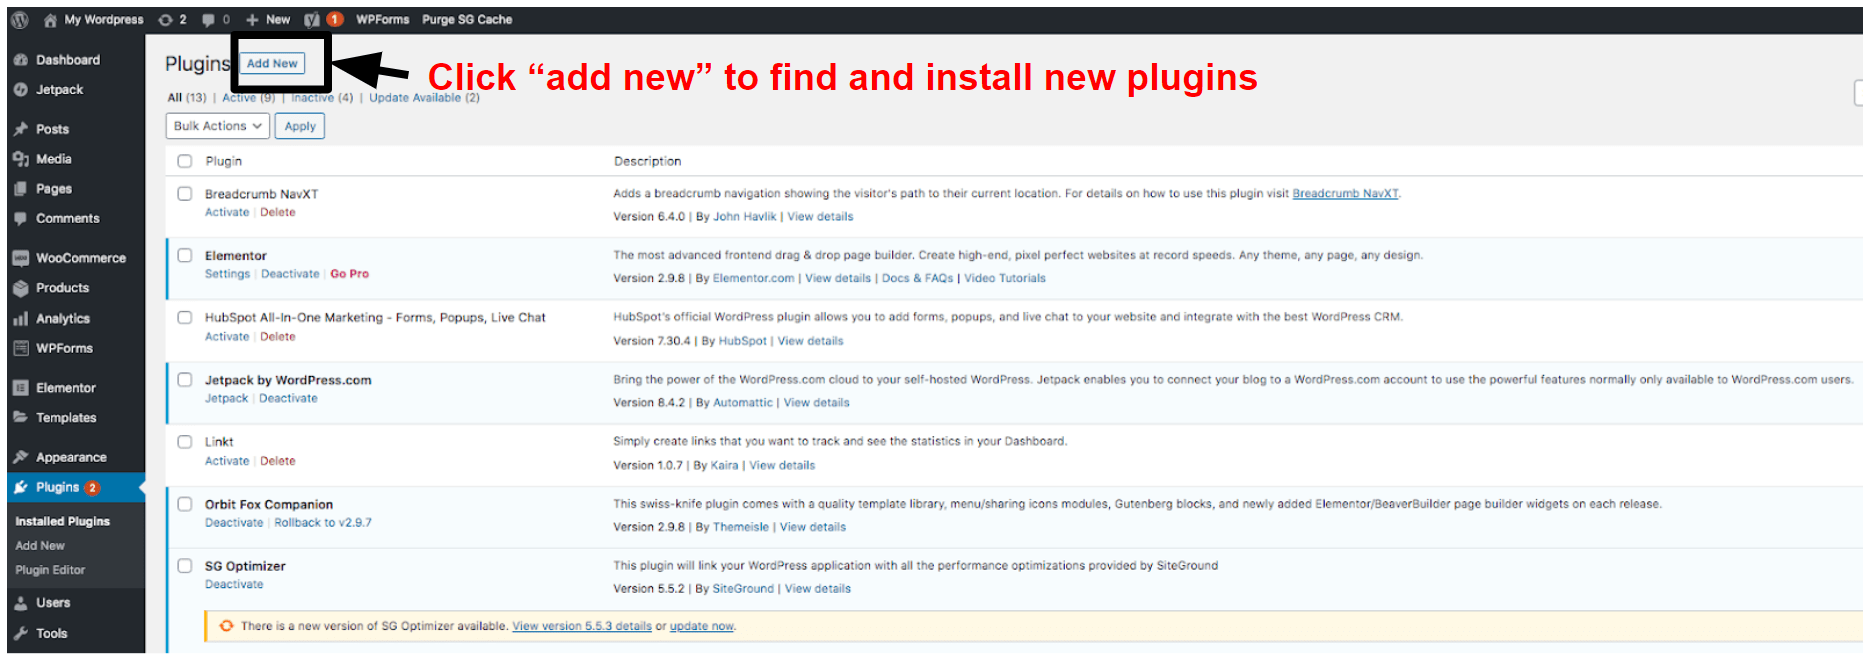
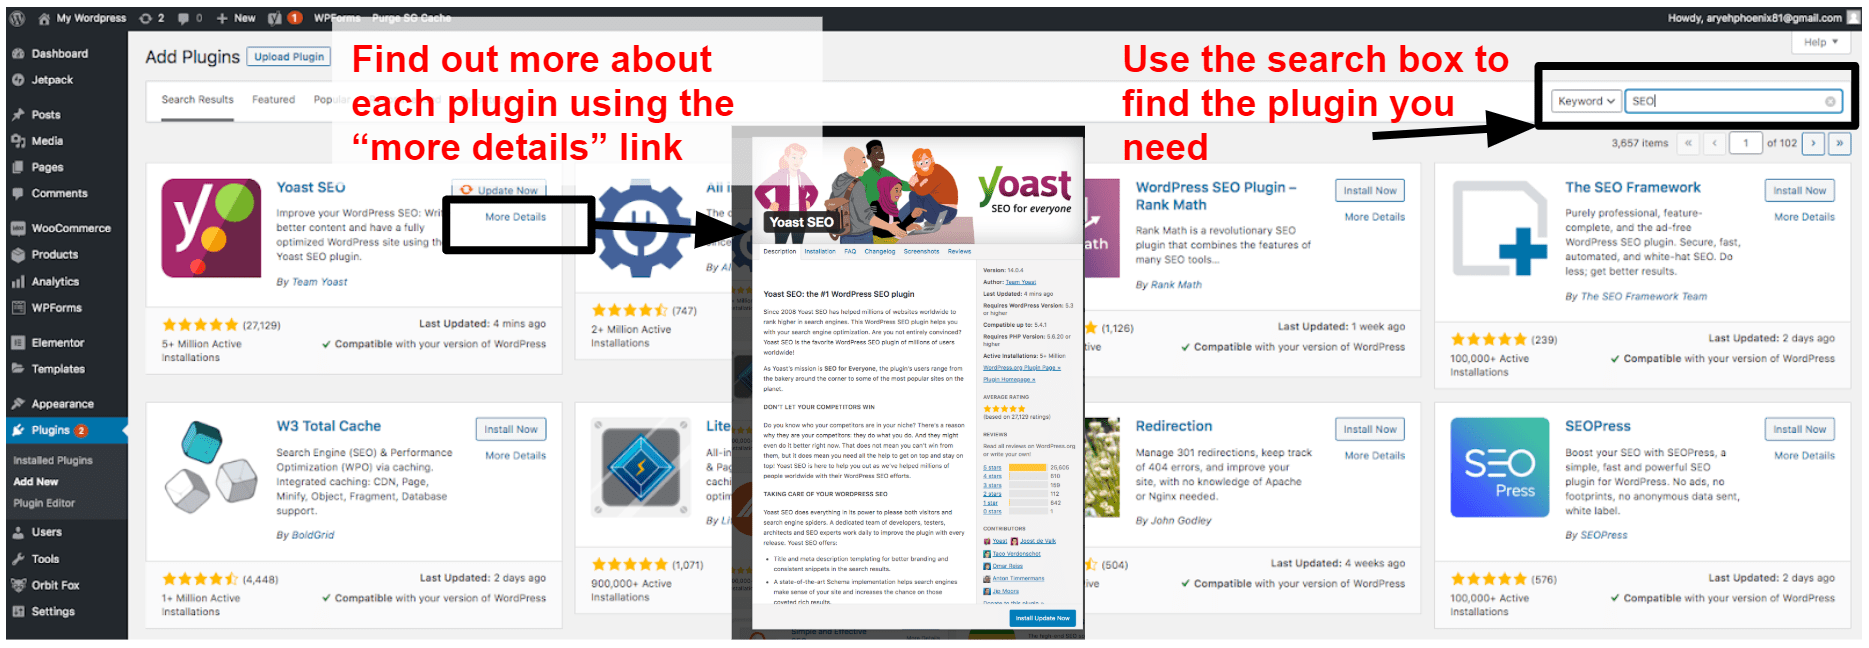
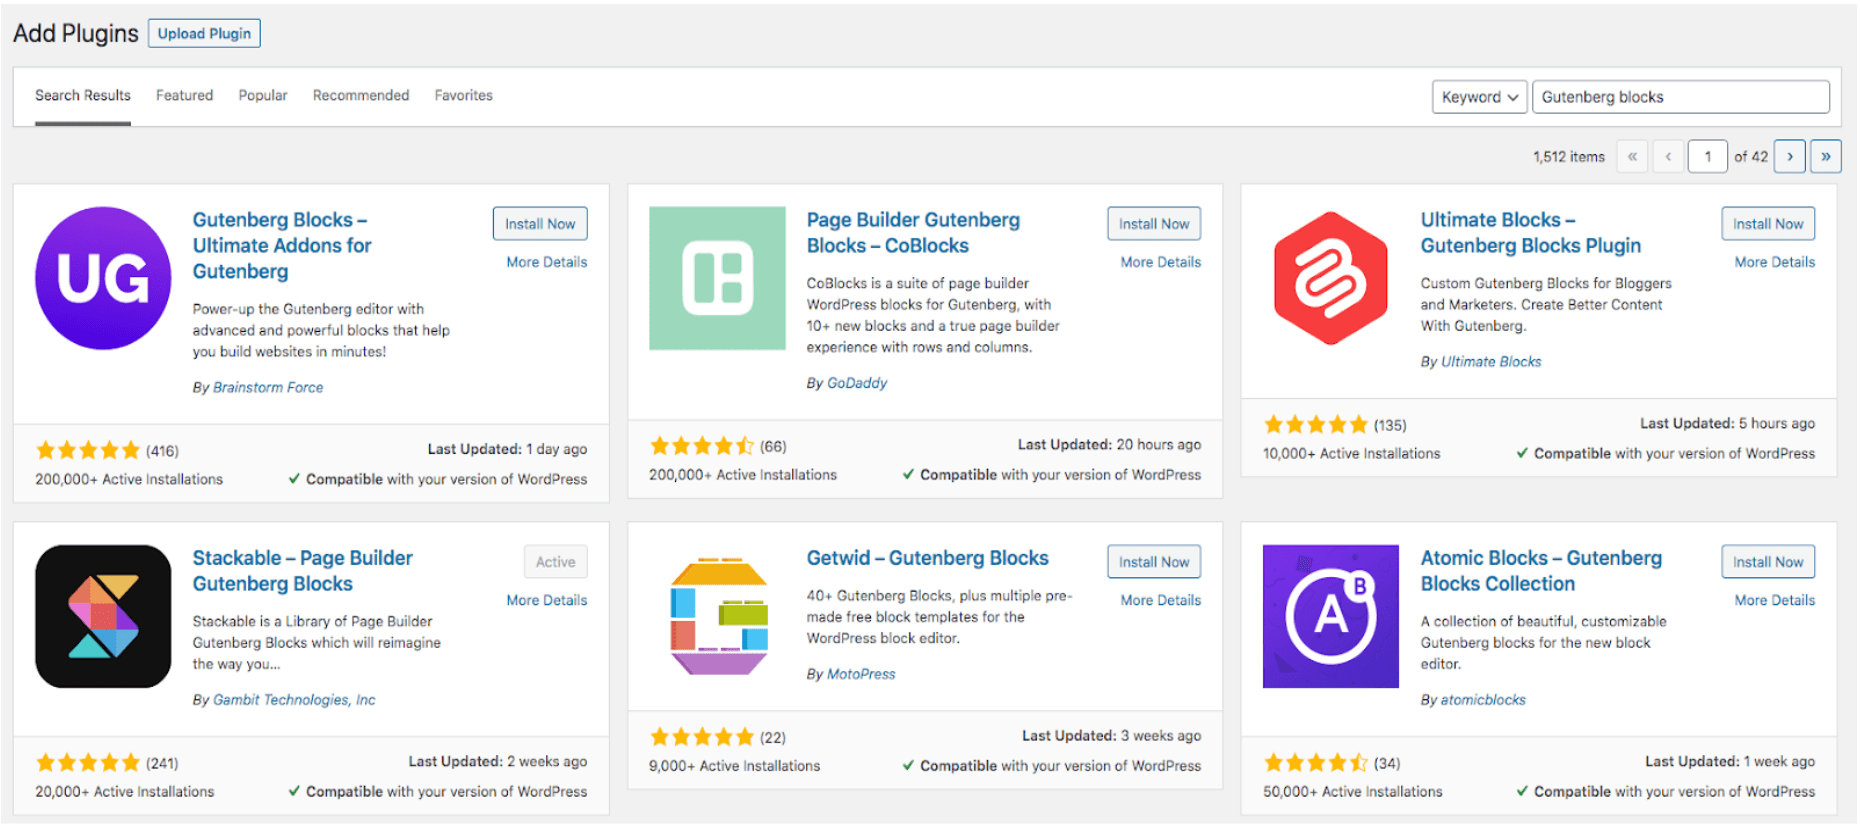
| Plugins | View and activate/deactivate existing plugins, search for and install plugins from the WordPress Repository, and upload third-party themes. | Apps |
| Settings | Change basic settings such as your site title/subtitle, date format, and permalinks (the URL structure of pages and posts). | Settings |
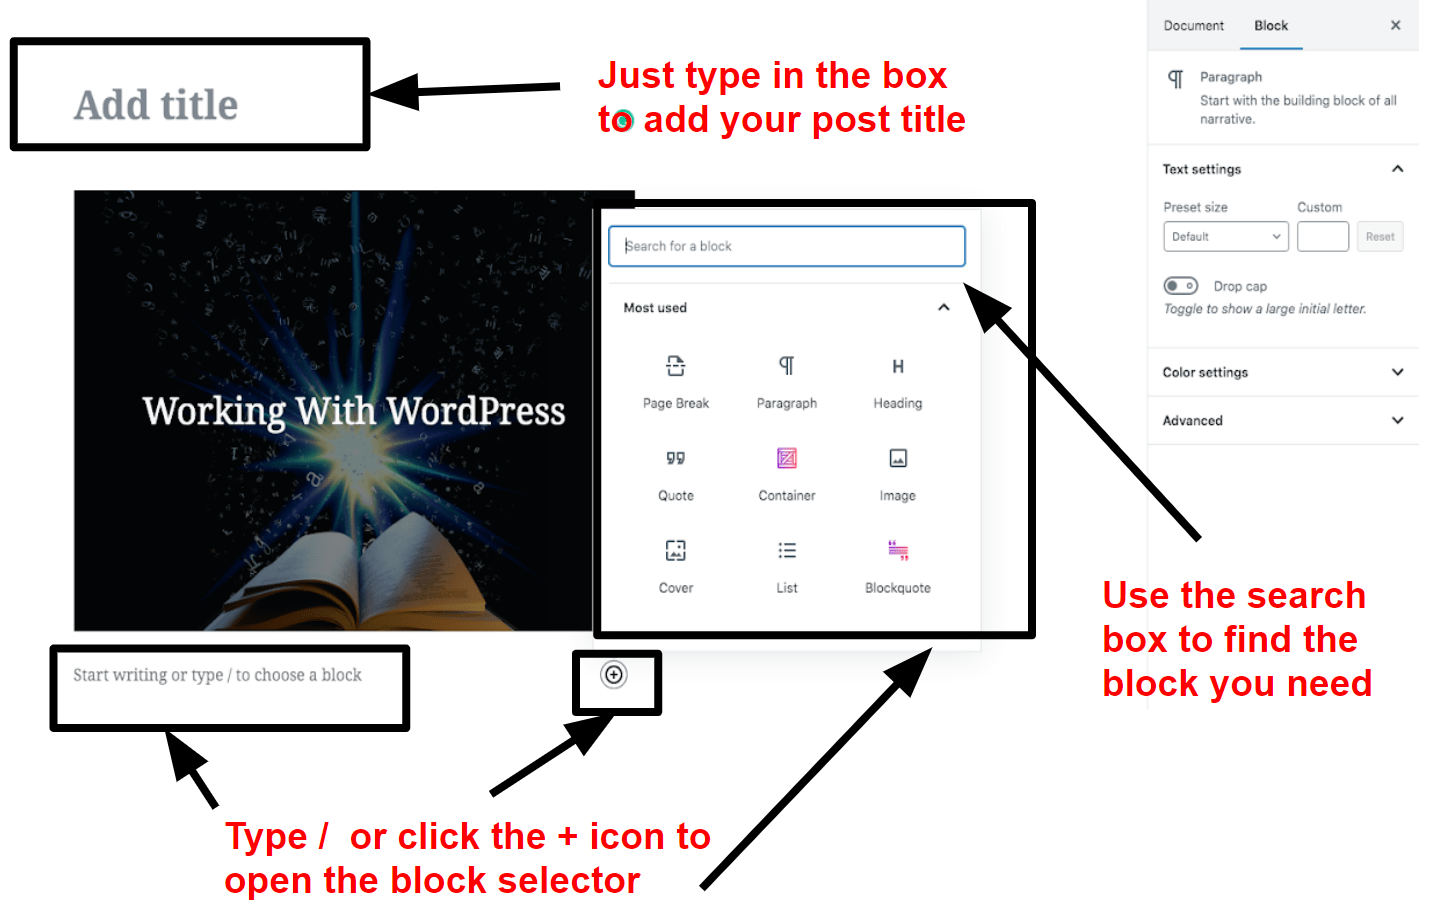
- Paragraph
- Heading
- Quote
- Image
- List
- Cover image
- Gallery
- Slideshow
- Table
- Buttons
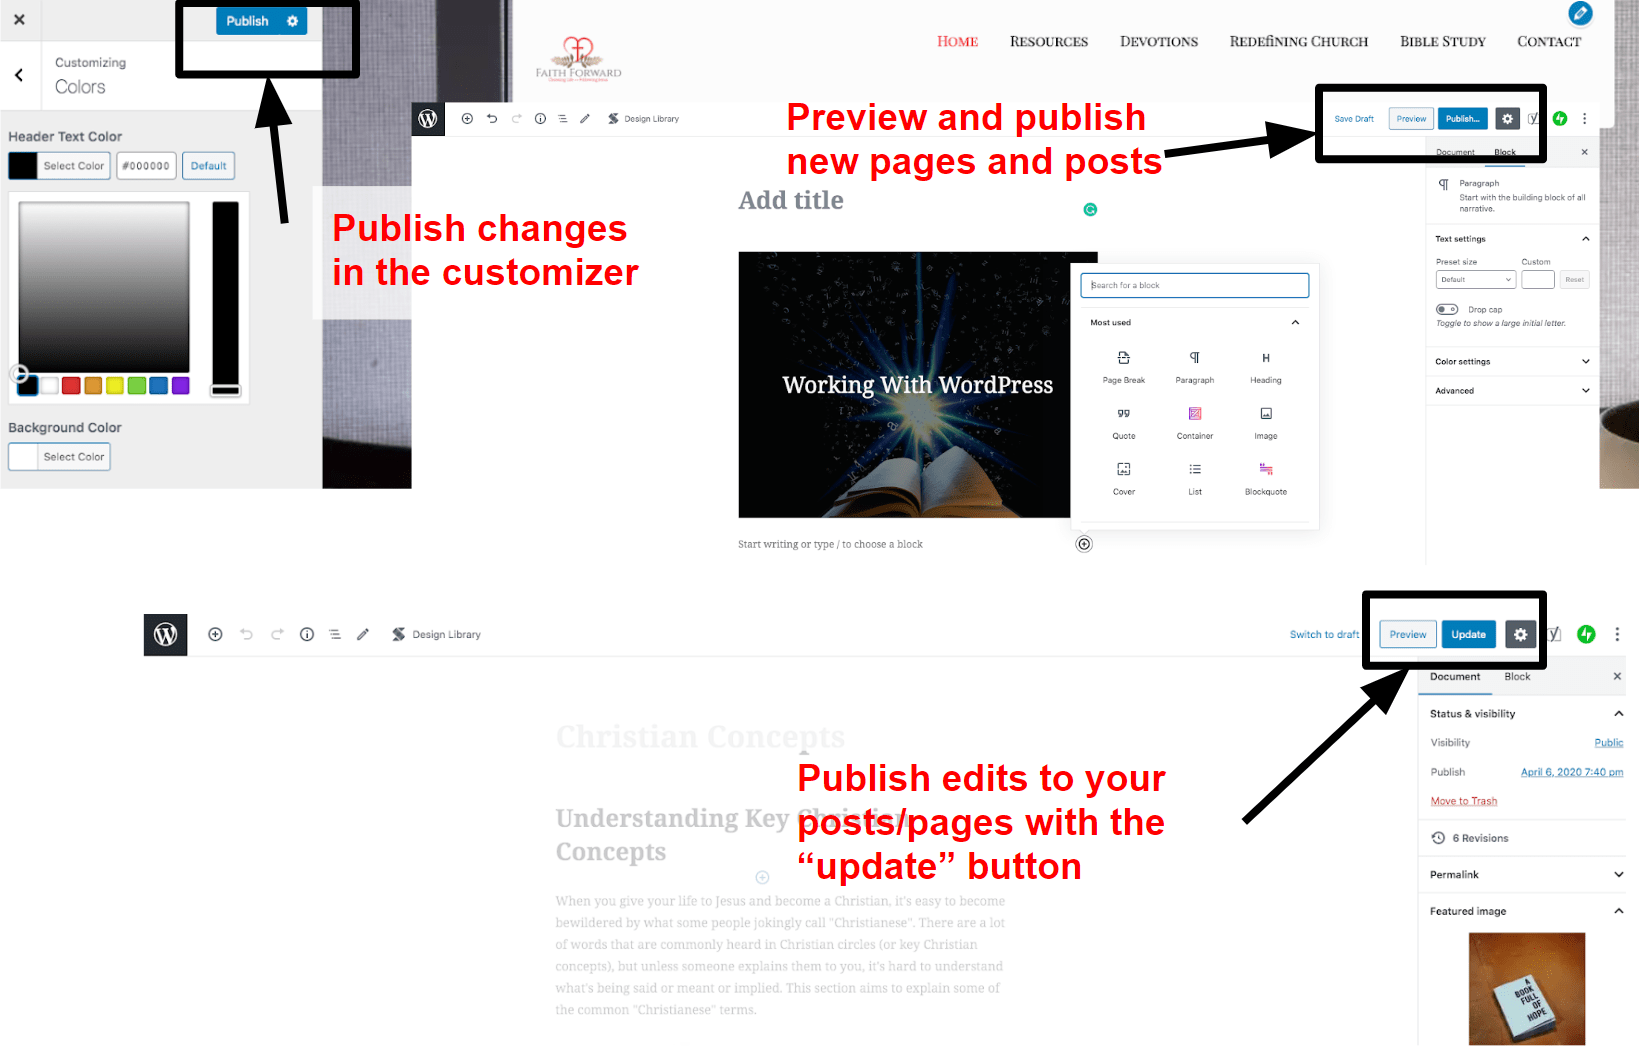
- In the customizer, where you’ll see a button at the top of the panel which saves changes and makes your customizations live.
- At the top right of each new post you create, you will find the option to publish. Until you click publish, your post will remain a draft and won’t be visible to others. If you decide to make edits later on, simply click update to make your changes go live.
- At the top right of each new page you create. As with posts, your content is just a draft until you publish, and when you make edits you need to click update or your changes won’t be saved.
Consider Spending $5 on a Web Developer and Save Time and Frustration
If you’re short on time or just don’t want to deal with any problems that could occur when building a WordPress website, then hiring a professional to build (and, perhaps, maintain) your website could be a better choice. Hiring a developer sure sounds expensive, but thanks to the rise of freelance platforms like Fiverr, you don’t have to spend a small fortune. I just did a quick search on Fiverr for full WordPress website creation and found plenty of professional website designers offering to build your website for as little as $5!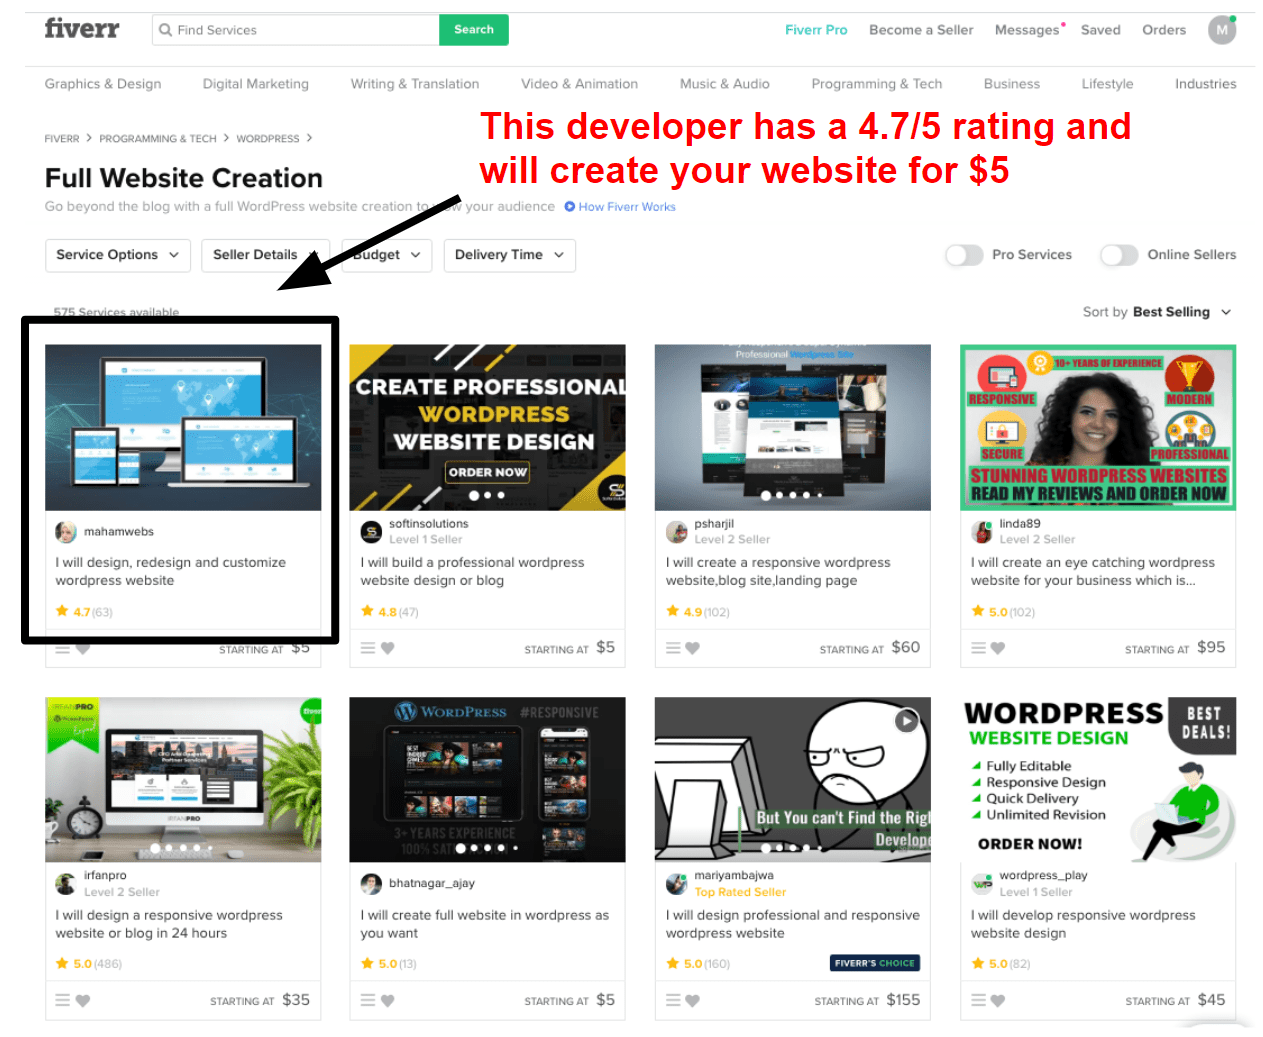
WordPress FAQ
Is WordPress free?
Technically, yes. The platform itself is 100% free, but you will have to pay for web hosting and a domain name (click here for a list of the best web hosts in 2024). If you want a premium theme or plugin from a third-party marketplace, you’ll have to pay a fee for these, too.Can I build a WordPress site on my own?
Yes, you can build a WordPress website without hiring a developer – but if you’re new to website building, you’ll probably find Wix much easier (and faster) to use. WordPress is more complex and it’s easier to mess up your website when making changes to settings or by installing plugins that conflict with one another.Hiring a developer for your WordPress website isn’t as expensive as it sounds! You can actually find a developer to meet any budget on Fiverr.
What’s the difference between WordPress.com and WordPress.org?
The main difference between WordPress.com and WordPress.org is in the way they’re hosted. With WordPress.com, you don’t have to pay separately for hosting but you will need to upgrade to one of the highest-priced plans (Business or eCommerce) to use plugins and upload themes from third-party marketplaces.WordPress.org is self-hosted, so you pay for hosting separately. You have complete control and freedom with this version and it can work out much cheaper than WordPress.com.
What is better, Wix, or WordPress?
There are pros and cons to both Wix and WordPress. Wix is more beginner-friendly but it can cost more than buying a hosting plan and building your site with WordPress.WordPress gives you a lot of flexibility and gives you more options for growing your site over time, but it can be trickier to learn and there’s potentially more that can go wrong. For example, incompatible plugins can cause your website to stop working.
Do I need a special WordPress hosting plan, or is a basic hosting plan enough?
You don’t need a special WordPress hosting plan, as WordPress will work on any shared hosting plan that has a one-click installer. However, there are definite benefits to choosing a WordPress-specific hosting plan.WordPress-specific hosting plans can be managed or unmanaged. With unmanaged plans, your hosting is pretty much the same as basic hosting, but your website will be hosted on servers that are optimized for WordPress and you might get access to some optimization plugins.
Managed WordPress hosting is the hassle-free version, as your host takes care of things like updates, security patching (depending on the host), and backups, so you can just get on with building your website. See our list of the best managed WordPress hosting providers in 2024.
Taking Your Website to the Next Level
Now you’ve built your website, it’s time to get it noticed. In my experience, you’re never completely finished with building a website, since you can always keep updating it, changing things and making it better. You want people to start visiting your website as soon as possible. Luckily, there are a number of things that you can do to grow your audience and give your site visitors a better experience.Designing a Logo
You don’t need to have a logo before you start building your website, but a logo makes your website look more professional and can help build your brand.
Your logo says a lot about you, so it’s important to take time to get it right. There are design trends to take into consideration – for instance, have you thought about the impact your color scheme can have on your target audience? Read more about the latest logo statistics from the Fortune 500 list to explore this further.
There are two ways to get yourself a logo – and both are affordable. My colleague actually tested all the major logo design services to find a new logo for Website Planet. To read all about his experiment and see who won, read our full comparison of the best online logo design services.
1. Do It Yourself with an Online Logo Maker
The DIY method may sound like the cheapest way to get a logo – but this isn’t always the case. Most online logo makers are free to try, but you will have to pay to download and use your logo. There are a few free logo makers out there, but they’re very basic and I don’t recommend using them.
My favorite of all DIY logo makers is Wix Logo Maker. This tool uses AI (artificial intelligence) to generate lots of logo ideas based on your own personal preferences. When you spot a design you like, you can customize everything from the fonts to the color scheme. You can even download a free low-res version of your logo so you can see how it might look on your website and social media before you make your final purchase.
2. Hire a Designer
Hiring a logo designer might sound expensive – but on Fiverr, you can get a professionally designed logo for as little as $5. Most Fiverr designers display examples of logos they’ve created, making it easier to find someone who offers the style you’re looking for. We tested Fiverr’s logo designers ourselves and were really impressed with the quality of the finished logos.
In addition to your logo, you’ll also need to generate a favicon – this is the small image that you usually see in browser tabs next to the website name and in your bookmarks. You can create a favicon in seconds with our nifty favicon generator tool.
Optimizing Your Site
Even if you build a fabulous website, it’s not going to show up on the first page of search engine results pages (SERPs) without some optimization. Optimizing your website involves search engine optimization (SEO), analyzing your traffic, and understanding what your audience is looking for. For SEO, there are some great tools that you can use to make optimization easier. One of the best tools available is SEMrush (check out our Guide to SEMrush to find out more), but there are other options if SEMrush is out of your budget. We’ve reviewed some of the best SEO Tools to help you choose the right one. Creating the right content for your website might seem like a challenge, but by using analytics tools to find out more about your audience (where they live, their age, their gender, and so on), you can tailor your content better. Read our Guide to Google Analytics to see how to get the most out of analytics tools. You can also use tools like Answer the Public to find out what people are searching for. Check out our Guide to Answer the Public for more about this.Grow Your Audience with Email Marketing
Email marketing is one of the best ways to grow your audience – and there are lots of tools to help you succeed with your marketing efforts. Email marketing possesses the ability to rapidly expand your business. Additionally, it exhibits a high click-through rate (CTR), surpassing social media channels like Twitter by up to 100 times. Through email marketing, you can provide customers with enticing discounts and promotions, encourage them to share your business with others, and offer valuable free resources to entice visitors into signing up for your mailing list. To get the most out of email marketing, you’ll need to think about the frequency of your emails, using automated emails, and what to put in your email newsletters. For more tips, check out our collection of the most important email marketing stats. We have tested and reviewed the best email marketing platforms. No time to read a bunch of reviews? No worries, here’s a quick overview of our favorite email marketing solutions.- ActiveCampaign – This is, hands down, the most feature-packed email marketing service on the market. It’s the industry-leader for automation, there are 880+ integrations, and it has the best drag-and-drop editor we’ve tested. With so many features, there is a bit of a learning curve but with a huge knowledge base and support team, it’s definitely worth your time.
- Sendinblue – Offering SMS marketing as well as email marketing tools, Sendinblue has an affordable solution that’s easy to use. It even has a generous free plan. You can create automated emails, add workflows, and use the option to “send it at the best time.”
- AWeber – Offering a unique drag-and-drop campaign builder, AWeber gives you everything you need for successful email marketing. It’s very beginner-friendly but still has more complex features, such as split-test functions and it can connect to more than 5000 apps with Zapier.
- Constant Contact – With hundreds of email templates to choose from and a 30-day free trial (60-day if you’re in the US), Constant Contact is an excellent choice. It’s great for creating automated emails, and it’s really easy to use, meaning you can get started right away.
- Benchmark Email – Supporting multiple languages, Benchmark Email is a top choice if your native language isn’t English. It has a free plan, too, that lets you send up to 3,500 emails per month. It’s great for beginners but has more advanced tools that you can use as you grow more familiar with the platform.
- GetResponse – More than just an email marketing platform, GetResponse is a multi-functional platform that incorporates marketing, customer relationship management (CRM), and webinar features. There’s a 30-day free trial, too.
Final Words
Phew! That’s a lot of information we’ve covered. To sum up, here are a few key takeaways from this guide to building your own website:- Website builders are a great place to start when you’re a beginner. Wix is one of the most flexible of them all, allowing you to start with the basics and add more advanced apps later.
- WordPress is often regarded as more difficult than website builders, but it offers much more freedom. It’s also a cheaper way of getting your website online, with lots of low-cost website hosting plans available.
- If you don’t have the time to build your website yourself, you can hire a developer on Fiverr for as little as $5. Who said working with a web developer had to break your budget?
- Publishing your website isn’t the end of the process. You can keep optimizing and promoting your website with tools for SEO, analytics, and marketing.