We rank vendors based on rigorous testing and research, but also take into account your feedback and our commercial agreements with providers. This page contains affiliate links. Advertising Disclosure
When I first heard about Hostinger’s low prices, I expected it to cut corners on quality, but it impressed me with its speed and global server network. Its intuitive hPanel and AI tools make setup effortless for first-time site owners and small businesses. The only trade-offs? You’ll need a longer plan for the best price, and support feels basic.
Hostinger Pros, Cons, & Things That Could Be Better
Reliable uptime and fast loading speeds
LiteSpeed servers for speed and security
Low-cost shared, cloud, and VPS hosting
Large discounts for long-term plans
Free domain name with annual plans
Optimized managed WordPress hosting
Free AI website builder with all plans
Support response time needs improvement
No built-in CDN on entry-level hosting
Plan renewal rates more than double
Hostinger is one of the most budget-friendly web hosting providers, starting at just $2.49 per month. But unlike most budget hosts, it delivers premium-level speed and features. Backed by LiteSpeed servers, NVMe storage, and global data centers with built-in CDN, it consistently performs well across regions.
The catch? To secure the best deal, you have to commit to one of its years-long plans (up to four years), paid up front, ensuring a fixed discounted rate for the entire term. That’s a long commitment though – can Hostinger maintain its service quality over this period?
Our extensive testing suggests it most likely can. Hostinger specializes in shared WordPress hosting but goes further than before. Its AI-powered tools now include Horizons for building no-code websites and Kodee, an AI assistant that helps with daily tasks. It’s also been officially recommended by WordPress.org, adding extra trust for beginners.
Combined with its intuitive hPanel control panel and one-click installer, Hostinger is ideal for personal sites, portfolios, and small-to-medium businesses. For more demanding websites, Hostinger offers very affordable self-managed VPS and managed cloud hosting. However, these plans lack flexibility and advanced tech support that you might find with higher-priced hosts.
Another major plus is Hostinger’s international reach. It operates data centers in the US, Europe, Asia, and South America and supports a multilingual interface in over a dozen languages, including Arabic, Chinese, French, German, Thai, Indonesian, Lithuanian, Portuguese (including Brazilian Portuguese), Spanish (Argentina, Colombia, Mexico, and Spain), Vietnamese, and Ukrainian.
5.0
Features
A Highly Optimized Platform With Plenty of Resources
With prices being as low as they are, my anxious personality immediately identified two areas where Hostinger might be trying to pull one over on me: features and performance. Sure, I’d love to pay less than what the competitors charge, but I don’t want to get only some of what they provide.
I focused my testing efforts on Hostinger’s Premium plan, and I was surprised to learn that even if it’s the cheapest, it can support up to 25 websites, 25 GB of SSD storage, and unlimited bandwidth. This is more than what some other top budget hosts offer with their most expensive plans. You’ll have plenty of room to grow and develop your online presence, and you’ll be able to host several sites at once.
But that was only the start of it. Here are the features that stood out to me.
Optimized Performance From LiteSpeed Web Server
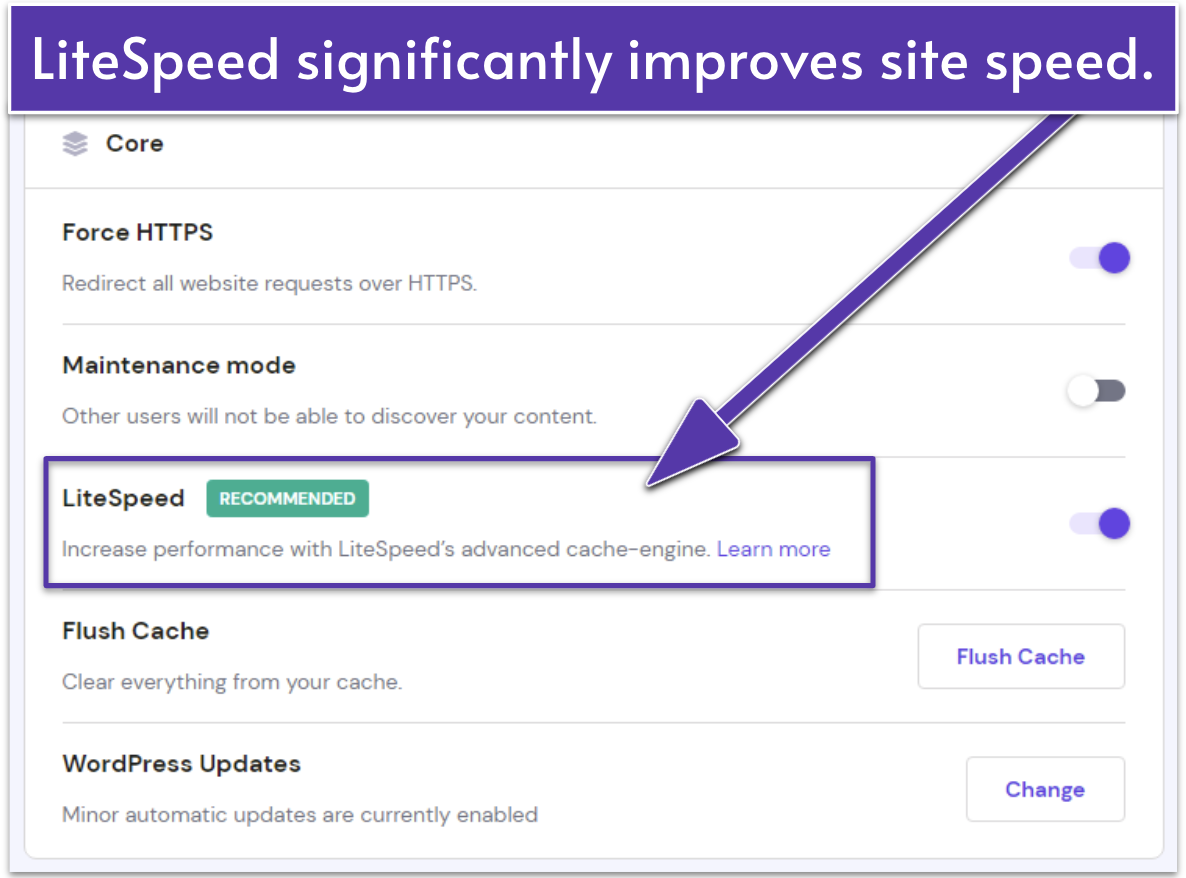
New WordPress sites are pre-optimized for maximum speed with Hostinger
Hostinger uses the impressively fast LiteSpeed web server – this is the software running on the physical server that delivers your website’s content to your visitors. LiteSpeed outperforms the more traditional Apache web server, upon which many other web hosts still rely due to its open-source (i.e. free) license.
LiteSpeed itself already offers great performance, but its LiteSpeed Cache for WordPress plugin stores pre-loaded (cached) copies of your web pages, which can then be more quickly delivered to your visitors. Additionally, Hostinger uses MariaDB rather than MySQL for Web and Cloud plans, offering faster performance overall.
Robust Security With Free SSLs and Automatic Backups
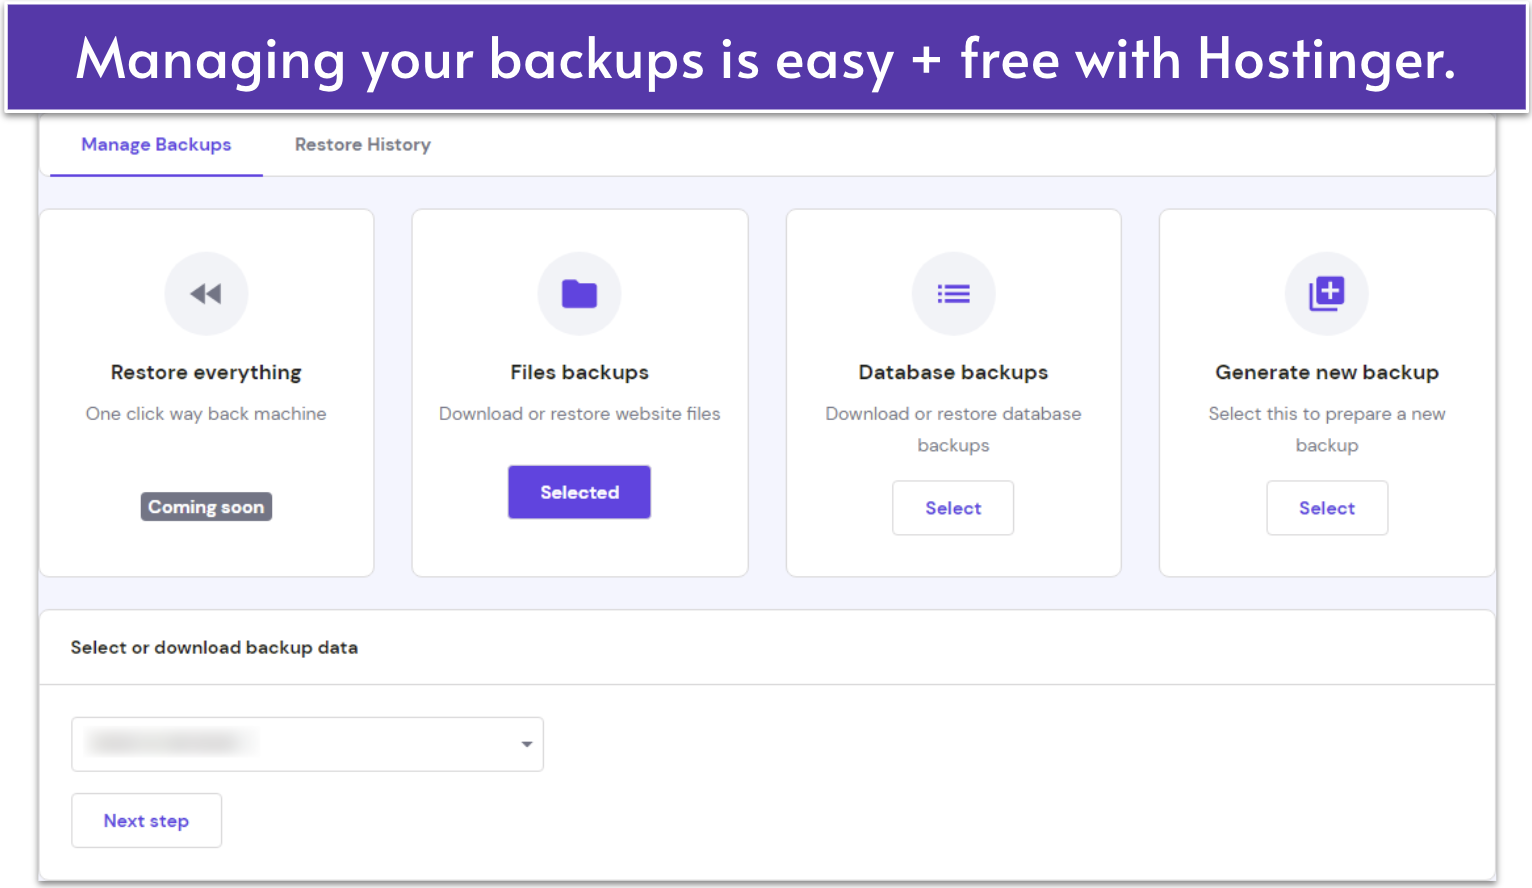
Hostinger gives you plenty of control over your backups
Data loss can be absolutely ruinous for an online business. Fortunately, Hostinger understands the importance of security and provides protection from an array of potential disasters and online threats.
With Hostinger’s Secure Access Manager, you can assign specific roles and permissions to collaborators, which is ideal for developers or teams managing multiple projects. In addition, the AI Security Audit scans for suspicious bot activity and access anomalies, helping safeguard your SEO and site performance.
Every Hostinger plan includes all the essentials: free SSL, an in-house web application firewall (WAF), an automatic malware scanner, and Cloudflare DDoS protection for its nameservers – not to be confused with Cloudflare’s content delivery network (CDN), which isn’t enabled by default. While its security suite isn’t the most advanced, it still protects against the most common threats, and it’s more than you’ll get from most budget hosts.
If you sign up for the Business plan and up, Hostinger offers a flexible automated backup tool that allows you to schedule, create, download, and restore daily backups for free. Under the entry-level web and WordPress plans, Hostinger provides free weekly automatic backups. Alternatively, you can pay for the on-demand backup feature as an add-on.
Free Domain and Email for a Year
Hostinger includes a free domain name and WHOIS privacy for the first year with most annual plans. You can choose from popular extensions like .com, .net, or .org, all preconfigured with privacy protection to keep your contact information secure. More importantly, I found that renewal rates remain competitive after the first year. This keeps Hostinger in line with major registrars like Namecheap and well below premium-priced providers such as GoDaddy.
With the Premium plan, you’ll also get up to two business email addresses linked to your domain, free for the first year, complete with spam protection and webmail access. For most users, deliverability is solid, though it may be best to upgrade to Hostinger’s business email plans or connect to third-party email services like Google Workspace for bulk marketing campaigns.
Hostinger has also introduced Hostinger Reach, an AI-powered email marketing tool available free for the first year. Reach lets you create, send, and track email campaigns straight from your dashboard, with AI-generated subject lines and content suggestions. This makes it perfect for small businesses that want to stay in touch with customers without paying extra for standalone tools.
Various Easy Ways to Build a Website Fast
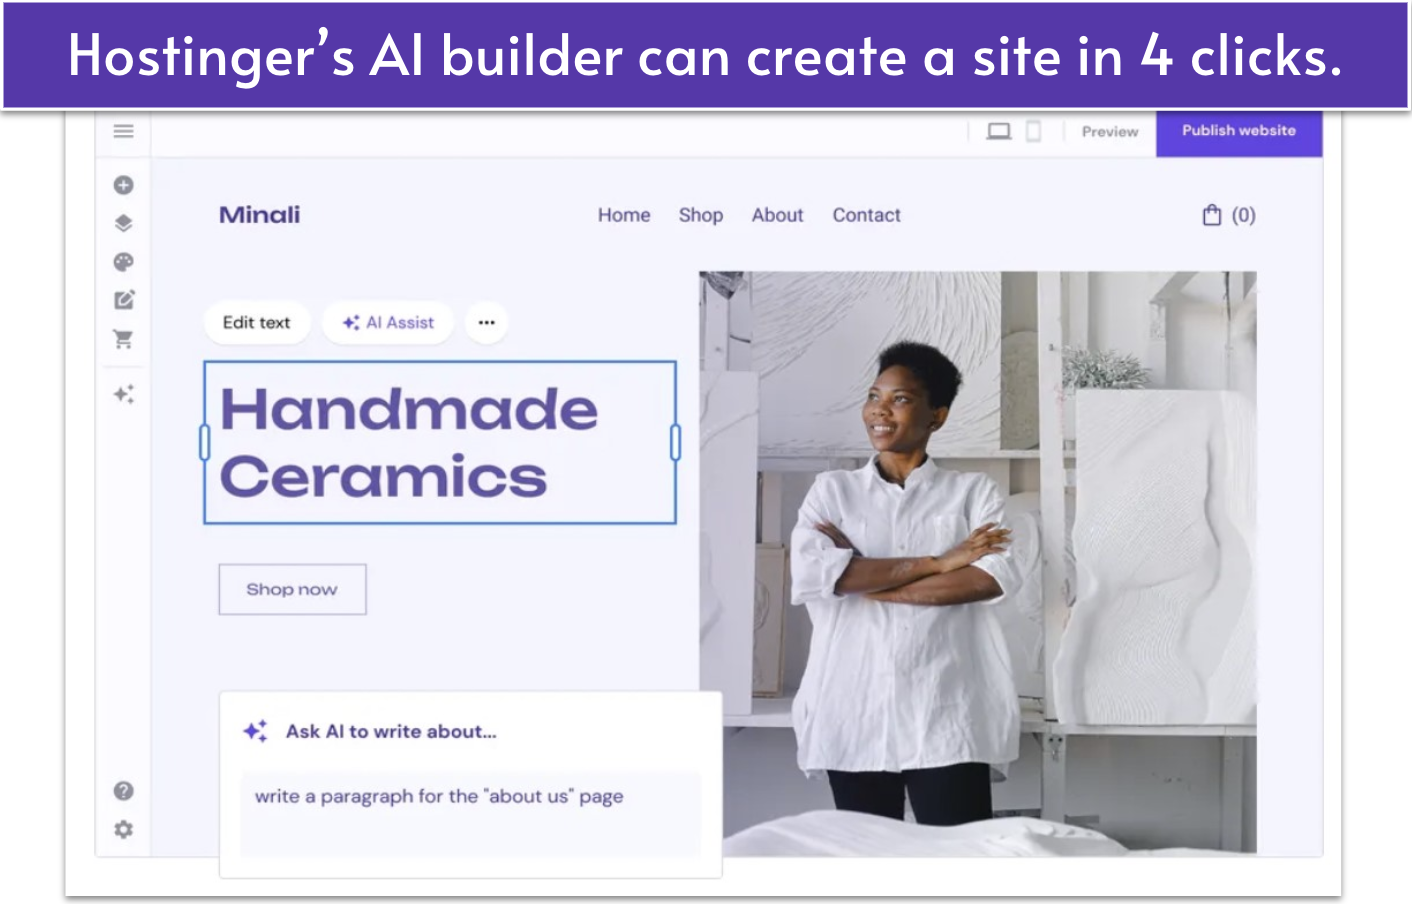
Hostinger’s AI website builder is the latest addition to its list of hosting features
Hostinger’s AI Website Builder is included for free with its web and cloud hosting plans. The customizable templates and drag-and-drop functionality make it ideal for freelancers, portfolios, or small businesses that want to get online quickly.
Signing up for a Business or higher-tier hosting plan gives you access to product management, inventory tracking, and integrated checkout tools. It’s designed to help beginners launch a professional-looking online shop in minutes, complete with shipping and tax automation. With AI tools such as an AI product generator, AI logo maker, and AI writer, you can spend more time growing your business and less time building it.
Then there’s Horizons, an AI-powered site and app generator for both business and personal use. Here’s how it works: You feed it prompts (the more specific and detailed, the better), and it will create a site or app customized to your needs. You’ll need to sign up for a plan to be able to publish and use your site or app, but you can go for the 7-day free trial before committing.
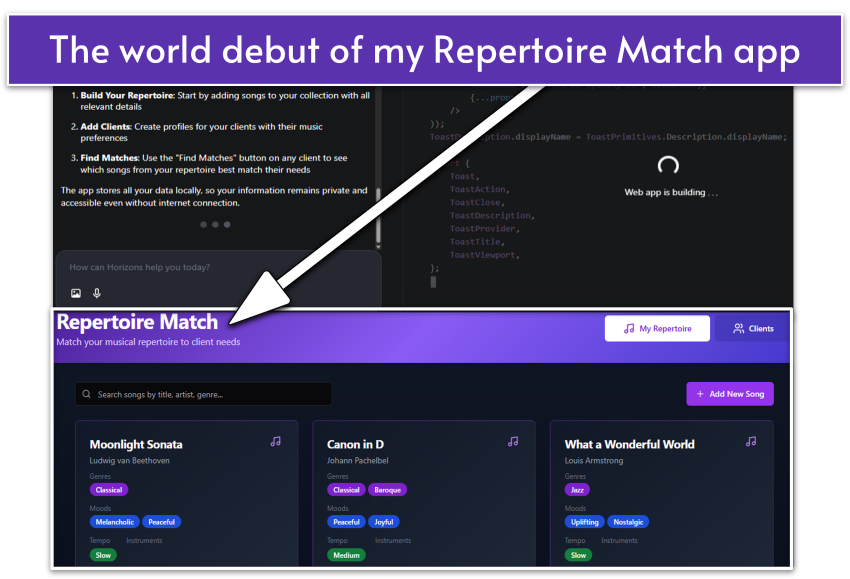
When I’m not testing, reviewing, and writing for Website Planet, I have a side hustle as a harpist. I’ve played for everything from community luncheons to garden parties and yoga classes. I always struggle with choosing the most appropriate pieces from my repertoire for each occasion, so when I was tasked with giving Horizons a trial run, I knew exactly the type of app I needed to create.
My very own harpist app, created by Hostinger’s Horizons app generator
I was not disappointed. I waited for Horizons to grind through the code and five minutes later, I had created the beta version of my Repertoire Match app. After a few quick tweaks, my app was ready to go. There’s even a mobile version I can use with my smartphone. All in all, I was extremely impressed with Horizons.
Free domain name
✔
Free backups
✔
Free email
✔ (for one year)
Money-back guarantee
30 days
Uptime guarantee
99.9%
Data centers
3 in US, 5 in Europe, 4 in Asia, 1 in South America
5.0
Ease of use
My Hosting Experience With Hostinger
Overall, I feel that Hostinger offers a remarkably easy platform to work with, from sign-up to developing and managing your website. I had no trouble purchasing a plan and building my test website.
This is due in part to Hostinger’s proprietary control panel, hPanel, which I found really easy to navigate (more on this later).
Creating a New Account With Hostinger
I’d never say no to a free domain name from Hostinger
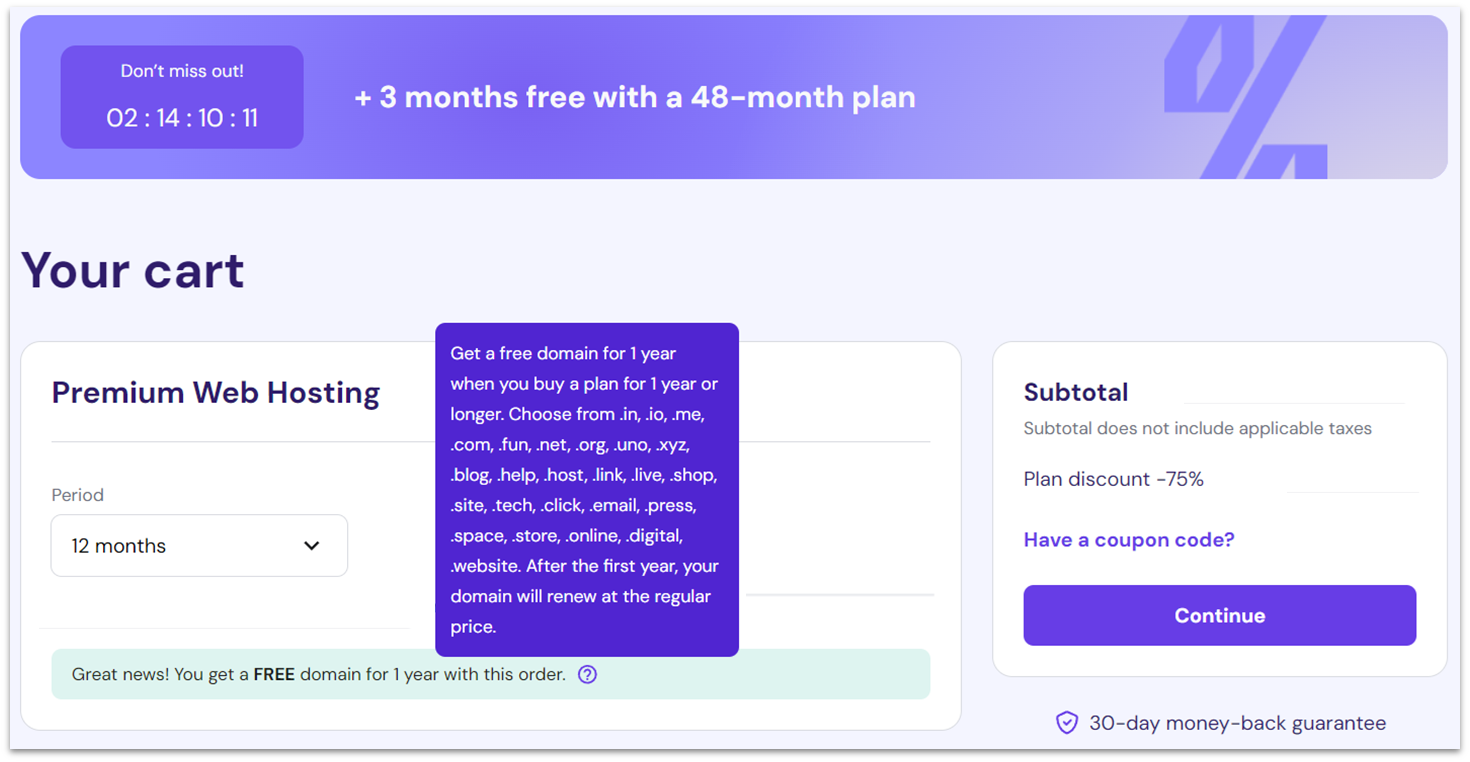
Signing up with Hostinger was refreshingly easy. Hosting plans were clearly laid out, and I had no problems discerning what was included with each of them. The Premium web hosting plan offers a free domain name if you choose an annual or longer billing cycle like I did, which was a nice addition. This is the case with every Hostinger shared and WordPress plan.
What’s particularly nice is that I only had to provide minimum information – there was no huge, time-consuming form requiring a ridiculous amount of personal data for me to fill out. I was also given the option to sign up with a Facebook or Google account to simplify the process.
Accepted payment methods include all major credit cards, PayPal, Google Pay, and AliPay. You can even buy domains and hosting via cryptocurrencies like Bitcoin. Thankfully, Hostinger didn’t pre-select any paid add-ons or try to upsell me during checkout. It was always clear how much I was paying and for what services.
After payment was complete, my account was set up. I was ready to connect my domain and install WordPress in under a minute.
Connecting a Domain and Installing WordPress
Once your account has been created, Hostinger takes you through some setup steps. I was first presented with a short questionnaire to help me set up the hosting environment. This is where I also auto-configured LiteSpeed’s caching to maximize performance based on my particular needs. This allowed me to take full advantage of LiteSpeed without having to figure out how to optimize the settings myself.
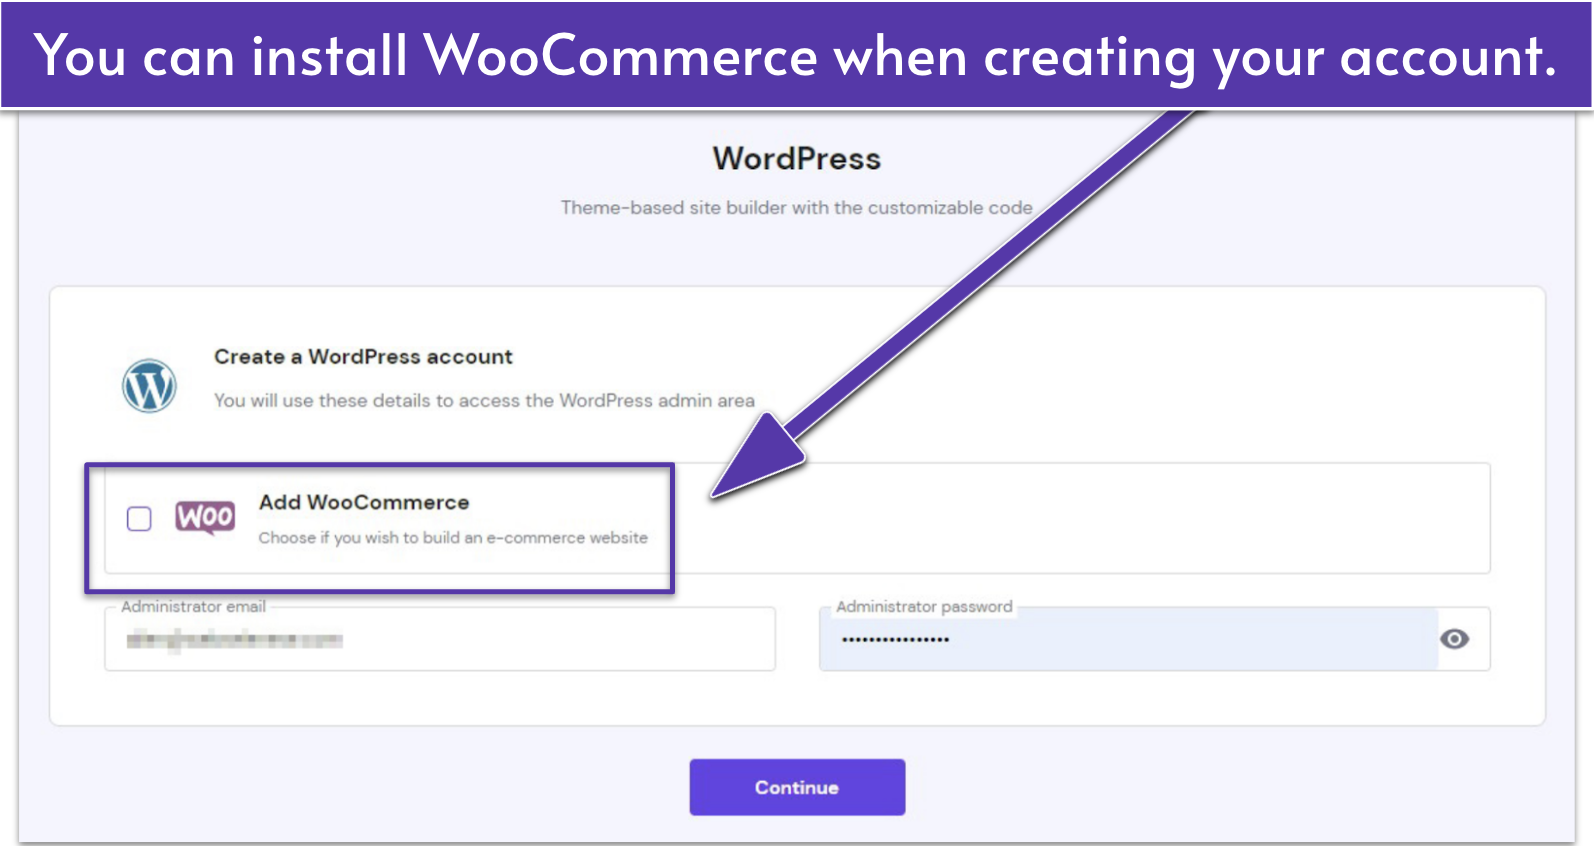
From there, I was asked if I would like to install WordPress automatically. This again was really quick and easy, as I only had to enter an administrator email address and password, and optionally choose a starter theme.
Hostinger can optionally install the WooCommerce plugin with WordPress
With that, the next step was connecting a domain name. As I had signed up for the WordPress Premium plan on an annual billing cycle, I was able to claim a free domain name. Be aware that not all domain extensions are available with Hostinger’s free domain name offer, though the popular .com is included.
After choosing a domain name and extension, I just had to pick a data center. I went with a US-based location, but you should choose the location nearest to your target audience. Once this was done, I was given a summary of the information I had entered, which I confirmed to begin installing WordPress and registering my domain name.
Five minutes later, the WordPress installation and domain registration were complete. My domain was automatically connected to my site as part of the setup process, but I had to wait for DNS (domain name system) propagation. This is an unavoidable process whenever you connect a new domain. It may prevent your WordPress installation from being accessible online until complete and can take up to 24-48 hours.
Amazingly, after just an hour or two of waiting, my DNS propagation was complete. I was then able to upload my custom WordPress theme and access my test website online. Overall, Hostinger sets up nearly all of the hosting and basic WordPress framework for you.
Other Ease of Use Features
Beginner-Friendly hPanel Makes Hosting Easy To Manage
Hostinger has developed its own proprietary control panel, called hPanel. It’s a joy to use: it’s easy to navigate, cleanly designed, and gives you access to all the basic processes you need to manage your sites. Plus, unlike cPanel or Plesk, it’s completely free – even on VPS and cloud plans. If you’re comfortable with the command line or SSH, you’ll be able to save time and money on a panel.
hPanel also includes tools that improve workflow for beginners and agencies, like built-in analytics, WordPress staging, and object caching toggles. You can test site updates safely with the staging feature, monitor performance directly from your dashboard, and use the Cache Manager to boost loading times. These additions make hPanel not just beginner-friendly, but genuinely capable of supporting long-term site growth.
That said, hPanel can be a bit slow at times, depending on which settings you’re accessing. For example, the File Manager can take several seconds to load. Accessing the WordPress Admin area can also take several seconds – though the fact that the WordPress login process is reduced to a single click in hPanel makes up for the loading time.
Kodee AI Assistant and Other AI Tools
Hostinger’s AI features go far beyond simple automation. The new Kodee AI assistant can handle real tasks, such as migrating websites, managing WooCommerce products, writing blog posts, and even registering domains. You can ask Kodee to publish content, update store listings, or check performance stats, all through chat. It’s a powerful time-saver for freelancers and small businesses focused on growing their sites rather than managing them.
Alongside Kodee, Hostinger tools like the AI Troubleshooter and AI Optimizer simplify quick fixes and performance improvements. You also get free credits for AI utilities, such as a background remover, image upscaler, attention heatmap, and logo maker, making it easy to refine visuals and marketing assets without paying for extra design software.
One-Click Auto Installer for All The Most Popular Apps
In addition to a simple installation for WordPress, Hostinger’s Auto Installer lets you easily install many other well-known web applications. This includes alternative content management systems (CMS) like Joomla or Drupal, along with apps for database management, message boards, and more.
The selection may not seem to be quite as extensive as some other auto installers, but it offers all of the most useful and popular apps. For those who want more advanced control, Hostinger’s cloud plans also include WP-CLI and SSH access so you can install your own software manually, as well as full root access on VPS plans.
4.9
Performance
One of the Fastest Budget Web Hosts Out There
Hostinger consistently delivers performance that rivals far pricier providers. In my hands-on testing, following our performance testing process, it proved to be one of the fastest shared hosts I have used, easily outperforming top competitors like IONOS, SiteGround, and HostArmada. Hostinger’s infrastructure runs on LiteSpeed Web Server with NVMe SSD storage and built-in server-level caching, helping websites load quickly even under heavy traffic.
With data centers across the US, Europe, Asia, and South America, Hostinger lets you host your website closer to your target audience for faster loading times. Higher-tier plans also include access to a built-in CDN, which stores cached versions of your site on global servers. This ensures that visitors get consistently fast load speeds, even if they’re far from your chosen data center.
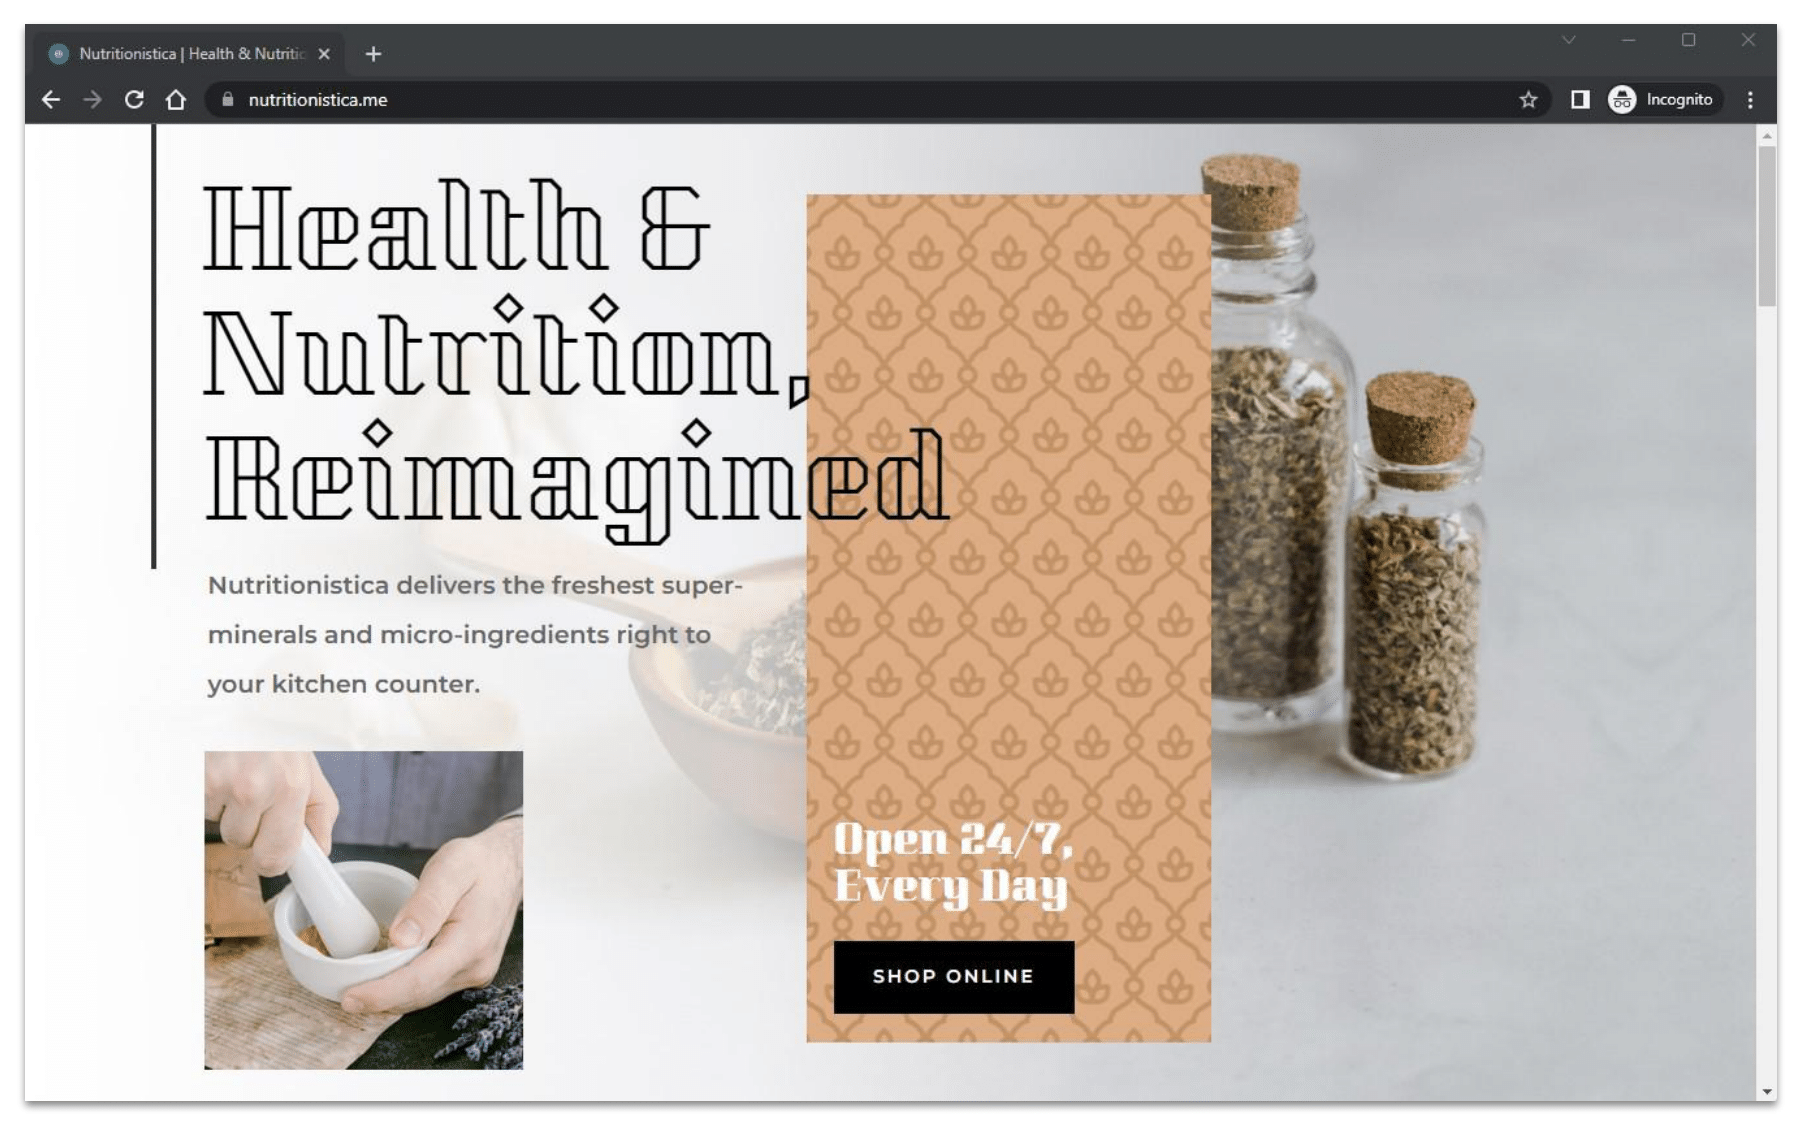
Our custom test site has all the typical elements of an e-commerce site
To test Hostinger fairly, we built a website to simulate an average landing page filled with text, high-quality images, custom fonts, and plenty of complex code for interactive elements. I then monitored this website using multiple testing tools – namely GTmetrix, Sucuri Load Time Tester, and UptimeRobot.
Our test site with Hostinger achieved a typical loading time of about 0.8s and 100% uptime over a month.
Put simply, it would be difficult to find better performance than this at Hostinger’s prices – see the impressive results for yourself below.
GTmetrix
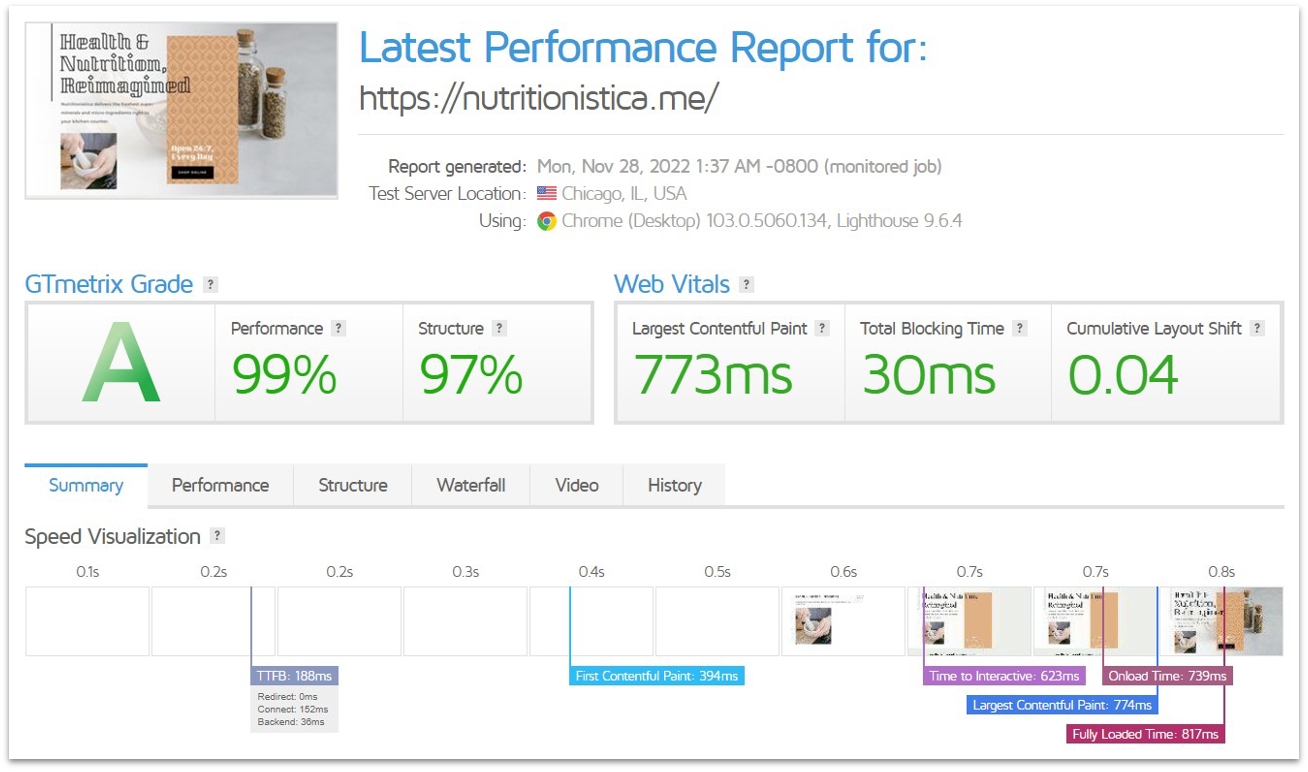
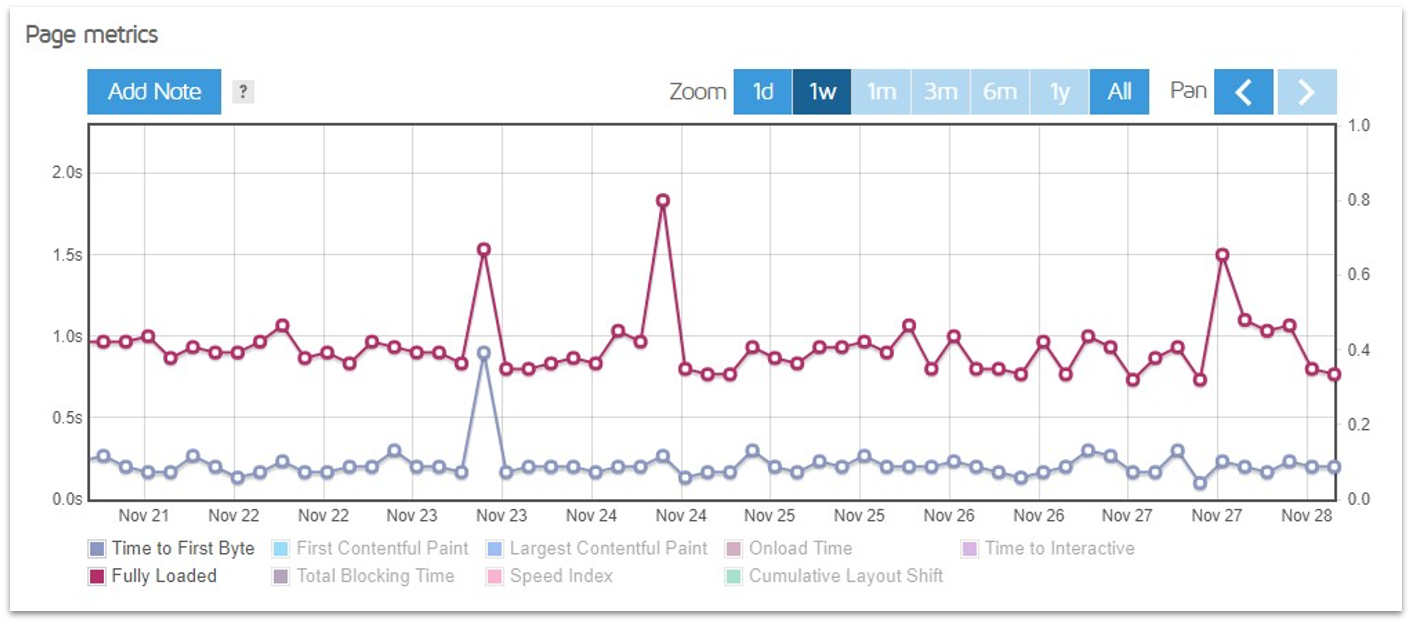
I used GTmetrix to test our website’s performance in a local setting. To do this, I selected a source server in the US, not too far away from my test site’s data center. I then completed a week-long performance analysis with hourly speed tests.
GTmetrix gave Hostinger an A rating
So, what did I find? During a week of testing, my website on Hostinger’s server achieved a typical Fully Loaded Time of just 0.8s. To put that in perspective, most other budget hosts hover around 2s to 3s – Hostinger manages to be several times faster.
How does it do this? Well, it is due in part to the default LiteSpeed optimization settings enabled by Hostinger when I first installed WordPress. For example, the default image compression reduced the total content on my test page in size from about 1 MB to just under 800 KB, allowing the page to load more quickly.
Besides a few hiccups, Hostinger’s performance was consistent
There were a few instances where my site took 1.5s to 2.0s to load. However, even these worst-case results are still within acceptable guidelines for visitor retention. And notably, as each of our tests is conducted from a “fresh” browser instance, some of the cache settings don’t affect these results – but a real website visitor should see the page load even faster on repeat visits.
The results for Time to First Byte – the amount of time it takes for the server to start sending website data – were typically around 0.2s. This is a very good speed – it isn’t unusual to see this number at 0.5s or higher from shared hosting services.
Sucuri Load Time Tester
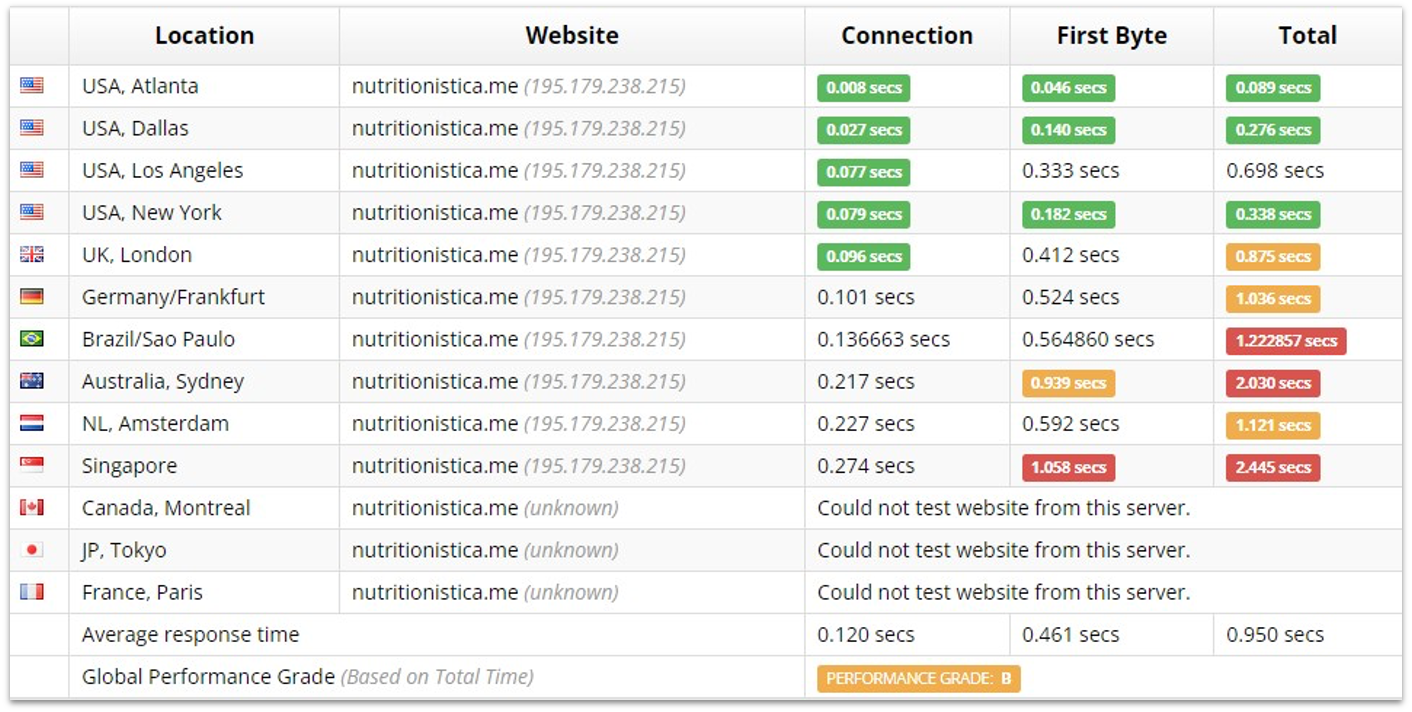
Next, I wanted to take a look at how Hostinger performed on a global scale. To do this, I used Sucuri’s Load Time Tester. Hostinger offers data centers located in the US, Europe, Asia, and South America. If your website is aimed at attracting visitors from Africa, Australia, or the Middle East, it’s advisable to select the closest accessible data center to their respective locations to get the best loading speeds.
To get the best loading speeds on an international scale, you’ll usually need to have a CDN (content delivery network) active. This saves copies of your website’s content (images and code, for example) on servers around the world, so visitors far away from your chosen data center can access some of your content from a server that is closer to them. Most providers do not have a CDN pre-enabled, requiring you to set one up yourself.
While Hostinger supports Cloudflare’s CDN, you’ll have to sign up for an account and configure it yourself, even if you’re just using the free Cloudflare plan. Because we test hosting plans “out of the box” in their default state so we can tell you how well they will work for beginner users, I didn’t enable Cloudflare’s CDN.
With a CDN, Hostinger would perform better globally, but these results are pretty good
The results were surprising. My test site achieved loading speeds of about 1s in Europe and South America, despite being hosted at one of Hostinger’s US data centers.
While it was far slower in Singapore and Australia, reaching around 2s, this is still well within acceptable limits. In fact, these results are better than some of the budget hosts in these regions can deliver on their own home turf.
UptimeRobot
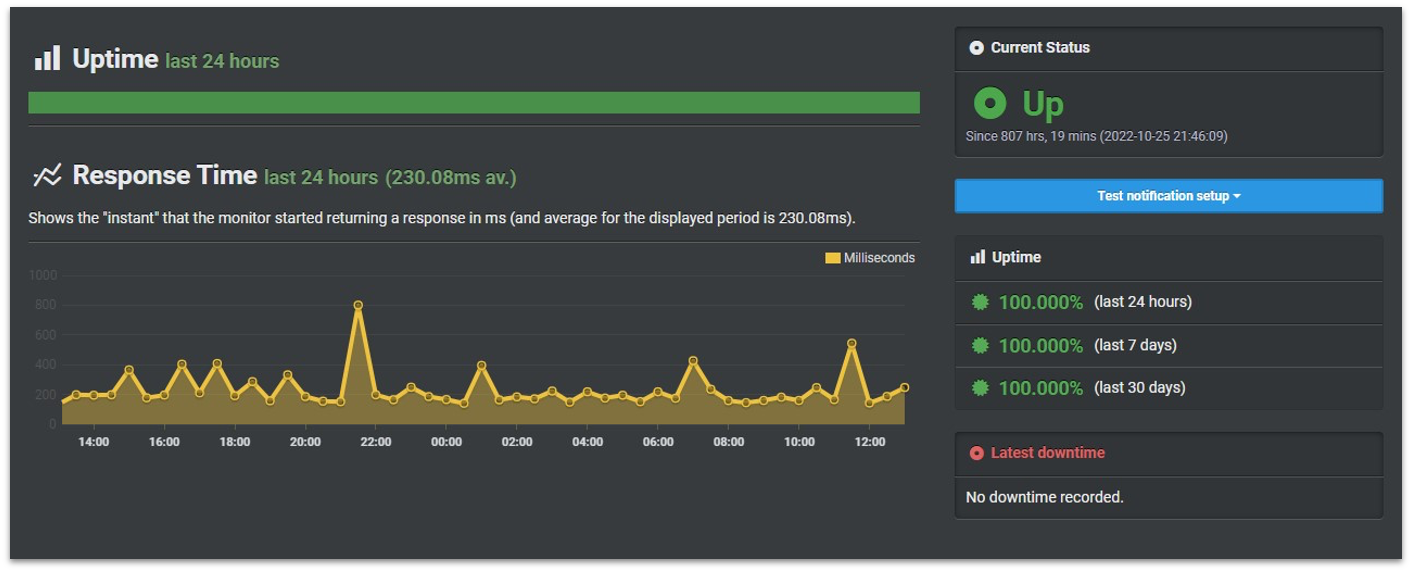
Finally, I measured Hostinger’s reliability. After all, it doesn’t matter how fast a host can make your website load if it’s rarely online to begin with.
To test Hostinger’s uptime, I monitored our test website with UptimeRobot for an entire month. Whenever an instance of downtime occurred, it would be recorded.
It really doesn’t get better than this – well done, Hostinger
Amazingly, there were no instances of downtime to record. Our test site was online and available for the duration of the testing period. Hosting providers with much more expensive plans sometimes struggle to match this result.
Hostinger also offers a 99.9% uptime guarantee. If Hostinger fails to achieve this uptime within a specific month, you can request compensation in the form of service credits. This is not unique since a 99.9% uptime guarantee is the industry standard.
Hostinger is a bit stingy with credits if you are entitled to compensation. You’d only be due 5% credit towards your next monthly bill. Thankfully, by my tests, it doesn’t look like you’ll frequently need to claim compensation, if ever.
4.7
Support
Support Is Polite but Primarily Relies on Links to Documentation
Hostinger provides 24/7 customer support through live chat and email, though there’s no phone option available. Response times can vary slightly depending on demand, but agents are available around the clock.
As an existing customer, you’ll have access to support through your hPanel account. You can type your query in a search box or select a general topic from a dropdown list to start the process. Typing a query will display links to articles based on your keywords. Hostinger’s knowledge base is fairly extensive and filled with concise step-by-step guides for all the basics – some tutorials even include video guides.
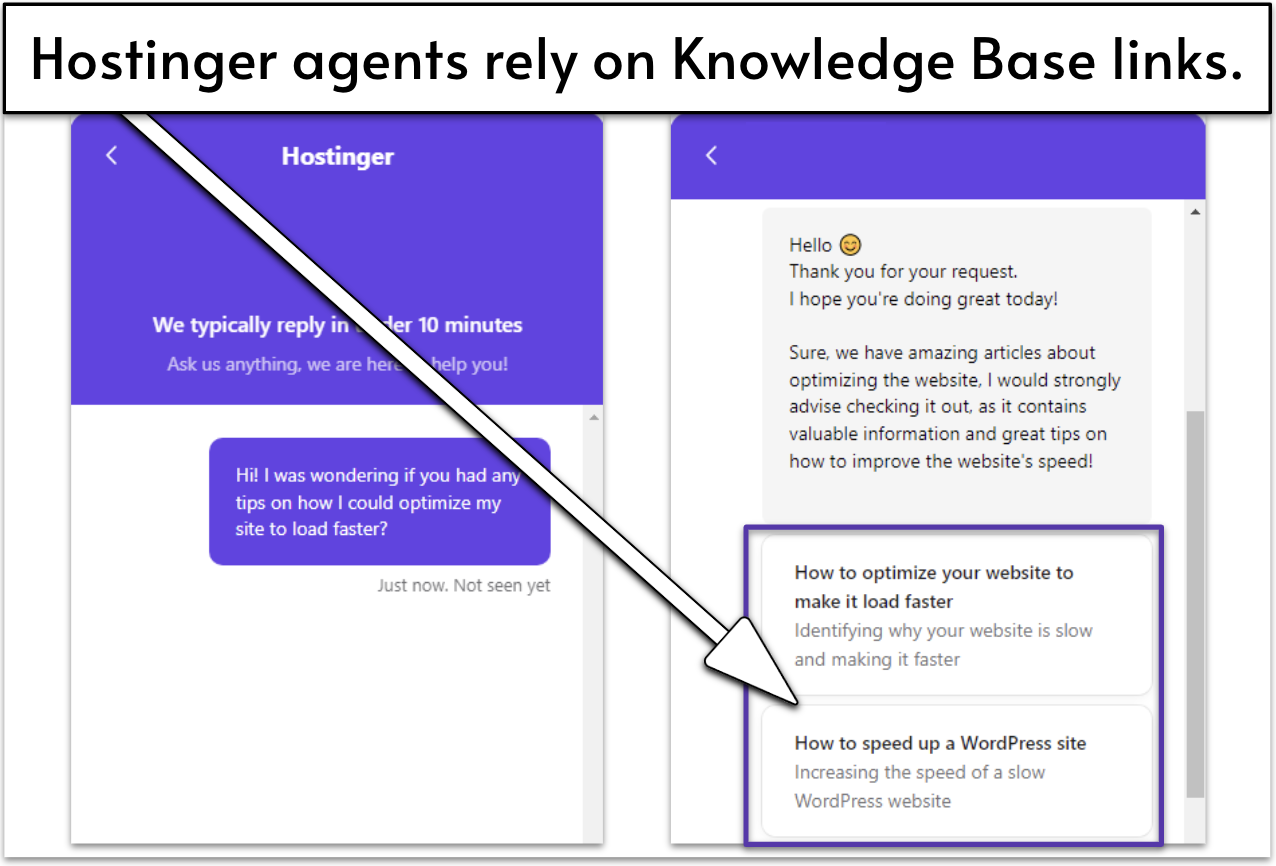
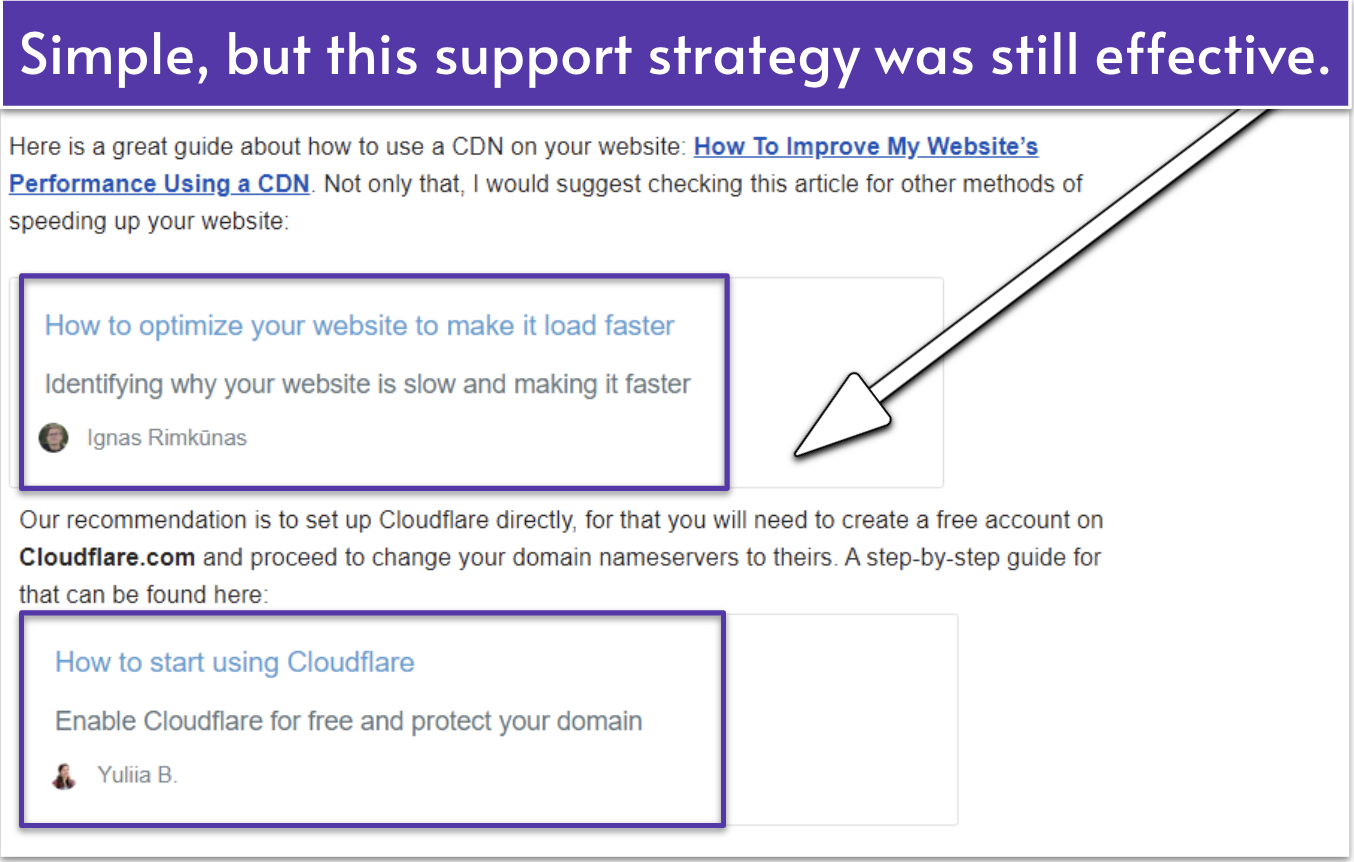
If none of the suggested articles are helpful, you can try Hostinger’s new AI assistant, Kodee (more on that soon) or connect with support. When I accessed the live chat, a prominent banner stated that live chat agents typically respond in under 10 minutes – a perfectly mediocre response time. I asked how I could optimize my site for faster performance and waited.
Hostinger’s support agent was polite and friendly
14 minutes later, I got my response. The Hostinger support agent was friendly and quick to respond… with links to the knowledge base, even when I tried to ask for more direct recommendations for WordPress optimization plugins. This was just OK. The linked articles provided relevant information, but I wanted more personalized help.
Next up, I tried email support. Hostinger’s email support promises a reply within one business day, so I prepared myself for the wait. Surprisingly, after a couple of minutes, I got a response from an agent stating they were looking into my query. Then, 22 minutes after my initial email, I got a detailed response to my question, which is pretty fast for email support.
It seems Hostinger’s support agents really know what they’re talking about
Email support was a similar level of quality to my previous live chat experience. They sent me links to guides on configuring a CDN and extra resources, which gave me everything I needed to know.
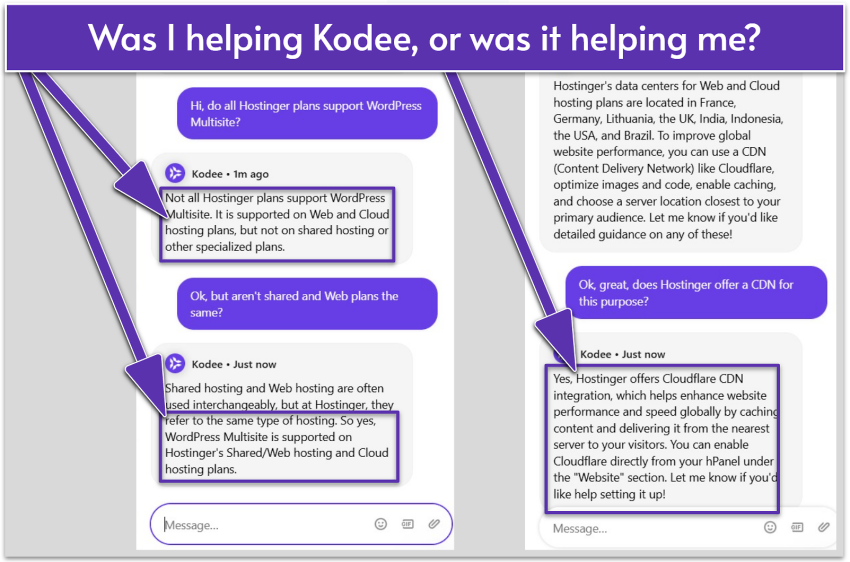
More recently, Hostinger released its Kodee AI chatbot, so I had to test out its quality. I was quite impressed with the level of assistance provided. Kodee was able to guide me on more common topics just as helpfully as live support, but with much faster response times.
Kodee seemed more than a little confused about Multisite capabilities, but maybe that’s because it’s a WordPress feature…
However, it appears you can’t 100% trust Kodee’s advice, especially for complex topics not already covered in a self-help guide or falling slightly out of the domain of Hostinger or hPanel features. For example, it told me that web and shared hosting aren’t the same (when they are) and that I’d be able to find Cloudflare’s CDN set up and ready to go in my hPanel (I won’t).
So, yeah… I wouldn’t put all of my faith in Kodee for complex queries (just yet), but this AI assistant is definitely a helpful first line of support that’s quicker and faster to access than an agent.
Overall, Hostinger’s support system is built for efficiency rather than hands-on guidance. The knowledge base handles most setup and troubleshooting questions, making it the quickest option. Live chat is best for account or technical issues, while email works well for detailed inquiries. And while Kodee is useful for quick answers, it can’t replace Hostinger’s experts. Despite some delays, the mix of AI and human support delivers strong value for the price.
5.0
Pricing
Massive Discounts for New Customers (And a Free Domain Name With Certain Plans)
Pricing is usually what draws customers to Hostinger in the first place. Hostinger is easily one of the most affordable options for shared and WordPress hosting, with prices starting as low as $2.49 per month. These can be purchased on monthly, annual, biennial, and even quadrennial (that’s 4 years!) billing cycles on some plans.
Signing up for four years gets you the best prices, but it also locks you into the longest commitment. The monthly plans are rather poor value, though you can still get a good deal with the annual or biennial plans. Hostinger offers a risk-free 30-day money-back guarantee, so if you aren’t satisfied, you can cancel within the first month for a full refund.
One thing to note is that Hostinger’s renewal rates are higher after the initial term. That’s because annual and longer-term plans include a free domain name and extras like Hostinger’s email marketing tool in your first year of hosting. After renewal, you start paying standard rates for those features, but even then, Hostinger remains one of the best-priced hosts for long-term use.
A free domain name is included with some hosting plans from Hostinger
Hostinger REVIEW: BOTTOM LINE
Hostinger’s reasonably priced shared hosting plans are well worth your time and money. It delivers strong performance backed by global data centers and a built-in CDN, and its user-friendly platform is easy to navigate for both beginners and experienced developers.
It also offers a generous set of resources and features that surpasses much of the competition. What really makes it stand out today is its growing suite of AI tools, all designed to help you launch, optimize, and grow your site faster. For anyone building their first website or managing several small projects, Hostinger delivers real value without cutting corners.
FAQ
What is Hostinger best for?
It depends on your needs. Hostinger’s shared hosting plans are probably inadequate for an enterprise or e-commerce site that gets an enormous volume of traffic or a custom-built web application that needs a really flexible hosting environment.However, Hostinger is one of your best beginner-friendly options for a basic website. It’s very affordable and offers some of the best performance metrics from a shared host.
What are Hostinger’s cons?
Hostinger is primarily known as a shared hosting provider. While it does offer premium solutions such as VPS and cloud hosting, these aren’t its specialty – and these plans tend to lack the advanced tech support and managed services that other providers offer. Also, its 24/7 support may take a while to respond and isn’t always comprehensive.
Does Hostinger cost more when you renew?
Yes. When the discounts on your initial hosting term end, Hostinger renews at the full price. This can mean quite a steep increase, so be wary when you sign up. That said, Hostinger is still fairly affordable even after renewal when compared to the long-term pricing of other budget hosts.
Does Hostinger offer free website migrations?
Hostinger offers free website migrations to new customers, plus self-migration tools for WordPress and other website types. However, Hostinger doesn’t offer free site migrations between hosting plans within the same account. You’ll need to pay for the service, but you can do it yourself for free using the available guides.
Does Hostinger offer managed or custom enterprise solutions?
Hostinger doesn’t offer custom enterprise solutions but it does offer managed WordPress and cloud hosting plans that feature pre-configured SSLs, CDN, backups, and LiteSpeed. Due to its high level of task management automation, Hostinger is able to offer these at an affordable rate. Just don’t expect advanced tech support with these plans.
What makes Hostinger hosting plans worth considering?
Sara is a former Website Planet writer, specializing in writing about web hosting, domain registrars, and digital tools that help businesses get online faster. Before joining Website Planet, she spent over eight years as a freelance content writer and editor, working with more than 100 clients across SaaS, tech, and finance. She holds a BSc in Audit and Accounting. When she’s not reviewing hosting platforms, Sara is usually exploring SEO trends or enjoying her coffee.
Danielle is a former editor at Website Planet, with expertise in editing product reviews, comparisons, and roundups. She ensures that published content is up to date and easy to read. With over a decade of content marketing experience, Danielle is familiar with digital marketing tools, and she enjoys learning about technical SEO and experimenting with website builders. Outside work, she’s a novice vegetable gardener and a regular concertgoer.
onclick="trackClickout('event', 'clickout', 'Visit User Reviews', 'hostinger', this, true, ReturnPopup );"
View 1 reply
View %d replies
Misleading and Unethical — Stay Away from Hostinger India
I chose Hostinger because they market themselves as “Hostinger India” with a .in domain, INR pricing, and local payment options — but the truth is, they have no legal presence in India. It’s highly misleading.
Recently, they suspended both my hosting and domain overnight without any prior warning, notice, or explanation. Since then, they have refused to respond, haven’t given me any clear reason for the suspension, and worse — they’re not even giving me a backup of my own website and data.
This kind of treatment is unprofessional and unethical, especially for Indian customers who trust them thinking it’s a local service. You have no legal support or accountability, and once your account is gone, you’re at their mercy.
Avoid Hostinger if you value your data, your business, or basic transparency.
Dear Satish,
Listening to our customers is essential to us, so thank you for sharing your experience. We hope to make sure everything is clear.
After investigating, we found that your service was suspended due to abuse, as we received legitimate reports from a higher authority regarding its content. In such cases, and as outlined in our Terms of Service (https://www.hostinger.com/universal-terms-of-service-agreement), we cannot provide backups or refunds for security reasons.
We cannot share additional information due to legal reasons, but we hope you understand the need for such actions to ensure a safe internet. We invite you to refer to our Terms of Service and related policies if you still have questions.
Best,
Team Hostinger
anonymus
,
USA August 15, 2025
Hostinger = catastrophy ! Avoid at all cost !
I bought a 4 years plan. Since then, after months of efforts, my 2 websites are still not indexed ! Very angry with hostinger. According to my own experience, AI and a friend computer scientist, it is 100% percent Hostinger fault, due to strong limitations with SEO and other problems. Their help online is 100% useless, AI always mistaken, human help does not help (because they can't i guess). I would totally avoid Hostinger if i were you and in deeply regret my choice. Now i am stuck with that problem for years.
Dear Fil, At Hostinger, we're always working to improve our services, and feedback like yours helps us a lot. Thank you for sharing it. The concerned teams received your review to investigate the situation, but don't hesitate to share any improvement suggestions via [email protected]. We'd love to learn how to upscale this partnership. Best wishes, Team Hostinger
Team Hostinger
,
USA June 05, 2025
They are the worst!
They are only available by email and even that does not work. If you want massive frustration, this is the place to get your hosting.
Dear George, Thank you for sharing. We've shared your review with the relevant teams for feedback. If you have any suggestions for improvement, feel free to email us at [email protected] — we'd love to hear how we can help. Best, Team Hostinger
Team Hostinger
,
USA June 05, 2025
Moved website – over 4 weeks since migration there support moved it broken and do not fix it
Moved website - over 4 weeks since migration there support moved it broken and do not fix it quality comes with a cost, guess the saying you get what you paid for is true.
Hi there,
Thank you for sharing. We've shared your review with the relevant teams for feedback. If you have any suggestions for improvement, feel free to email us at [email protected] — we'd love to hear how we can help.
Best,
Team Hostinger
Team Hostinger
,
USA February 07, 2025
Scary Hostinger Policy, DO NOT GET A PLAN With Them!
I own several generic domain names, and Hostinger flagged two of them as "suspicious domains." Seriously? Now they’re asking for business registration or a personal ID to prove relational ownership, and it has to somehow align with the domain name. I explained to them that generic names can’t be registered as trademarks or patented—they’re literally generic! And I am a freelance blogger, I discuss over 50 topics in different niches. Do I need to have business permit for each topics? Funny but seriously frustrating idea by Hostinger. These domains were being used as WordPress blogs—one reviewing car insurance quotes and the other focused on credit cards popular among Americans.
Despite my explanation, Hostinger decided to suspend my entire hosting plan. As a result, all my blogs hosted on that plan were affected, and I lost access to everything. This experience has made me realize that I should never have chosen Hostinger in the first place. I STRONGLY DO NOT RECOMMEND THIS COMPANY.
I've been blogging since 2010 and have worked with many hosting providers, but this is the first time I’ve encountered such a frustrating and unreasonable situation. Hostinger’s policies are outrageous. Just look at this clause from their terms:
9. ADDITIONAL RESERVATION OF RIGHTS
Hostinger expressly reserves the right to deny, cancel, terminate, suspend, lock, or modify (including access to or control of) any Account or Services (including the right to cancel or transfer any domain name registration) for any reason (as determined by Hostinger in its sole and absolute discretion)...
FOR ANY REASON. Yes, they reserve the right to terminate, cancel, lock, or modify your account at their sole discretion. So, essentially, you pay for a service, and they can terminate it whenever they want—no explanation necessary. And guess what? Your money is gone.
BE VERY CAREFUL. Think at least 100 times before you sign up for a plan with them. And if you’re still considering it, think 1,000 more times. I’m not exaggerating. This is a hosting company with policies that prioritize their control over your rights as a paying customer. Save yourself the headache.
Dear Crispino,
Thank you for sharing your concerns. Hostinger has the legal responsibility to monitor how our services are used (as discussed in our Terms of Service: https://www.hostinger.com/legal/universal-terms-of-service-agreement) and act upon it to prevent abuse — but all of our customers are required to read and agree with our terms and policies before purchasing, to ensure everyone is aware of the requirements.
Our team hopes you understand the need for such actions to ensure a safe internet, and we invite you to write to [email protected] if you have any questions about our Terms of Service or other policies.
Best,
Team Hostinger
Hostinger
,
USA February 07, 2025
Great Hosting
I have been developing websites since 2016 and i have been through several hosting providers but Hostinger is the best by price or by feasibility. I am using Hostinger since 2020. Once My hosting plan was expired other hosting charge to backups but they keep your backup for 40 days even after plan expiration. I just loved it. Highly recommended.
It's only been a week since I bought the hosting, and logging in takes ages. the "H" icon rotates slower than the Earth. I'm very disappointed as it's wasting my time and delaying the work. Even to talk to customer support chat I need to log in which is not happening.
Allan Rufus, United Arab Emirates October 01, 2024
Hi, Allan,
Thank you for sharing your experience with us. While we're sorry it doesn't reach the high standards we've set for ourselves, it'll be a pleasure to help you.
To correct the error you're reporting, one suggestion is to try cleaning your browser's cache (we have a tutorial here: https://support.hostinger.com/en/articles/1583501-how-to-clear-cache). If it still doesn't work, you can email us at [email protected] — we're here for you.
Best wishes,
Team Hostinger
Hostinger
,
USA October 04, 2024
Horrible & Down Time Issues
Been a customer with them for last couple of years and have been using Cloud Enterprise plan. I must say that at first things improved and support was good but for last couple of months the down time has affected a lot and been down for a few hours seems to be quite normal. Be very very careful before signing up for Hostinger and they seem to be good with marketing. Horrible experience and yesterday they were down for more than 3 hours and the status page already says that we have applied the fix and monitoring where as in reality you can't even open the site. Moreover if you are looking for fast reliable hosting then hostinger is the worst in my opinion. Customer support keeps on saying we are sorry for the incoveniance bla bla and at the end they ask you "please let me know how can i help you" lol
I am trying to get my refund and interestingly i just spoke with Paulius Žunda just three days back about how they have improved but still a few things need to be worked on and today it was just game over. I hope i can get some sort of refund from them and move to another host because they are not what they project.
Dear Hammad,
We sincerely apologize for this experience. That's not the level of quality we expect to offer our clients, but your review is more than welcomed as it allows us to improve our services.
The concerned teams received your review to investigate the situation, but don't hesitate to share any improvement suggestions via [email protected]. We'd love to learn how to upscale this partnership.
Best wishes,
Team Hostinger
Hostinger
,
USA October 04, 2024
Family sharingMulti User SharingExpert SupportBackupSmart syncPersonal SolutionBusiness SolutionTeams optionsOffline foldersFile history and recoveryRead more reviews
Hostinger Alternatives
Our Score
4.9
Instantly scale RAM and PHP memory to handle traffic spikes
 Website Planet