Whether you want to create a basic “Members Only” area of your business site, or just have a private blog for your family and friends to read, there are lots of reasons to lock down some or all of your website. Fortunately, WordPress makes that simple and easy enough.
I’ve been building websites off and on for a decade, and using WordPress a lot of the time. I’ll admit, I’m usually trying to make my sites easier to find, so researching and writing this review was a new exercise for me. Even so, I figured out how to make everything work pretty quickly, not counting the time it took for me to screenshot everything.
Most of the functionality you need is built into WordPress, and the rest can be added via plugins very quickly. Ready? Let’s get started, and you should be done in a few minutes, at most.
Pre-Tutorial Notes:
So, let’s set some expectations here. I’m going to show you how to set posts, pages, and your whole to private with WordPress’ own settings, and one simple plugin. People you choose will be able to see your content, and no one else will (in theory).
I am not going into how to build a whole membership site. That’s a whole other sort of tutorial, and it can get complicated. If that’s what you want, I recommend a plugin called Simple WordPress Membership. It’s fast and easy to configure, and will work with most WordPress themes.
What You’ll Need for This Tutorial
First, you’ll need a WordPress site, already up and running (see below). If you don’t like the idea of self-hosting your site, you can easily get started with a free website on WordPress.com.
Secondly, you’ll need a plugin called “My Private Site,” for self-hosted WordPress blogs. This is easy to install, and requires almost no configuration to make it work. All it does is lock your site so that only registered users can view your site’s content. You will have to create user accounts for everyone you want to allow onto the site.
Wait… Which Version of WordPress Are We Using?
A quick tip for those who haven’t used WordPress a lot: there are two versions of it. The first version comes from WordPress.org, and it’s software that you can download and run on your own web hosting. It’s completely free and open source, and there are no limits on using it however you like.
The second version is hosted on WordPress.com, and is run as a sort of mass blog host / site builder. There’s a perfectly usable free plan, but if you want to use any plugins, you need to upgrade to the Business plan at least.
For most of this tutorial, I’m using WordPress on a server I pay for. However, making a private blog on WordPress.com is a lot easier, and I’ll show you how.
How to Make Your Blog Posts Private (on any WordPress Site)
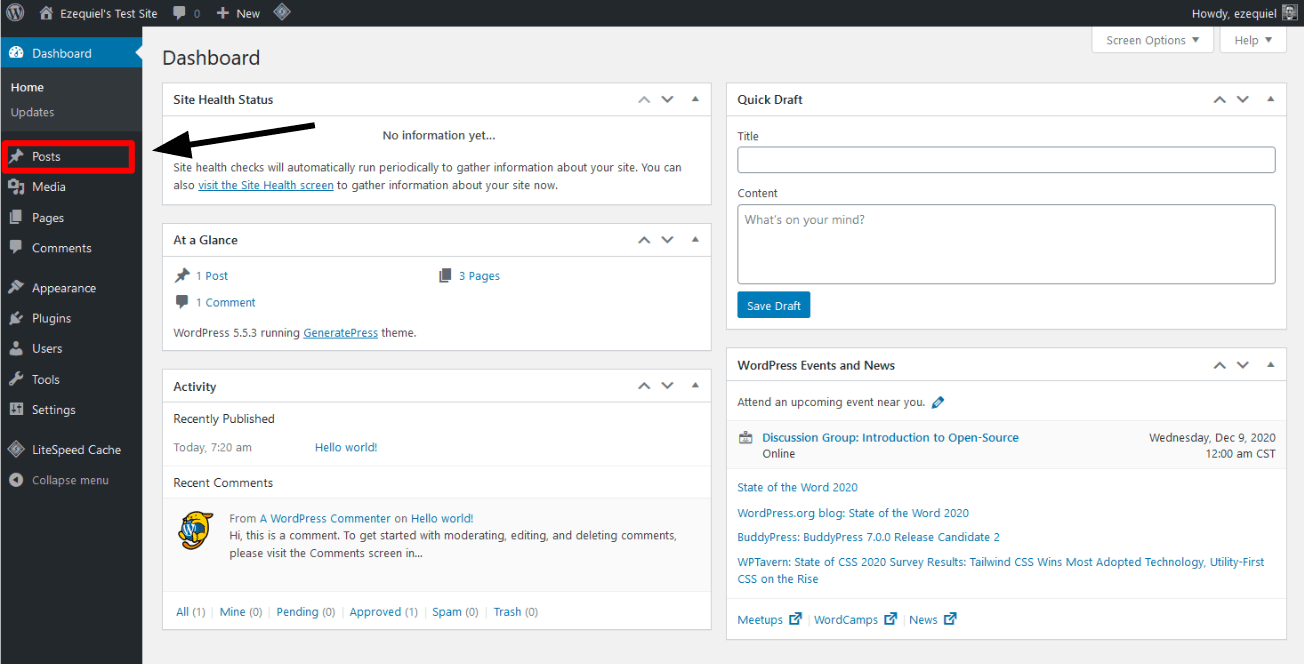
This is the easy part; you can do this with no plugins required. Starting from any page on your WordPress dashboard, just click on Posts in the sidebar on the left.
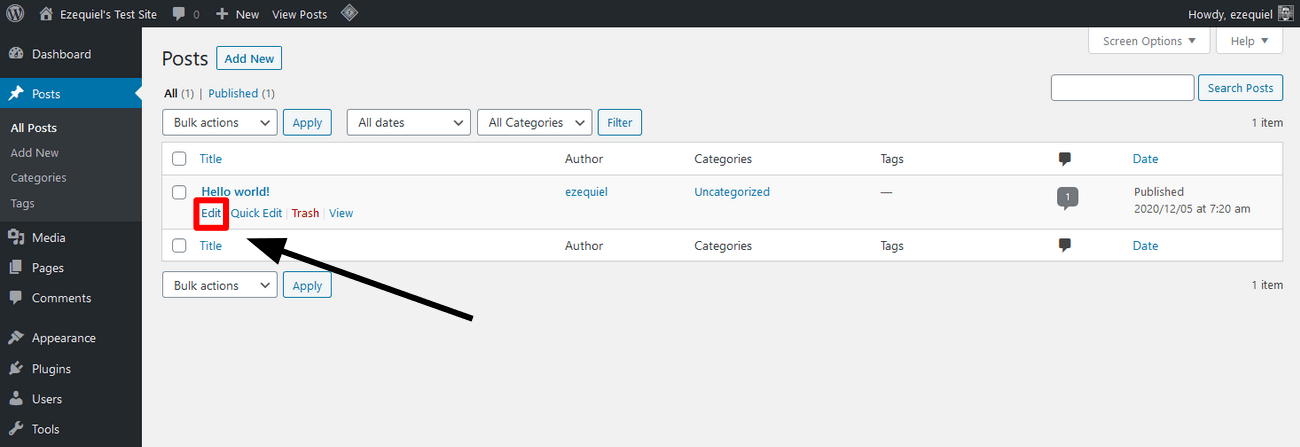
This will take you to the Posts management page. Hover over the post you want to make private, and click Edit.
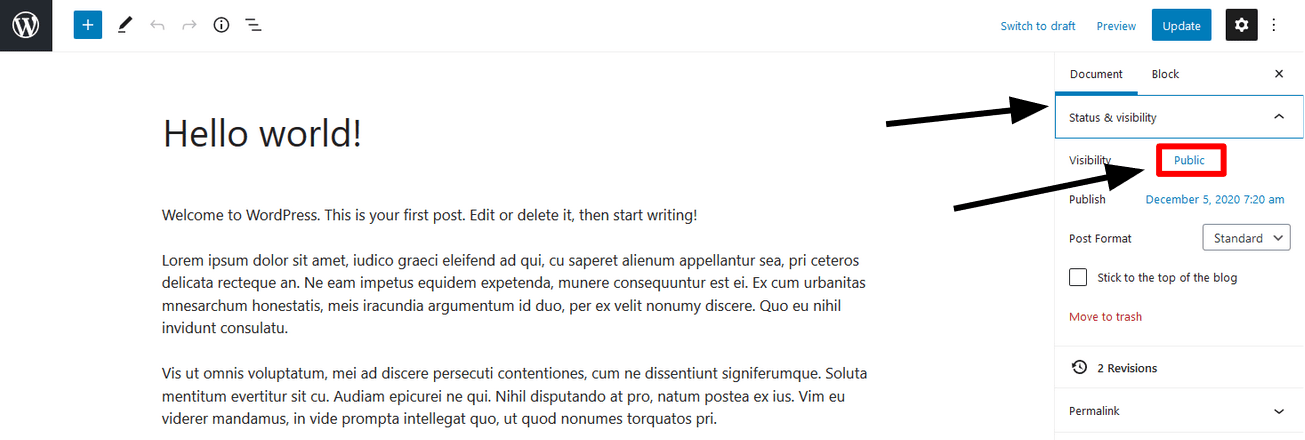
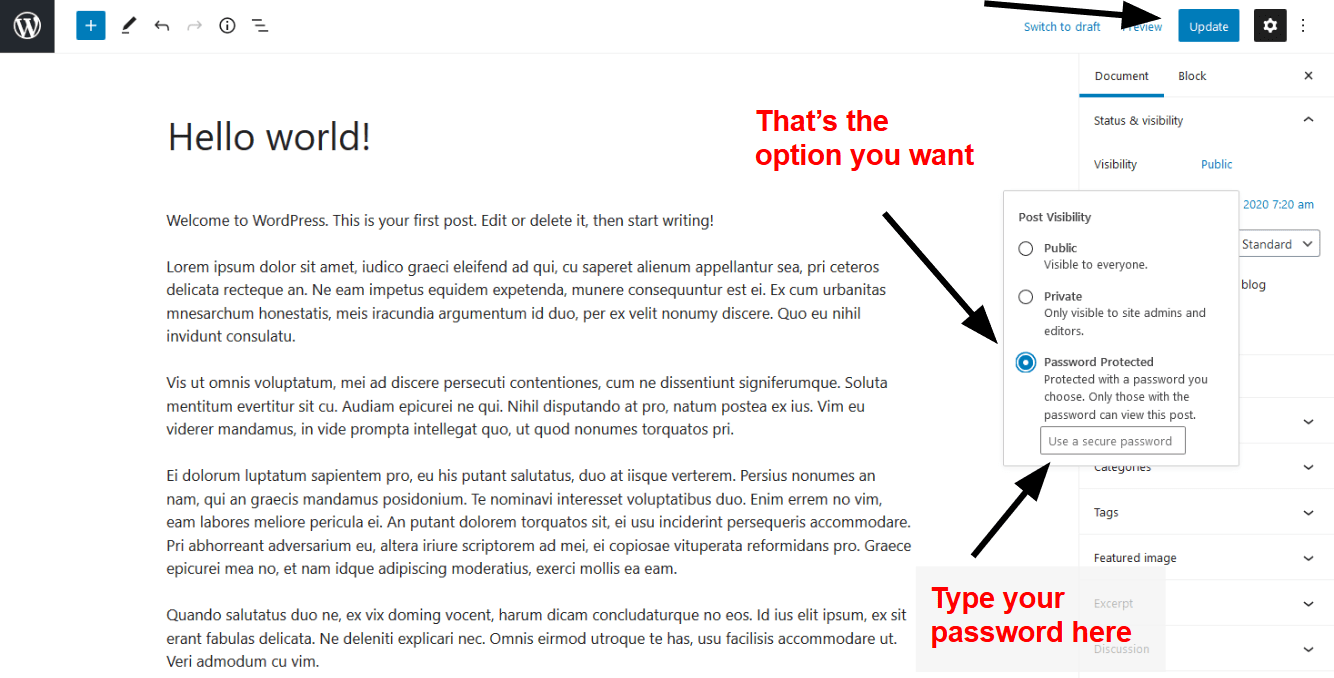
Once you’re editing the post, go to the sidebar on the right. Click on the Status and visibility menu to open it, then check out the Visibility option. If it says “Public,” then you can probably guess what that means.
Click on the word Public.
That will open a menu. You actually don’t want to click on Private. That option makes the post only visible to site administrators and editors. Sure, you could add a bunch of editor accounts for people you want to see the post, but then they could…you know…edit it.
Well, that’s annoying.
The more fool-proof option is to choose Password Protected, and set a password for that post. Don’t forget to click the blue Update (or Publish, if it’s a brand new page) button in the corner. Then share the password with everyone who you want to see said post.
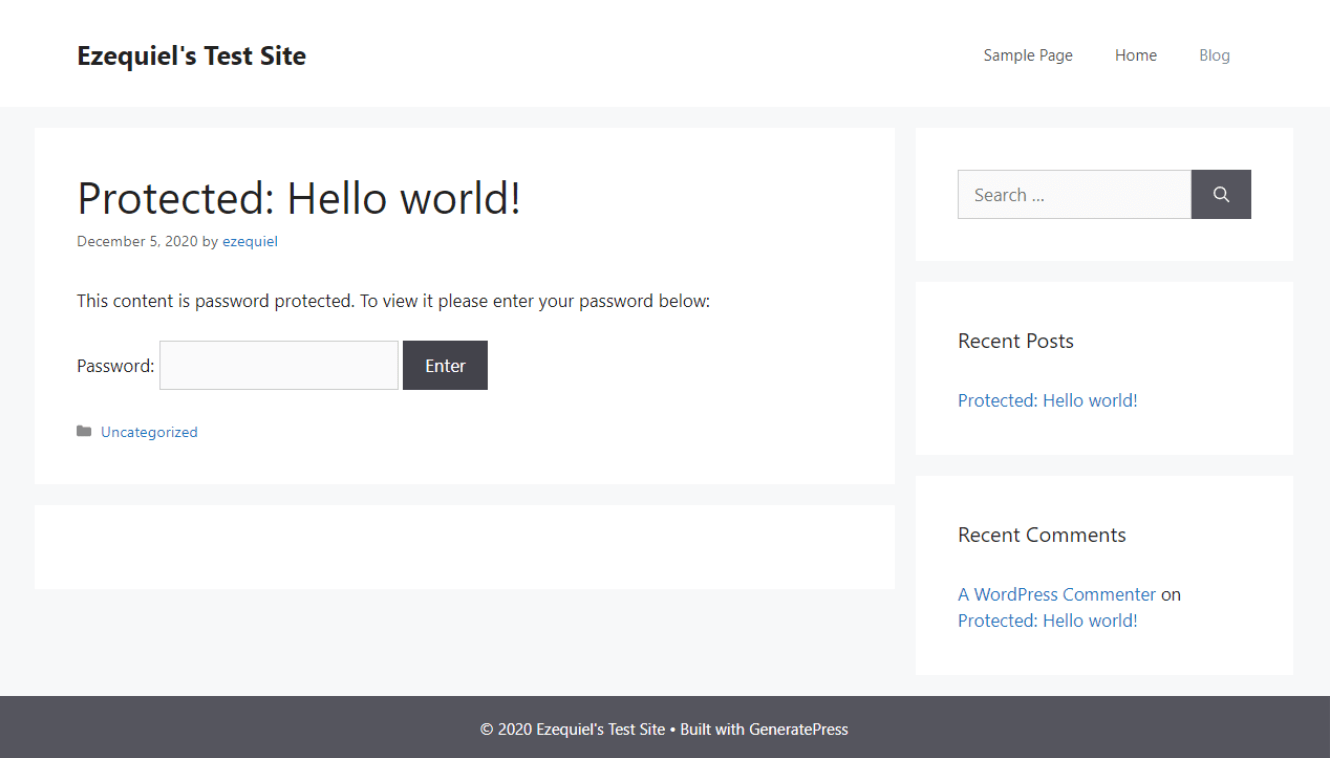
When a user browses your site, protected posts will look like this:
How to Make Your Pages Private (on any WordPress Site)
No screenshots here. Why? The process is literally exactly the same as it is for posts. Just instead of going to the Posts screen, you go to the Pages screen (link in the sidebar on the left). That’s it! That’s all there is to it.
Now what should I do with all this extra space? I know! I’m going to tell one of those really long-boring stories on every cooking blog that comes before the recipe:
It was a dark and stormy night. I’d just been dumped, but I hadn’t yet found out about my shapeshifting powers…

How to Make Your Whole Site Private (on a Self-Hosted Site)
Okay, so this is the part where you’re going to need that plugin I mentioned before. And remember, if your site is on WordPress.com, you won’t be able to do this without paying. And again, this is not a full membership system.
Okay, with the reiterative disclaimer out of the way, let’s do it.
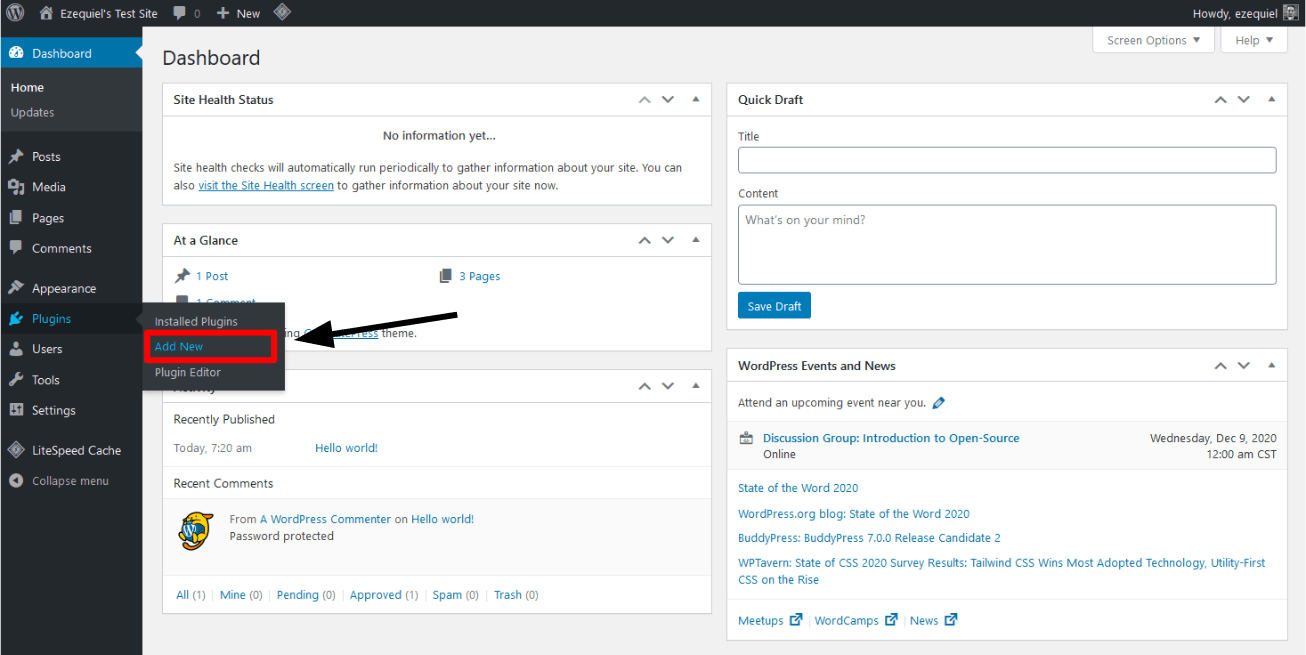
First, go to Plugins > Add New in the sidebar menu.
On the Add Plugins screen, search for “My Private Site” (without the quote marks). There’s only one relevant plugin result, and as of right now, it’s the easiest way to do this sort of thing.
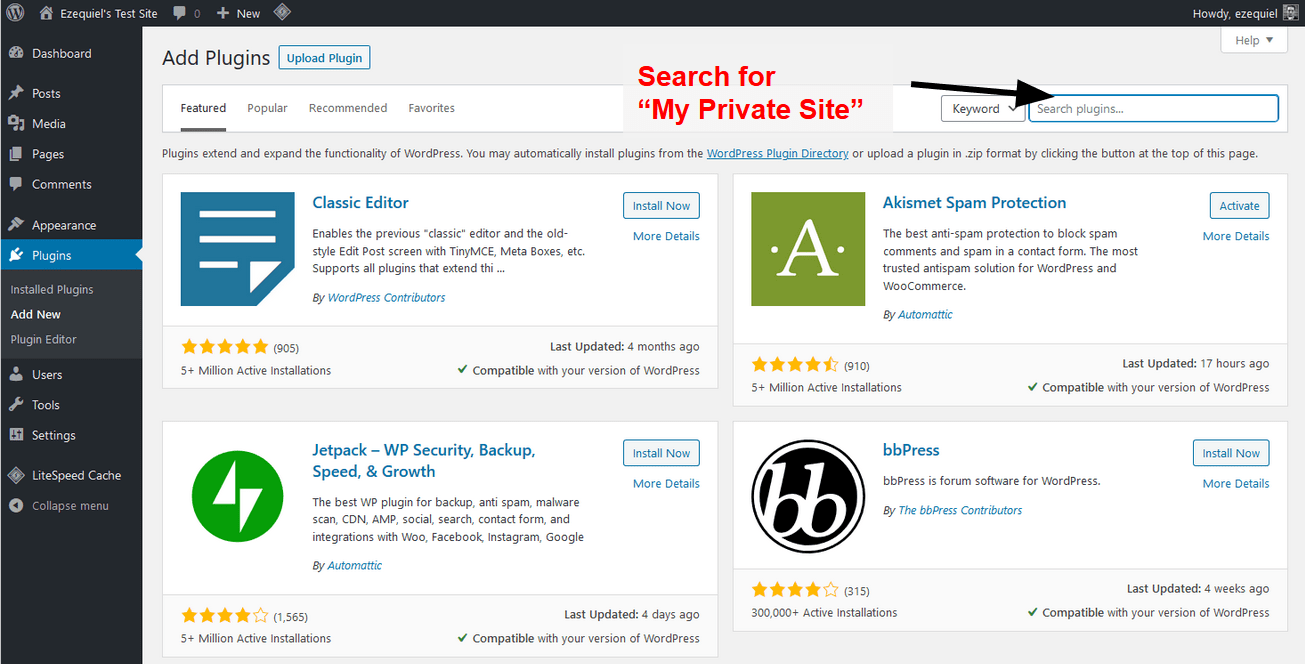
When the plugin you need pops up in the results, just click the Install Now button.
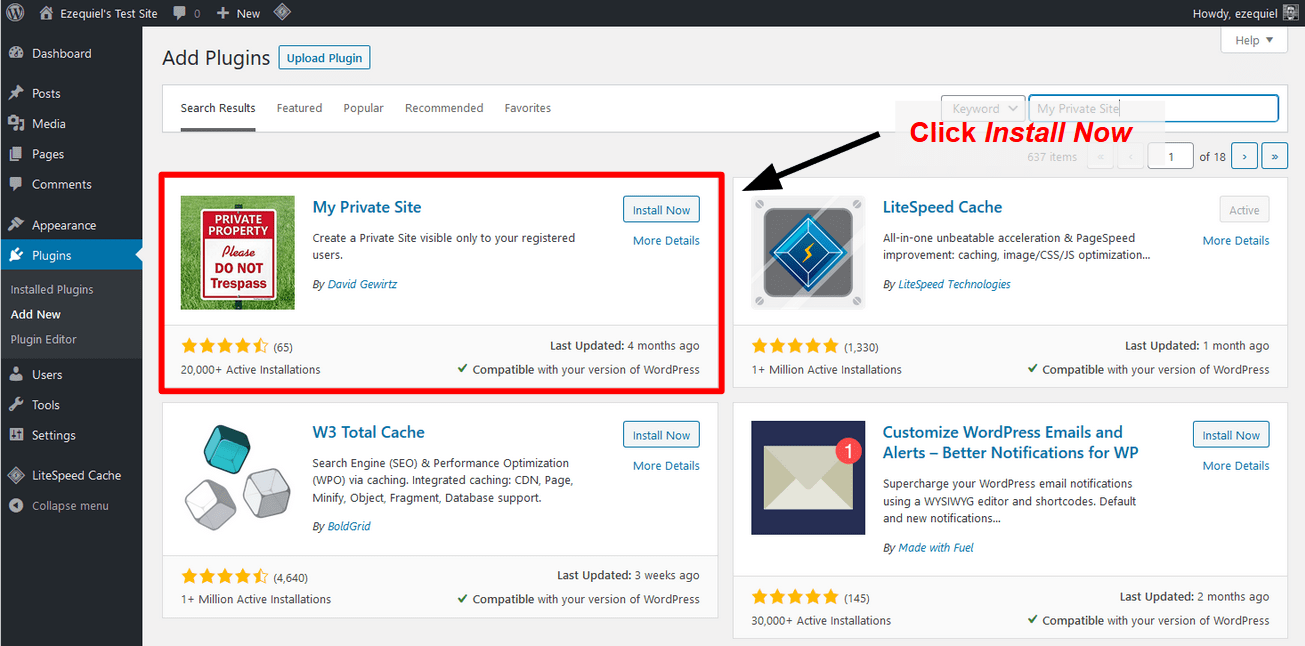
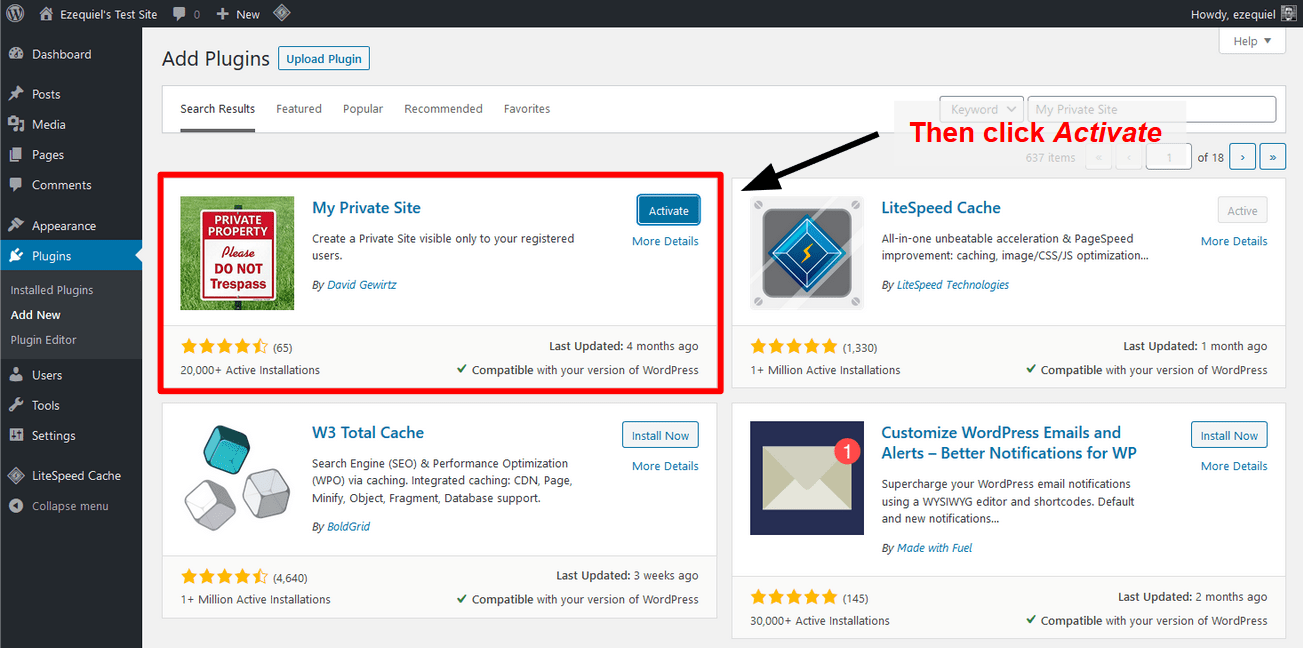
Depending on how fast your server is, it’ll take a few seconds to install the plugin. Don’t go anywhere just yet, wait for the installation to finish. Once it’s done, hit the blue Activate button that should have just showed up.
Beginner’s note: all plugins and themes for WordPress have to be activated after installation.
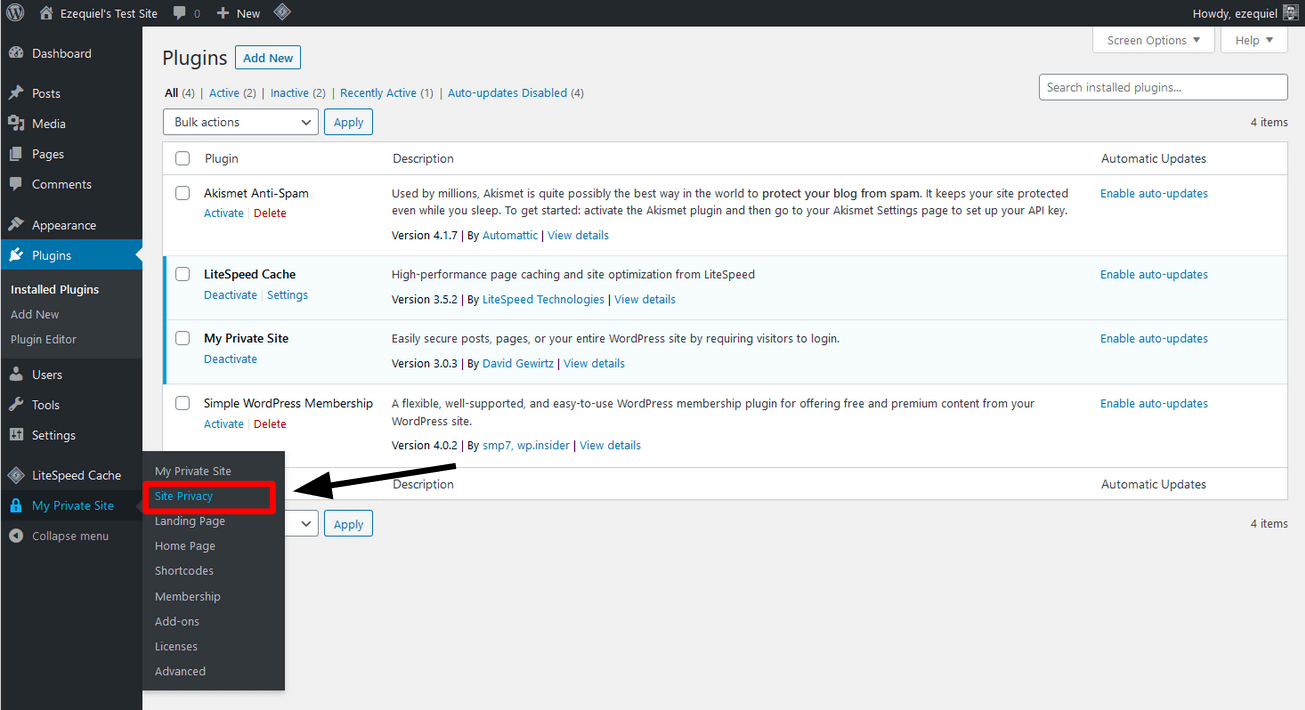
You’ll see a new entry in the sidebar menu on the left, usually at the bottom. It’ll be called My Private Site, just like the plugin. Hover over it, and click on Site Privacy to go to the exact screen you need.
On the next screen, check the box that says Enable login privacy. Then click the big blue Save Privacy Status button. You’re done! Well, mostly.
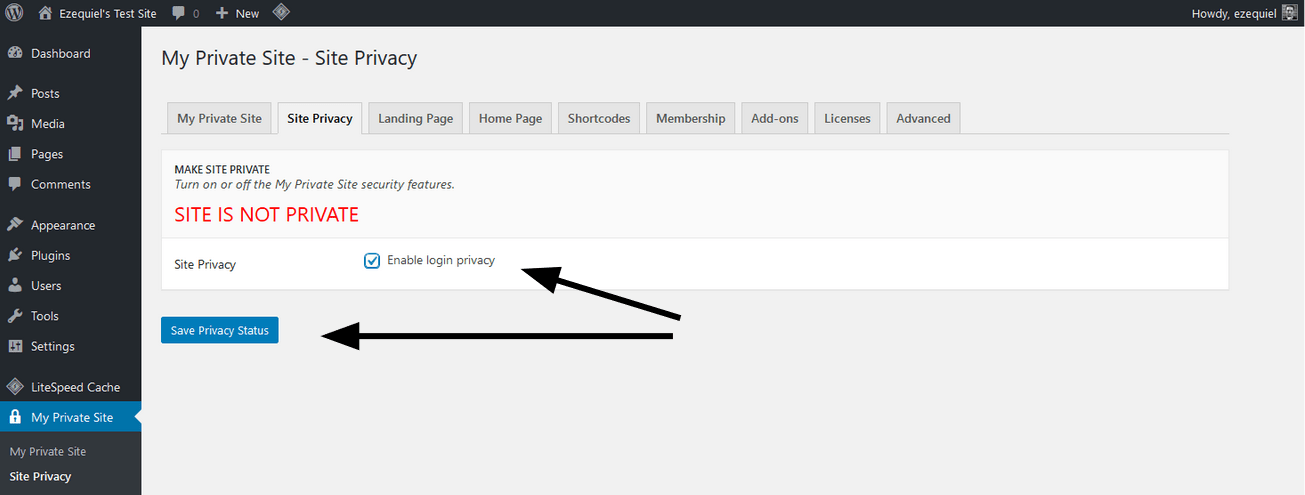
Now, whenever anyone who isn’t registered and logged into your site comes to see it, this is all they’ll get: the login screen.
Adding Users
Now, you can allow anyone to register on your WordPress site as a “Subscriber,” but that would defeat the purpose of keeping your site private. And for reasons of security and convenience, that option is disabled by default.
We’re going to leave it that way.
No, you’ll need to create a user account for everyone you want to access the site, and you’ll need to do it manually. Here’s how:
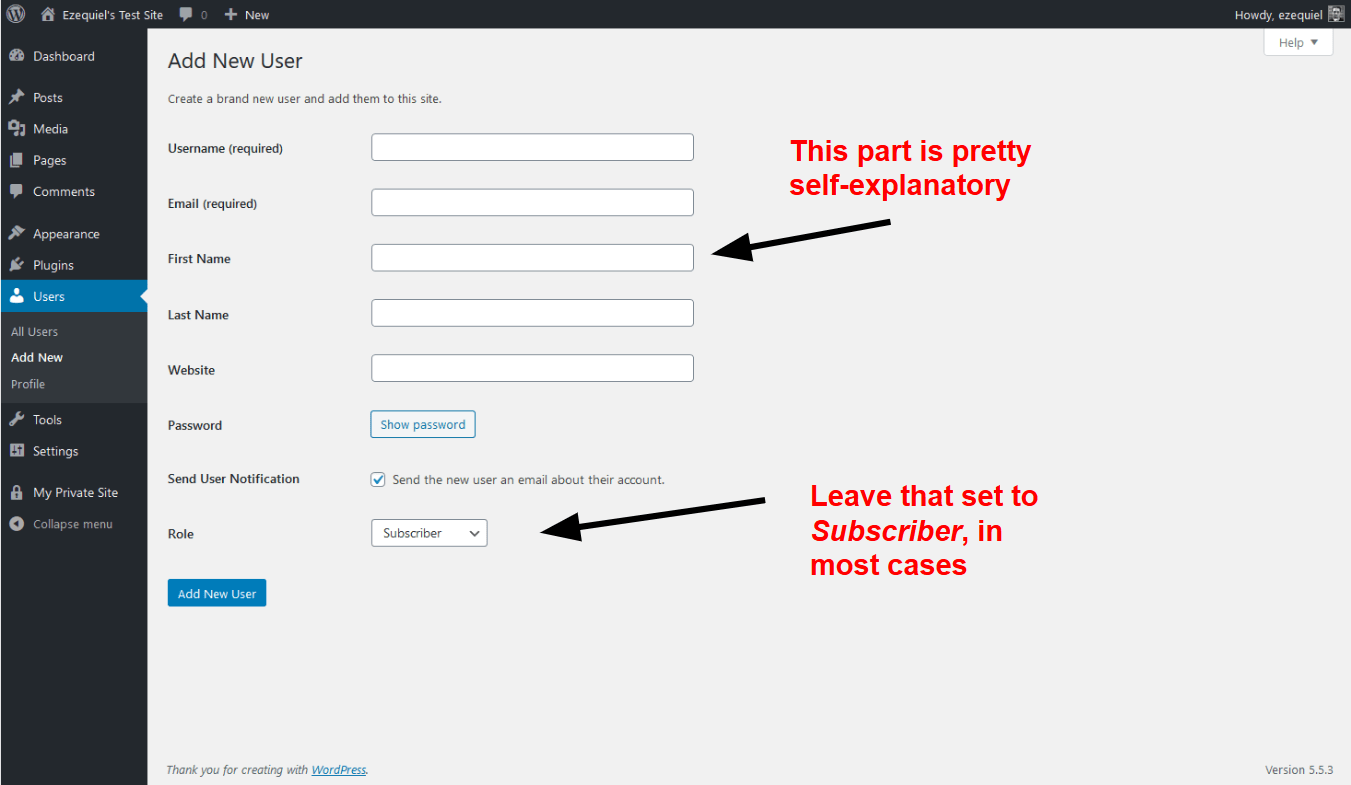
Back to the sidebar! Go to Users > Add New.
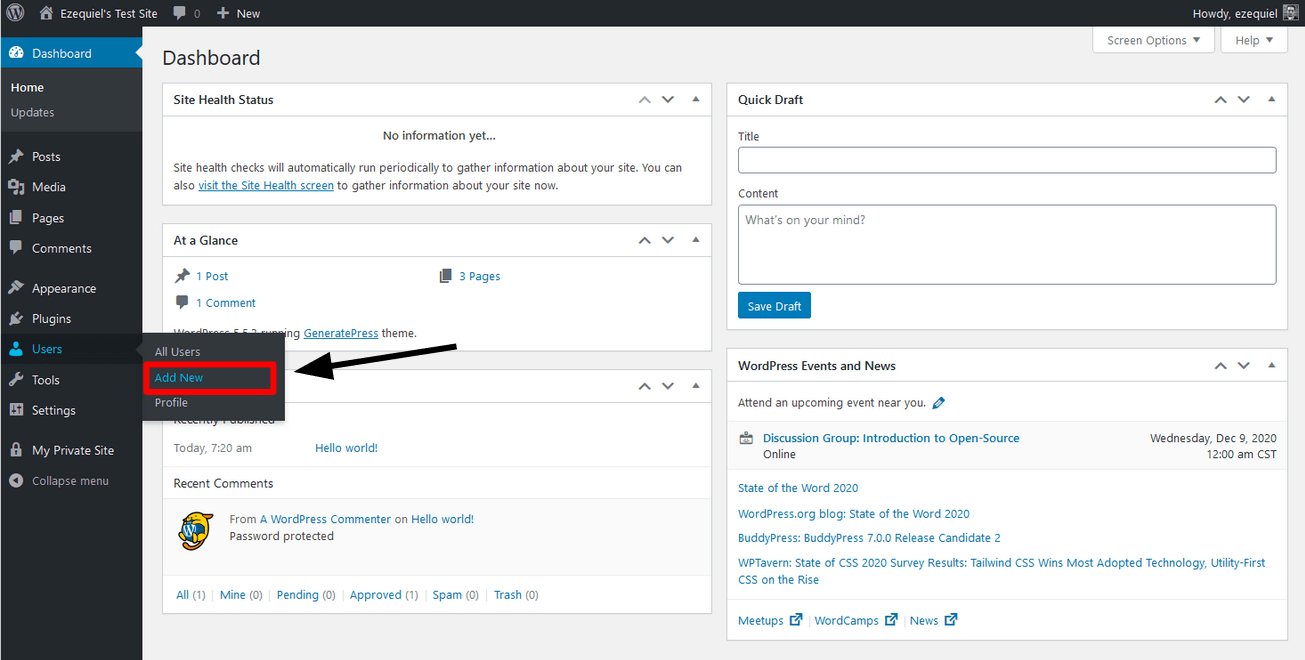
All you need is a username and an email address. WordPress can handle the rest, including randomly generating a password for the user. You can always set that manually, if you like. Once you click the Add New User button at the bottom, WordPress will automatically send that username and password to the email address you specified.
Note: Unless you want people editing your site, leave the Role option set to Subscriber.
How to Make Your Whole Site Private (on WordPress.com)
This is a lot easier than the whole thing with the plugin. Just go to the menu on the left, to Manage > Settings. Scroll down until you see the privacy options, then click on Private.
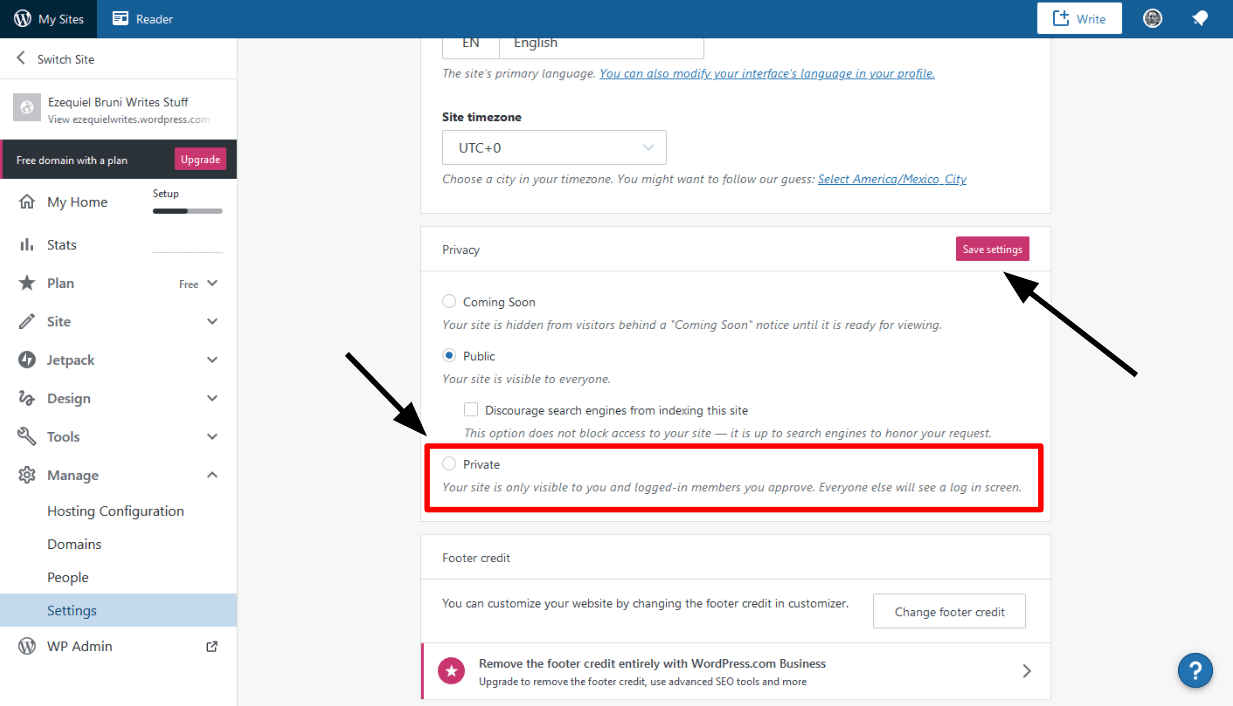
You can use the Manage > People menu to invite other WordPress.com users to view and maybe even contribute to your blog. The only possible downside? They have to be members of WordPress.com.
And then, as you’re aware, Automattic (the WordPress company) possesses data access concerning every user of your site, which isn’t a particularly private approach to conducting operations. However, it remains a more convenient method.
Wrapping Up
So those were the simple and easy ways to lock down your posts, pages, and whole website. As you can see, it doesn’t take much time or effort, unless you have hundreds of people you want to let in.
At that point, you may as well build a proper membership site, though. That’s a lot harder, and a subject for another day. In the meantime, have fun making secret club pages for friends, family, and / or small numbers of clients!