We rank vendors based on rigorous testing and research, but also take into account your feedback and our commercial agreements with providers. This page contains affiliate links. Advertising Disclosure
Google Cloud may not be perfect, but it was true to its word and gave me a full refund when I cancelled my account. The process was mostly hassle-free, even though I had signed up for the cheapest virtual server.
Google Cloud isn’t one of the easiest hosting platforms to get started with. In fact, it’s not uncommon for beginners to spend a lot of time troubleshooting a minor error, or accidentally incur unexpected fees due to the complex pricing structure.
Perhaps you’re looking for a more user-friendly platform with affordable managed support. Or, maybe you’re looking for a similarly powerful but more flexible solution.
If that’s the case, I’d recommend Kamatera, which offers cheap on-demand billing and affordable managed service. Unlike Google Cloud, you won’t need to commit to a multi-year plan to get the best deal.
Quick Guide: How to Cancel Google Cloud and Get a Full Refund
Log in. Enter your account details at the Google Cloud website.
Disable billing on your projects. In the Billing menu, enter the Account Management page. Click the three dots next to each active project and select Disable billing.
Request a refund. If you have unused balance, open the Billing menu and click Overview. Press Payment Overview at the top, then Request a refund.
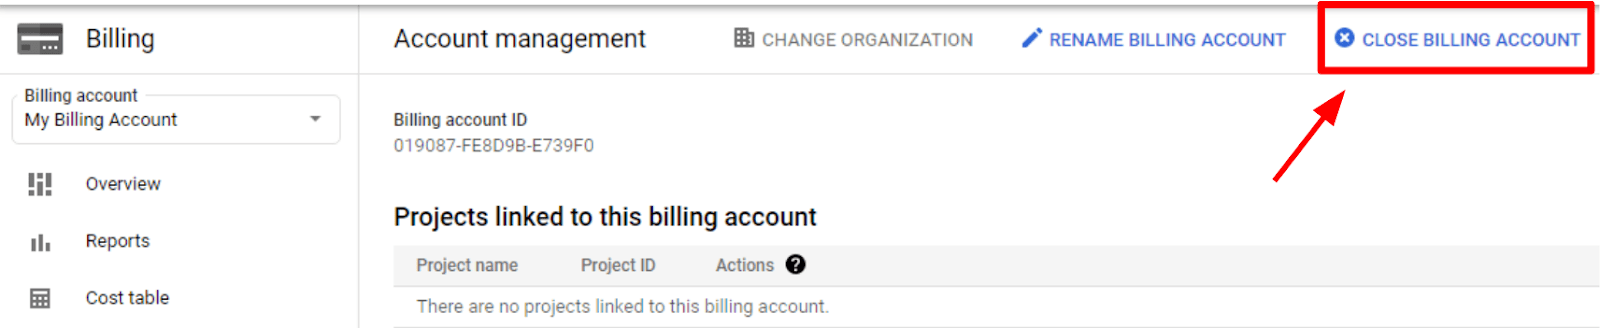
Close your account. Head back to the Account Management page and hit Close Billing Account.
My Experience: Here’s How I Cancelled My Google Cloud Account
Like most other pay-as-you-go services, Google Cloud does not offer refunds for used cloud resources without a very good reason. If you feel you deserve a refund in such a case, you’ll have to take this up with support.
In my case, I had added funds to my Google Cloud balance that I didn’t use. Thankfully, Google Cloud allows for easy refunds of unused balance.
Before you begin the cancellation process, you’ll need to ensure you have the permissions of a Billing Account Administrator. If you’re a solo developer like me, you’ll likely already have the necessary permissions by default.
However, if you’re working with a team, you may lack the needed permissions depending on your assigned role. You’d have to get the team member with billing administrator privileges to grant you the necessary permissions.
Once you have the right permissions, you’ll be able to close your account. Here’s the step-by-step process to cancel a Google Cloud account and get a refund for any unused funds.
1. Log in to your account. The login button can be found on the top-right of most pages on the Google Cloud website.
The Google Cloud console button is easily missed
Once you’re logged in, you’ll need to press the Console button to enter Google Cloud’s dashboard. This can be found near where the login button previously appeared.
2. Disable billing on your projects. Before you begin closing your account, it’s a good idea to disable billing on your associated projects now. This will prevent additional charges from accruing, and will ensure a clean cancellation.
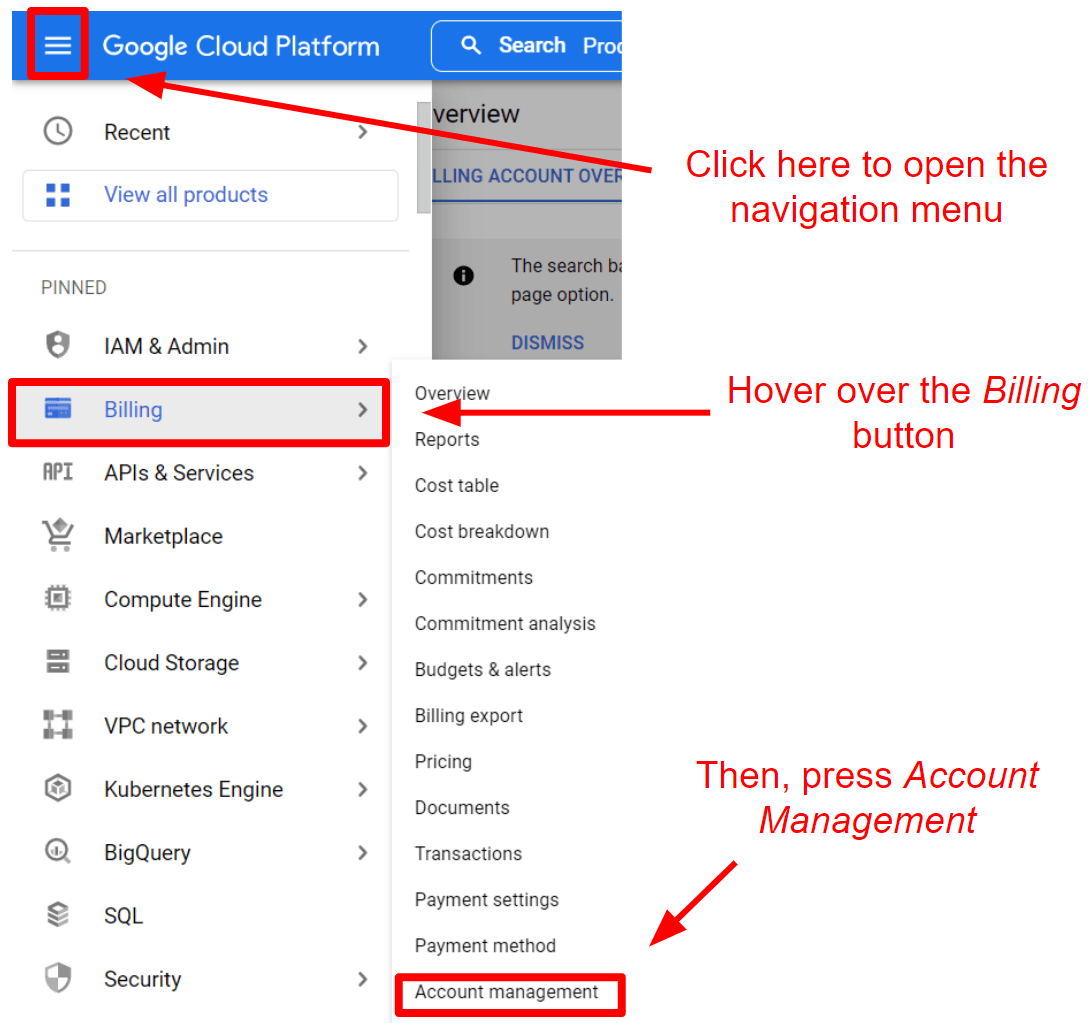
Google Cloud’s sheer number of options makes the menu more difficult to navigate
To disable billing, open the navigation menu by clicking the three-line icon in the top left. Then, hover over Billing. This will open a sub-menu – choose Account Management to continue.
This will disable billing for all resources in your Google Cloud project
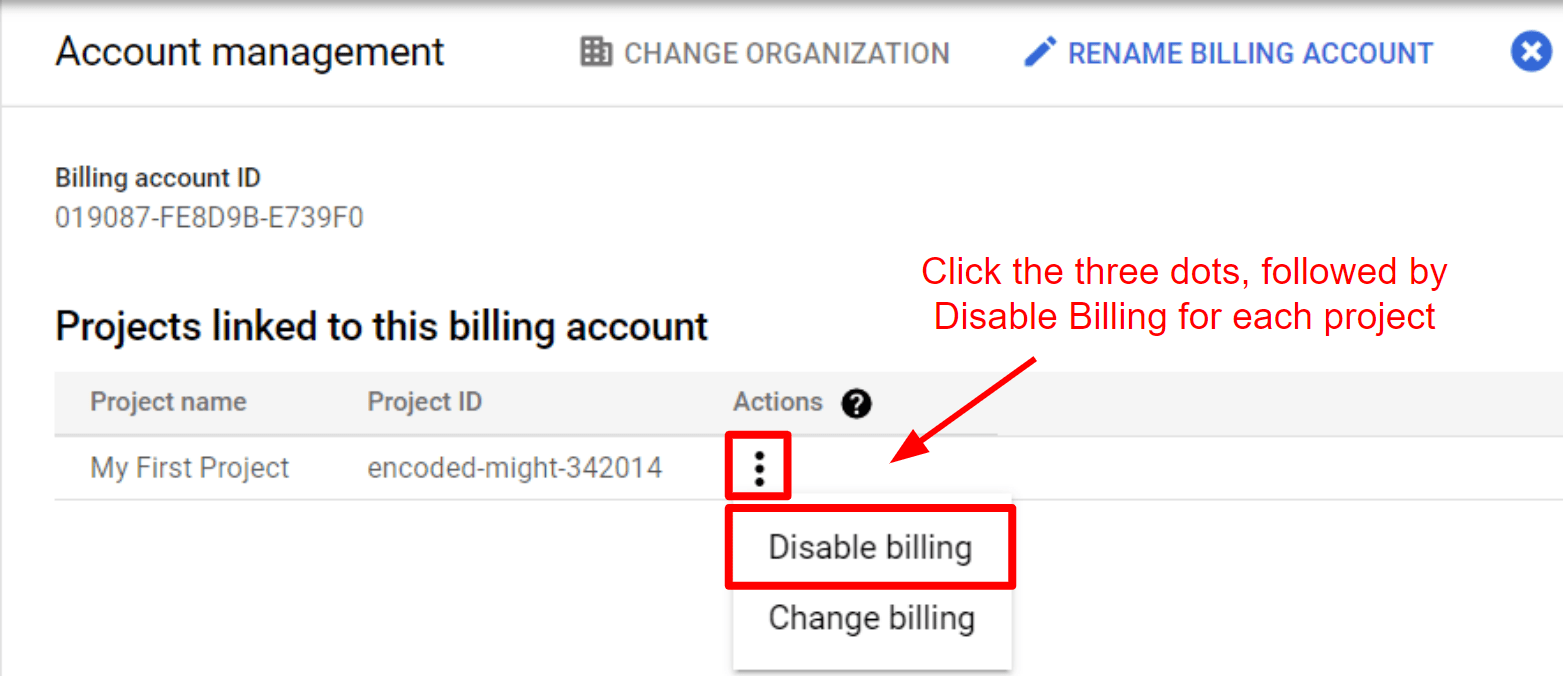
On this page, you’ll be able to disable billing for any associated projects on the current billing account. You should do this for every active project tied to the account.
To stop billing for a project, click the three dots next to the project, followed by Disable billing. This will impact any active resources, stopping any billable services. Any unbilled charges will be added to your account.
Your project will be backed up and available to be restored for 30 days. After that time period, it will be deleted permanently.
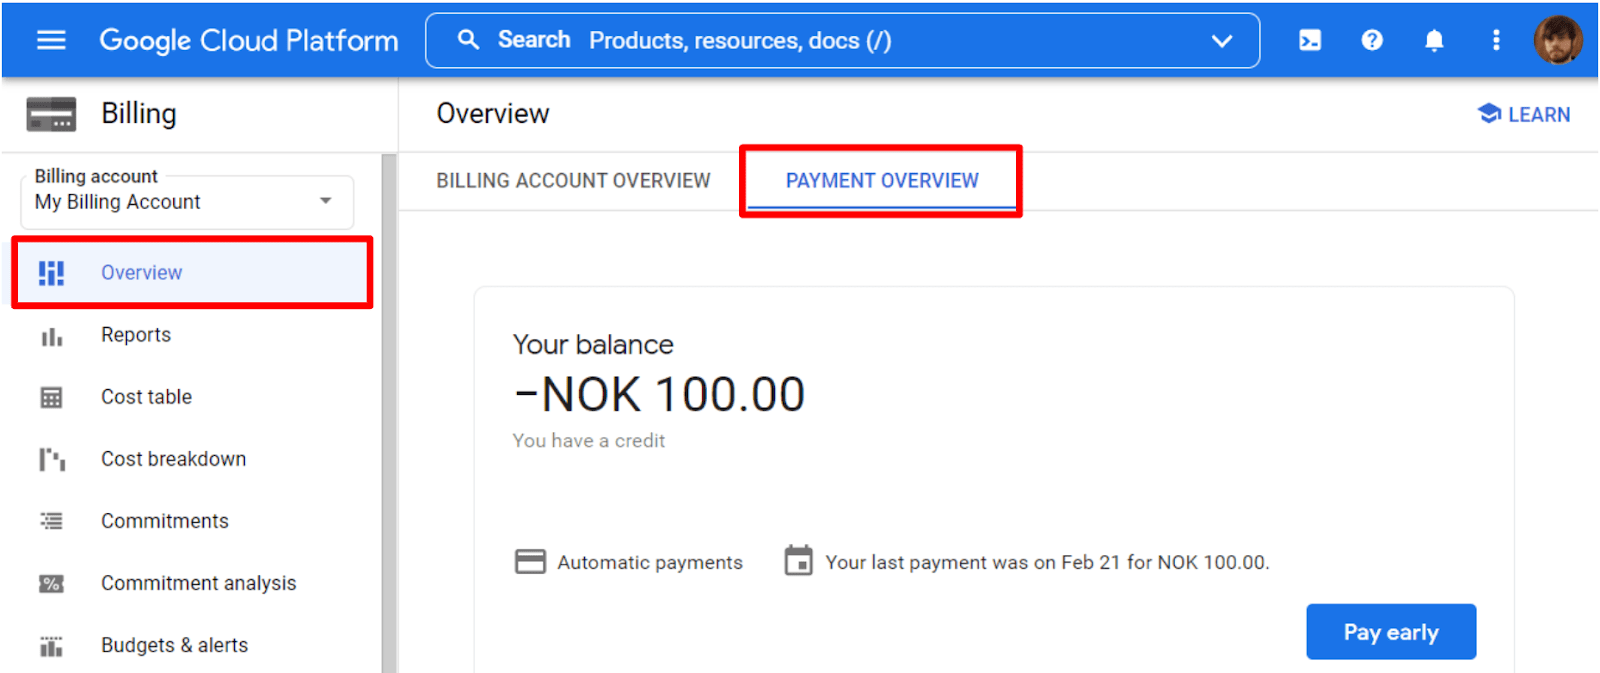
My Google Cloud balance was hidden away – it wasn’t easy to find3. Request a refund for any unused balance (optional). If you wish to refund any unused Google Cloud balance, you should do this before continuing.
You can confirm whether you have any remaining balance with Google Cloud by hovering over Billing in the navigation menu once more, then clicking Overview. Once here, click Payment Overview near the top of the page.
If you have no balance with Google Cloud, you can freely begin the account closure process. Feel free to skip ahead to learn how. However, I did have some balance with Google Cloud that I would’ve liked refunded.
According to Google Cloud’s own documentation, I should have been able to see a Request a refund button on this very same page. I would simply have been able to click it and confirm the payment method for my refund.
However, that wasn’t the case for me, as the button was nowhere to be seen. There are some factors that may prevent you from qualifying for a refund, such as improper permissions or an outstanding payment. However, I confirmed that I had the correct privileges with no bills due. I had to contact support to get to the bottom of the issue.
Google Cloud’s bot was just a waste of time
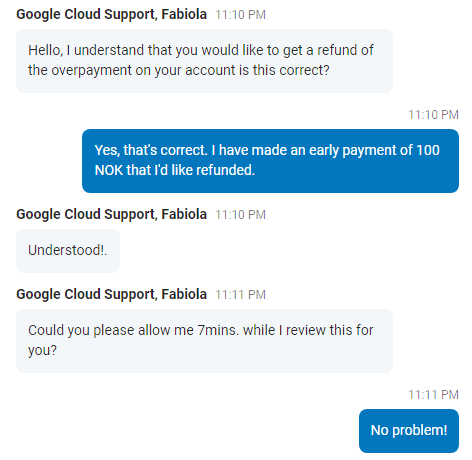
I tried Google Cloud’s live chat. I first had to deal with a bot. It attempted to send me documentation, but none of it was remotely relevant to what I was looking for – so I had to keep clicking “This didn’t help” until I was finally able to speak with a human support agent.
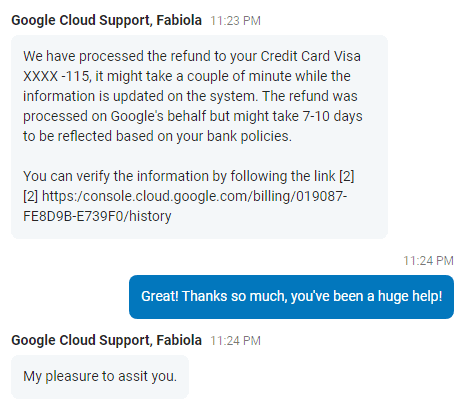
The Google Cloud support agent was eager to help
Thankfully, the support agent jumped in to solve my issue immediately.
I received my refund from Google Cloud after a few minutesAfter a few minutes, my refund was fully processed. Other than the irritating support bot, I was very happy with my support experience. Of course, it would’ve been ideal if the Request a Refund button appeared in the first place – but I’ll take what I can get.
4. Close your account. With my refund sorted, I was able to begin closing my account. Thankfully, the entire process was quick and easy.
You’re almost done – two more clicks to cancel
To begin account closure, enter the Account Management page once more. Click the Close Billing Account button at the top-right to begin account closure.
In some cases, this button may not appear. Again, you won’t be told why, but this is usually due to a lack of permissions, outstanding bills, or outdated payment information. After resolving these issues, the button should appear. If not, you’ll need to contact support.
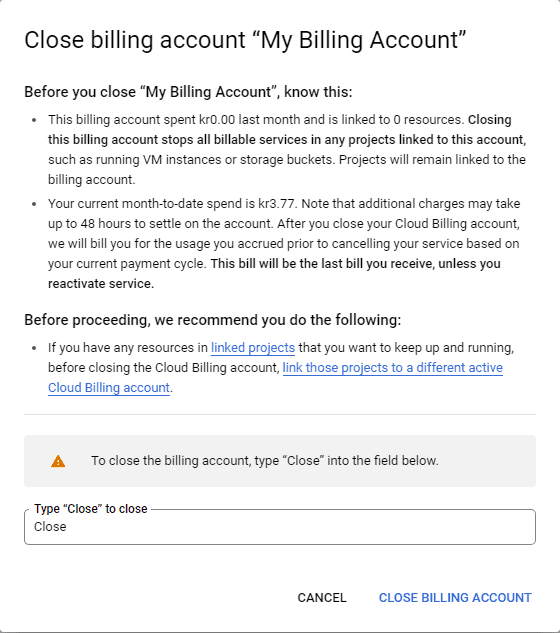
Ensure you confirm the cost of your final bill for Google Cloud
You’ll see a summary of your total expenditure in the last month and whether the billing account is still linked to any active resources. It also warns that you will receive a final bill for the resources used from your last bill to the cancellation date. Finally, it will state again that any resources linked to this billing account will be stopped.
Google Cloud will ask you to type “Close” to confirm. Once done, hit Close Billing Account. With that, you’re done!
Keep in mind that you can reopen your account at any time. This is done on the same page as closing your account – there will now be a Reopen Account button where the Close Account button once was.
Unfortunately, there’s no way to fully delete your account. While a closed account cannot accrue charges, your account will remain accessible with the same sign-in credentials.
3 Best Google Cloud Alternatives for Cloud Hosting
If you want to give another cloud host a try, I’ve tested each of the alternatives below and found them to excel where Google Cloud falls short.
Kamatera is a highly customizable cloud hosting platform. You can build a virtual instance from the ground up, setting the exact resource capacities you need (or expect to need). This is similar to Google Cloud’s own custom virtual machines. However, Kamatera’s platform is much easier to use.
In addition, Kamatera only offers simple on-demand billing. With Google Cloud, you’re encouraged to commit to three years of hosting and use your resources 100% of the time to get the best price. Kamatera doesn’t require you to fulfill any restrictive conditions to get a good deal.
If you’re looking for an easier cloud platform to work with, I’d recommend Liquid Web. All of Liquid Web’s cloud VPSs are core-managed by default, meaning many aspects of server administration will be handled for you. You also get an impressive 100% uptime guarantee, which far exceeds Google Cloud’s rather disappointing 99.5%.
Even better, you’ll get rapid technical support whenever you need it, as support response times are also protected by a guarantee. If you’re ever left waiting for more than a minute for a response from live chat, you could be due compensation.
InterServer is a solid option if you’re looking to save money. InterServer’s cloud VPSs give you better value than Google Cloud’s, offering comparable CPU and RAM levels for lower prices.
Once you reach a certain level of resources, you even get free managed support. It’s not nearly as extensive as Liquid Web, only offering repair services in the case of severe issues. Still, it’s nice to have that to fall back on during an emergency.
A Few UI Issues Saved By Great Billing Support
Google Cloud’s console could use some work – it’s not always easy to navigate. That said, with the help of support, I did manage to close my account and get a full refund without too much trouble.
I shouldn’t have had to contact support to close my account initially. Moving forward, I hope Google Cloud will introduce a more organized and user-friendly dashboard.
FAQ
How do I stop automatic payments on Google Cloud?
To do this, you’ll need to disable billing for any active projects tied to your account. You can then choose to close your account if you wish. Follow my step-by-step guide to learn how. If you’re looking for alternatives with a simpler billing structure, check out our list of the top-rated web hosts for 2025.
Why am I being charged for Google Cloud?
You likely have active resources attached to your billing account, such as virtual machines or storage solutions. To disable billing and/or close your account, read our quick tutorial. If you’d like guidance on building a website on a more user-friendly platform, check out our detailed guide to launching a new website.
How do I remove my credit card details from the Google Cloud Platform?
To delete a payment method, hover over Billing in the leftmost menu of the Google Cloud console. Then, select Payment method. Locate the card details you’d like to delete, then click Remove. If this payment method is the only one tied to your account, you will not be able to delete it. In that case, you’ll simply need to close your account.
How do I cancel the Google Cloud trial?
To cancel your Google Cloud trial, you’ll have to disable billing for any projects you may have created first. This is because these projects will be using up your free trial credits, which may result in a charge if left unchecked. My detailed guide covers exactly how to do this. Once done, you can freely close your billing account.
Ryan Jones is a former writer at Website Planet who has been professionally reviewing web hosts and credit card processors for 2+ years. Before joining Website Planet, Ryan Jones was a freelance content writer with experience in several industries, from gaming to pet care. In addition to his work with Website Planet, he also reviews VPNs along with his colleagues at vpnMentor.com. When he isn’t writing, you can usually find him keeping up to date with the latest tech news or playing video games.
Thank you, - your comment was submitted successfully!
We check all user comments within 48 hours to make sure they are from real people like you. We're glad you found this article useful - we would appreciate it if you let more people know about it.
Share this blog post with friends and co-workers right now:
Thank you, , your comment was submitted successfully!
We check all comments within 48 hours to make sure they're from real users like you. In the meantime, you can share your comment with others to let more people know what you think.
Thank you for signing up!
Once a month you will receive interesting, insightful tips, tricks, and advice to improve your website performance and reach your digital marketing goals!