We rank vendors based on rigorous testing and research, but also take into account your feedback and our commercial agreements with providers. This page contains affiliate links. Advertising Disclosure
US$
We rank vendors based on rigorous testing and research, but also take into account your feedback and our commercial agreements with providers. This page contains affiliate links. Advertising Disclosure
Food blogging is an exciting and rewarding hobby, which can potentially lead to a full-time career. Many entrepreneurial food bloggers have been able to grow their food blog into a media empire,all the while inspiring many avid foodies with delicious recipes, insider dining recommendations, and expert culinary tips along the way. When it comes to food blogging, there are just so many opportunities – and you don’t need to be a professional writer or photographer, website designer, or classically trained chef to start!No matter in which direction you want to go, the first step is to publish your own food blog website. And as someone who’s been able to launch several successful blogs, I’m here to help. This guide explains how you can start your food blog (today) in 5 easy steps – from market research to publishing and monetizing your website. Plus, I’ll cover some useful tools and features (including AI) you can use to create a thriving food blog with zero experience.
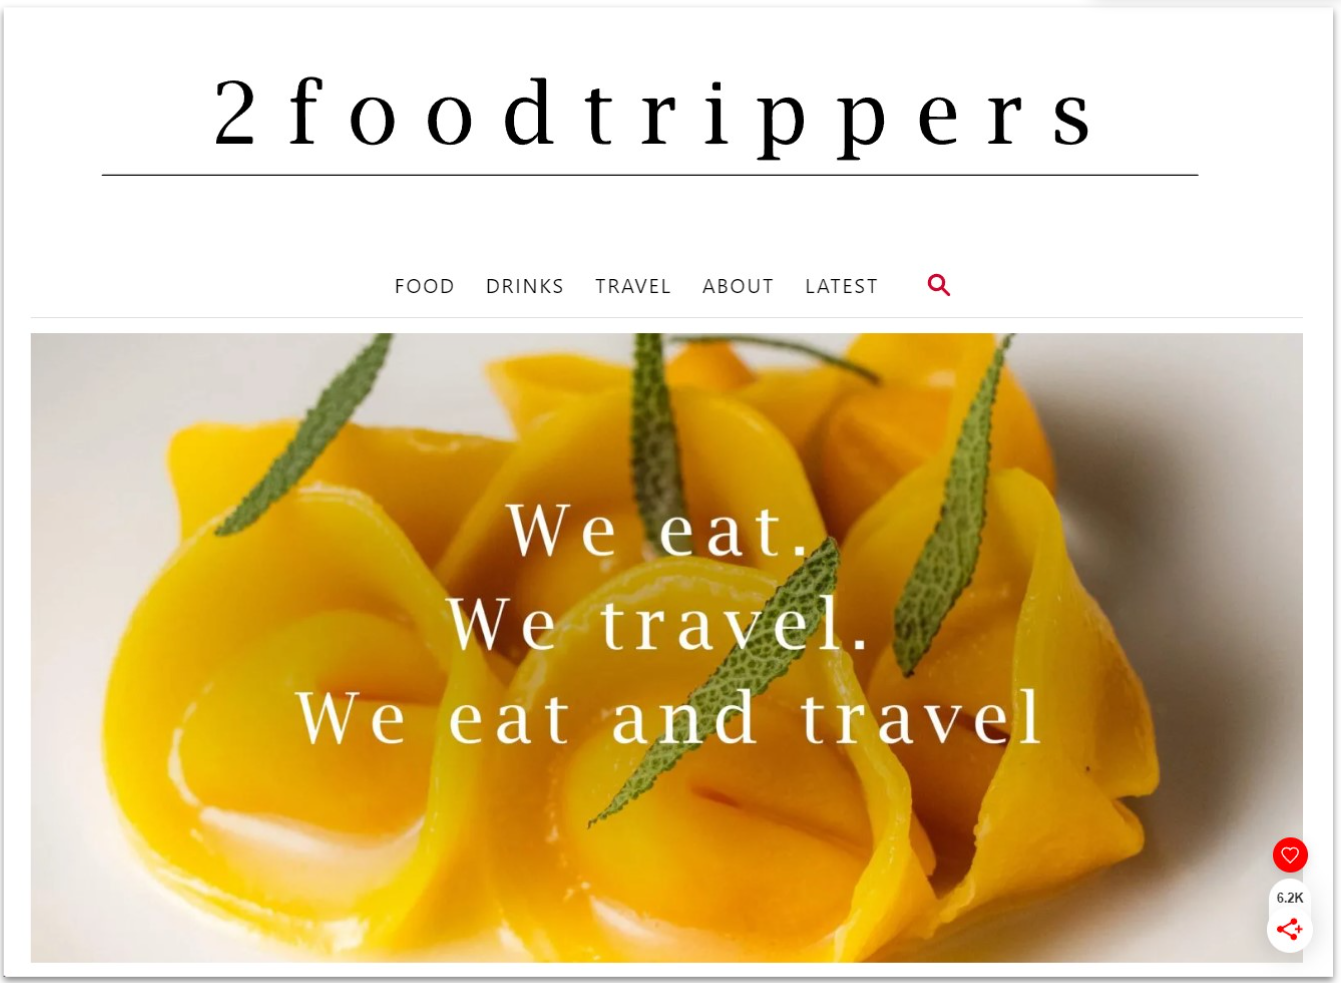
Branding is an important aspect of your food blog and what sets it apart from the competition. Because food blogging is such a broad industry, it’s important to establish your niche market to attract a unique segment of devoted readers. Take the time to finalize your niche and branding before proceeding with anything else. Luckily, you can now use a number of AI tools to help you do just this.2foodtrippers share their travels and food experiences with readersFood blogging is as diverse as global cuisine. From food travel blogging to restaurant reviews and cooking tips and recipes, there are a ton of different niches you can dive into. Additionally, there are sub-niches within each group, ranging from regional eats to diet restrictions and allergies.For example, you could focus on:
Gluten-free recipes
Beginner-friendly cooking techniques
Dining out recommendations in your hometown
International cuisines you enjoy while traveling
Cooking hacks for busy moms or professionals
Nutritional recipes for health, weight loss, or building muscle
Entertaining guides, including festive recipes and decor tips
Indulgent desserts
Plus, a whole host of other topics
Before you create your website and brand, you should have a very clear idea of the niche you plan to focus on. It will largely affect everything from your branding to your blog’s name.Most food bloggers choose a niche they’re passionate and knowledgeable about. However, I’d suggest finding a unique or untapped angle that no one else is doing. A good place to start is by doing competitor research, such as looking up food bloggers in your chosen niche. See what they’re doing right (and wrong) and what you could do better or differently.
Food Blog Branding
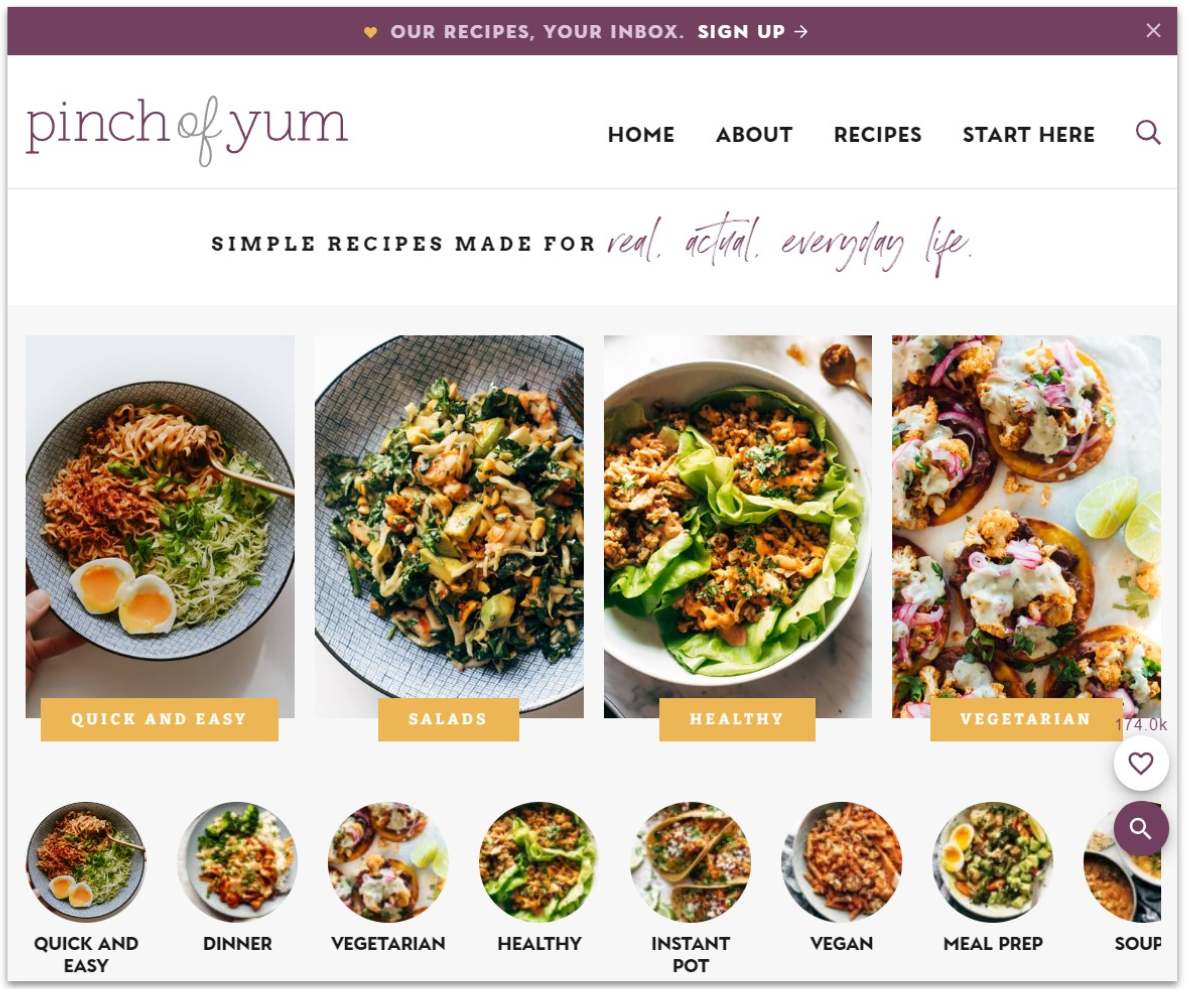
Pinch of Yum’s logo, brand colors, and fonts are clearly defined and recognizableYour food blog should have a cohesive brand. A logo and consistent colors, fonts, and stylistic elements form a part of this and you should incorporate this into your food blog. You can create a branding style guide yourself or request a designer do this for you. If you have a limited budget or lack free time, you don’t have to go all out, either. You just need to stick to the basics:
A logo. You can hire a graphic designer, create it yourself, or use an AI logo generator. Logos can use stylized text, an image, or a mix of both. However, it doesn’t need to be fancy at the start – just on-brand and recognizable.
Fonts. Select 2-3 fonts, including a unique font that can serve as an “accent” (this can also be the font you choose for your logo) and a simple, easy-to-read one. Keeping to a few select fonts throughout your blog will reinforce your branding.
Brand colors. Choose 3-10 color tones, ranging from bright to muted. You should have a palette of complementary shades that are suitable for use on dark, light, and neutral backgrounds. Bonus points if they feature in your logo!
Icons (optional). Icons are a fun way to inject uniqueness into a site and maintain consistent branding. They can be as simple as a clipart-style heart or as complex as a custom-designed set created by an illustrator. Some brands even use the illustration in their logo as an icon.
Step 2: Secure A Domain Name
A domain name forms the main part of your website URL (for example, yourawesomefoodblog.com), which readers will use to access your site. Adomain name that matches your blog’s name is a must for your website. Ideally, as soon as you’ve decided on a blog name, you should secure a domain to ensure no one else snaps it up. However, don’t get disheartened if the .com extension isn’t available – you might have better luck trying a different domain extension (.net, .co, .us,). Domain name generator tools (often available on domain registrar sites) can also help you brainstorm alternate ideas.You can secure a domain name with a domain registrar like Domain.com or Namecheap.com. However, some website hosting packages also include a free domain name. For example, Hostinger’s shared and WordPress hosting plans come with a free domain for your first year. It might be a good idea to get your domain and hosting at the same time to save money and keep things simple.
Step 3: Choose a Reliable Web Hosting Service
A domain name is simply your “online address” – you’ll also need web hosting to make your food blog available online. A web host “hosts” your website’s contents on its server, ensuring it’s available 24/7 for readers.Hosting may seem complex, but choosing the best host for your food blog boils down to a few important factors. To find a great host, here’s what you should be looking for:
Uptime. Uptime is the percentage of time your website stays online with the host. You don’t want your readers to never be able to access your food blog. A 99.9% – 100% uptime is ideal and a good host will offer you an uptime guarantee.
Speed. A loading time of 1-2 seconds or less is ideal to ensure readers don’t go looking for that recipe or review elsewhere. You’ll also want to choose a host with strategic data center and server locations (and a content delivery network) to ensure the best global performance.
Value. Not all hosting plans offer essentials like 1-click WordPress installs, professional email, and website backups unless you pay extra. Always compare before you sign up for a plan, as competitors may offer superior features and services for the same amount of money.
Support. When things go awry, you want to be with a host that supports and helps you. A friendly, responsive, easily contactable, knowledgeable support team is a must. But also pay attention to the level of support you get – do they just read from a manual or can they step in?
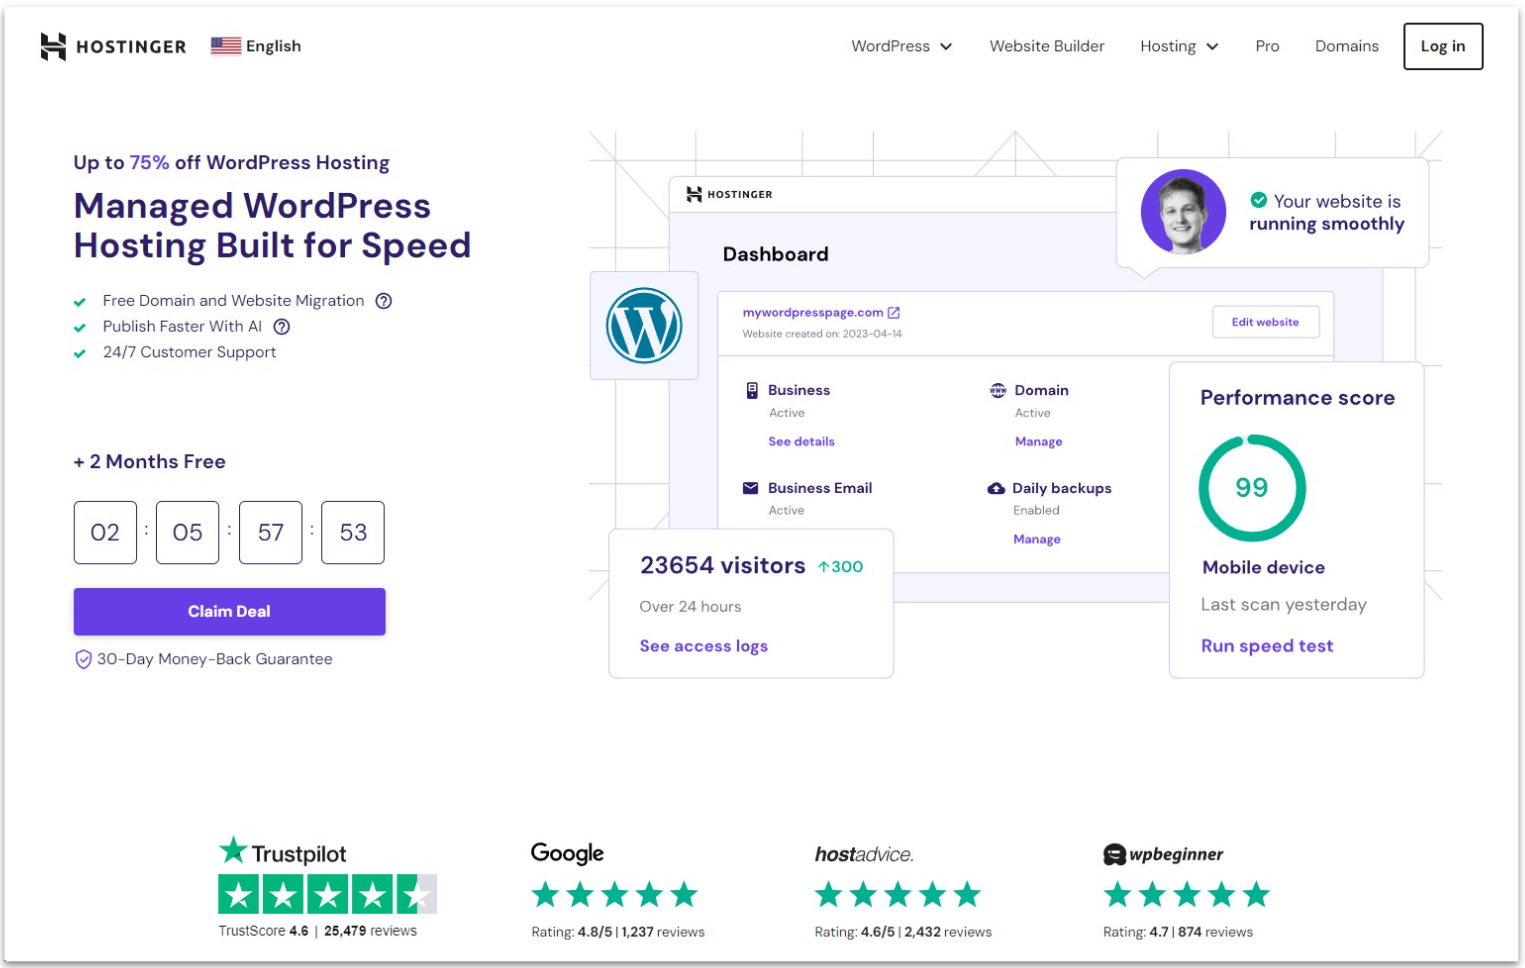
Hostinger offers both shared and WordPress hosting with 1-click WordPress installationWe’ve tested hundreds of web hosts based on the above criteria. Ultimately, Hostinger is our top choice. It offers excellent value for money and excellent uptime and loading speeds. With 1-click WordPress installations, a foolproof dashboard (hPanel), plenty of storage space (think 100 GB+), free domain name, free backups, and more, Hostinger definitely has a lot to offer your food blog.
Step 4: Install WordPress and Set Up Your Food Blog
Believe it or not, besides a domain name and hosting, you still need a platform to build your website. I know this sounds daunting but I did promise that you’d be able to set up a food blog in five easy steps. That’s why I recommend WordPress as the best option to create and run a website or blog.With WordPress, you can publish content and make changes to your blog without any coding skills. You can also add free and paid plugins to expand your blog’s capabilities.
Note: While they have the same name, they’re not quite the same thing. WordPress.com is a web building platform while the WordPress CMS (WordPress.org) is a free, open-source software that requires third-party hosting services like Hostinger.
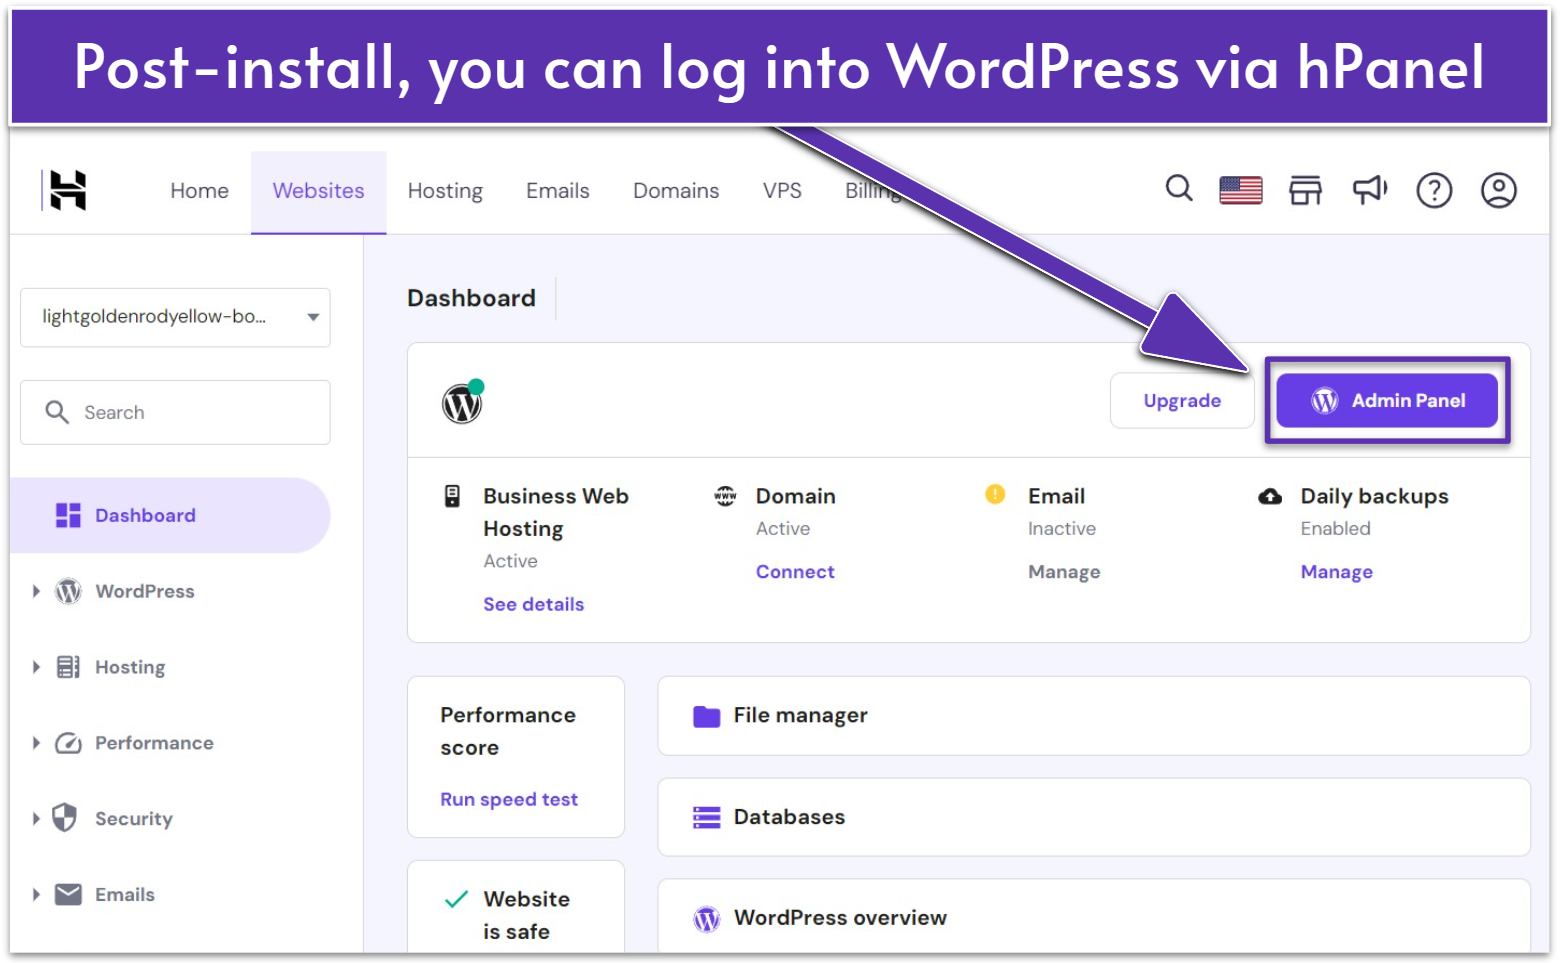
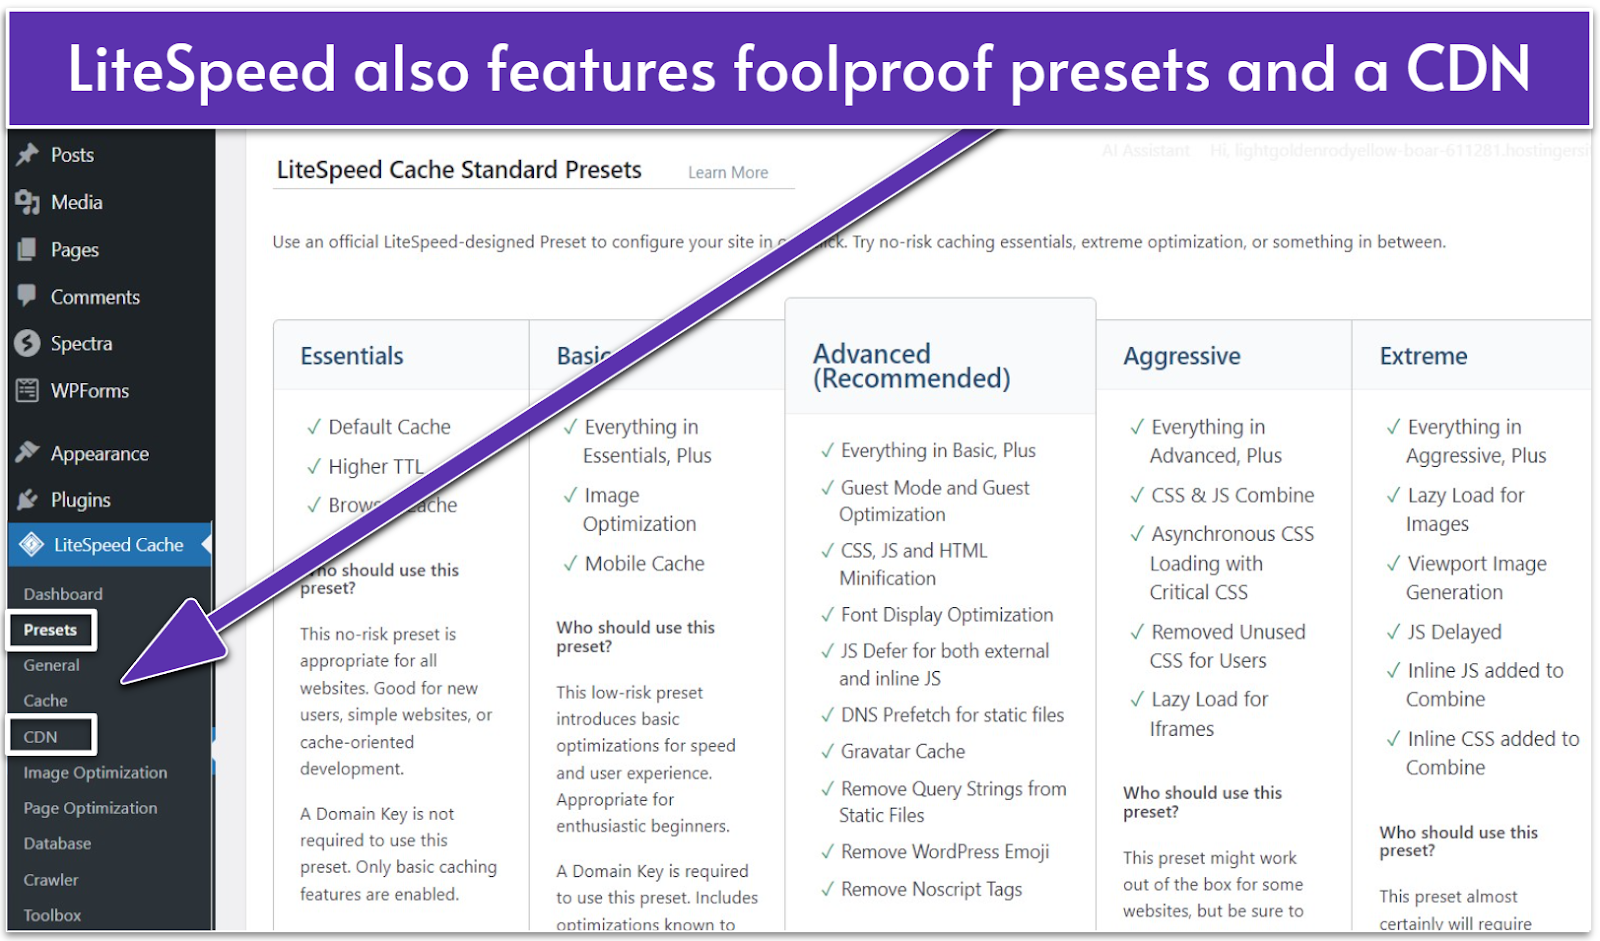
Most hosts offer pre-installed or 1-click WordPress installations and WordPress-specific tools and enhancements, and Hostinger is no exception. While I’ll be guiding you on how to install WordPress on Hostinger, bear in mind that not all hosts will offer this level of user-friendliness.You just have to click one button to get started installing WordPressYou’ll need to log into your Hostinger dashboard and select the Home tab to start. Then, click on the Create a website with AI button to install WordPress. You can choose between installing WordPress or Hostinger’s proprietary website builder.After the WordPress installation is complete, you can access your WordPress dashboard from hPanel. You just need to navigate to your Websites tab and click the W Admin Panel button.Passwordless WordPress login is available via hPanelHostinger even activates the LiteSpeed cache for you automatically. However, you’ll need to activate the LiteSpeed CDN – luckily, you can do so via the LiteSpeed Cache section found in WordPress’ left-hand menu. Here, you can also easily change your pre-configured LiteSpeed settings by selecting various presets. Activating LiteSpeed Cache and CDN will improve your blog’s loading time.Hostinger’s LiteSpeed menu in the WordPress Admin Panel makes cache management ridiculously easy
Choose a WordPress Builder and Theme
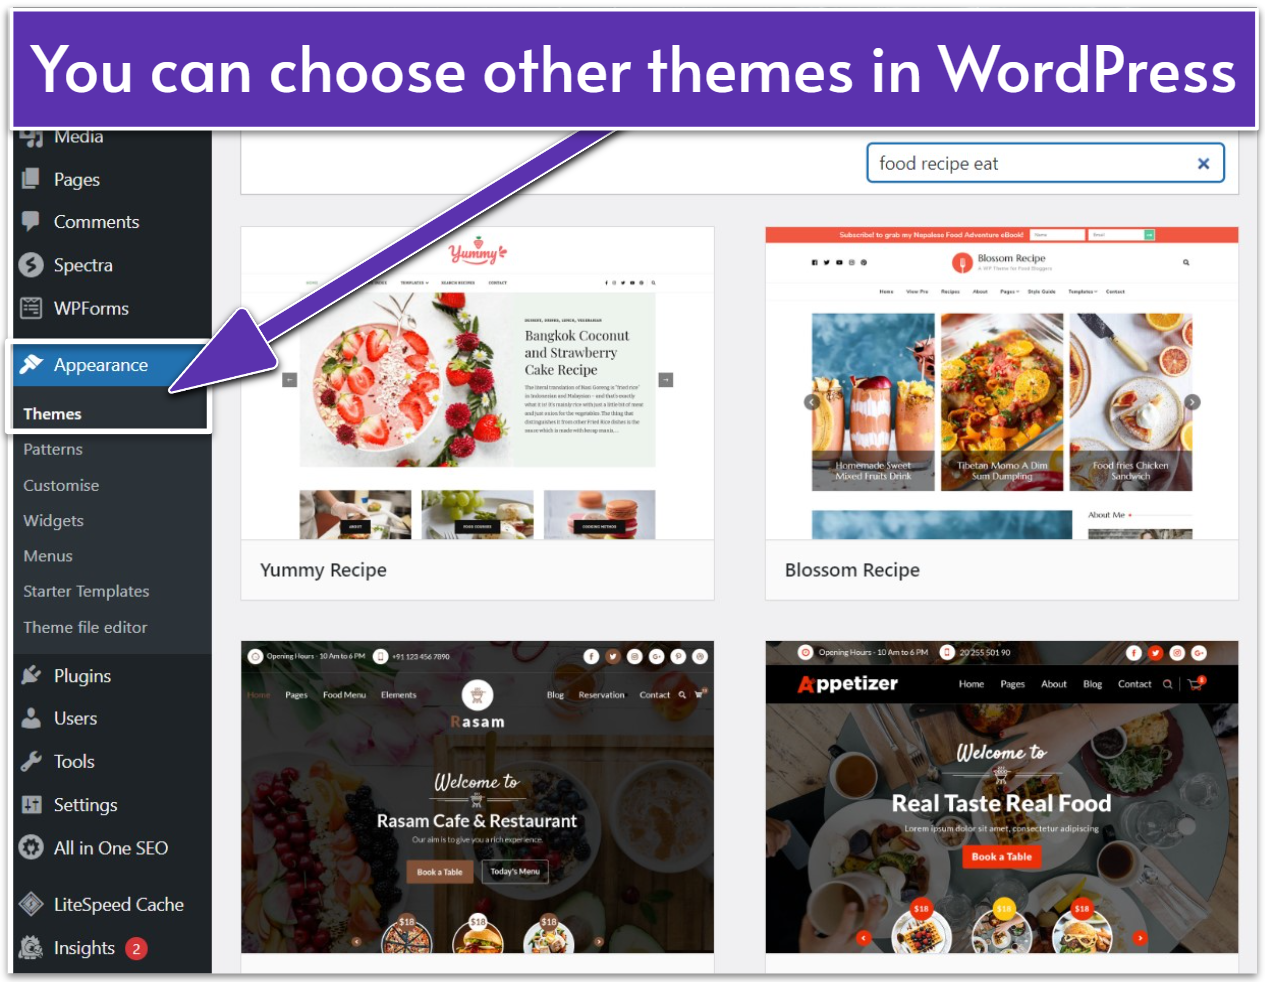
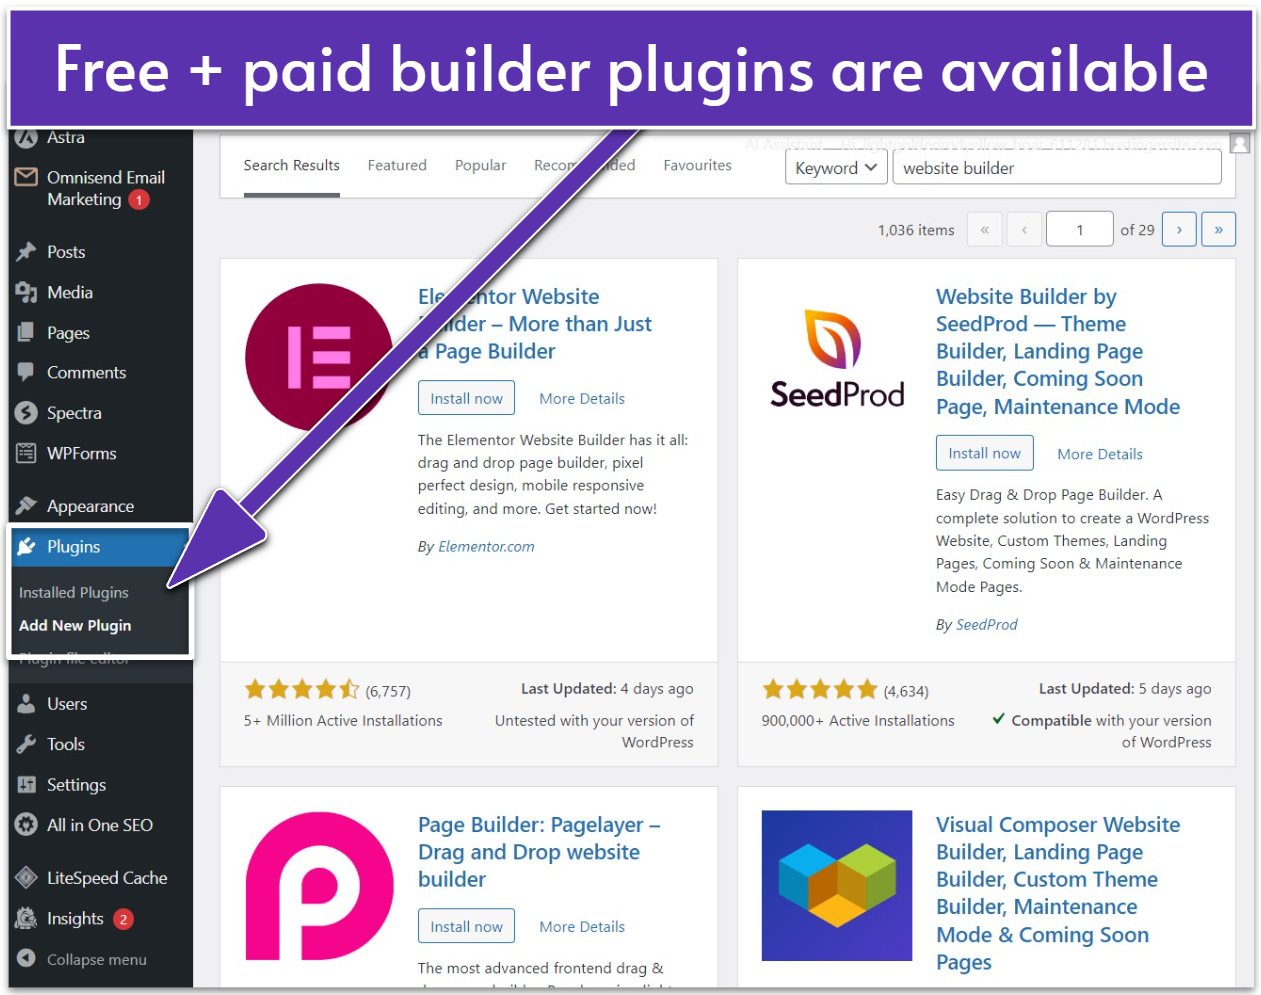
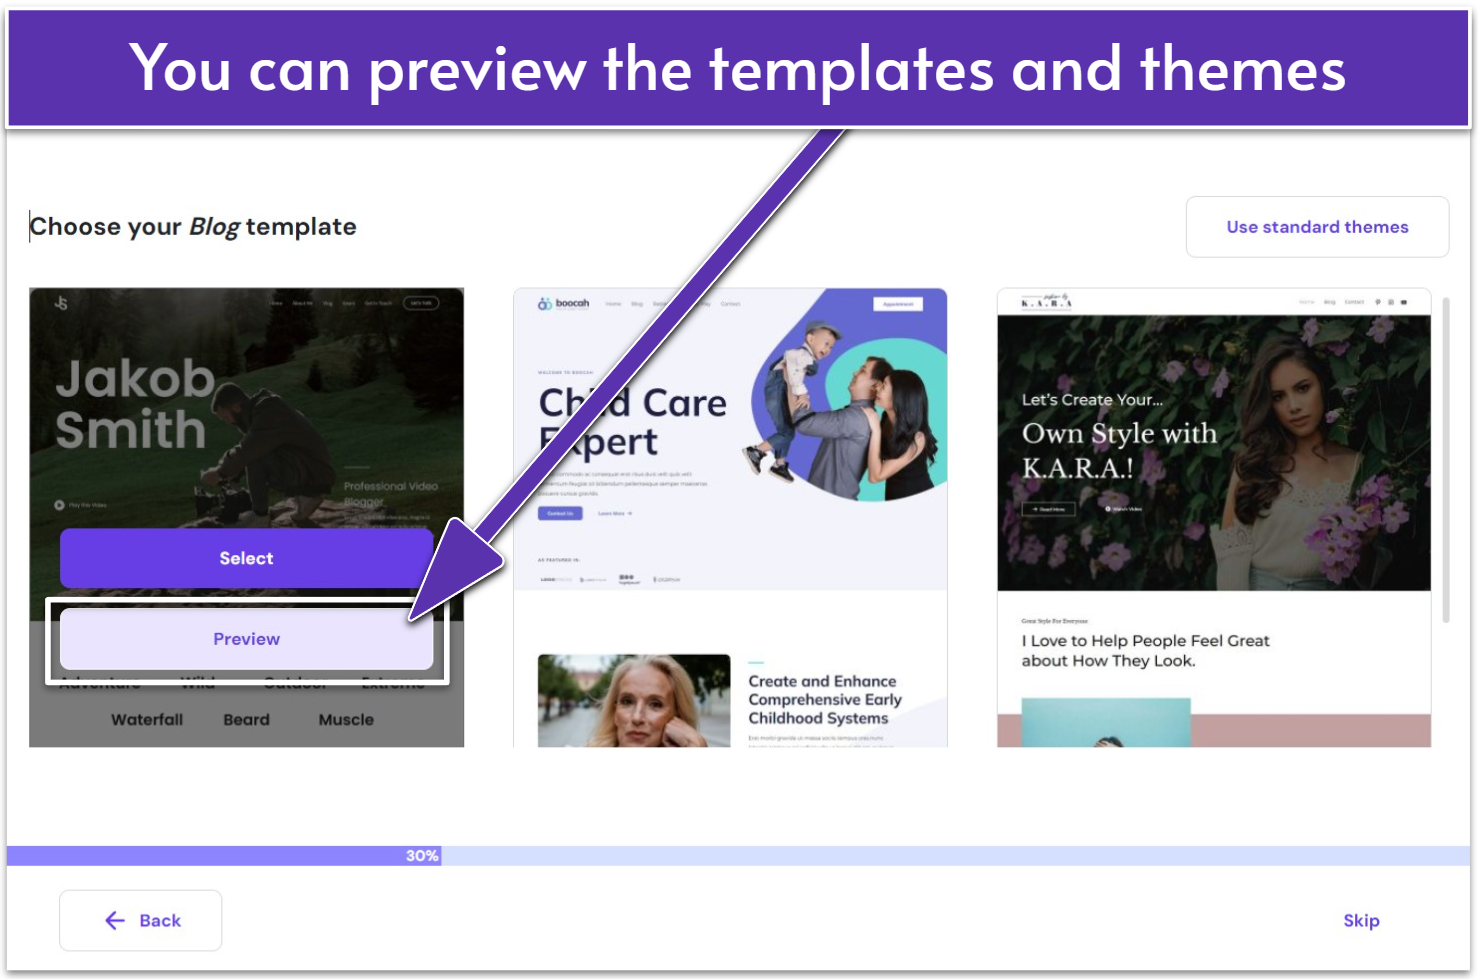
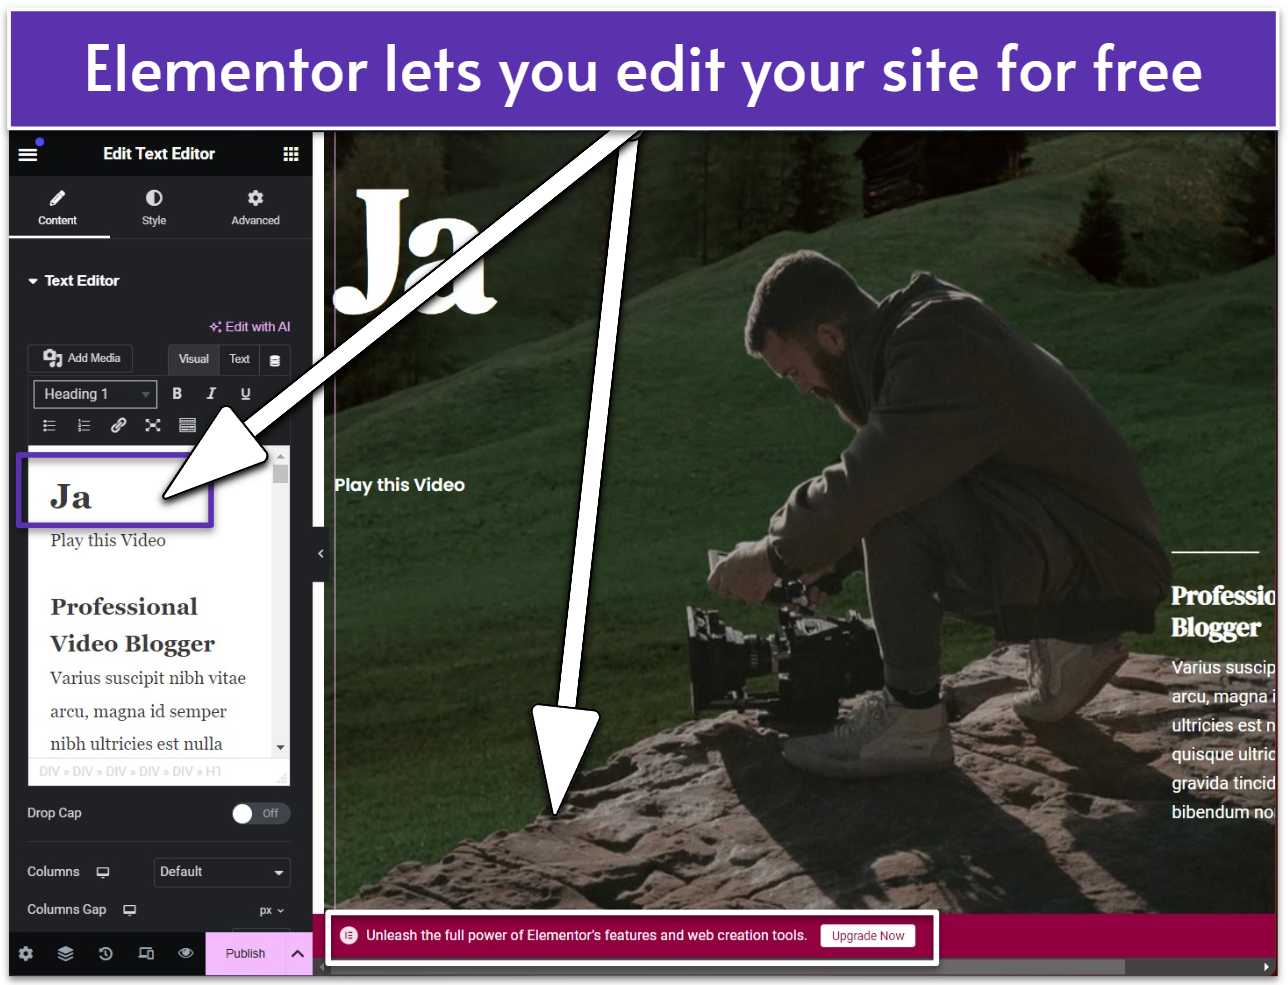
During the WordPress setup, Hostinger will prompt you to choose a WordPress theme or a pre-built website template. The templates fall into a small selection of categories (blog, online store, portfolio, etc.) but based on popular themes so they’re modern and clean.For my food blog, I chose the single-page Jakob Smith template from Hostinger’s Blog category as I liked the overall layout. When selecting a theme or template, bear in mind that you can change the images, fonts, and colors so I suggest selecting a theme based on the layout and not the visuals.You can also share information about your website’s purpose at this point, though this does nothing to modify its design. Don’t worry too much about the theme or template you choose, either. You can always change it later by navigating to the Appearance menu and choosing Themes.WordPress has a lot of themes available for food blogsWordPress has its own basic website editor but it does come with a bit of a learning curve. If you’re not sold on using the block editor, I recommend installing a more advanced (free or paid) website builder plugin. These can save you considerable time during the design process and you’ll be able to see your vision come to life with no coding experience required.You can check the rating and user reviews before installing the pluginAs far as WordPress website editors go, Elementor is one of the most popular. While its beginner-friendly drag-and-drop builder gives you a ton of design flexibility, Elementor is most notably recognized for its stunning themes. It can create websites that look just as good as any Wix or Squarespace site – but for free. Elementor does “paywall” some premium features (like Elementor AI), but you don’t necessarily need a subscription to create a food blog.
Consider These Other Useful (Free) Plugins
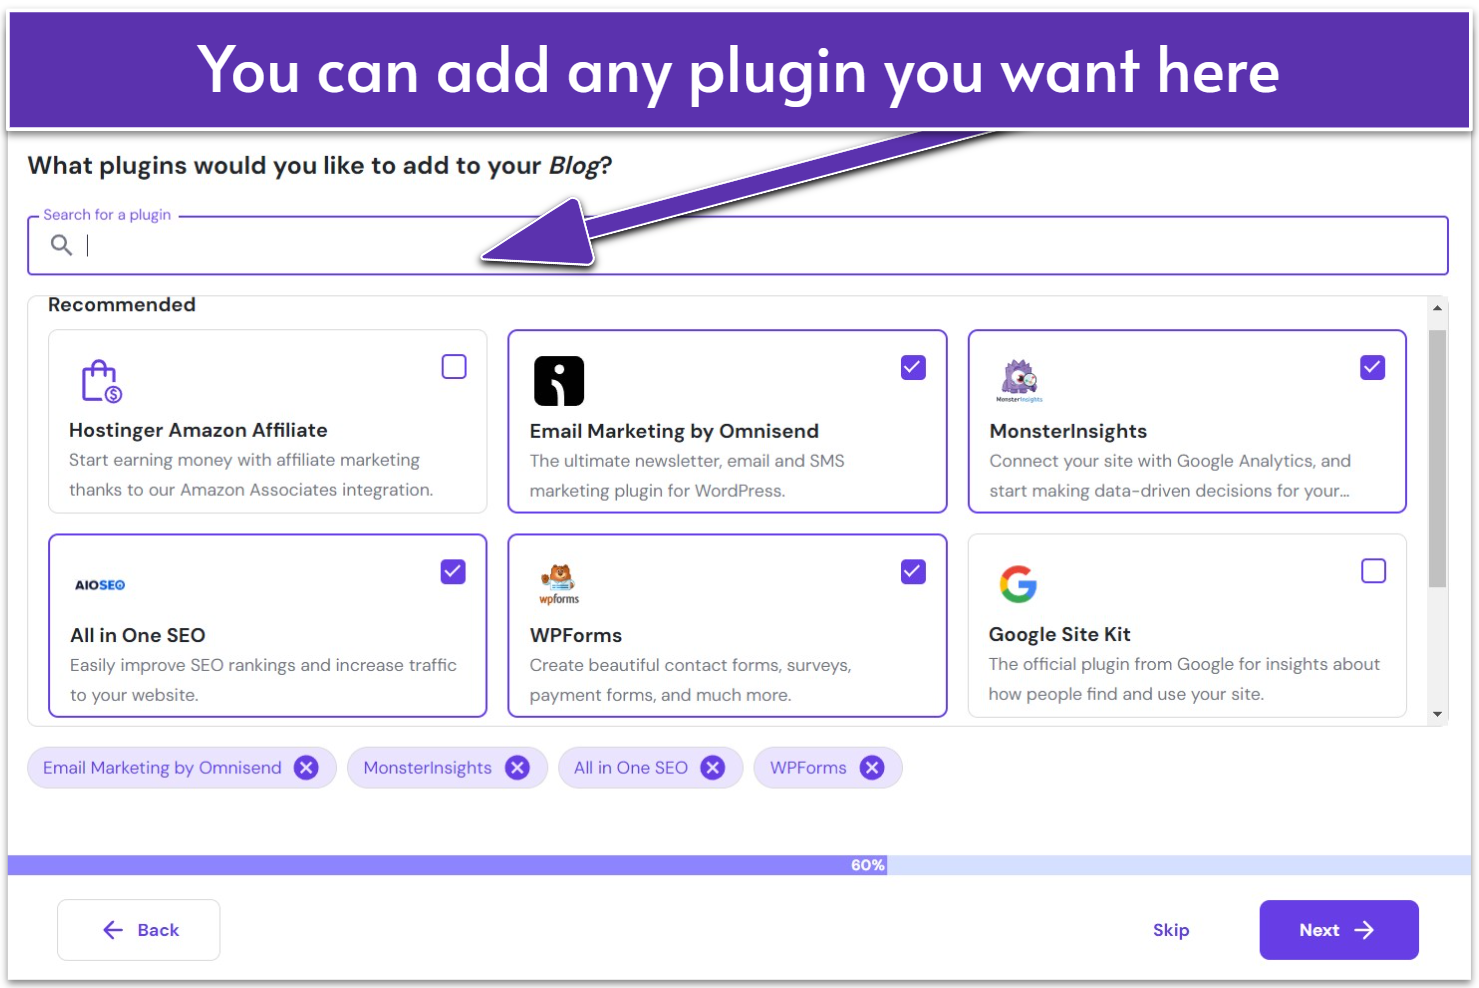
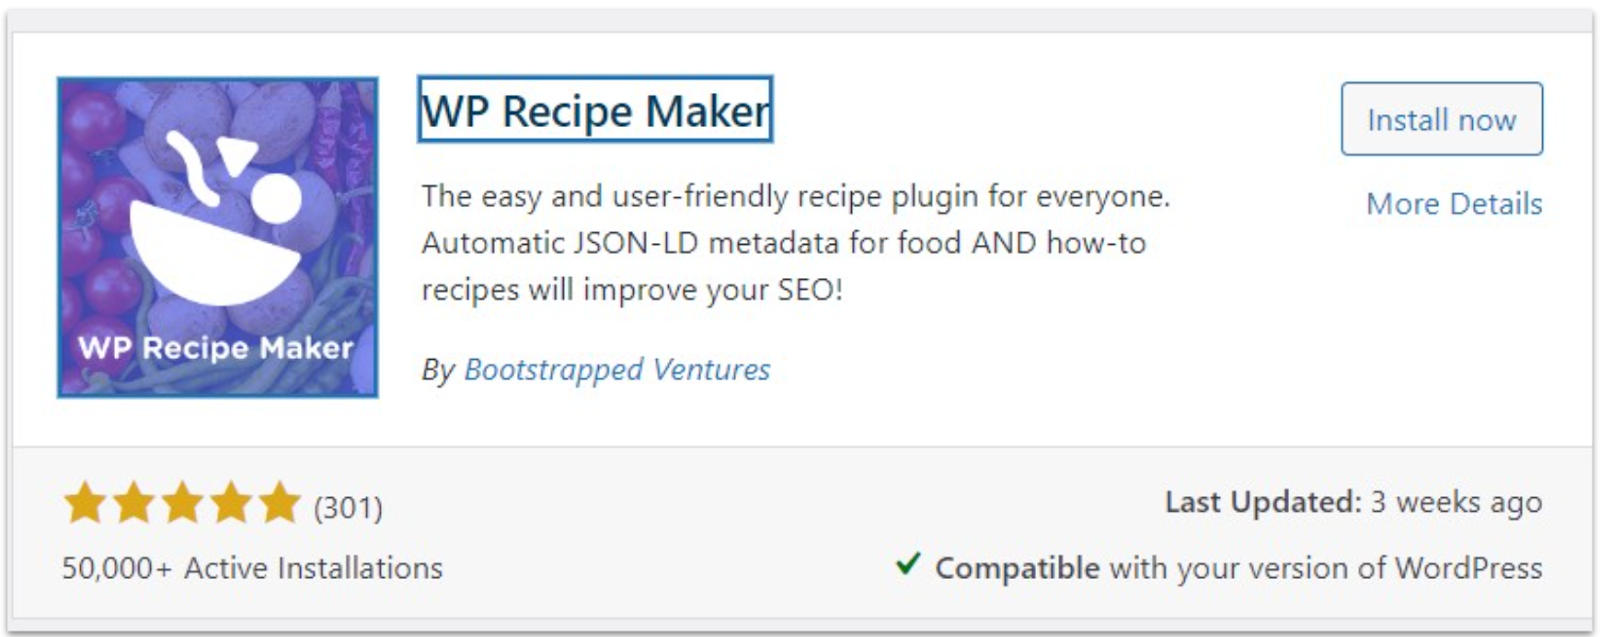
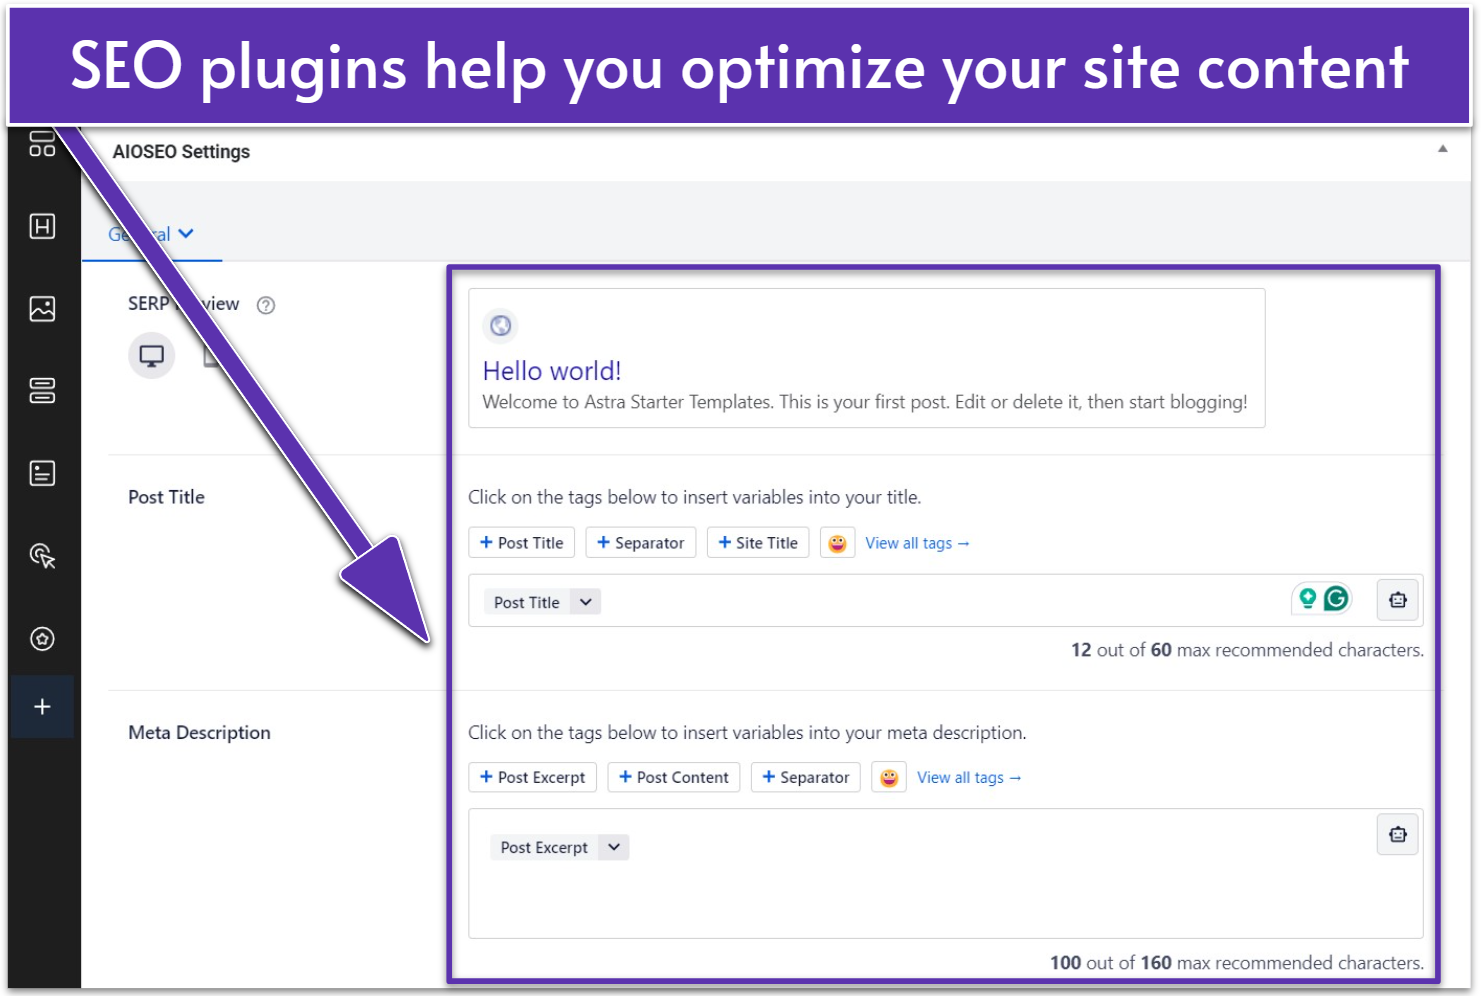
In addition to website builder plugins, WordPress has thousands of other plugins available, covering spam protection, SEO, web forms, analytics, and so much more. If you’re overwhelmed, Hostinger will suggest a few good plugins to install during the WordPress setup process. All selected plugins are pre-installed for you.Hostinger let me add any plugins I wantedRegularly updating your WordPress installation and using reputable plugins are just some of the things you should do to keep your blog secure. Hostinger’s plans come with free backups and security (firewalls, malware scans, DDoS protection, and more), but you can also install a security plugin like WordFence to manage all the above for you. Like many WordPress plugins, it has both a basic free tier and a paid tier with premium features.The WP Recipe Maker is highly rated by food bloggersI would be remiss not to recommend a recipe plugin. The highly rated WP Recipe Makeris compatible with a number of WordPress website builder plugins and editors, including Gutenberg and Elemetor. You can display a lot more than just a recipe – the plugin allows you to post nutritional info, photographs, and videos. Plus, you can monetize your recipe using the Shop with Instacart button.You don’t even need to know SEO to get your blog found – these plugins can teach youSEO is an important aspect of website publishing, improving your ranking and visibility on search engines like Google. Luckily, WordPress offers a number of indispensable SEO plugins – including AIOSEO (Hostinger-recommended) and Yoast SEO. With both free and paid tiers, you can try them out risk-free. The free versions cover important website optimizations like meta descriptions, keywording, linking, and content structure.
Set Up and Customize the Most Relevant Pages
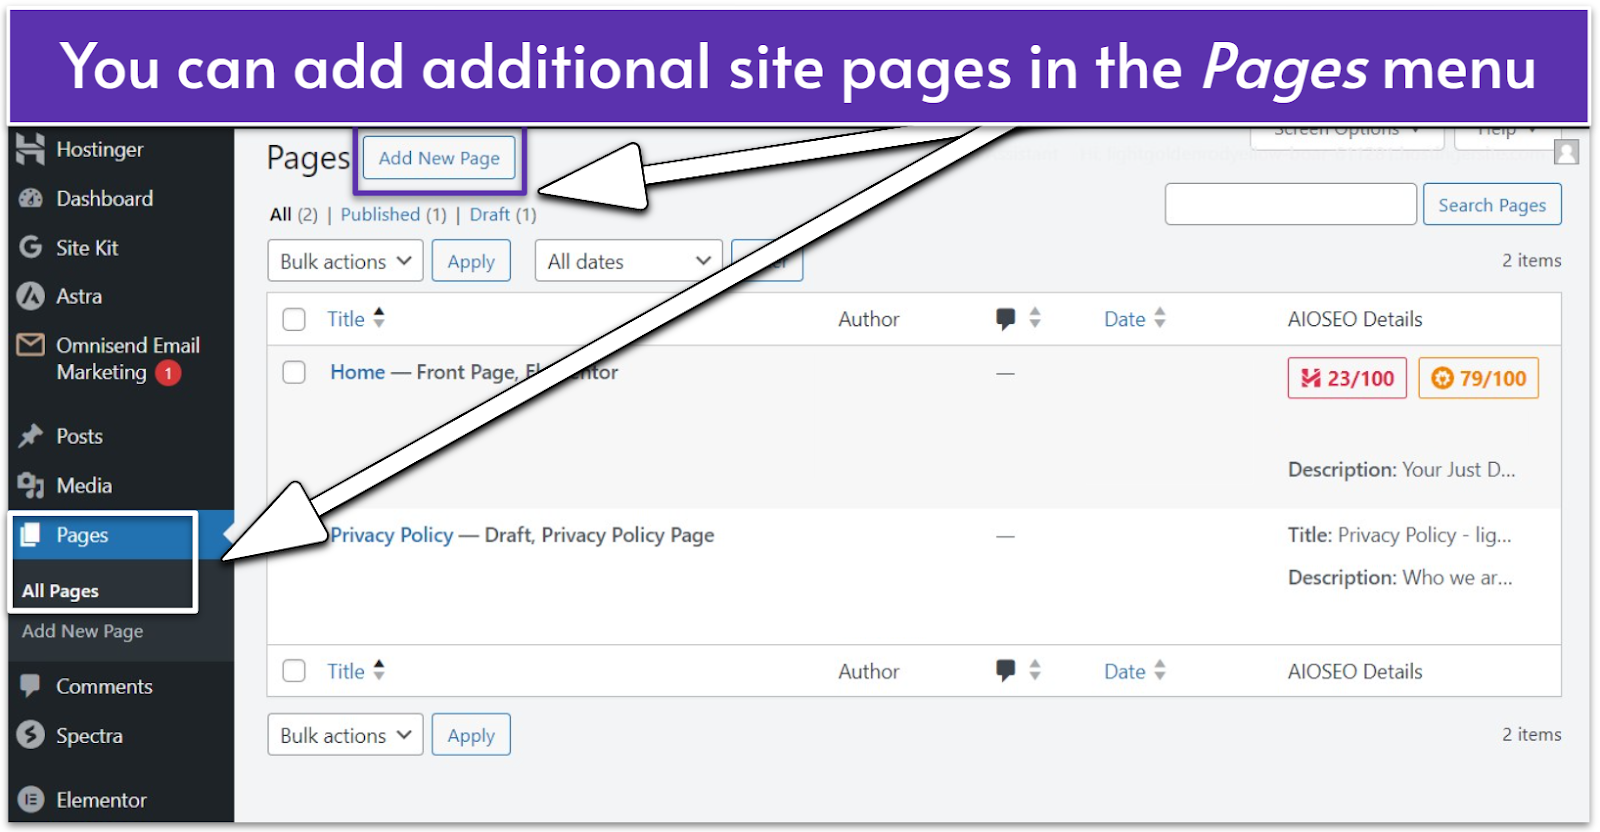
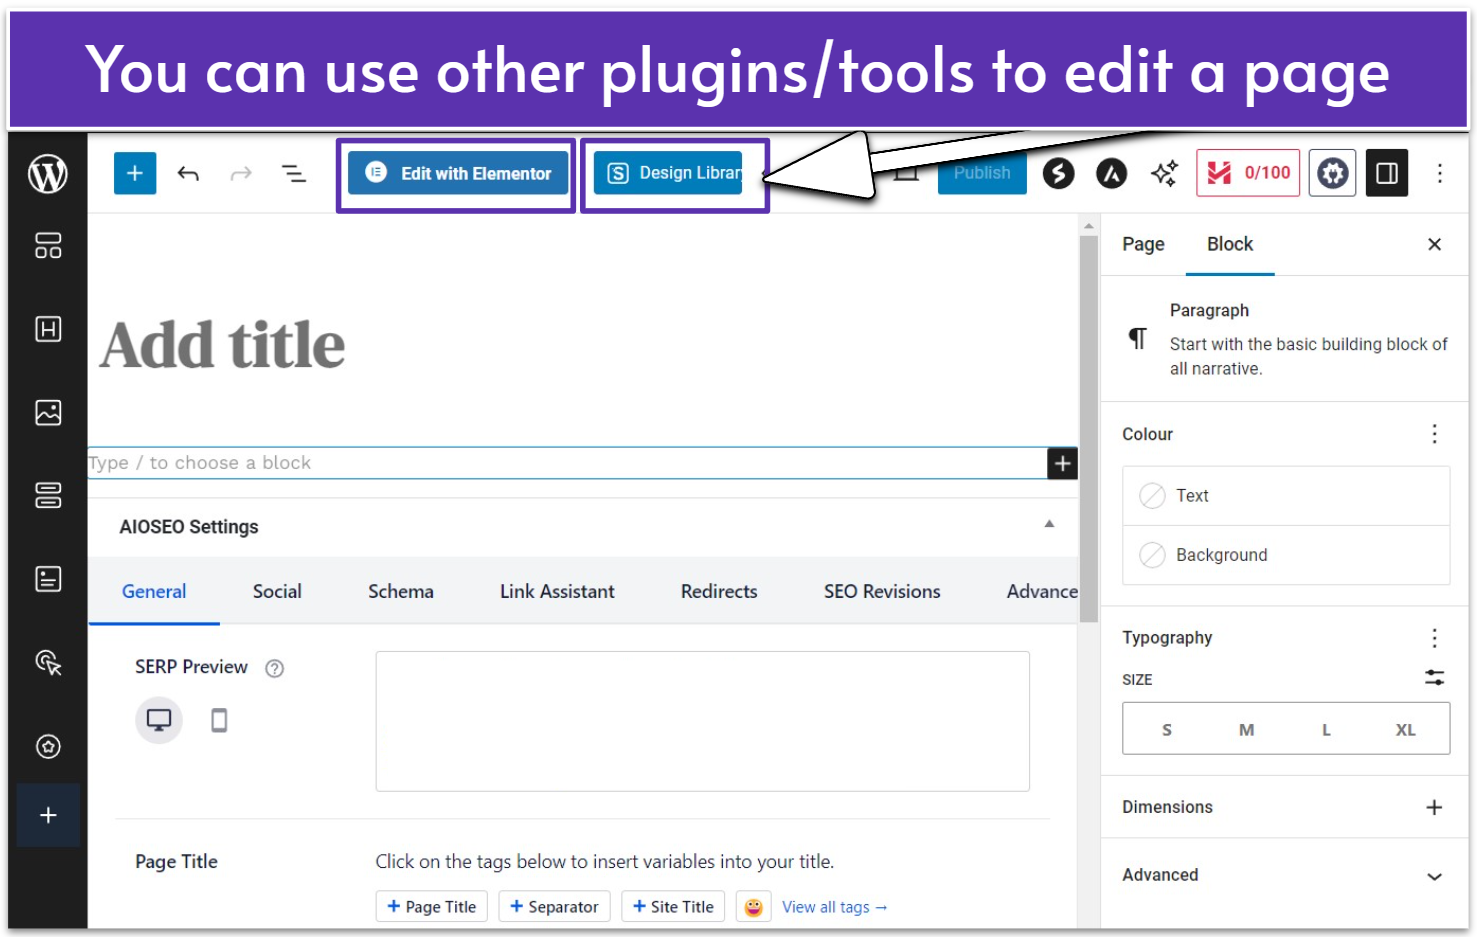
Under the Blog category, Hostinger offers three pre-made templatesIf you haven’t installed a website builder plugin, you can always use the WordPress block editor for free. To access it, go to the Pages menu and select All Pages. Choose the page you want to access and click “Edit.” You can also customize basic theme settings like fonts and colors by navigating back to the Appearance > Themes menu and clicking “Customize” on your installed theme. These changes will apply to all the Pages and Posts on your site.Elementor is a little more advanced than the WordPress editor but makes site editing easyThrough the WordPress block editor or your website builder, you can change your fonts, colors, images, blocks, layout, and more. Take the time to look around and familiarize yourself with all the settings. Changes won’t take effect until you press the “Publish” or “Update” button. You can play around to find out how things work without risking anything. Since WordPress offers code-free editing, it’s 100% beginner-friendly.Third-party editors like Elementor are undoubtedly the most comprehensive and user-friendly options. I used Elementor’s drag-and-drop editor to customize my website template. It’s compatible with most WordPress themes and website templates. It allowed me to change my menu’s font, color, format, and size and also update all text and images in the template.To add an additional page, you must navigate to the Pages menu in your WordPress Admin panel. Clicking on Add New Page will launch the WordPress page editor. Here, you can create an About Me, Recipe, and Contact pages using drag-and-drop blocks.I could add pre-configured blocks, pages, and site templates from the Design LibraryHowever, you can also use Elementor (or any other third-party website builder) to edit your pages. With the Astra theme, I was able to add matching pre-configured blocks and page layouts from the Design Library.
Revise, Test, and Publish Your Food Blog Site
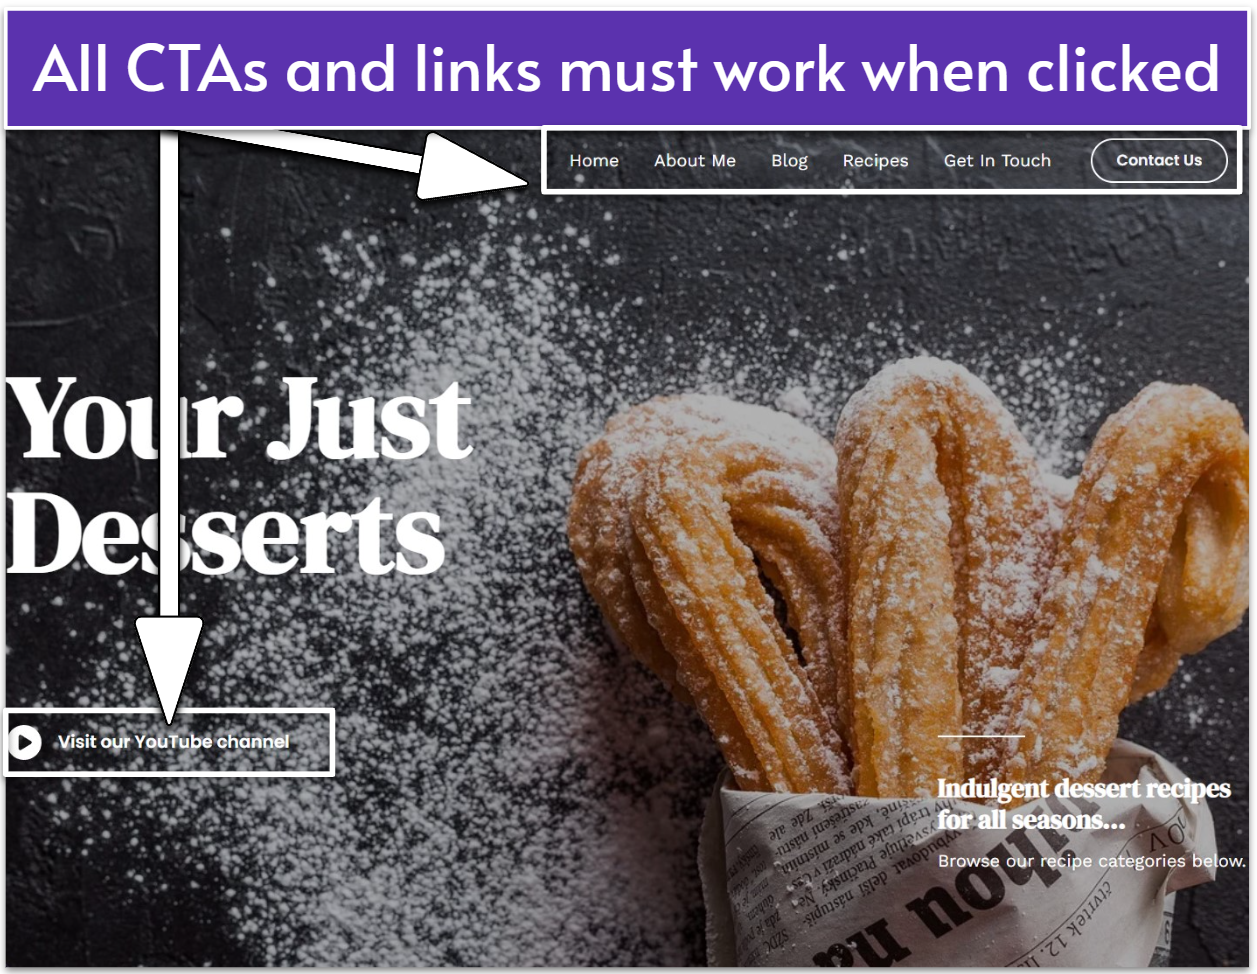
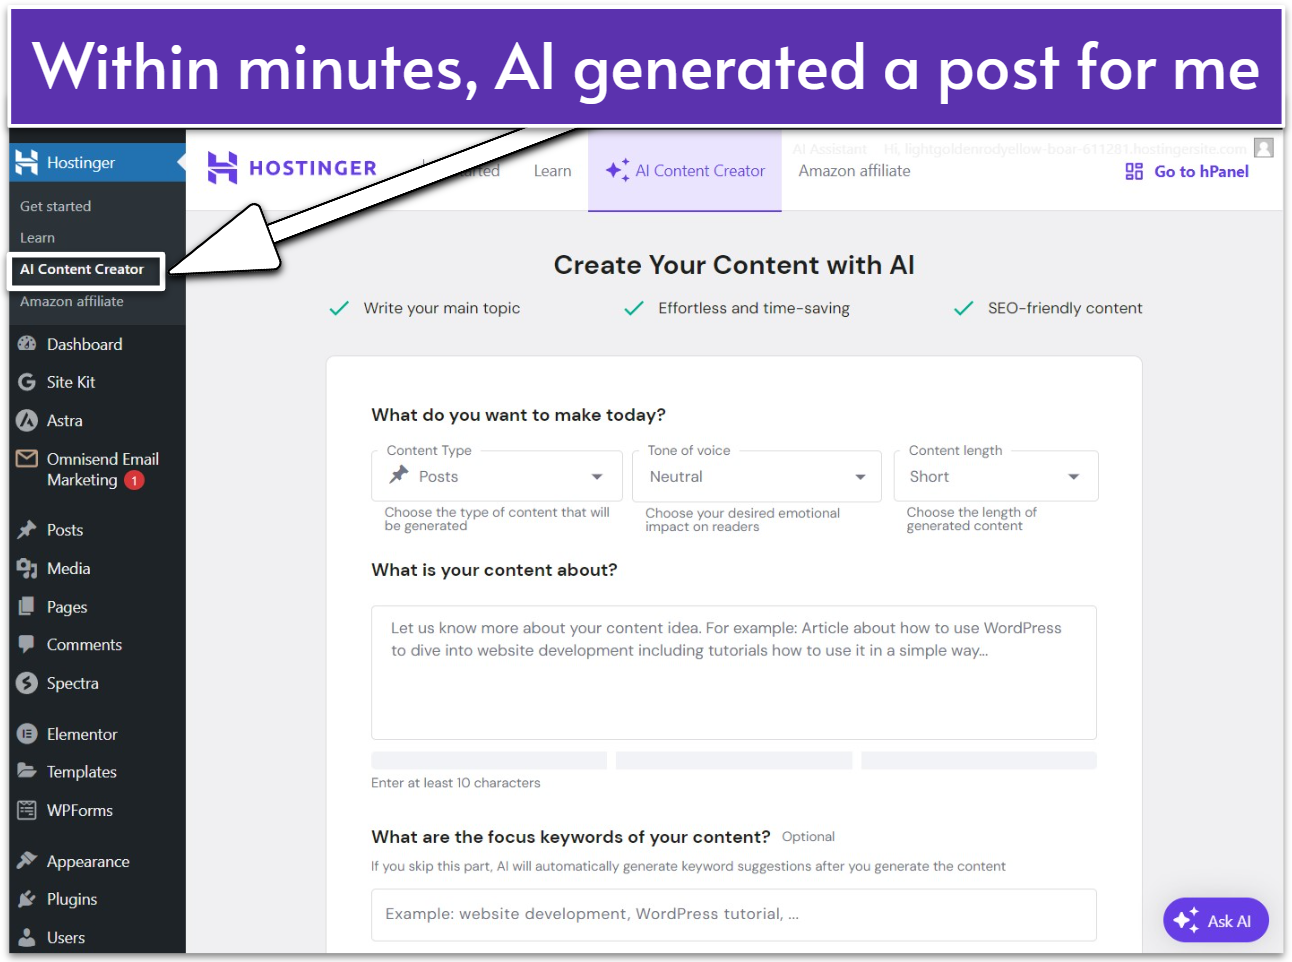
Just like with any creative process, it’s necessary to fine-tune your food blog before publishing it. During this process, you can save it as a draft or publish it under a temporary domain. I prefer the second option, as it allows me to visit and view the finished site exactly as visitors will. Besides finalizing the actual design, you also want to ensure your site is functional.My dessert recipe blog looks great, but I still need to test its functionalityYour food blog should load well across devices and screen sizes and all clickable elements should work. I recommend visiting your site and methodically trying out each function, then revising or correcting any issues as you go along. Expect to spend anywhere from a few hours to a week creating an optimized site, even when working from a template.Luckily, there are plenty of new time-saving tools. For example, you can populate your WordPress site with images from the Free Images section located next to your Media Library. You can also create posts with AI (a Hostinger exclusive) or create an entire custom website with Hostinger’s AI website generator.With AI, you can generate, fine-tune, and publish site content quickerMy top tip is to use as many free tools as possible:
Check your grammar with Grammarly’s free version.
Optimize your SEO with Yoast Free.
Check heading capitalization using Capitalize My Title.
Analyze your site for SEO issues with Ahrefs’ free Website Checker.
Learn how to use the WordPress block editor (it’s complex but it’s free).
Create a Gmail account to research keywords using the Google Keyword Planner.
Watch tutorials, read, and learn about web design, food photography, and food blogging.
Use AI tools such as website generators, content creators, and image generators.
Of course, paying for select plugins and tools to up your game can also be a wise investment to make your food blog a success.
For those looking to quit their day job, here comes the exciting part – how to promote and monetize your food blog. There are many ways to go about it but the most important thing is to consistently post quality content and keep it up to date.Here are additional ways you can promote yourself and make money:
Affiliate marketing, especially for ingredients or cooking equipment listed in your blog.
Selling one-on-one courses, lessons, training sessions, meet-ups, or experiences.
Promoting a digital or physical cookbook, guide, or food/dining-related publication.
Promoting content on social media in order to increase blog visitors and sales.
Selling your own line of products, including food items and cooking utensils and tools.
Advertising, whether you’re hosting ads on your site or paying to advertise it elsewhere.
Referring readers to monetized social media content, such as YouTube videos.
A mailing list or newsletter that can grow into email marketing campaigns.
Sponsored posts that feature a sponsor’s products or services.
Hiring a professional to handle post and recipe writing, posting, and monetization.
Do note that the above options are by no means an exhaustive list. You should do extra research on monetization if you want to turn your food blog into a career or business. Initially, monetizing your food blog may also cost you. However, if done correctly, it can be a worthwhile investment that speeds up the time it takes for your food blog to become profitable.
An Easier Alternative to Get a Food Blog Online
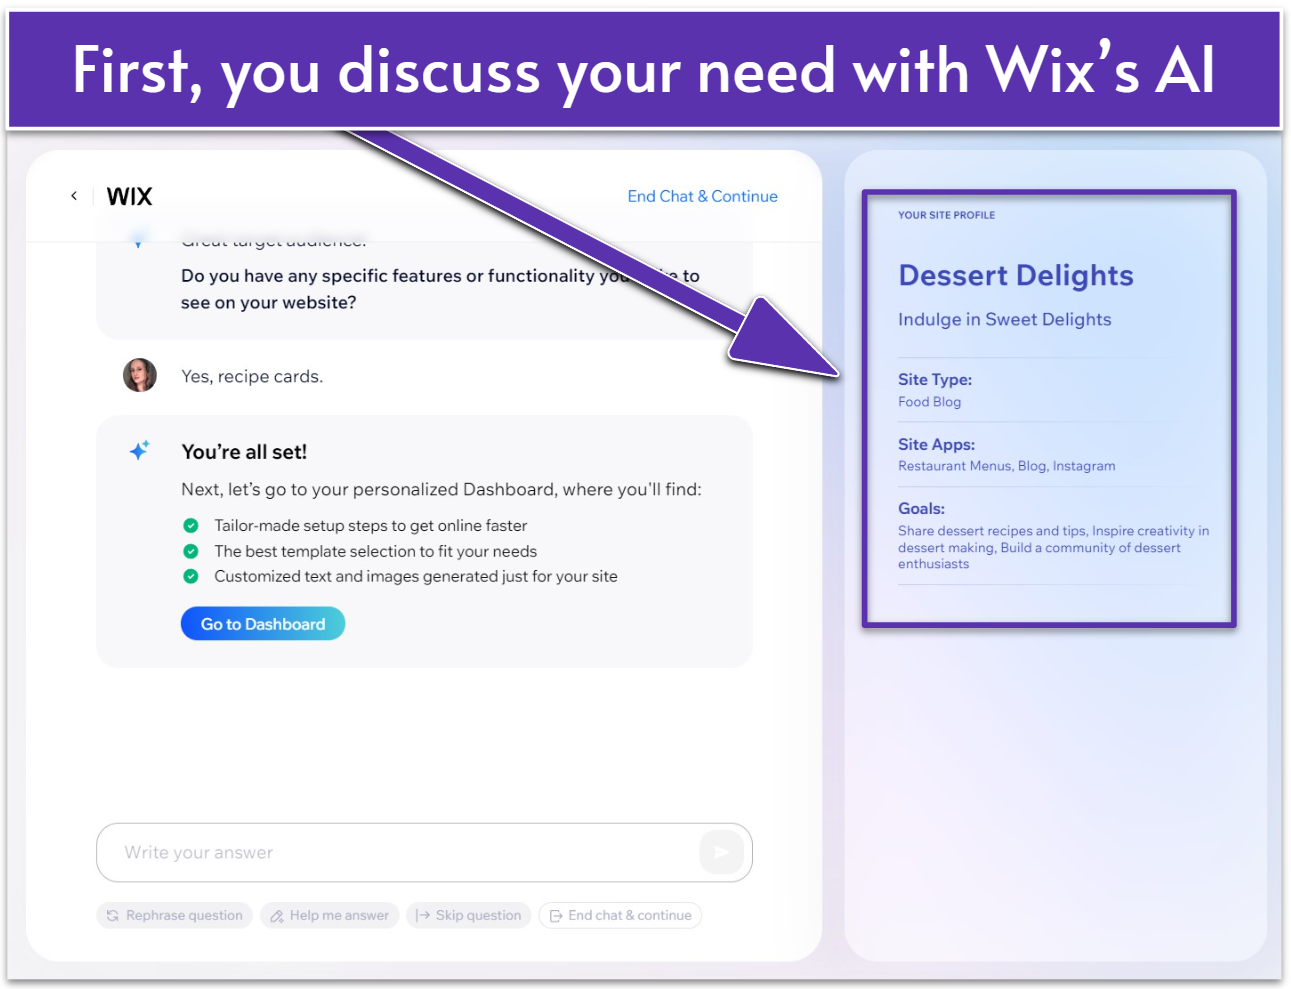
If the above WordPress setup and website creation steps are too confusing, time-consuming, or stressful, I understand. I’ve created quite a few websites myself, and – even when using a template or no-code platform with drag-and-drop elements – it has always taken a lot of time (and the occasional blow-out) for me to finally hit “Publish.”However, there’s now another option – AI website generators. I’ve tested a few, including Hostinger’s offering, which is available if you opt to build a site using the Hostinger Website Builder (not WordPress). However, my favorite has to be the Wix AI Website Builder.Wix’s AI chatbot asked me a few questions and created a unique site profileThe creation process is extremely fast and stress-free, and the results, well, they’re spectacular. Wix is known for its stylish and elegant modern designs, which you can use and customize for free – all you need to do is create an account, set up and design your blog, and publish it under a subdomain. (If you’re happy, you can sign up for a plan to connect your domain.)You also have the option of regenerating the site until you’re happyPlus, everything (your hosting, website builder, and website/content management platform) is all rolled into one. No hopping from one platform to the next trying to line everything up or wasting time managing your plugins, updates, and installations. Wix takes care of everything for you – simply customize your food website and publish your blog posts.
If you’re passionate about food, sharing your interest and experiences in a blog may be the perfect outlet. It can be rewarding, not to mention it could open up opportunities you may not otherwise have.Of course, there are those pesky technicalities like actually creating a website… and choosing a host, content management platform, and website builder for it! Hopefully, this guide has helped you straighten out those details and formulate your approach.Taking the first steps is the biggest part – where you go from an aspiring food blogger to a real one. Next up is maintaining the momentum. Remember to post regularly and track your blog’s performance so you can constantly improve your content. However, all of this doesn’t have to be difficult. There are many tools, plugins, and services available to help you make your food blog a success.
FAQ
What are the initial steps beginners need to take when starting a food blog?
First, you must do your research and decide on a unique niche to cover. Only then can you conceptualize your brand identity. After that, you’ll need to publish a website, which includes buying a domain name and a hosting plan. When your website is live, you can get blogging (and tasting, dining, traveling, cooking, and photographing!). Keep in mind that successful monetization usually comes after you’ve been consistently publishing for a year or so.
Can I start a food blog without any technical background?
Yes, you can! Many successful bloggers didn’t start out as professional writers, chefs, food critics, website designers, or photographers. You can teach yourself many technical skills, like recipe writing or food photography. There are lots of tools (AI included) that you can also use to polish your website content and branding. But remember that regardless of your skill level, the passion you bring to the blog will shine through.
What are the best content management systems and hosting services for food blogs?
WordPress is the most popular content management system for creating a food blog, blog, or website. So, the best web hosts are those that offer WordPress or WordPress-compatible hosting, with either pre-installed or 1-click WordPress installations. For example, Hostinger has web hosting plans that are suitable for hosting multiple WordPress sites. It also offers WordPress-specific security and performance tools.
What are effective ways to use SEO and social media to increase my food blog’s visibility?
SEO and social media both offer opportunities to promote your food blog – just in different ways. Social media connects you with followers in real time, with your food posts being a key engagement driver. In contrast, SEO can increase your food blog’s visibility by improving its rank on search engines like Google. Appearing on the first page of results is ideal, but it does require strategies like keywording and making sure your content is informative and valuable.
Can I monetize my food blog and make enough to leave my job?
Yes, it’s possible to make a career or business out of food blogging. However, it may take a few years so it’s probably best not to leave your day job before you can support yourself. It’s also important to remember that between writing, updating old content, and conceptualizing new content, blogging and website management can be a full-time job itself. The sooner you start, the better, though – and now, with the advent of AI, publishing a food blog is easier than ever.
A freelance author, graphic designer, and photographer, Caitlin Greyling writes about web hosting, web builder software, graphic design, tech, and electronics, and has published hundreds of product reviews and comparisons for Website Planet, The Daily Mail, and Durability Matters. Her creative and technical knowledge has been showcased at PictureCorrect, Photutorial, and others. She is currently studying for an NCTJ diploma in journalism. When Caitlin’s not working, she’s exploring nature with her son and dog or relaxing at home with her cat.
Thank you, - your comment was submitted successfully!
We check all user comments within 48 hours to make sure they are from real people like you. We're glad you found this article useful - we would appreciate it if you let more people know about it.
Share this blog post with friends and co-workers right now:
Thank you, , your comment was submitted successfully!
We check all comments within 48 hours to make sure they're from real users like you. In the meantime, you can share your comment with others to let more people know what you think.
Thank you for signing up!
Once a month you will receive interesting, insightful tips, tricks, and advice to improve your website performance and reach your digital marketing goals!