
Adding real customer feedback is one of the easiest ways to build trust and engagement on your website. In this guide, I’ll show you how to display Google Reviews on a Wix site using the Google Reviews by Elfsight app, all from the Wix App Market.
Short on Time? Follow These Quick Steps to Add Google Reviews to Your Wix Site:
- Open your Wix Editor.
- Click Add Apps on the left sidebar of the editor.
- Type “Elfsight” in the search bar.
- Select the Google Reviews by Elfsight app in the search results.
- Click Add to Site, and Wix will install the app on your site.
- Enter your business name and address or use a Google Maps link.
- Customize your Google review layout and style settings.
- Publish your site to see your reviews live.
Step 1. Install the Google Reviews by Elfsight App
Elfsight is a popular third-party solution that simplifies embedding Google reviews on Wix. You’ll install it right from your Wix site.
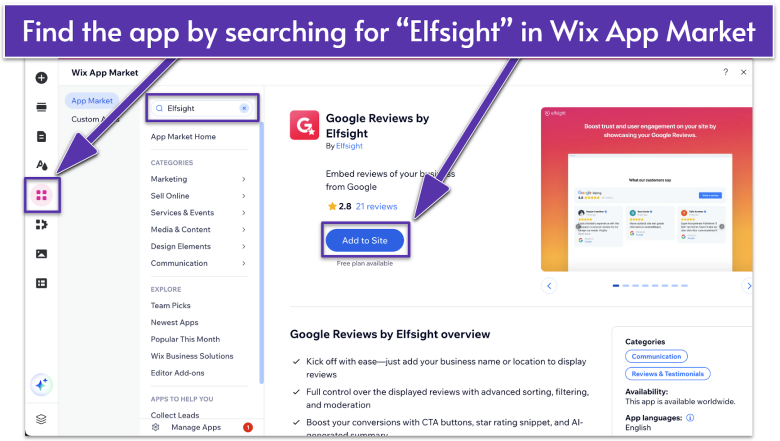
- Open your Wix Editor.
- Click the Add Apps icon on the editor’s left sidebar.
- Type “Elfsight” into the search bar.
- Look for the Google Reviews by Elfsight app in the search results and select it.
- Click Add to Site on the app’s download page. Wix will install this app in just a few seconds and include an example feed to give you creative ideas.
After installation, Wix placed a placeholder widget on my homepage so I could see how the Google Reviews would eventually appear.
Step 2. Place and Resize the Review Section
You can easily drag the widget anywhere on your page. Make sure it’s sized and positioned in a way that’s easy for visitors to spot.
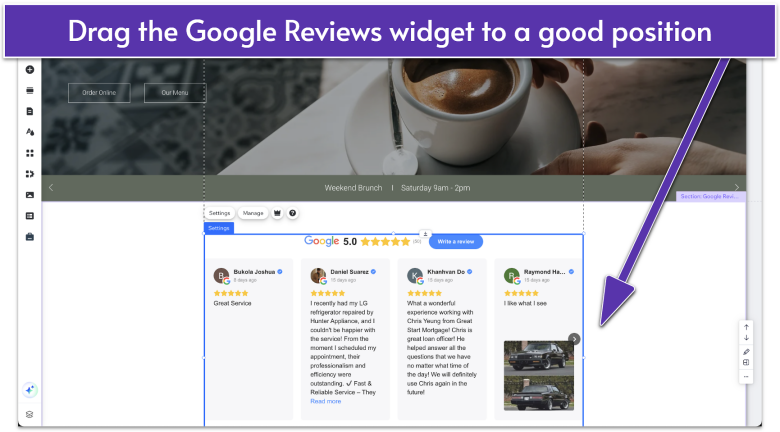
- Click and drag the reviews box to your chosen page section. If you want to move it to another page, you can cut it, switch to your selected page (e.g., homepage, “About” page, or even a dedicated “Reviews” page), and paste it in.
- Drag the widget’s corners to adjust its width and height.
- Make sure the reviews in the widget look balanced and are easily readable.
I created a website for a coffee shop called Twede’s Cafe. Because it’s all about cozy vibes and word of mouth, I placed the Google Reviews under my homepage’s main banner image so visitors can quickly see glowing feedback about the coffee and pies.
Step 3. Connect Your Google Business Location
To display your actual reviews, you’ll need to link your Google Business Profile (formerly Google My Business) so Elfsight can automatically display your ratings and comments.
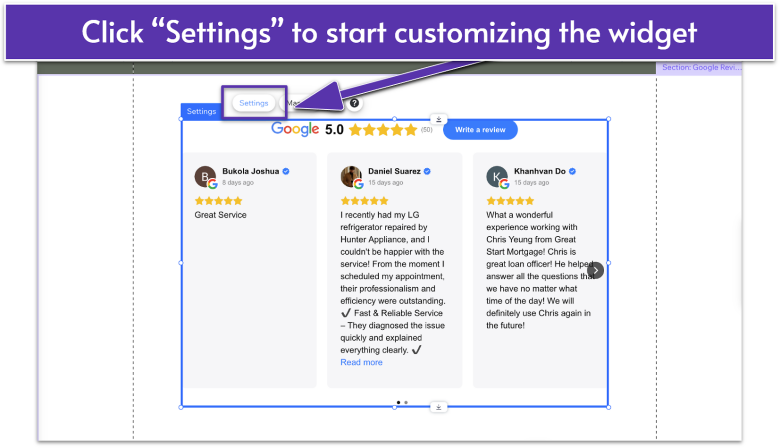
- Hover over and select the Elfsight Google Reviews widget.
- Click Settings to open the Edit Widget panel.
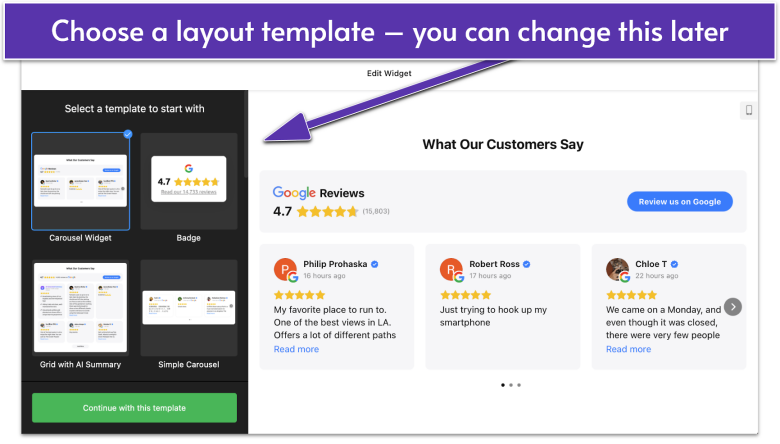

- Choose a layout template (grids, carousels, lists) to fit your Wix page design. Don’t worry, you can change this at any time.
- Click Continue with this template to go to the next page.
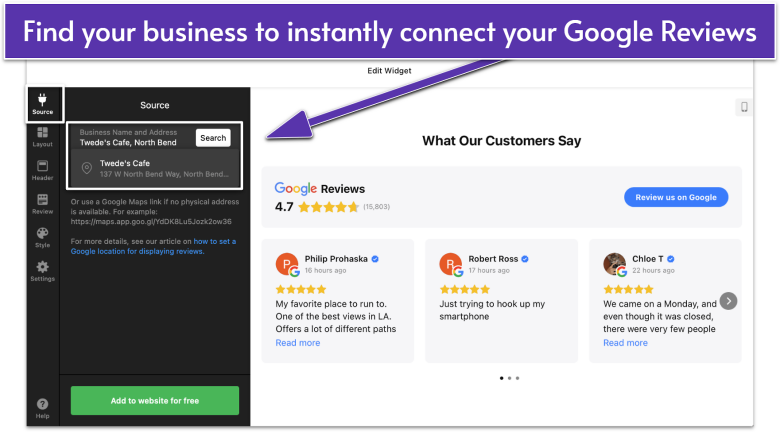
- In the Source tab, enter your business name and address (city, street, zip, etc.), or paste a Google Maps link if no physical address is available.
- Click Search. Elfsight will look up your business using the information you provided and match it to your profile.
- Select your business in the search results. If you have multiple locations, pick the one you want.
In the search bar, I typed “Twede’s Cafe, North Bend,” and the app recognized it right away. Within seconds, the widget loaded actual Google comments from patrons praising the pies and cozy vibe – a perfect fit for that Twin Peaks charm.
Step 4. Filter and Sort Your Reviews
Decide which reviews you want to show by filtering out and sorting your reviews with ease.
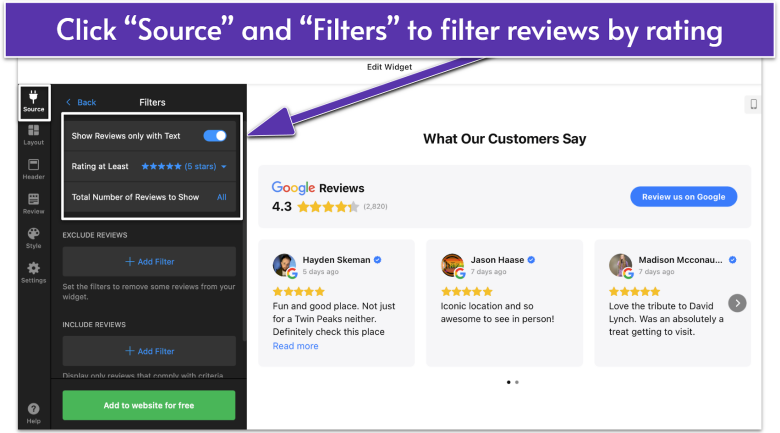
- Still in the Source tab, click Filters. Here, you can set a minimum star rating to show only reviews with 4 stars or higher, or filter for reviews that contain a certain keyword.
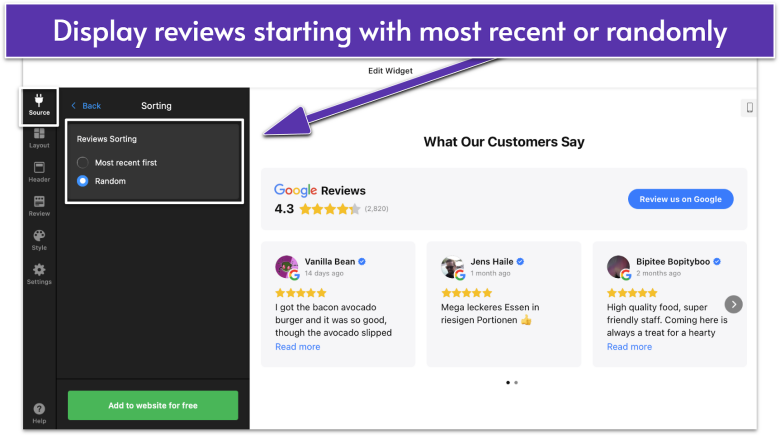
- Go back to the main screen in the Source tab and click Sorting. Select if you want to show the most recent reviews first (preferred) or randomly selected testimonials.
I chose the default settings for Twede’s Cafe. There are enough raving reviews coming in that sharing new 5-star reviews isn’t limiting.
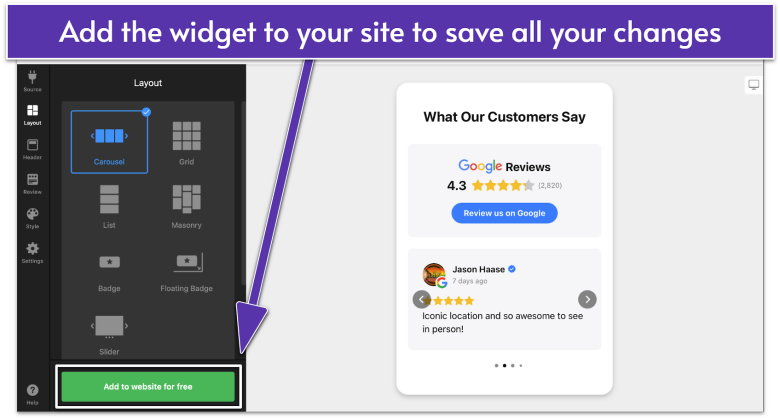
Step 5. Choose Your Reviews Layout
Make your widget match your site design and highlight the best testimonials by picking the right layout for your Wix website page design.
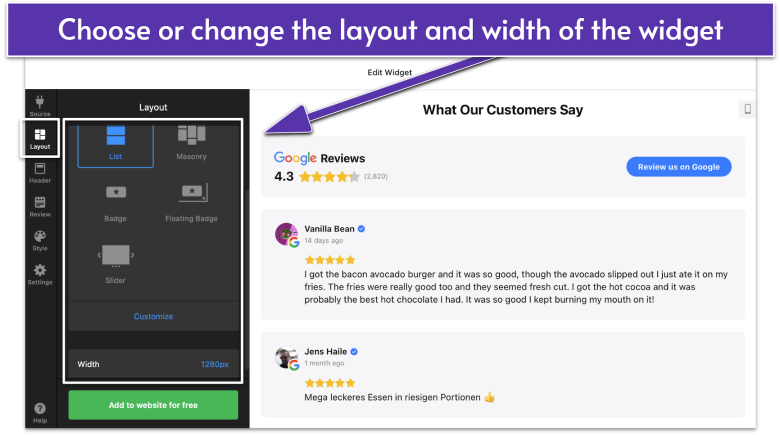
- Click the Layout tab on the left sidebar. Browse the available layout designs and select one.
- Click Customize to adjust your selected layout. You can also click Width to set your layout’s max width.
I kept the carousel layout so visitors can scroll left or right to see multiple reviews. This is especially helpful if you have lots of happy coffee enthusiasts.
Step 6. Customize Your Header
Let customers know what this widget is for – a great tip for user-friendly, accessible website design.
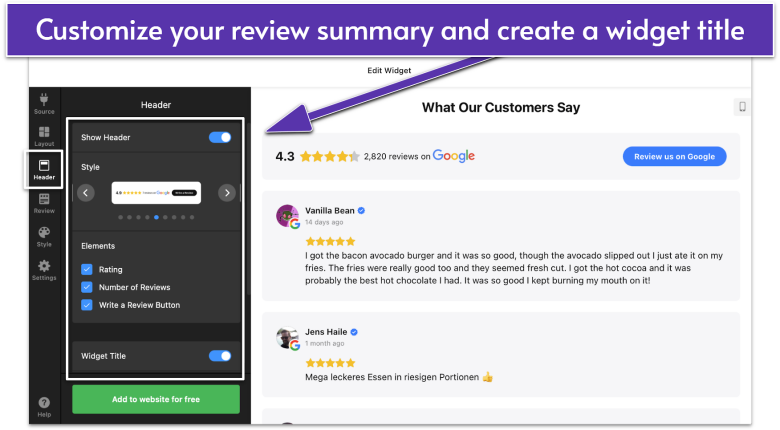
- Click the Header tab on the left sidebar.
- Toggle the Show Header switch on or off. Turn this on to show a Google Reviews heading, star ratings, the number of reviews you have, and a button that asks users to leave a review.
- Toggle the Widget Title switch on or off. When enabled, you can describe what this section of your website is for.
I kept the “What Our Customers Say” widget title – with no extra elements – because I want the customer reviews to stand out.
Step 7. Showcase Your Customers in Your Reviews
Design your widget to showcase the people behind the words.
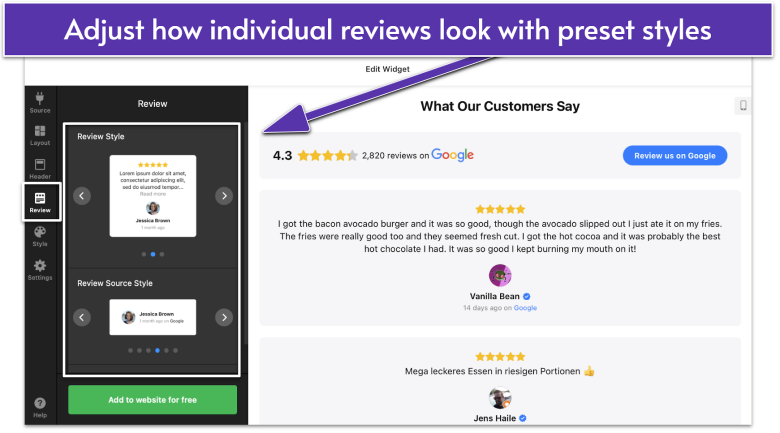
- Click the Review tab on the left sidebar.
- Select your preferred Review Style and Review Source Style.
- Click Customize to enable or disable certain review elements. For example, you can show or hide star counts, reviewer photos, or timestamps.
I chose a Review Style that displayed reviewer photos because seeing real faces beside real names adds extra trust.
Step 8. Match Your Brand Colors
Customize your widget to match your brand’s color and theme.
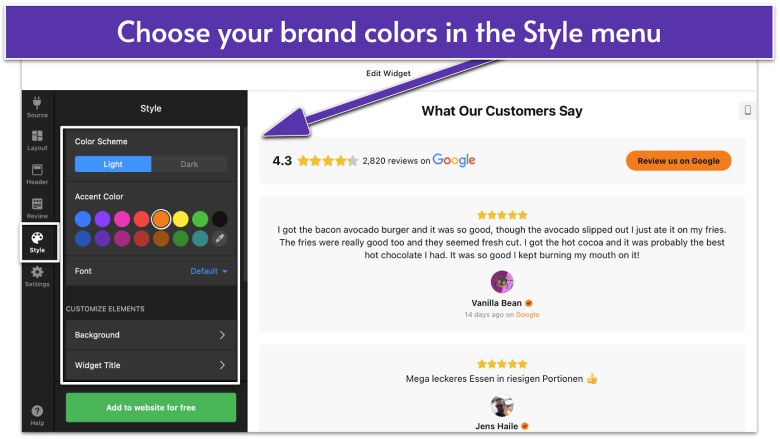
- Click the Style tab on the left sidebar.
- Adjust background colors, fonts, or accent colors to match your site.
I matched the widget to my site’s main brand colors. If you prefer, you can style the widget using Google’s default colors for a more familiar look.
Step 9. Adjust Settings
Make additional adjustments to your settings to make sure this widget meets your website’s needs.
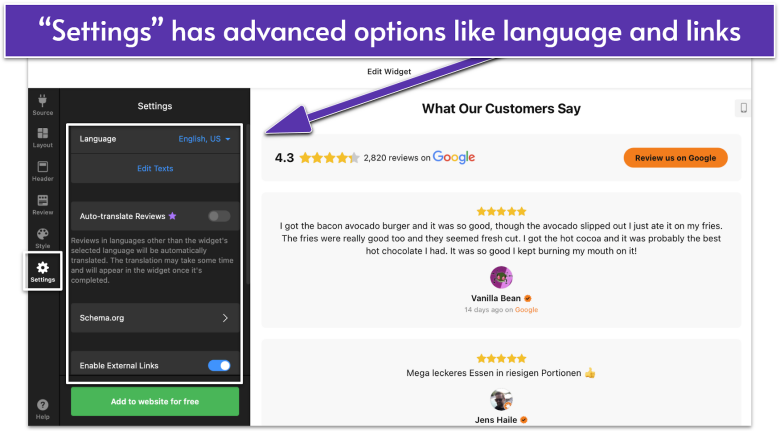
- Click the Settings tab on the left sidebar.
- Enable or disable settings. You can change the review language, control whether website visitors can leave your site to read reviews, and more.
I left the defaults on to allow website visitors to explore.
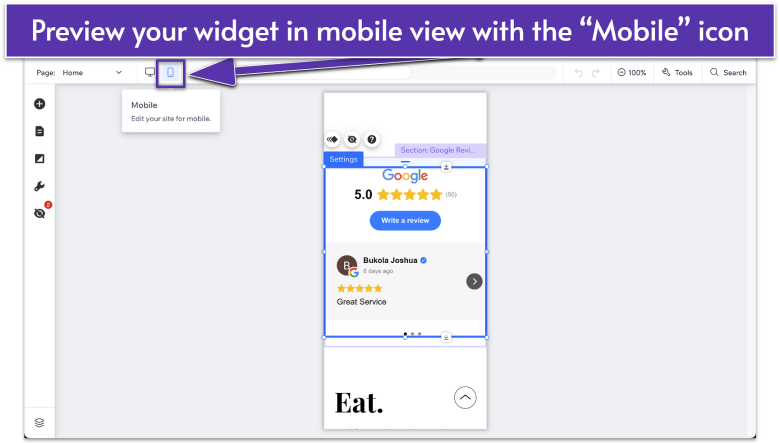
Step 10. Design for Mobile Visitors
Be sure to set up your widget for mobile users.
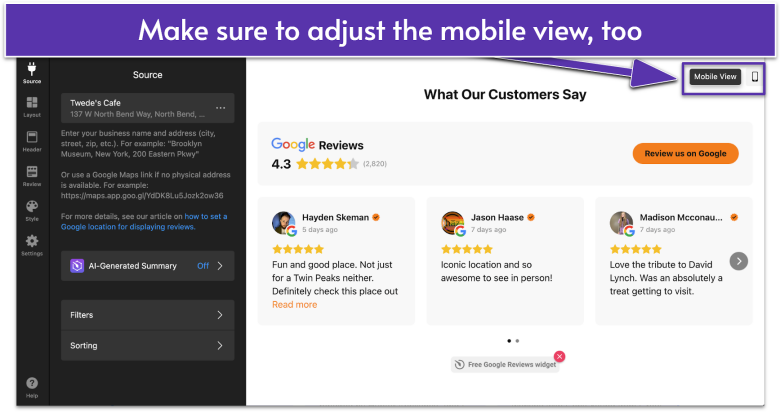
- Click on the Mobile View icon on the right side of the widget panel.
- Look through steps 4 to 9 to ensure you like the way the Google Reviews widget looks on mobile. Keep in mind that the mobile and desktop settings are synced. What you change on mobile also affects the desktop view.
Everything checked out for me, so I’m ready to continue!
Step 11. Create Your Elfsight Account
Once you’ve customized your widget’s design, you’re ready to create an account with Elfsight to make these changes go live.
- Click Add to website for free to create your custom widget.
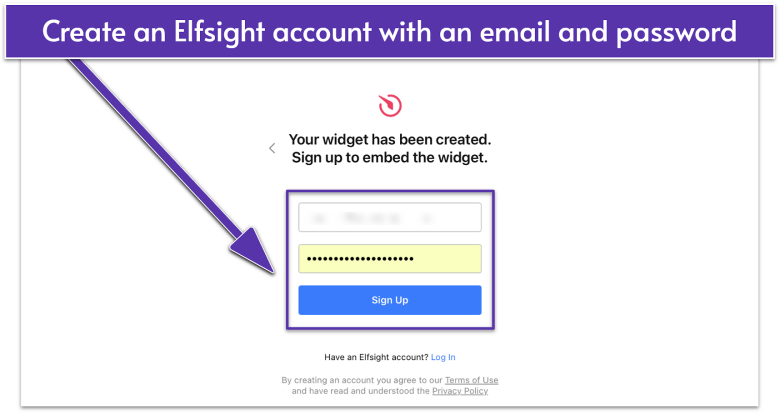
- On the sign-up screen, enter your email and create a password to create your Elfsight account. Click Sign Up to continue.
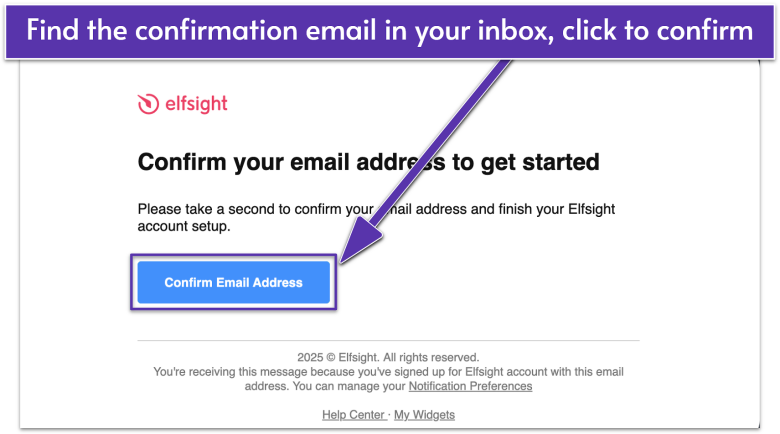
- Check your inbox and click the Confirm email address button. You’ll see a verified message.
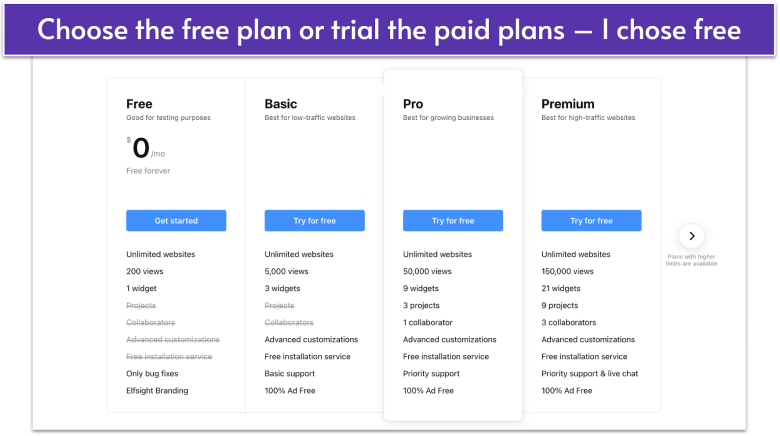
- Choose your plan. You can use a limited version of this widget for free. If you need to add more widgets, access more customizations, and remove Elfsight branding, choose a paid plan.
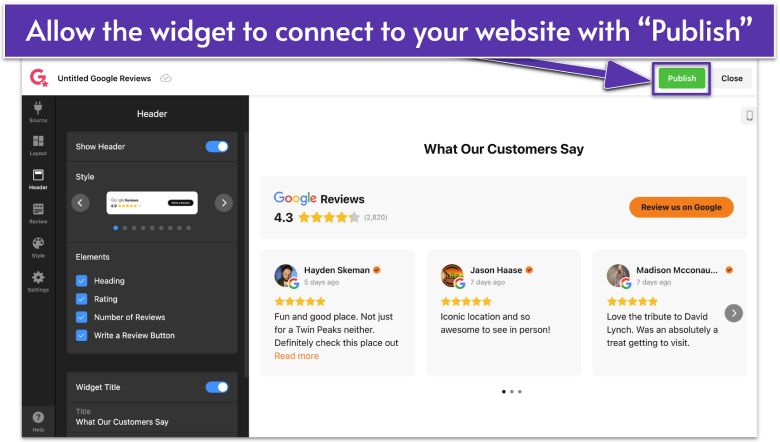
- Enable your Google Reviews widget to display on your selected page by selecting the green Publish button. This is different from publishing your Wix site. That comes later.
Step 12. Preview and Test Your Google Reviews
Always preview your site before publishing. That way, you can double-check how your Google Reviews widget looks on desktop and mobile.
- Click Preview in the top-right of the Wix Editor.
- Scroll and inspect the page. Make sure the reviews load, images appear, and the text is easy to read.
- Switch to Mobile View to see how the Google Reviews widget looks on smaller screens. Adjust sizing if necessary.
On mobile, I gave the carousel a bit more margin so that visitors could comfortably swipe left and right to see each rave review. Everything was legible, so I was set.
Step 13. Publish and Celebrate
Once everything looks good, it’s time to go live! Publishing ensures site visitors can see the new reviews section and engage with them.
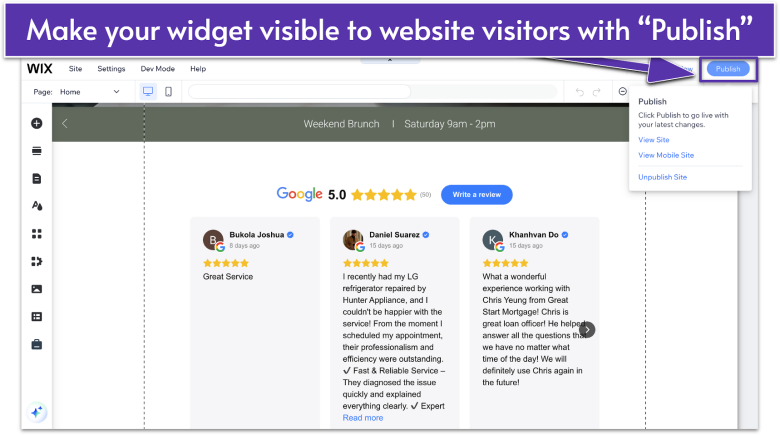
- Click Publish. Wait a moment for your changes to go live.
- Visit your live site. Open it in a new tab to confirm everything works smoothly.
I published, hopped over to the live page, and voila – fresh reviews about the “best pie in Washington” and “must-stop for any Twin Peaks fan” were there for all new visitors to see.
Your Google Reviews Are Ready to Take Center Stage
Congrats! You’ve successfully displayed Google Reviews on your Wix website, giving visitors a snapshot of the great feedback you’ve earned. This not only boosts your credibility but also invites new customers to join the conversation. If you want to refine anything (like changing layouts or filtering out certain reviews), just head back into the Elfsight app settings. Enjoy showing off your 5-star testimonials!