


This is your About page, but it’s really about your clients and how you can help them. It should highlight your expertise, values, and unique solutions. But don’t make it a boring Services page – we’ll do that in the next module, minus the boring part.
The secret sauce here is storytelling. Focus on elements that build trust and connection with your audience. By the end of this module, you’ll have a powerful About page that positions you as a guide to clients’ success.
Let’s do it!
3.1 Add a New Page
Kick-start the process by adding a new page. But unlike what you did on the Contact page, you’ll include the About page in the website’s main navigation (the bar at the top of the website you see on every page). Regardless of the type of page you’re adding (“Main Navigation” or “Not Linked”), the process is almost the same.
Step 1: Add a “Main Navigation” blank page
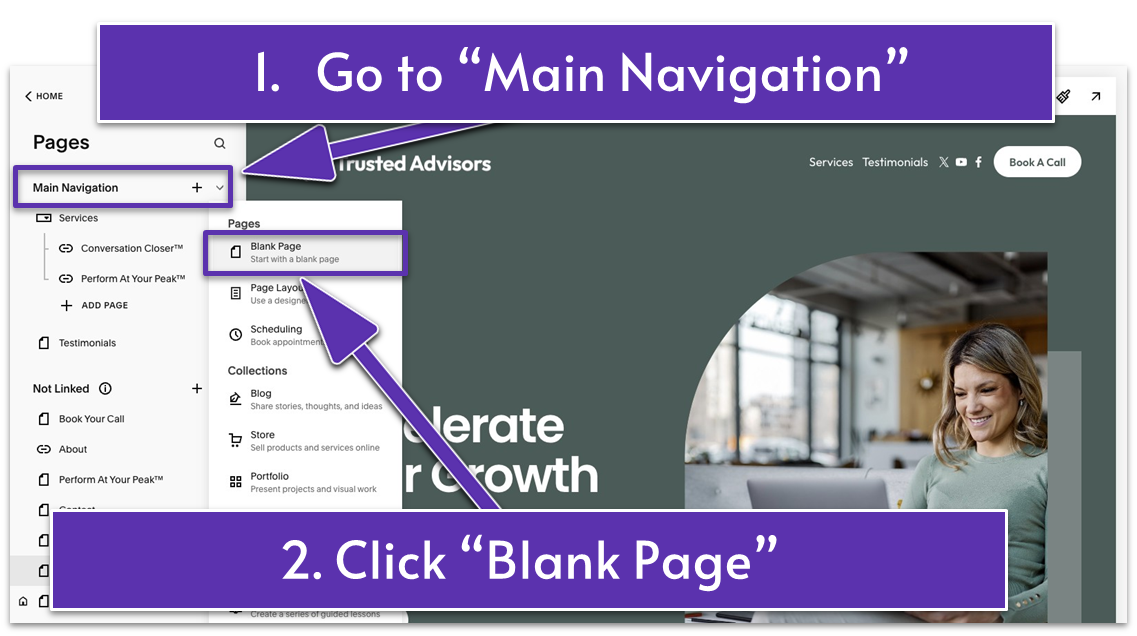
- Select “Blank Page” from the “Main Navigation” menu. This means the page will appear in your website’s main navigation menu.
Step 2: Change the page name to “About”
Here comes the exciting part! Let’s design a unique About page together.
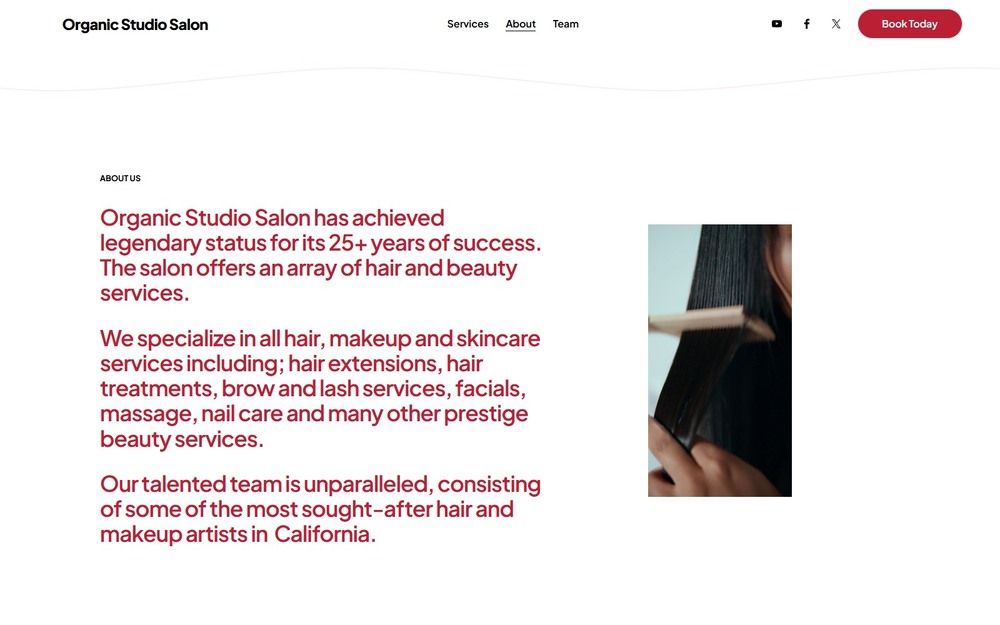
3.2 Introduce Your Business (First Section)
Use this section to describe your business and the benefits clients can expect from working with you. Make it short and powerful. Seal it with a clear call to action (CTA) like “Book A Call with Me.”
Step 1: Open the page editor and add a blank section
Step 2: Change the section’s color
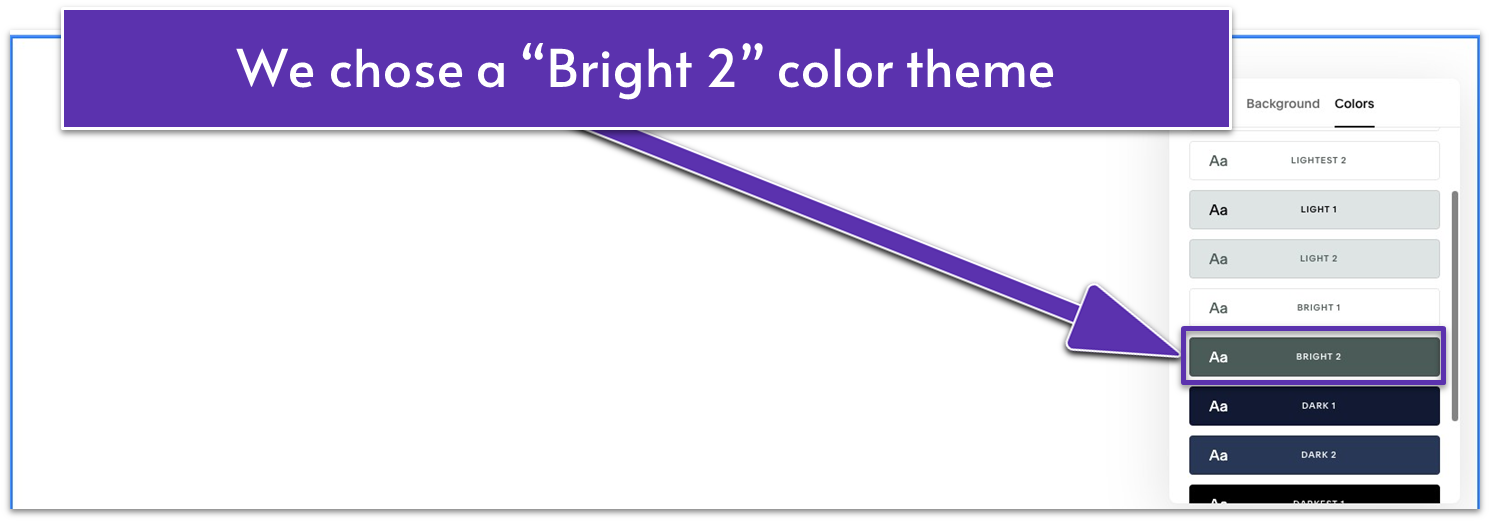
- Choose a background color. For our website, we chose a “Bright 2” color theme.
Step 3: Add a text block
- Write the section title. Here, we wrote “ABOUT US” (all capital letters) and formatted it to “Paragraph 3” and “Bold.”
- Drag and align the text block tightly with the grid frame, moving it into the upper-left corner.
Step 4: Add another text block
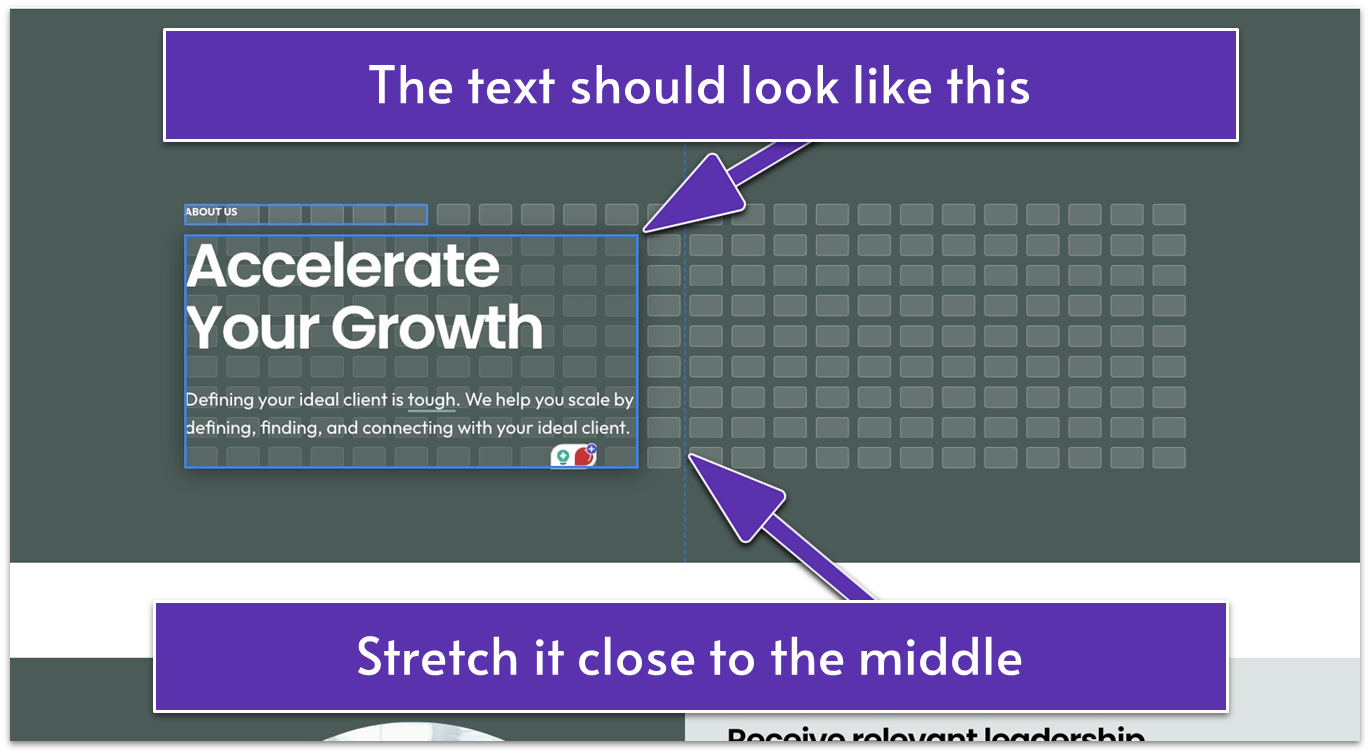
- Drag the new text block below the first text block. Stretch it to cover almost half of the section.
- Fill this text block with a headline that captures your key benefit to potential clients. For example, we wrote “Accelerate Your Growth.” Make it a “Heading 1.”
- In the same text box, add a line or two below the headline. This will support the statement you’ve made in the headline. We added “Defining your ideal client is tough. We help you scale by defining, finding, and connecting with your ideal client.” Make this text a “Paragraph 1.”
3.3 Add a Button
Your About page needs a CTA button to guide visitors toward taking the next step after learning about you. While the page introduces your expertise and builds trust, the CTA encourages them to get in touch – in this case, book a consultation. Without a clear CTA, your visitors may leave without taking action, even if they’re interested. So, let’s make sure they reach out.
Step 1: Add a button block
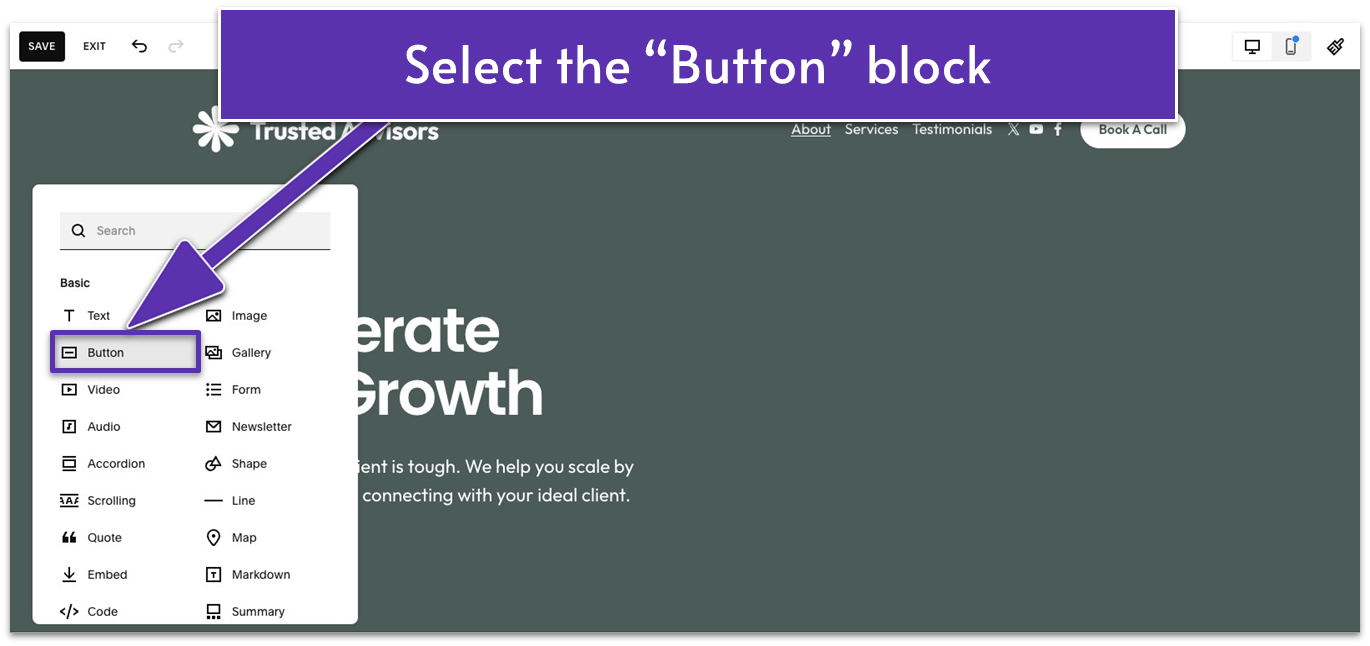
- Click “Add Block.”
- Select “Button” from the list.
Step 2: Customize the button
- Drag the button below the short paragraph using “Paragraph 1” formatting.
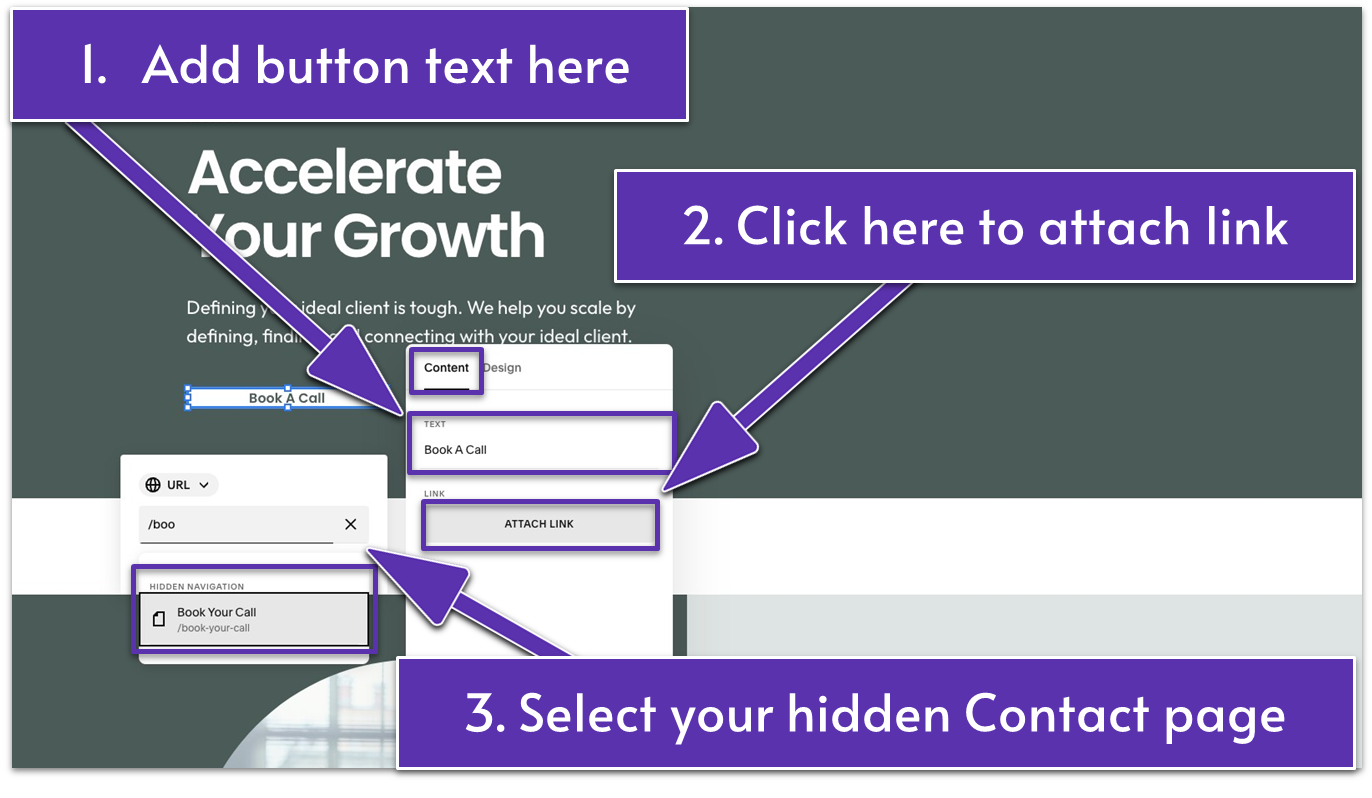
- Click the pencil icon ( ).
- Under the “Content” tab, enter the button text. We named our button “Book a Call.”
- Click the “Attach Link” button.
- Select the hidden “Book Your Call” contact page you created in the previous module.
You can attach a link in a few ways:
- Select a link from the list that shows up below the link field.
- Copy and paste the page’s URL slug (e.g., “/book-your-call”) into the link field.
- Type the name of the page you want to link to. Select it when it pops below the link field.
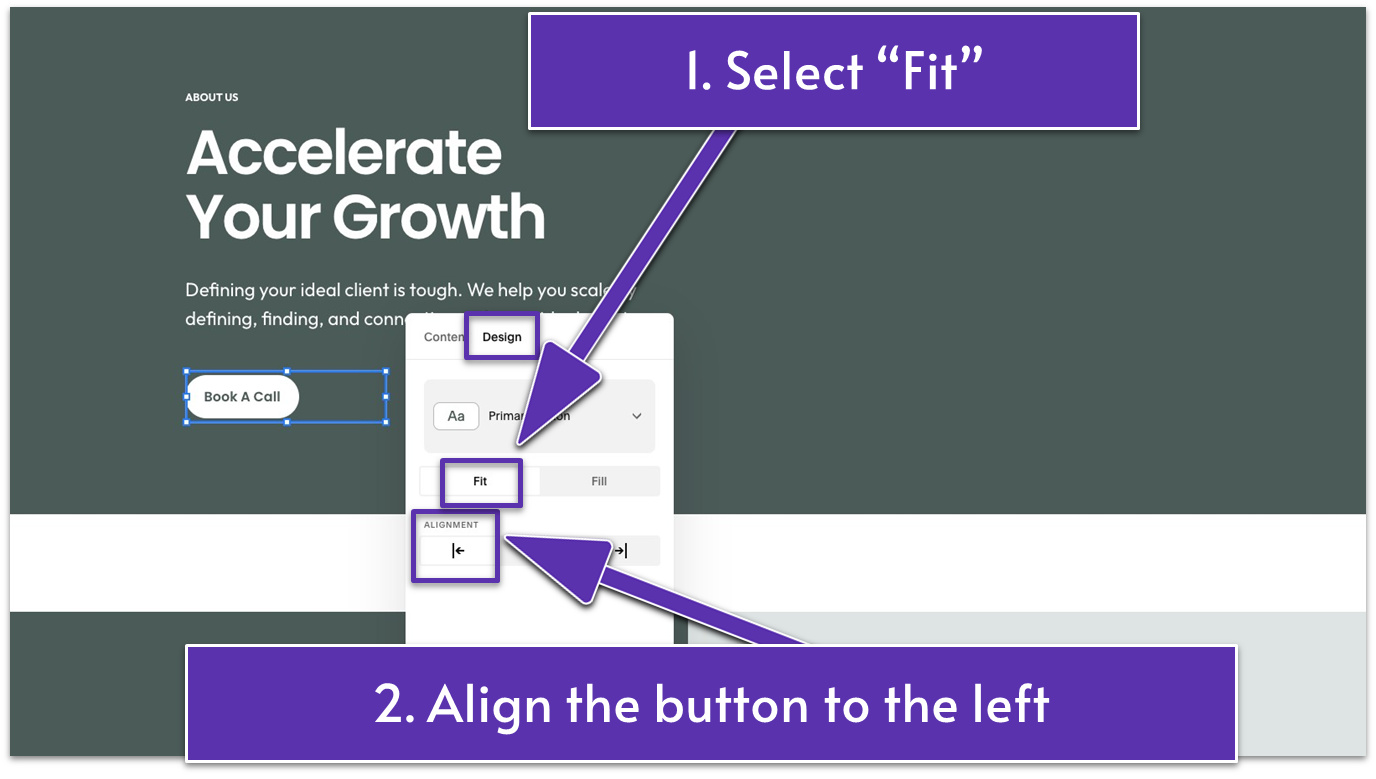
- Head to the “Design” tab.
- Select “Fit” and align the button to the left.
3.4 Add an Image
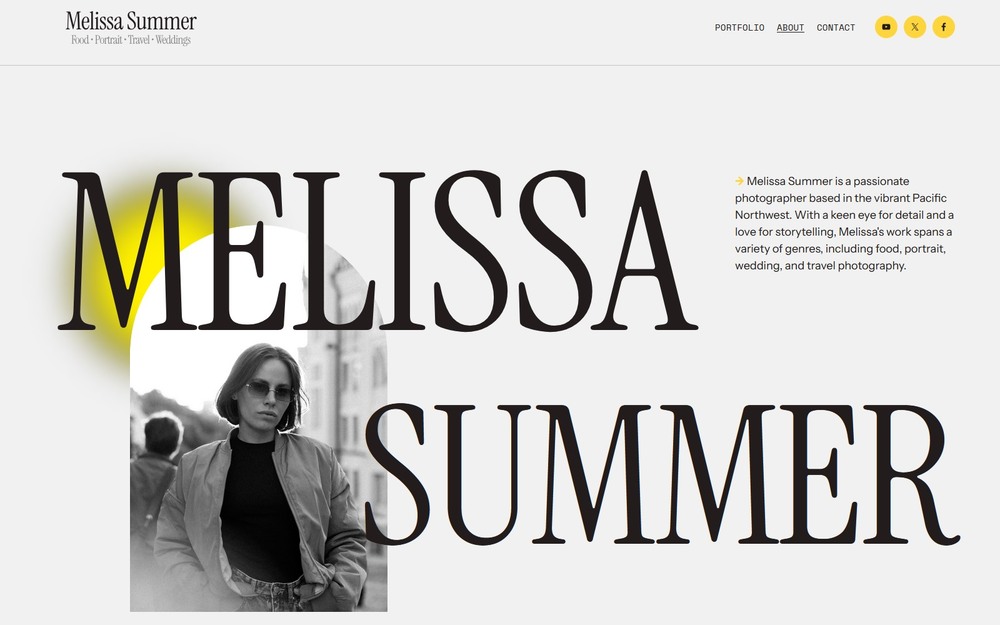
The top section image on your About page will be the first visual impression potential clients will have. So choose a high-quality, well-lit headshot or an action shot of you working in your element. It should reflect your brand’s tone while reinforcing your credibility and making clients feel comfortable reaching out.
Your image should be more than a perfect “Insta-ready” shot. Select a confident, authentic photo that helps humanize your business and builds a strong connection with your audience.
Step 1: Add an image block
Step 2: Position the image block
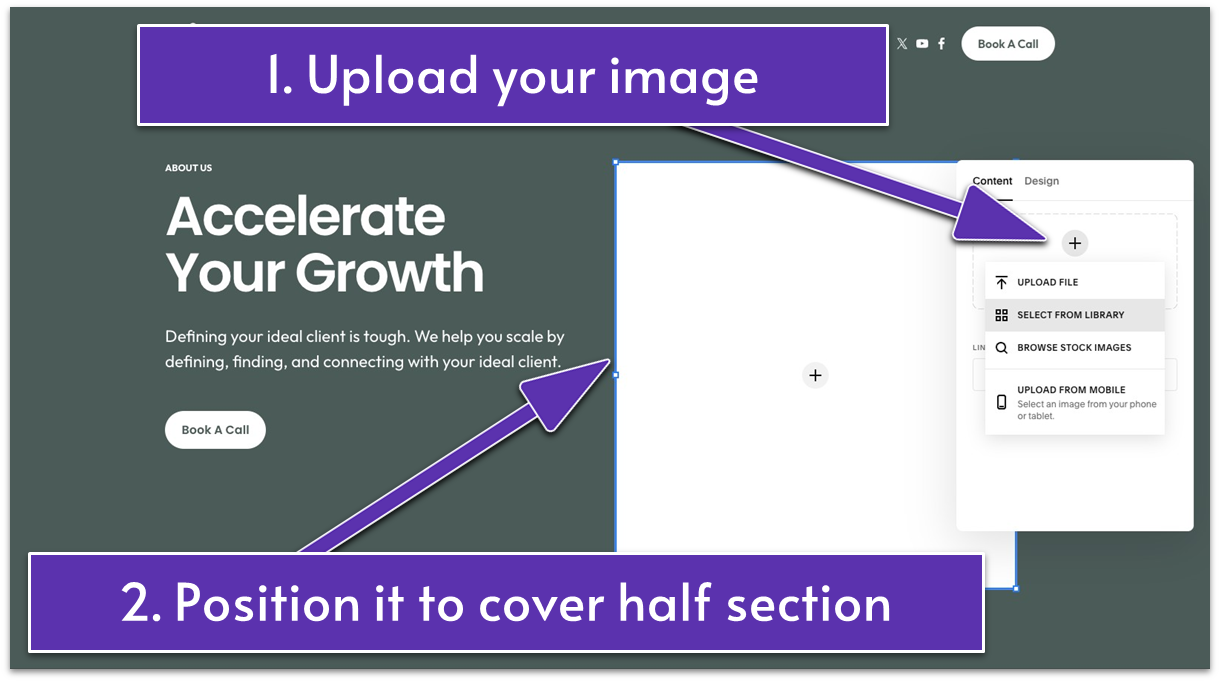
- Drag the image block to the right side of the section, opposite the text blocks.
- Stretch the block out to the desired size. We stretched it vertically so it’s longer than the text to mix up the design.
Step 3: Upload your chosen image
Step 4: Edit the image

- Go to the “Design” tab.
- Play around the design settings and see what works best for your image. If you’d like to match our example, we went for “Fill” and applied a top left corner radius of 300 to get that curve on the image.
- Now that you’ve completed the edits, you can go back and further adjust the position if needed. For example, we made the image a bit taller in the end.
3.5 Add a Shape
Adding shapes to your website will enhance its visual appeal and improve user experience by guiding attention and creating structure. Shapes can also help break up text, highlight key information, and make everything more interesting to look at.
Let’s make your website feel bonita!
Step 1: Add a shape block
Step 2: Edit the shape
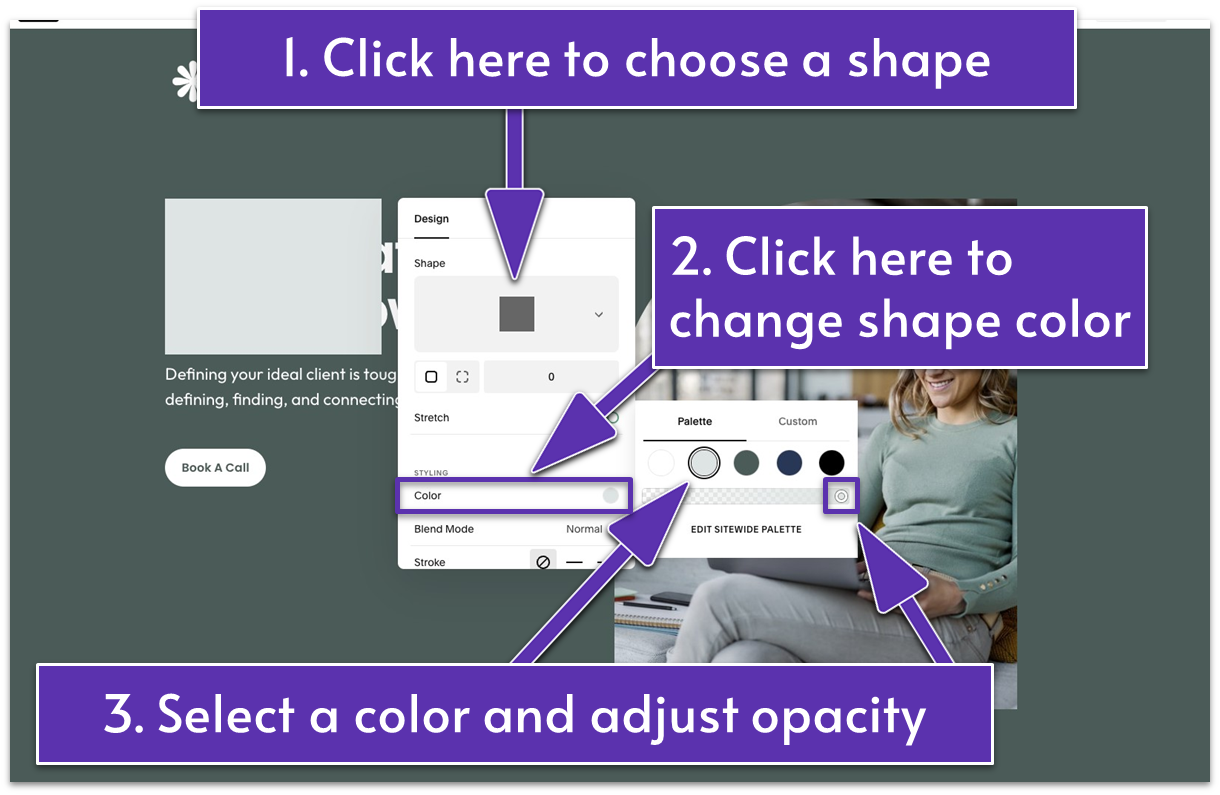
- Click the pencil icon ( ) to customize the shape. We went for a rectangle shape, white color, and opacity of around 20%.
- Adjust the form to your liking. We made the shape narrower and taller by stretching the block.
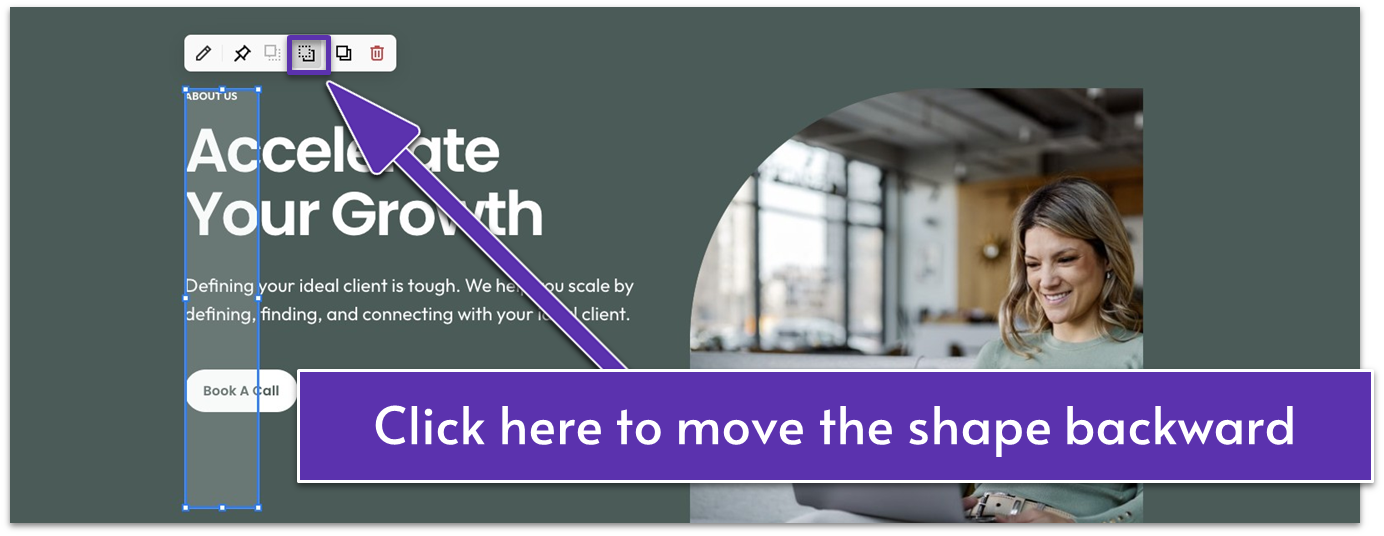
- Move the shape back by clicking the “Move Backward” icon ( ) in the block toolbar.
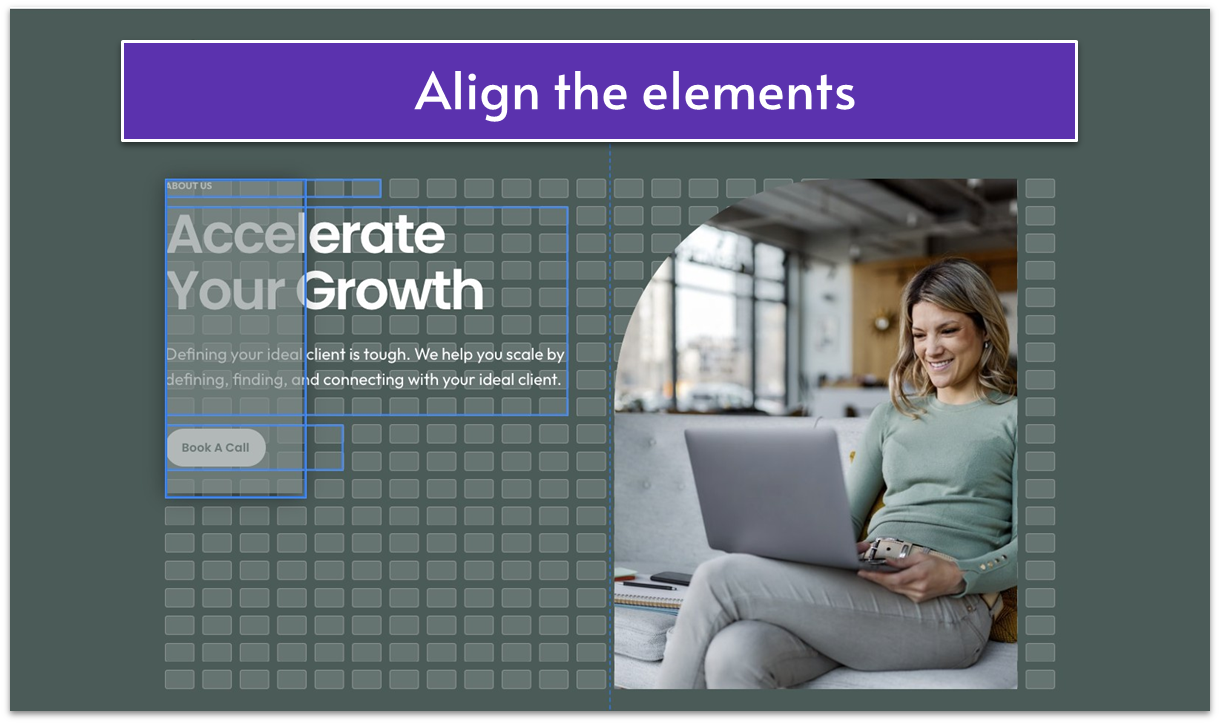
- Select all the text and shape elements on the left side and center them with the image.
Step 3: Duplicate the shape block
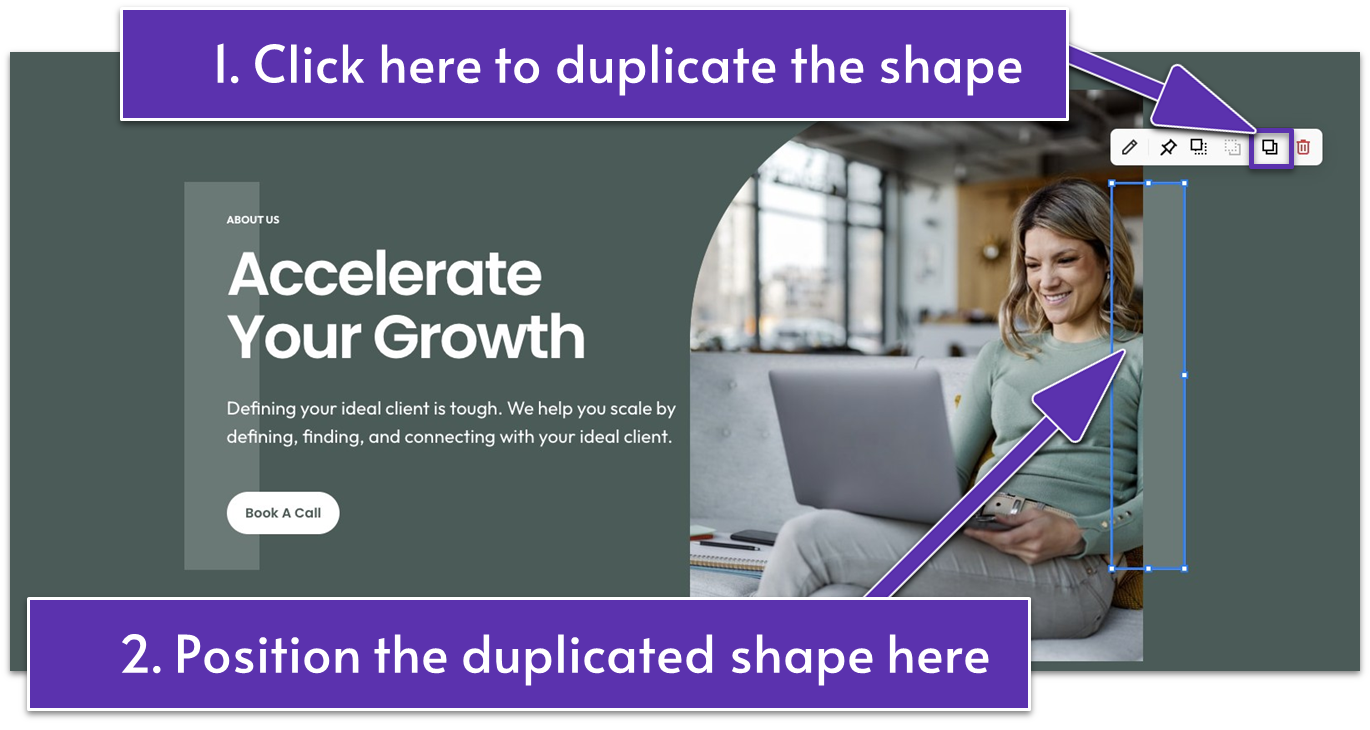
- Duplicate the shape you just made by clicking the duplicate icon ( ).
- Place the duplicated shape on the right side of the image, directly across from the first shape at the same height.
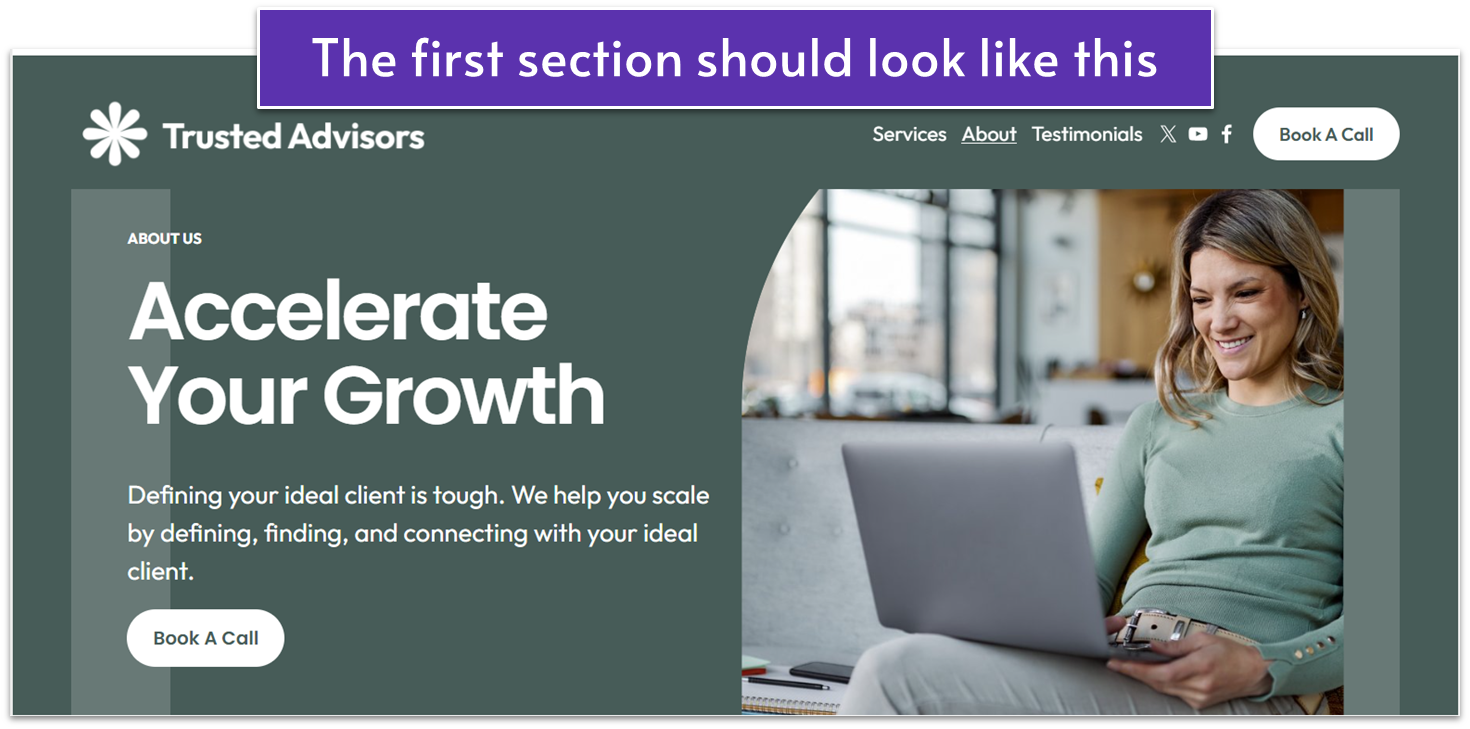
You’re going places! The first section of your About page is DONE!
Now, let’s continue building.
3.6 Present Your Expertise & Benefits (Second Section)
Step 1: Add a new blank section
Step 2: Add a text block
- Stretch the text block to cover the section from left to right.
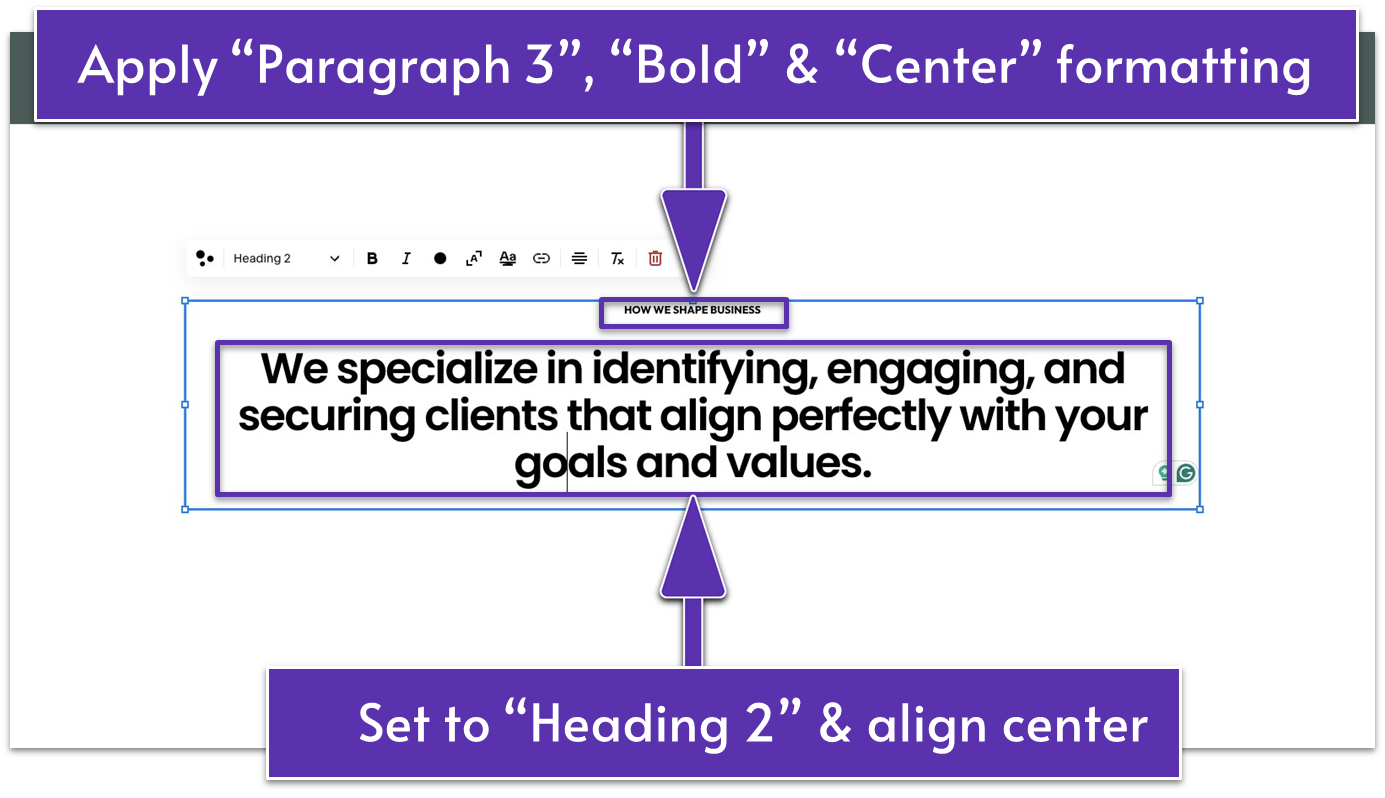
- Write your section title. For our website, we wrote “HOW WE SHAPE BUSINESS.” Apply “Paragraph 3,” “Bold,” and “Center” formatting.
- Below the title, you can add a short message to tell what you specialize in. We added “We specialize in identifying, engaging, and securing clients that align perfectly with your goals and values.” Set this to “Heading 2” and center-align it.
Step 3: Add highlight effect to text
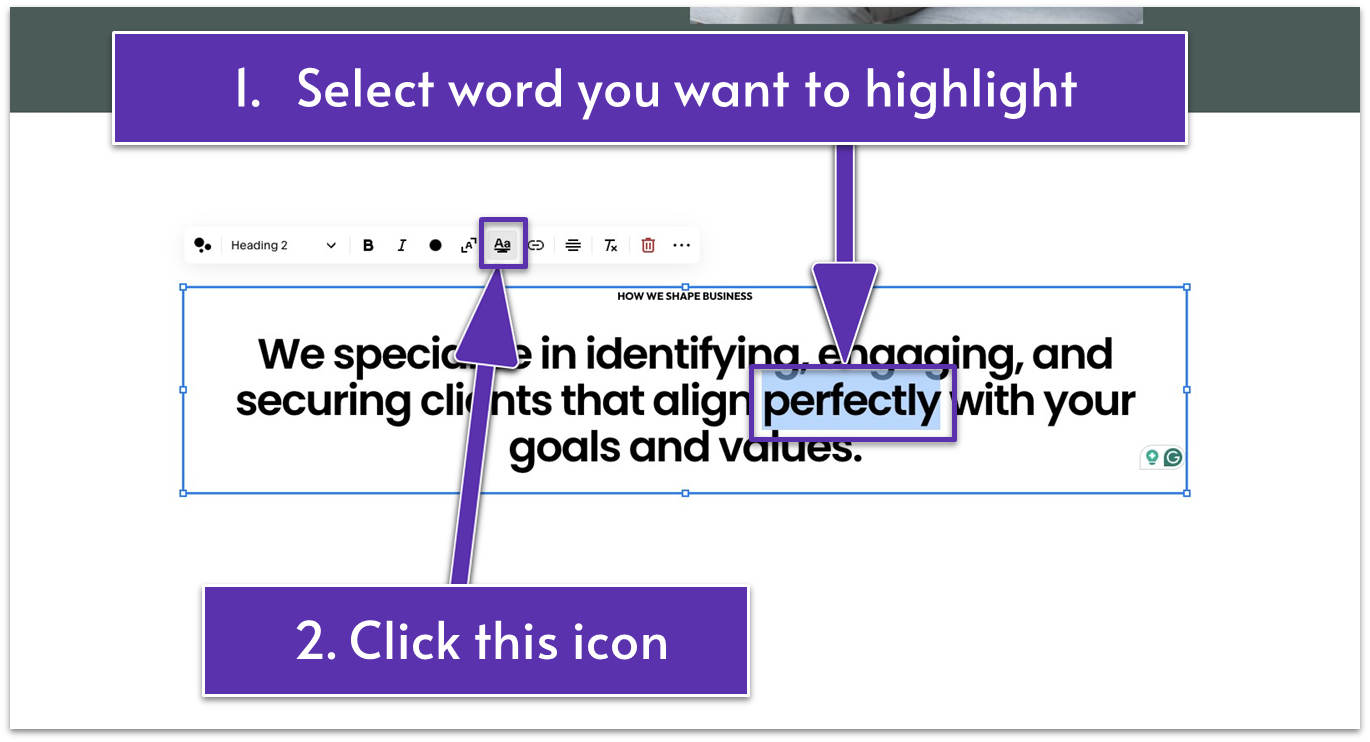
- Select the word that you want to highlight. We highlighted “perfectly.”
- Click the “Highlight” button ( ) in the editing toolbar.
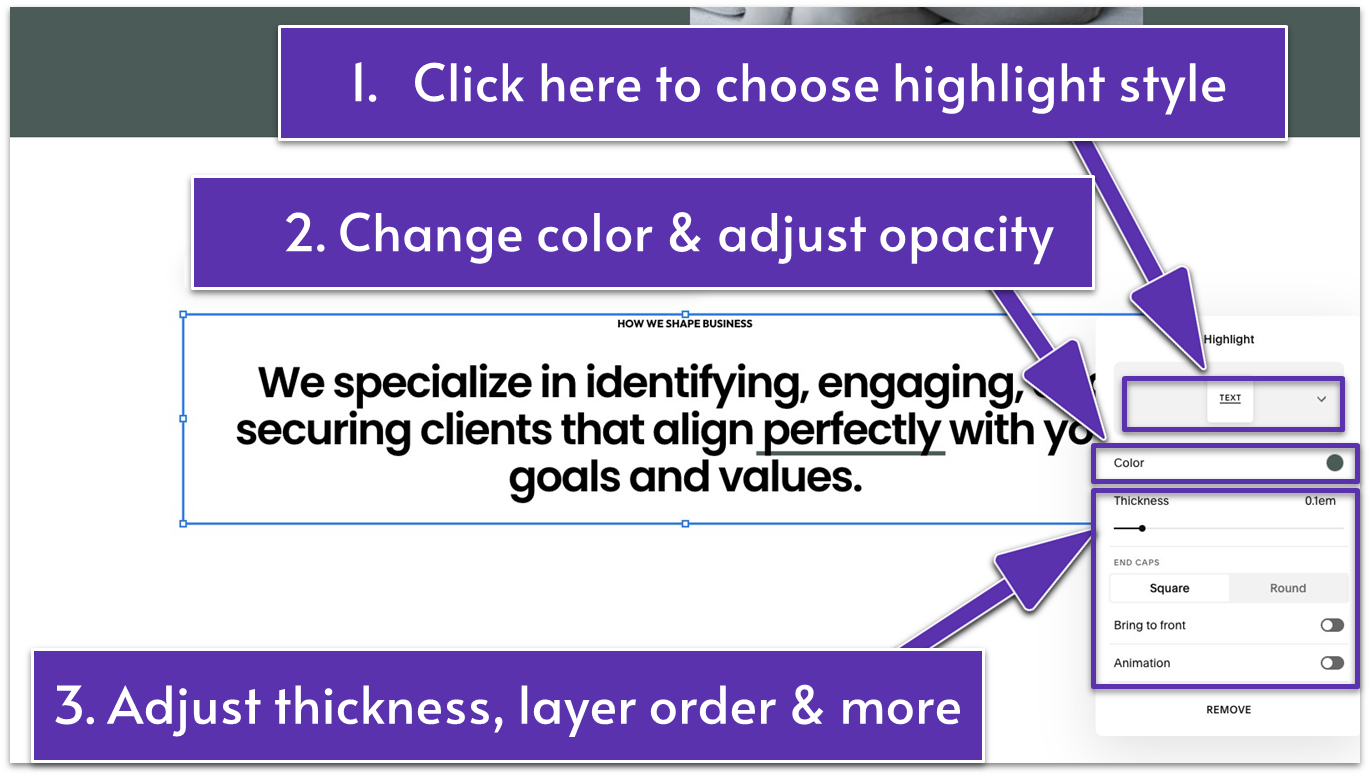
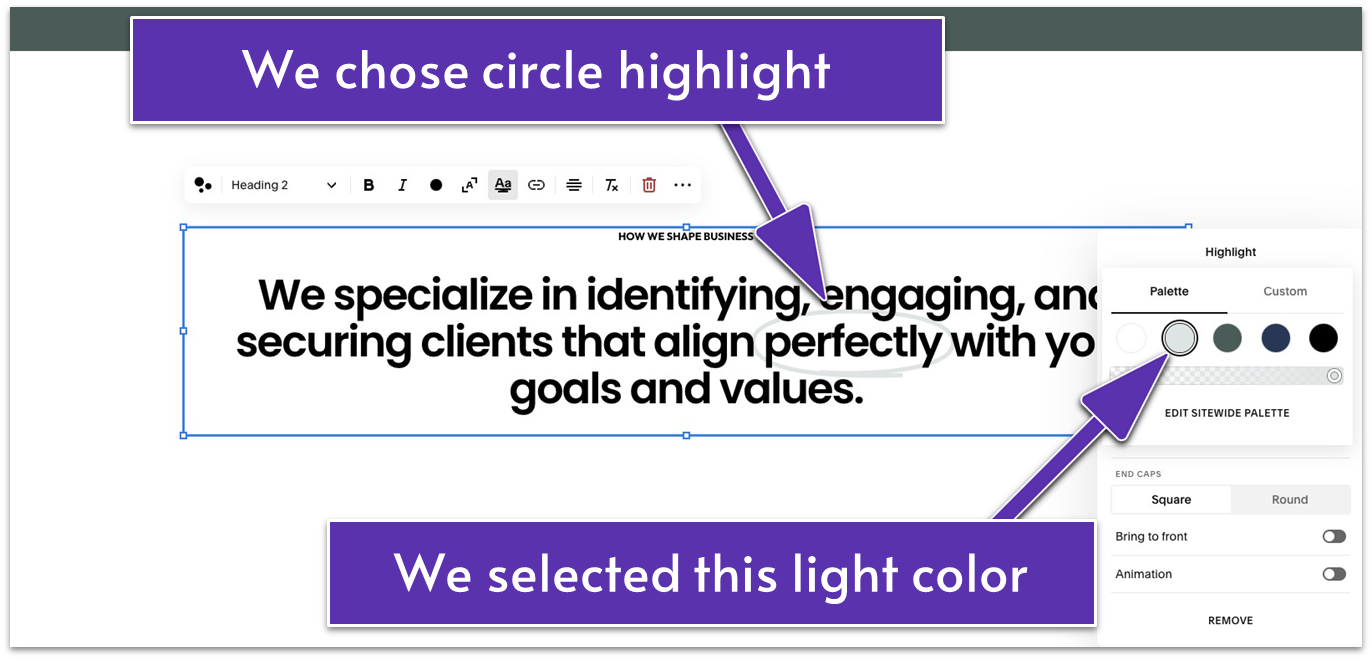
- Choose from the available highlight styles. We selected “Circle.”
- Apply further edits to the highlight if desired. We only changed the color to lighter, but you can also adjust the opacity and thickness, add animation, and more.
Step 4: Add a line block
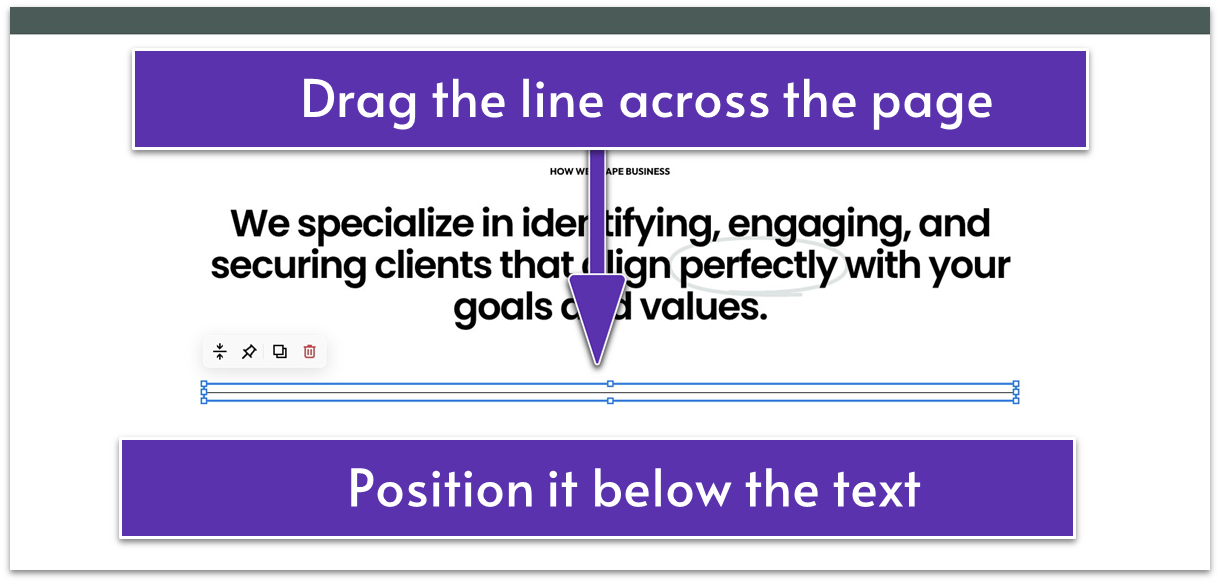
- Place the line block below the text block and drag it across the page.
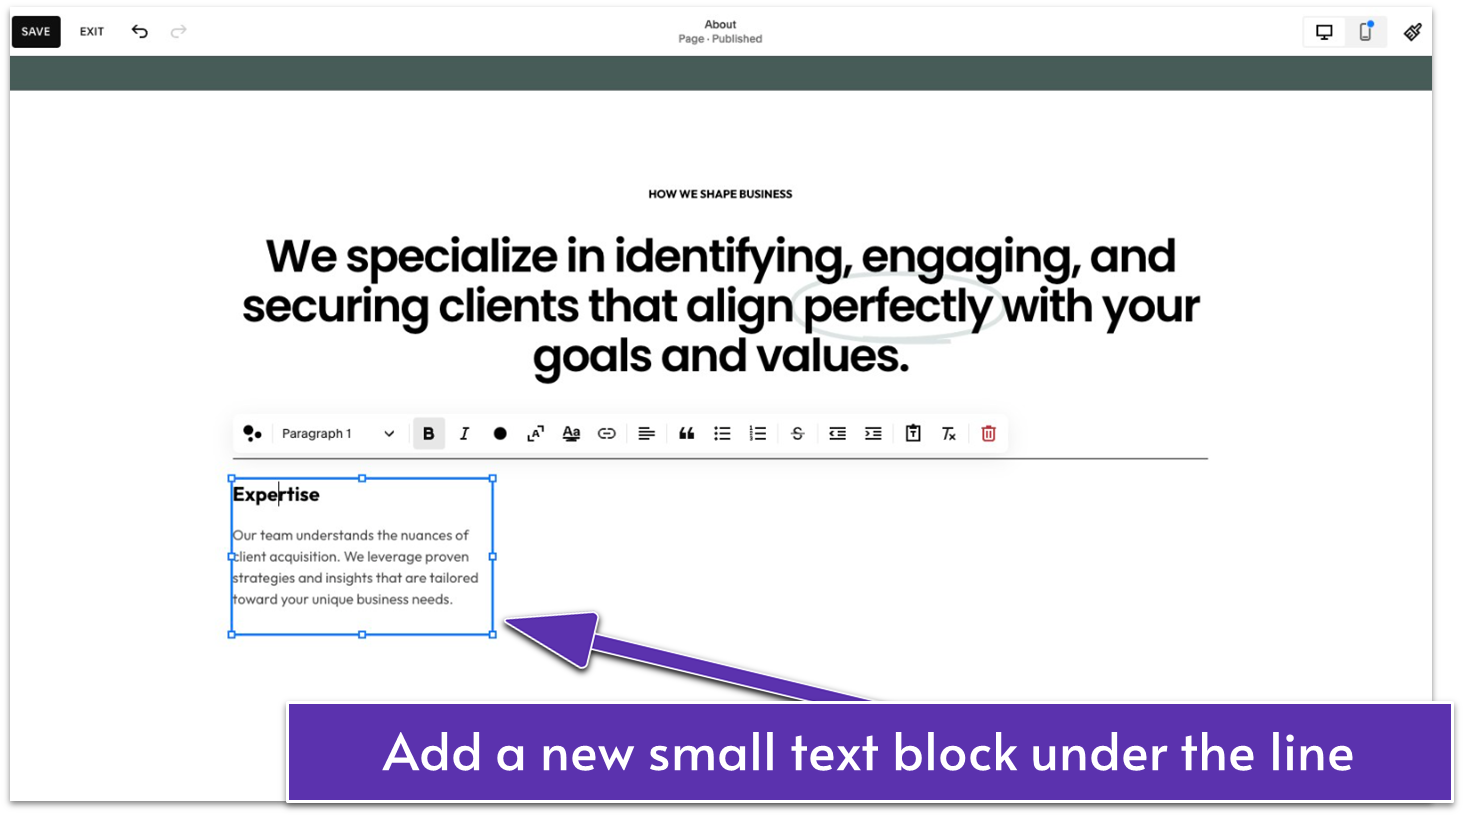
Step 5: Add another text block
- Place the line block below the text block and drag it across the page.
Step 5: Add another text block

- Duplicate the first text block two more times.
- Place the duplicated text blocks next to one another in one line.
- Click and drag over the line and the three text blocks to select them. Duplicate the entire section.
- Move the duplicated section below the original section with three text blocks.
- Duplicate as many text blocks as you need.
- Add information about your expertise, solutions, guarantee, etc., in these text blocks.
Step 7: Align the elements
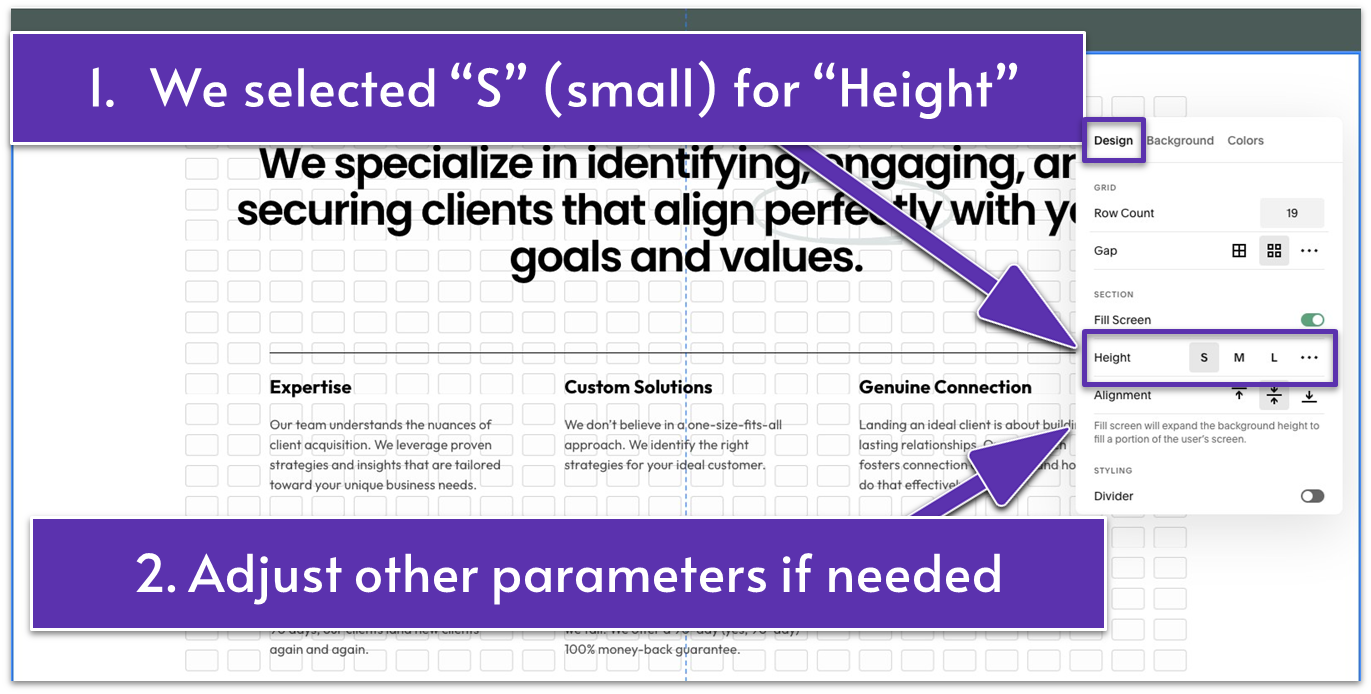
- Go to “Edit Section.”
- Under “Design,” we adjusted the Height to “S” (small).
You can make adjustments in this section to improve its appearance. For example, you can enable or disable “Fill Screen,” add a divider, change the color, etc.
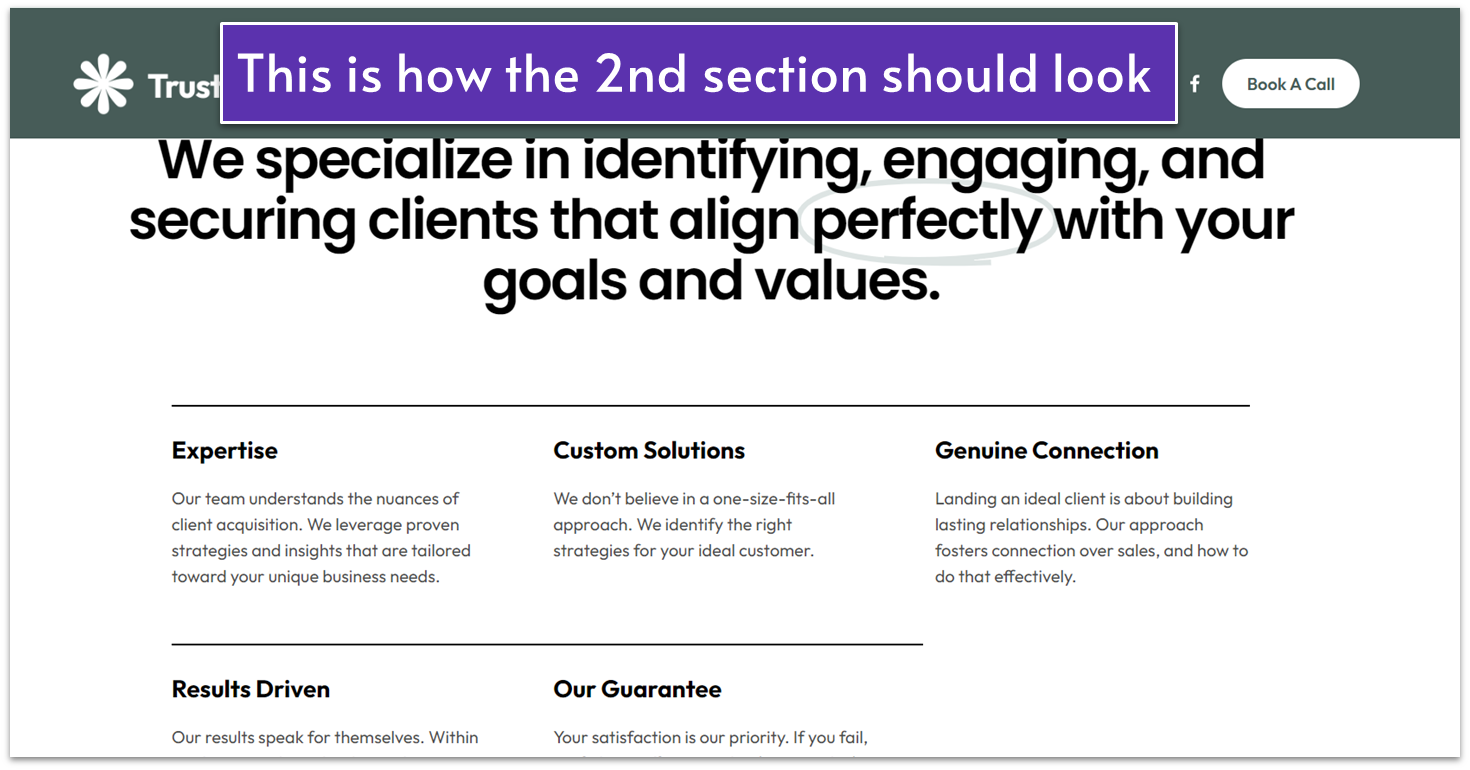
You’re on a roll! The second section of your About page is all done.
Let’s keep building.
3.7 Introduce Your Team (Third Section)
Introducing team members on your About page helps personalize your business and build trust with potential clients. Include professional headshots and disclose each member’s role.
Optionally, you can include short bios to highlight your team’s expertise and add a touch of personality. This section is about building trust in your team and making clients feel more connected to the people behind the brand.
Step 1: Add a new blank section
Step 2: Add a text block
- Drag the corners of the text box to stretch it horizontally across the page.
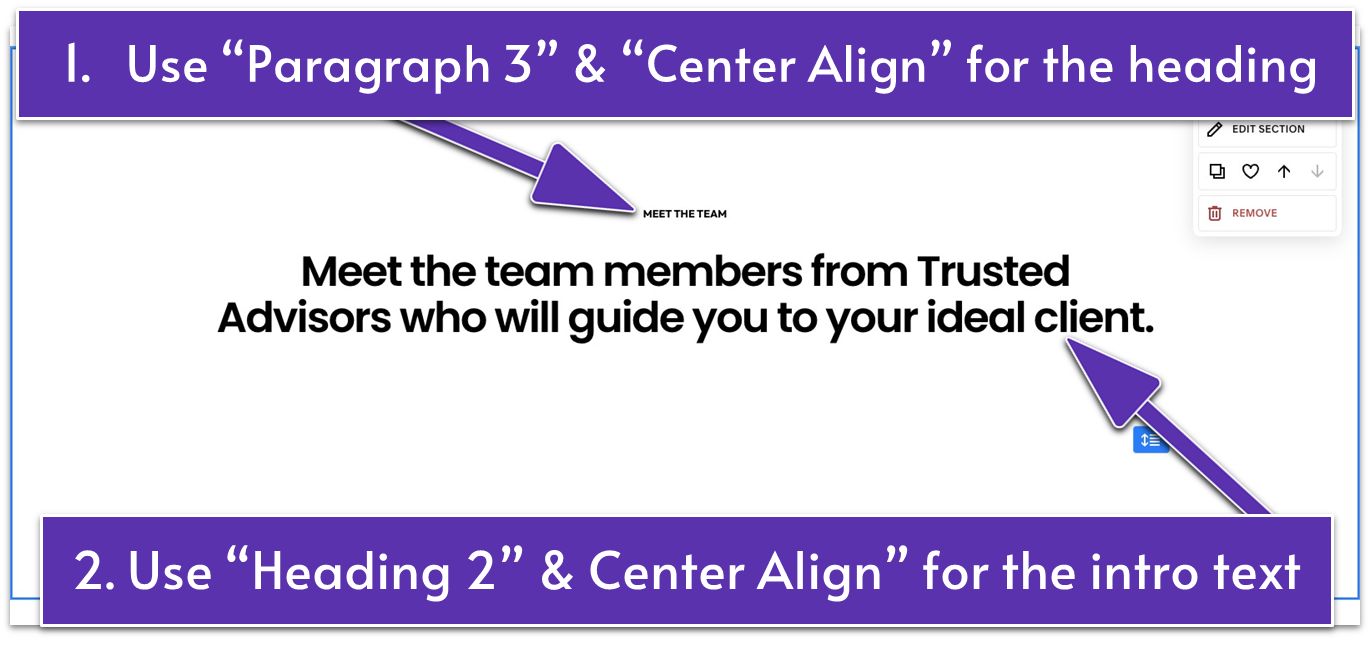
- Add a section title like “MEET THE TEAM” to introduce your team. Apply “Paragraph 3” and “Center Align” to it.
- Below the section title, add your introductory text with “Heading 2” formatting. Our intro text is “Meet the team from Trusted Advisors who will guide you to your ideal client.”
Step 3: Position and align the text
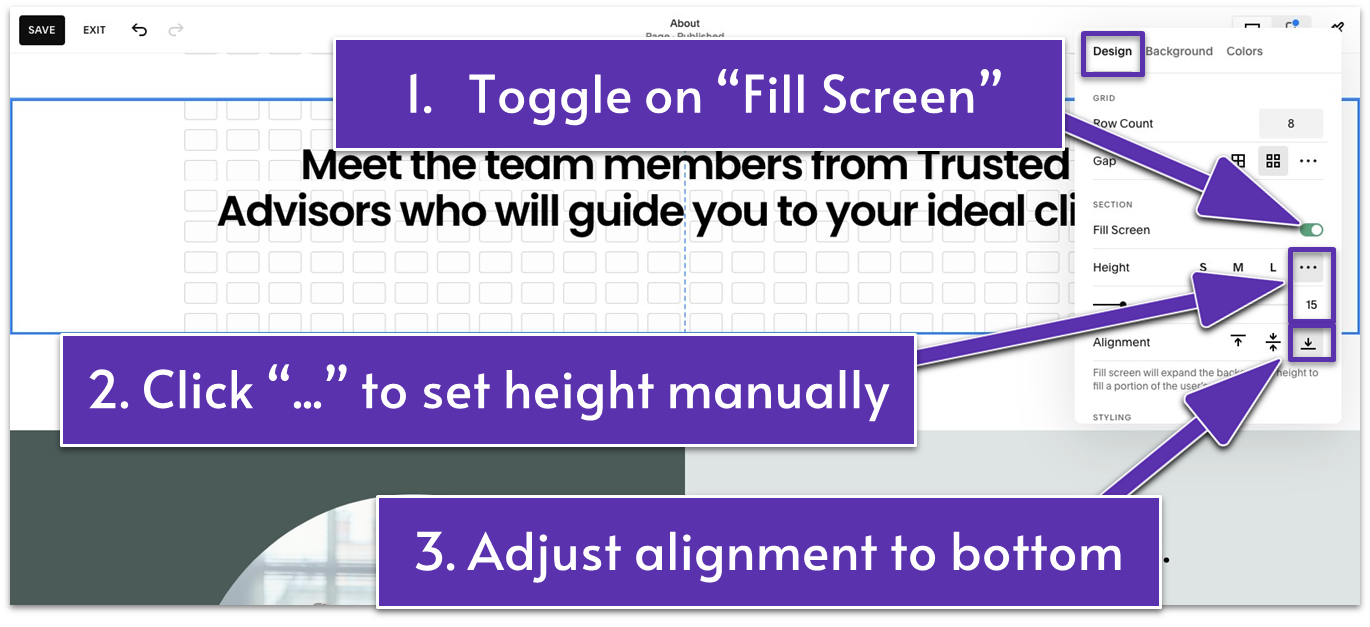
- If the section appears quite big, head to “Edit Section” to fix this. Under the “Design” menu, you’ll see three dots next to the “Height” settings. You’ll notice that the section will automatically shrink.
- Just below the three dots menu, you can adjust the height manually. We changed it to 15 for this section.
- Head to the “Alignment” settings below “Height.” Click to align content to the bottom of the section.
- Drag up to reduce the extra white space below the text block.
Step 4: Select a dark color theme

- Click “Edit Section.”
- Go to the “Colors” tab.
- Select a dark color theme. We chose “Dark 2” for this section.
Step 5: Add a “People” section
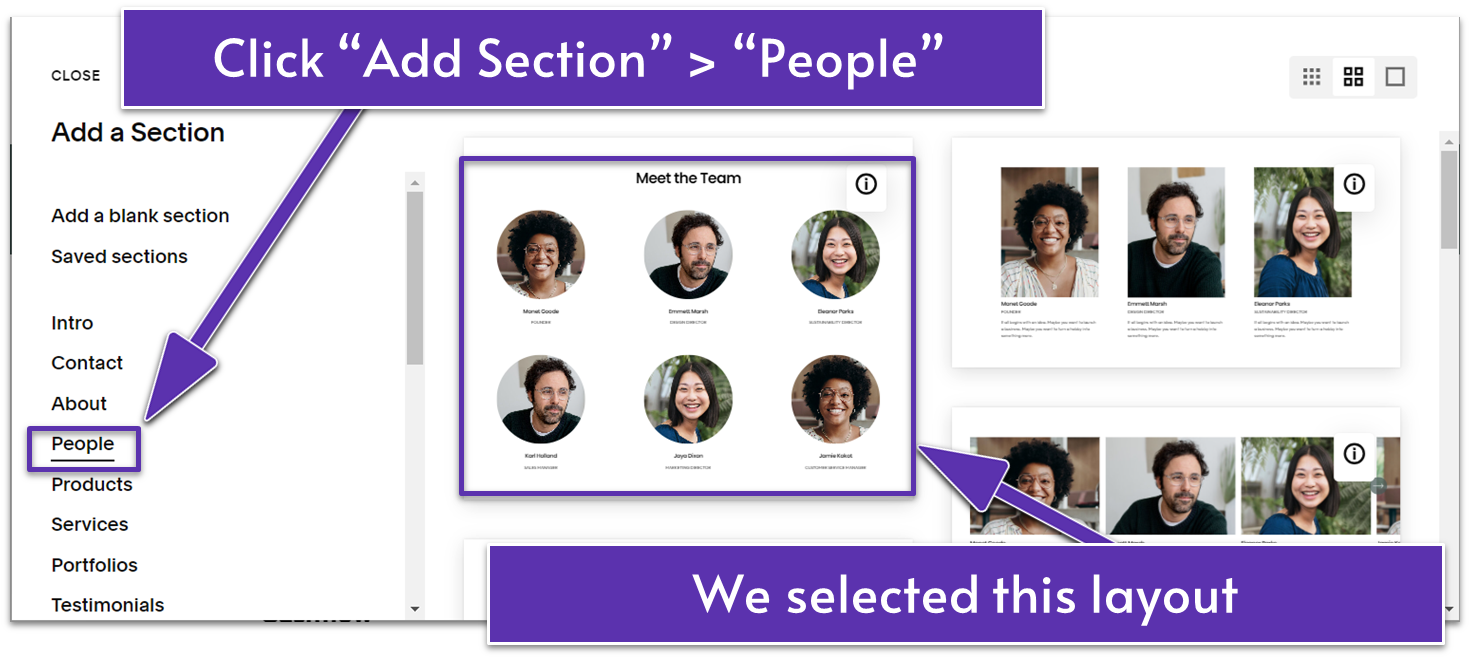
- Click the “Add Section” button.
- Select “People” from the available options. A selection of different layouts to present your team will pop up.
- Select a layout of your choice. We chose the first option.
Step 6: Change the section color
- Edit the section and go to “Colors.”
- Pick the same “Dark 2” color theme to match the section above it. Although these are built as two different sections, the goal is to make them visually appear as one.
Step 7: Remove the section title
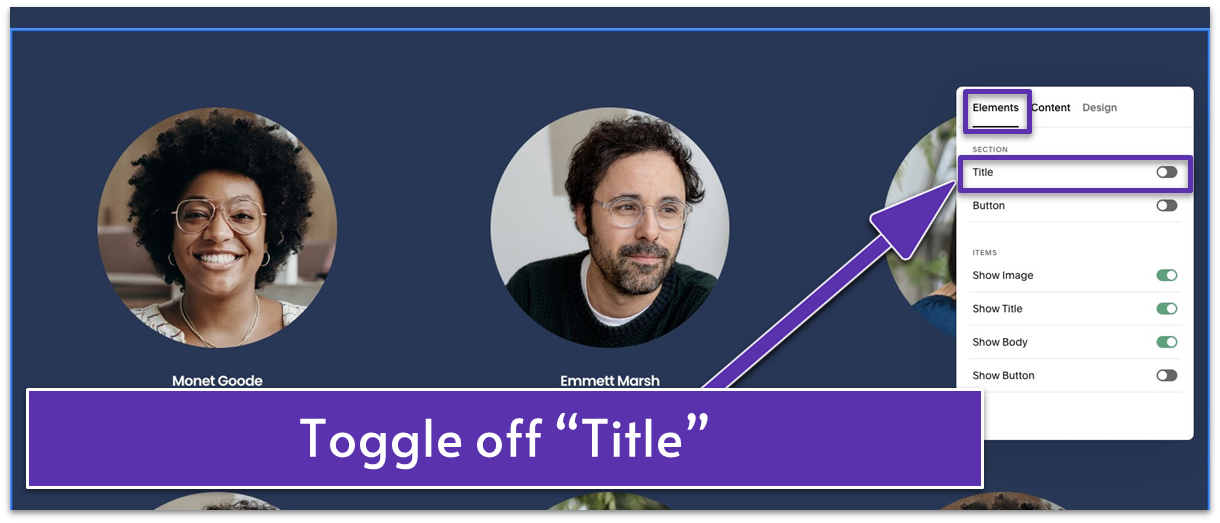
- Go to “Edit Content.”
- In the “Elements” tab, toggle off “Title” to remove the premade title in your chosen “People” layout. The section above already serves as a title for this section.
Step 8: Add images and information about team members

- Go to the “Content” tab to add images of your team members. A list with the preset images will show up.
- Click your selected item to open the item editor. From here, you can upload an image and add the team member’s name and role in the company.
- Click the trash can icon ( ) to delete images. Click “Add” at the bottom of the list to add more images.
Step 9: Adjust other settings
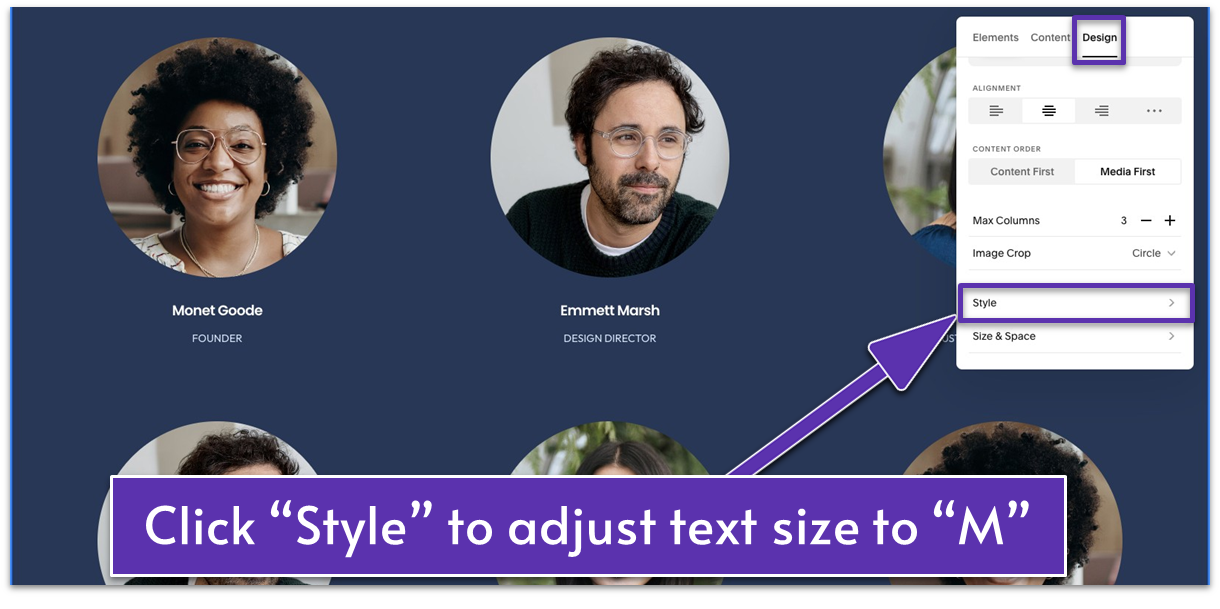
- Go to the “Design” tab. We’ll keep most of the default settings here for our site, but you can play around to see what works best for you.
- Under “Style,” we adjusted the “Text Size” to “M” so the text appears a bit bigger.
The options under “Size & Space” might appear tricky. Here’s how we formatted it:
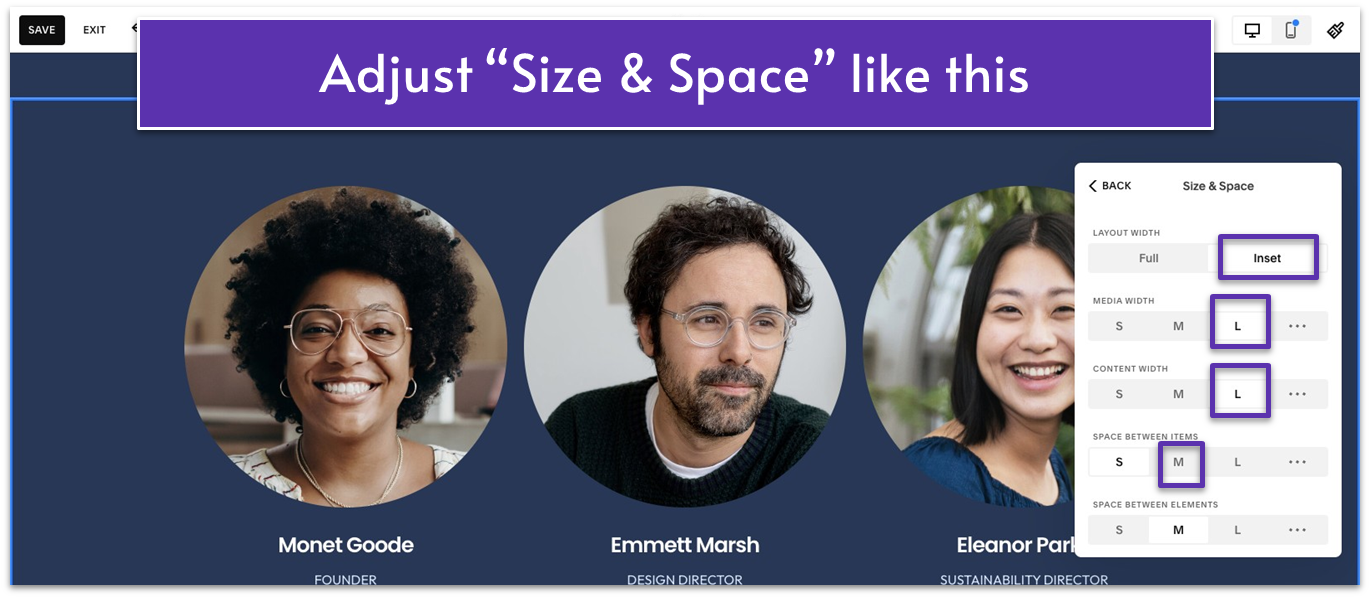
- “Layout Width” changed from “Full” to “Inset”
- “Media Width” and “Content Width” set to “L” (large)
- “Space Between Items” adjusted to “M” (medium)
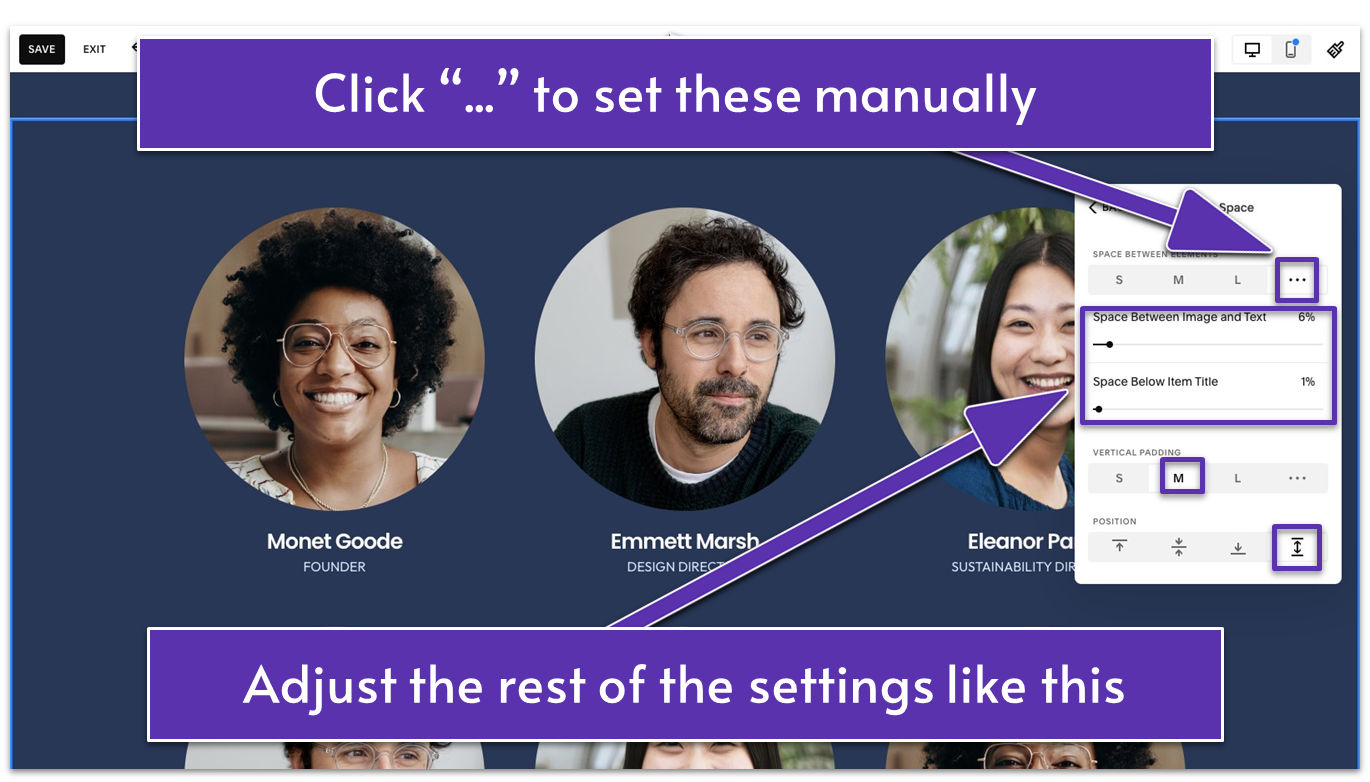
- “Space Between Image and Text” set to 6%
- “Space Below Item Title” set to 1%
- “Vertical Padding” adjusted to “S” (small)
- The icon selected for “Position”

3.8 Add Contact Section (Fourth Section)
You should make it frictionless for potential customers to contact you. Use this space wisely to encourage them to take the first action. This convenient contact section will allow those interested to easily reach you without searching for a separate page.
Step 1: Add a new blank section
Step 2: Add a background to the section
Instead of plain color, we’ll jazz things up this time with an inviting background.
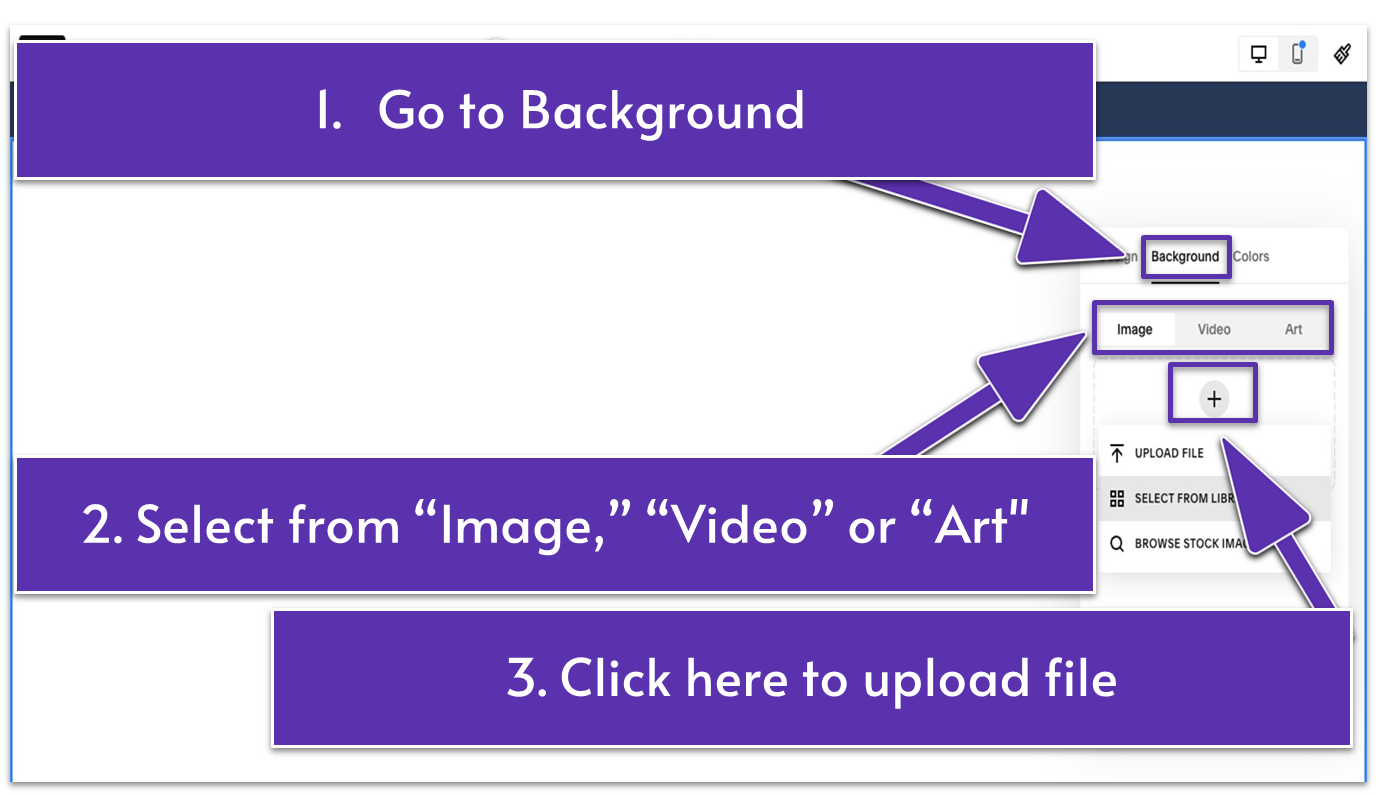
- Go to “Edit Section” and “Background.” You can set an image, video, or abstract art as a section background. We added an image for our website.
- To add an image, click to upload a file, search from the library, or browse Squarespace’s stock images.
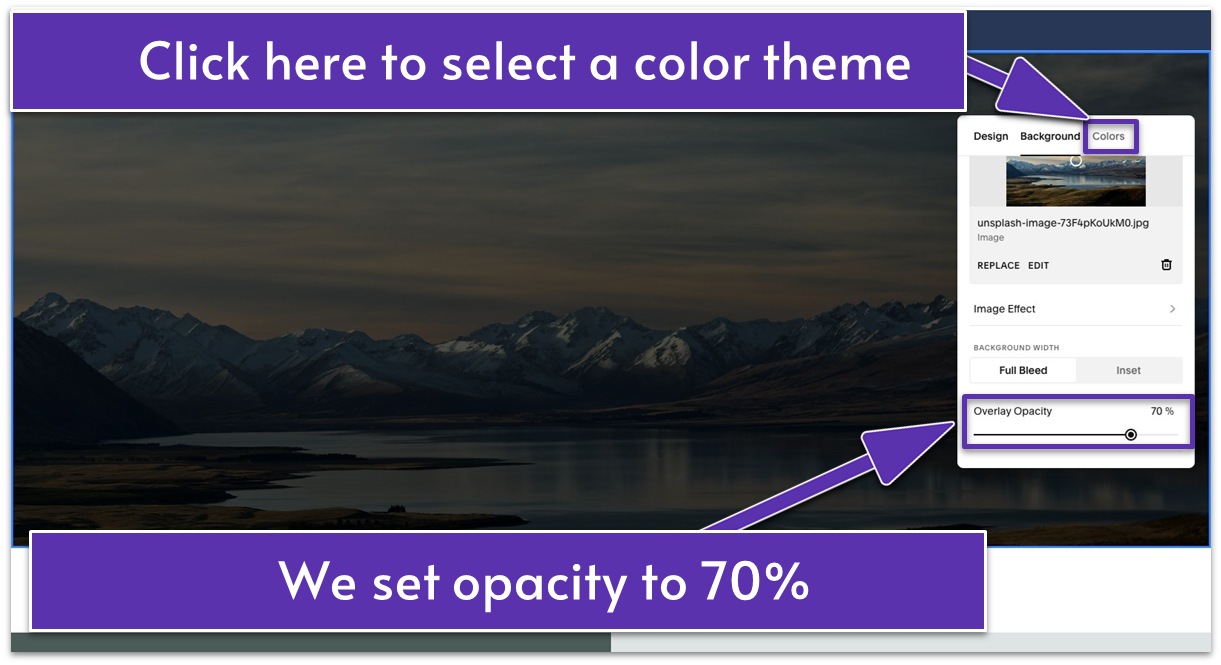
- Once you upload the right image, you might need to make some adjustments. For our particular image, we changed the color theme to dark. We went for our “Darkest 1” theme and adjusted the “Overlay Opacity” to 70%.
Step 3: Add a text block
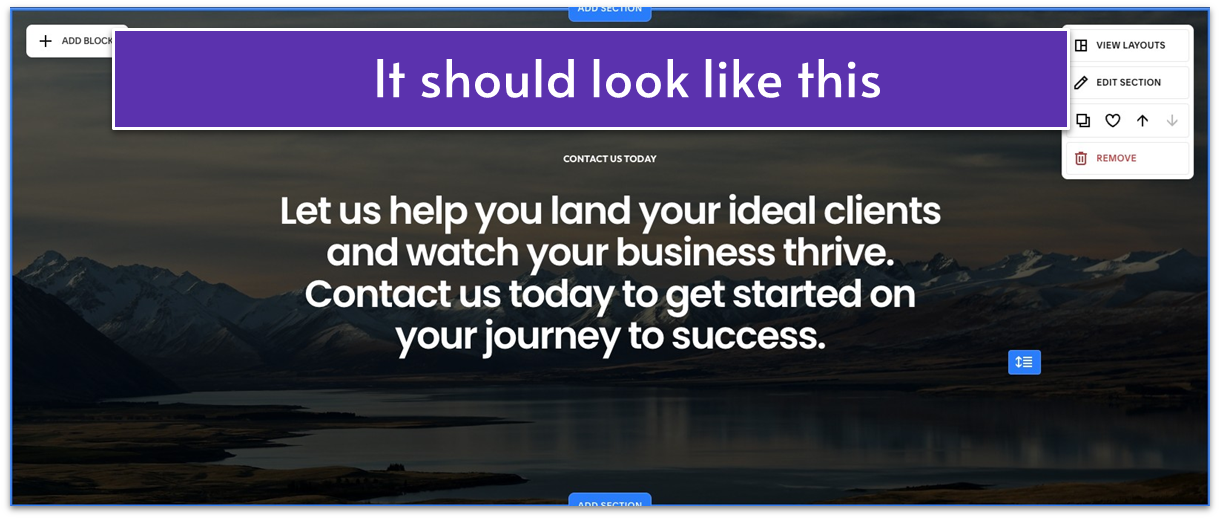
- Stretch the text block to enlarge and center it.
- Add a CTA section title in this text block like “CONTACT US TODAY.” Apply “Paragraph 3” and “Bold” formatting and center-align it.
- Below the title, write a short message to entice potential clients to reach out. For example, we wrote “Let us help you land your ideal clients and watch your business thrive. Contact us today to get started on your journey to success.” Use “Heading 2” formatting to keep it consistent with what we did for the previous sections.
Step 4: Add a button block below the text block

- Click the pencil icon ( ) and go to “Content.”
- Customize your button text. We labeled it “Book a Call.”
- Attach a link. You’ll want this button to lead to your Contact page.
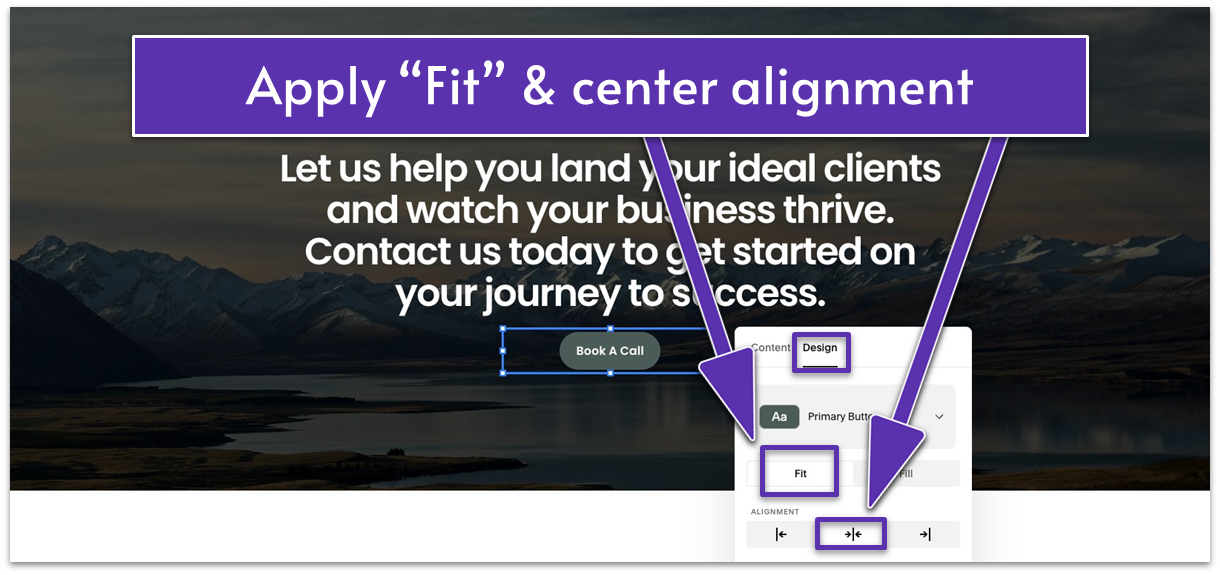
- Go to “Design.” Here, we’ll go for “Fit” and center alignment.
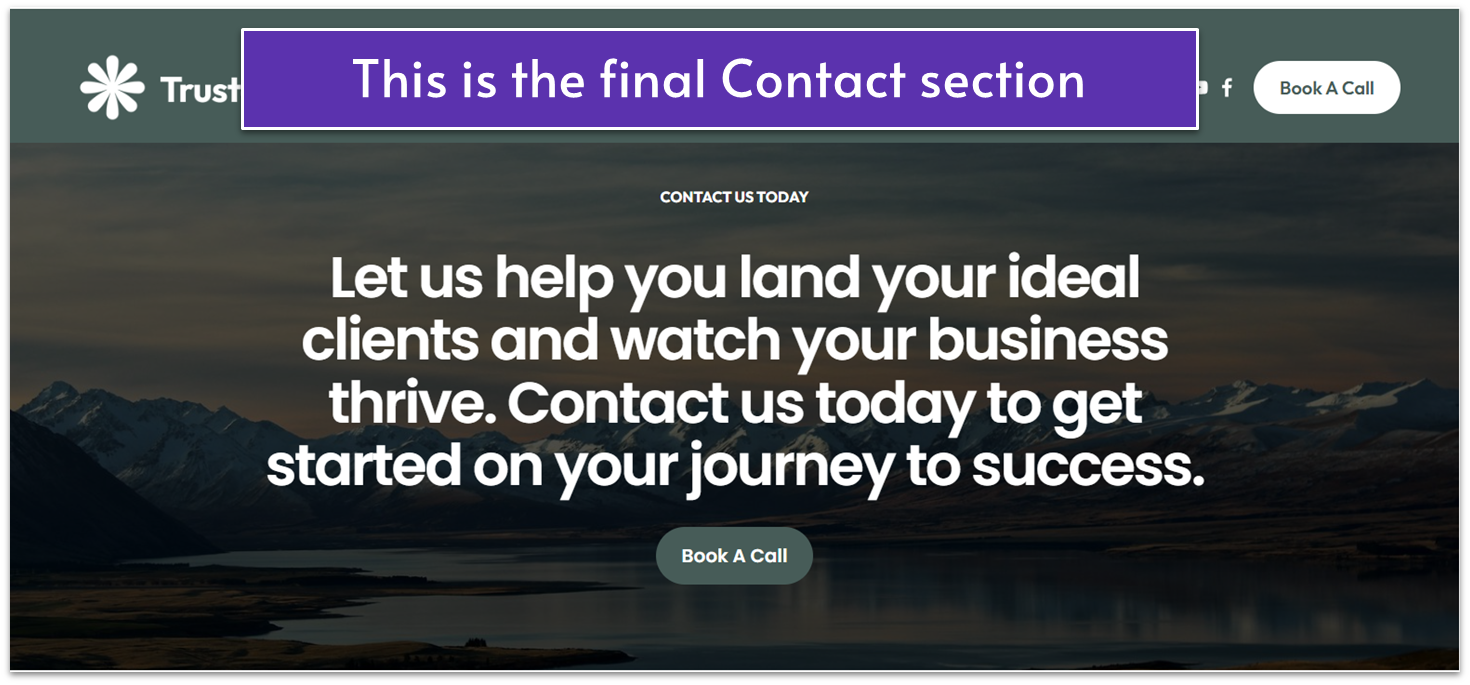
Step 5: Make sure the elements are framed tightly
3.9 Optimize for Mobile
Some elements might look off in mobile preview. Worry not – it’s easy to optimize for mobile in Squarespace. You can quickly make adjustments to create a cohesive mobile experience.
Keep in mind that if your About page features elements that aren’t part of this guide or if you decided to remove some, your mobile preview will look different from ours. In this case, you might need to tweak more or less things than those covered in this section. But by the end of this section, you’ll feel confident about optimizing for mobile on your own.
Step 1: Enter “Mobile View”
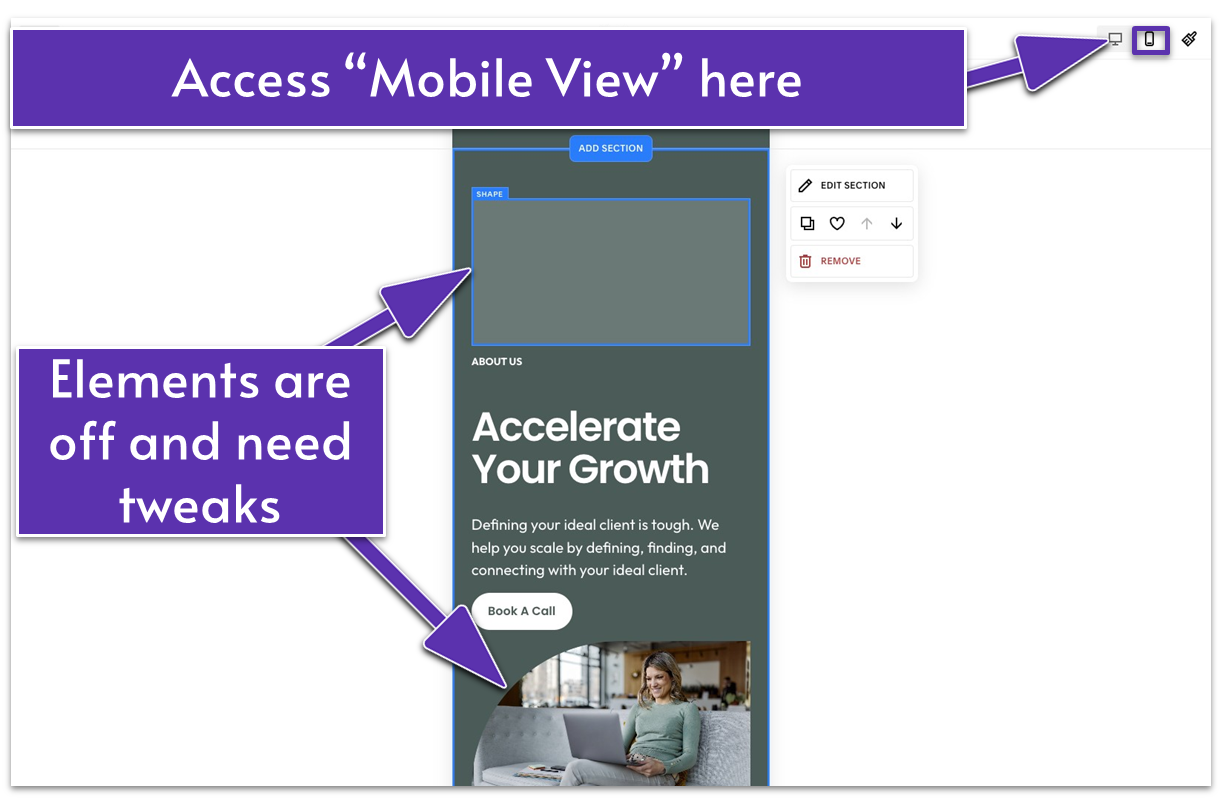
- Click the icon that looks like a mobile device ( ) to activate “Mobile View.”
Step 2: Optimize the first section for mobile
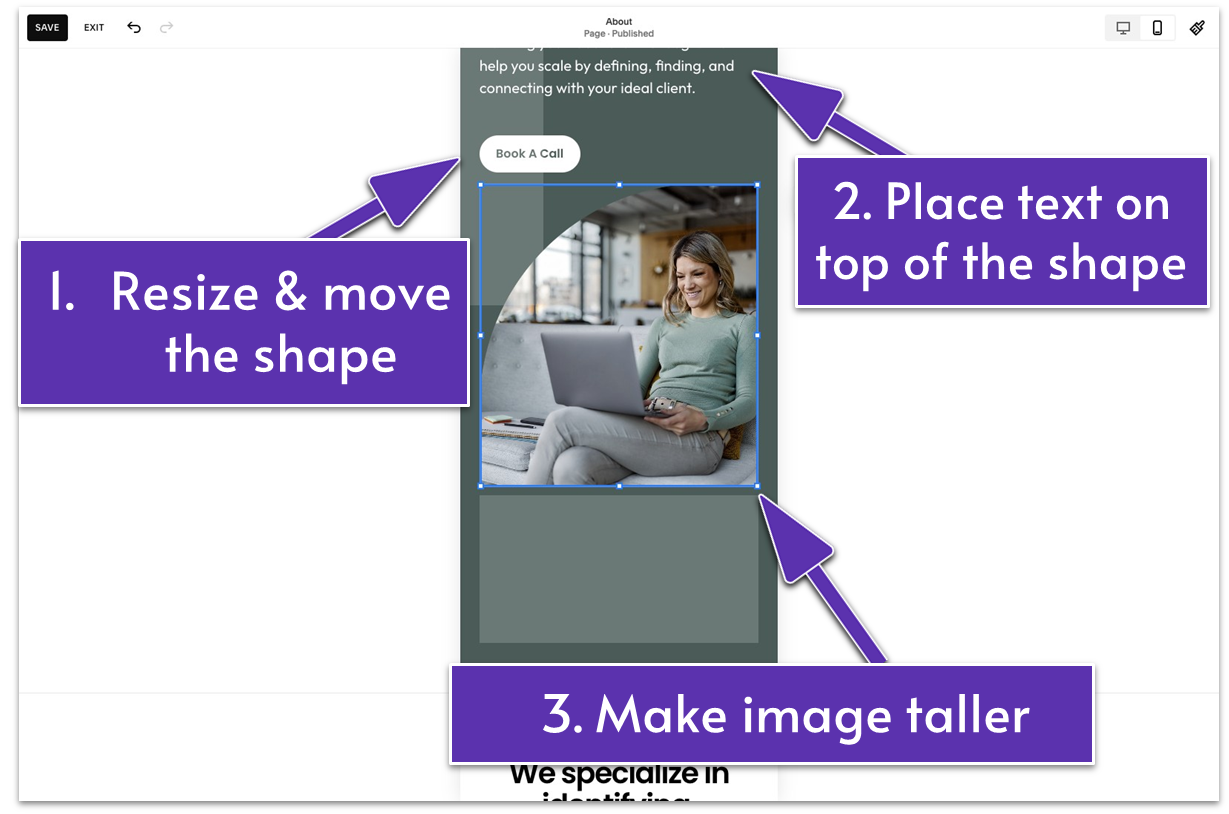
- Vertically stretch and narrow the shape above the “About Us” text block. Align it to touch the left edge of the grid. Its height should extend slightly beyond the height of the text and button blocks.
- Move the text and button blocks over the vertical rectangle. Bring them to the front using in the block toolbar.
- Stretch the image to make it taller.
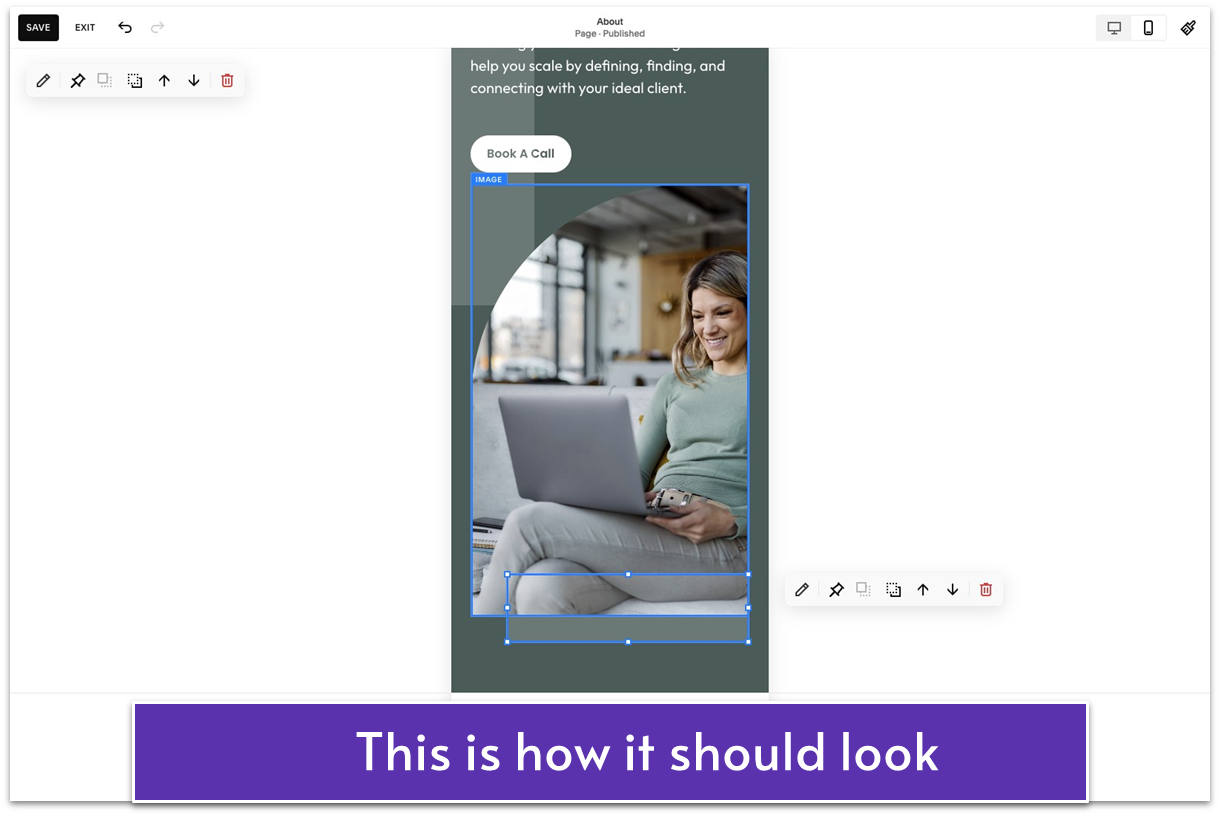
- Resize the shape below the image to a small horizontal rectangle, slightly narrower than the image. Place it in the bottom-right corner, half overlapping the image, and move it behind so the image stays fully visible.
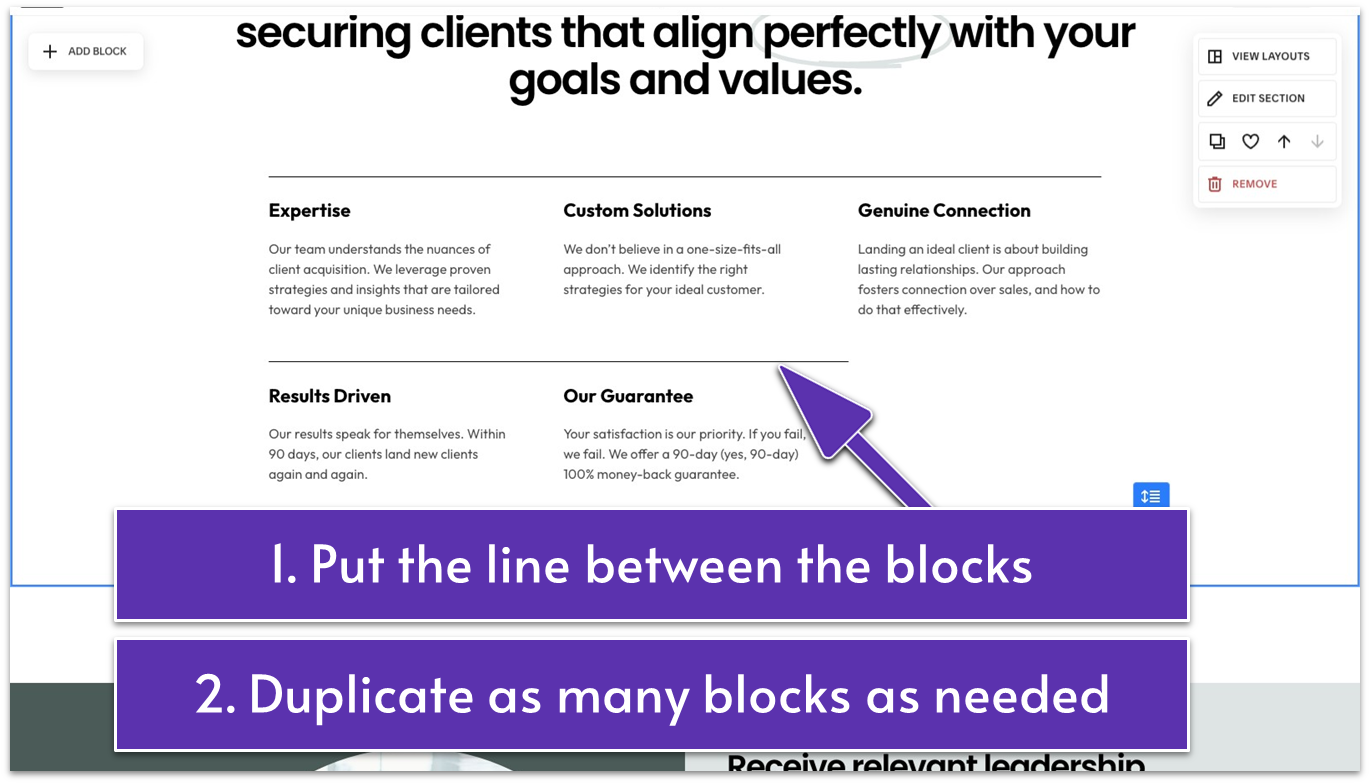
Step 3: Optimize the second section for mobile
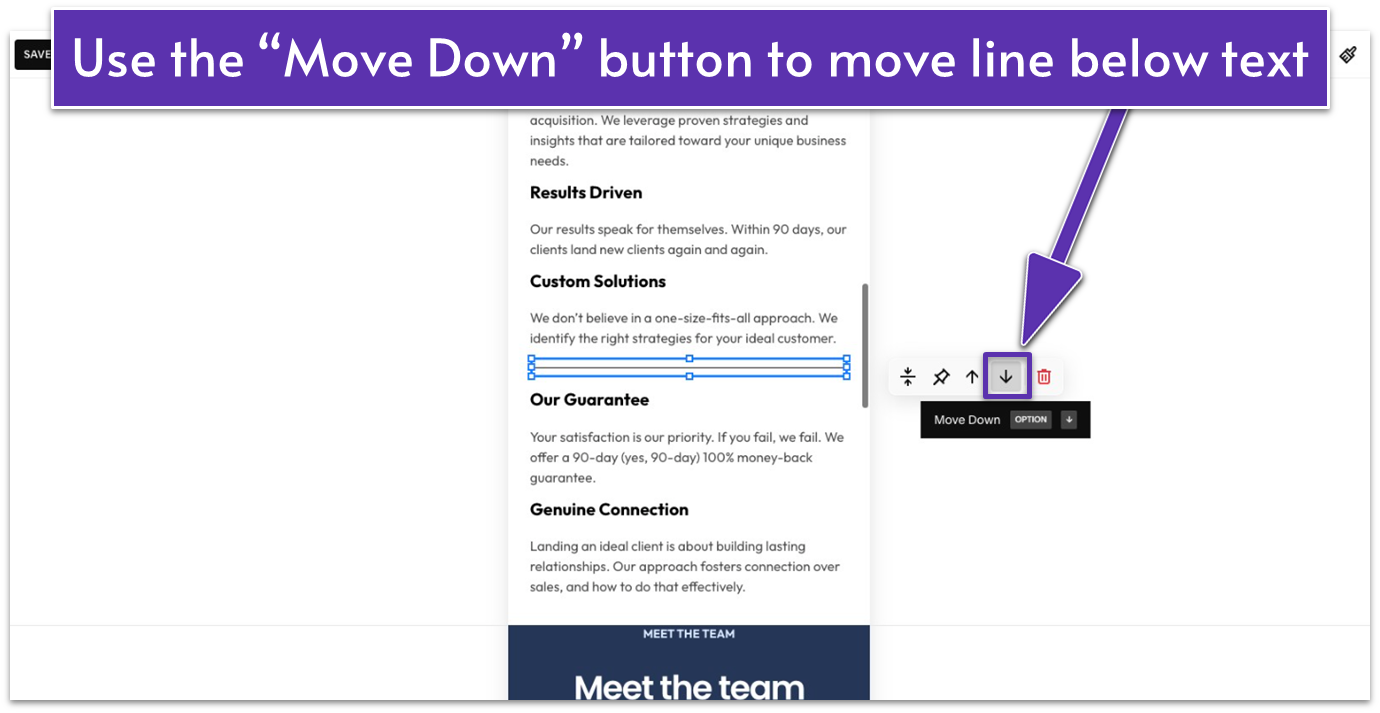
- Move the line between the text blocks to the end of the section using .
The rest of the sections look great as they are, but you can always make small adjustments in spacing, positions, and other tweaks if necessary to improve the mobile experience.
Voila! Your About page is ready to captivate potential clients.
Now that you have optimized your page for mobile, I recommend saving all sections by clicking in case you need to reuse them elsewhere throughout your site. Finally, save your progress and exit the page.
Off to the next adventure – now let’s build your Services page!
