
Hostinger’s affordable pricing, reliable performance and above-average speeds, and beginner-friendly interface make it one of the best hosting providers currently on the market. Creating your Hostinger account could be the first step of a long and fruitful journey for your website, and I’m here to show you how.
Whether you’re starting a new website or want to transfer your existing site to Hostinger, I’ll walk you through the entire signup process with step-by-step instructions from start to finish – and ensure you get the best possible deal along the way. The best part is that you can try Hostinger risk-free for 30 days.
Quick Guide: How To Create a Hostinger Account
Hostinger offers a wide range of shared, cloud, VPS, and email hosting plans. We’ll be signing up for the Premium shared hosting plan, but the process will be almost identical with any other plan. The process is straightforward and can be completed in less than 10 minutes.
- Step 1. Go to Hostinger.com. If there’s a localized version for your country, you can find it by clicking on the upper left corner of the page where it says “English.”
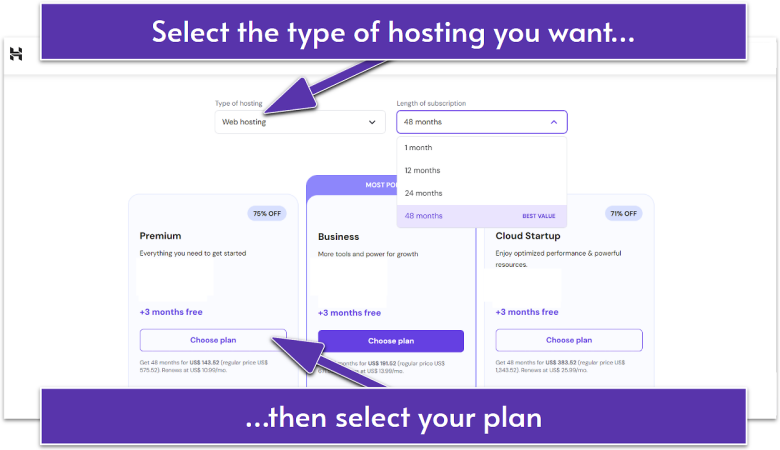
- Step 2. Click on Pricing in the upper right corner and select the type of hosting and length of subscription you want from the dropdown menus. Then, select the plan that works best for you.
- Step 3. Confirm your billing period and create your account with an email address and password or link it directly to your Google or Github account.
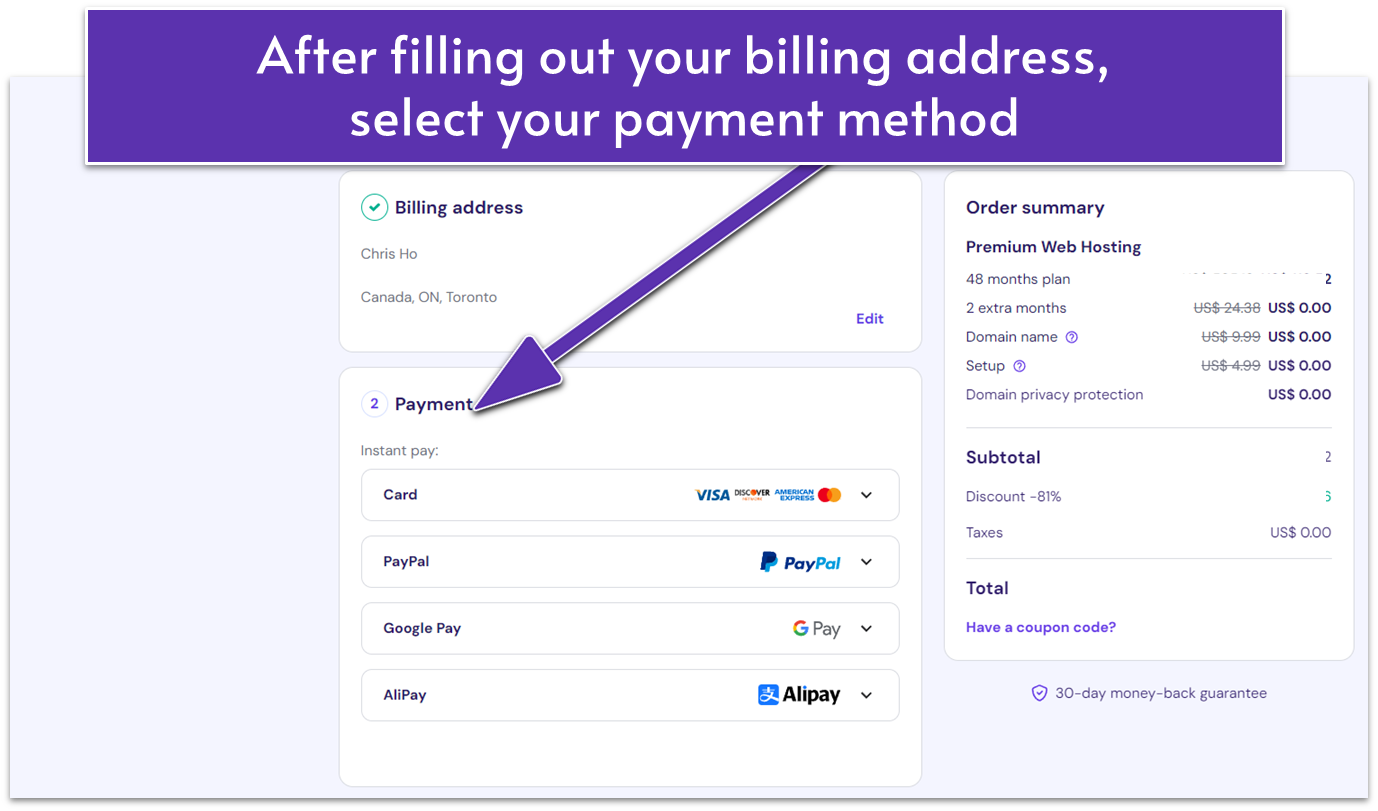
- Step 4. Input your payment details and select your payment method.
- Step 5. Once your payment has been processed, create a password for your account and start hosting.
The In-Depth Guide to Creating a New Account
Start by heading to Hostinger.com. If there’s a local version for your country available, chances are you’ll automatically be redirected, but if not, simply type “/” followed by your country code (in my case, the full link would be hostinger.com/mx).
Select the Pricing tab and then choose your hosting type and subscription duration with the dropdown menus. For a full features comparison, simply scroll down to the bottom of the features list and click See all features.
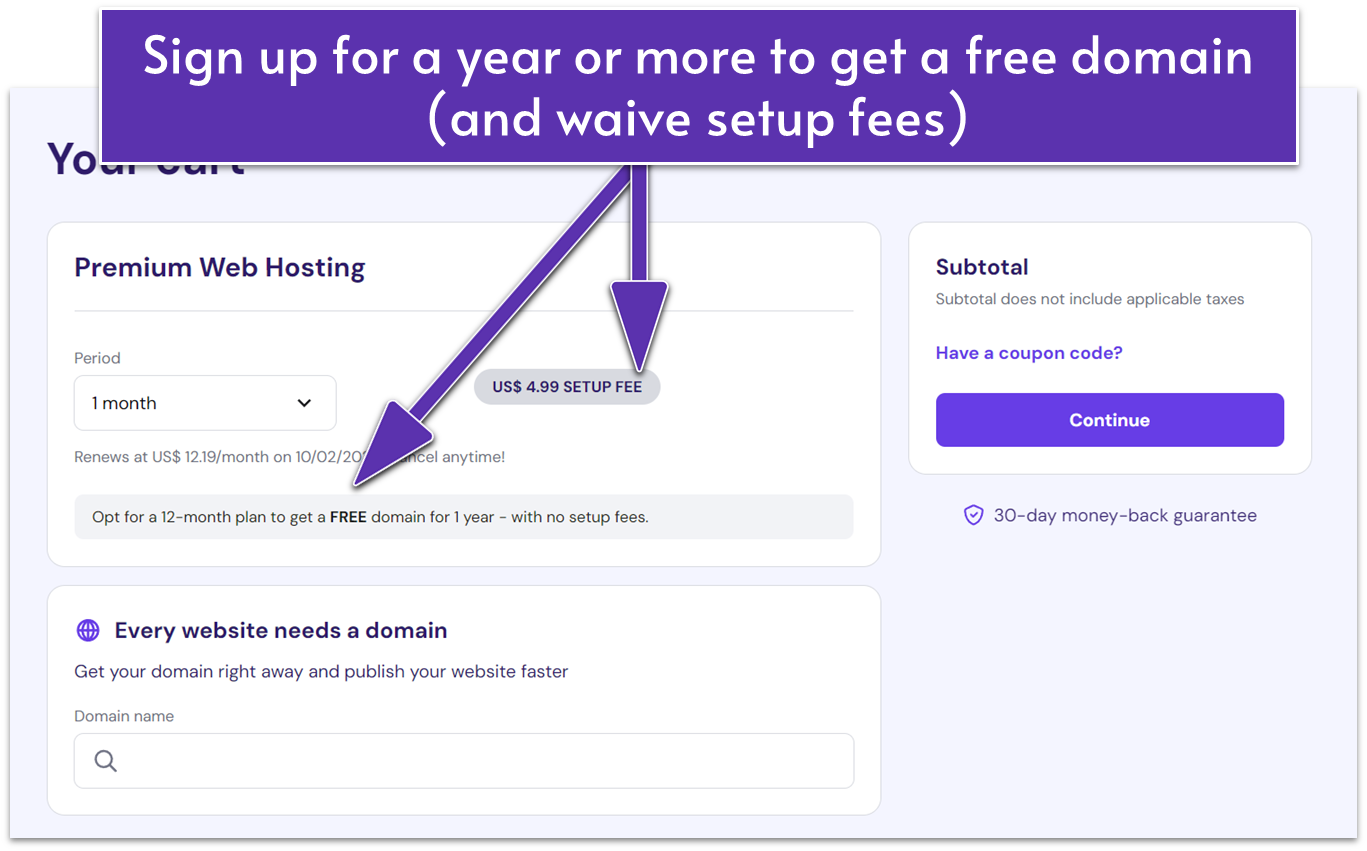
If a plan catches your eye, simply click on Choose plan to get started. You’ll be redirected to the signup page where you can select your payment method, billing period, and get the option to add discount codes. Keep in mind that the longer your billing period, the smaller your cost per month will be.
If you go with an annual plan or longer, you will also get a free domain name registration for one year. You can choose from top-level domains (TLDs) like .com, .org, and .info, as well as over 25 other options like .eu, .shop, .tech, and .online. Remember that you don’t have to register your domain yet if you aren’t clear on what you want, you can always set up your free domain later.
After choosing your payment period, you’ll have to create a Hostinger account. You can sign up with an email and password combo or link your account to your Gmail or Github profile. If you sign up with an email address, you may receive an automated email to confirm your account activation.
Then, you’ll have to input your payment information. Hostinger allows payments via credit and debit cards, PayPal, digital wallets, and Coingate for cryptocurrency. If you’re on your country’s Hostinger website, you’ll be able to pay in local currency and see payment options exclusive to your region, including PaySera, Blik, Nequi eWallet, and Akulaku.
Before you make your payment, take a moment to check out our available Hostinger coupon codes. Our codes are regularly updated and you can get impressive discounts for your web hosting plan.
Save up to 75 % on your Hostinger plan!
Limited-time offer - Don't miss it!
Once you’ve created your account and reviewed your payment term and method, all that’s left to do is click on Submit payment and wait to complete your transaction.
How to Purchase a New Plan From hPanel
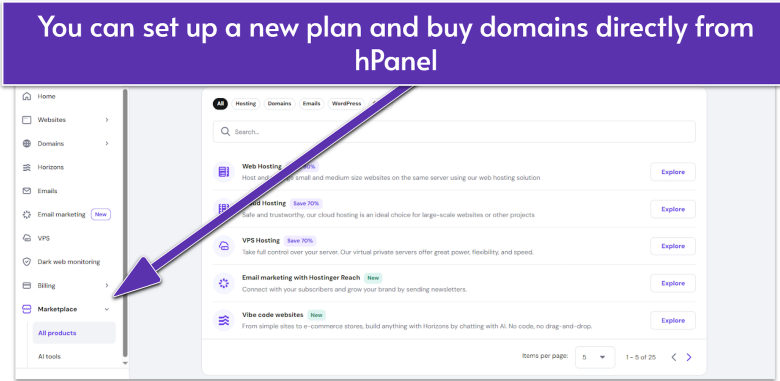
Once you become a Hostinger customer, you can add a new plan and buy additional domains right from your hPanel dashboard.
Click on the Marketplace link in the menu on the left of your dashboard. In the dropdown menu, Hosting is your second choice. The default view is set to All products, but you can parse by product under hosting, domain, and e-mail. Make your choice and you’ll see the plans available (you can check the website for full plan features if you’re not sure which plan is best for you). From there, simply follow the same steps outlined above to complete your purchase.
How to Upgrade Your Plan From hPanel
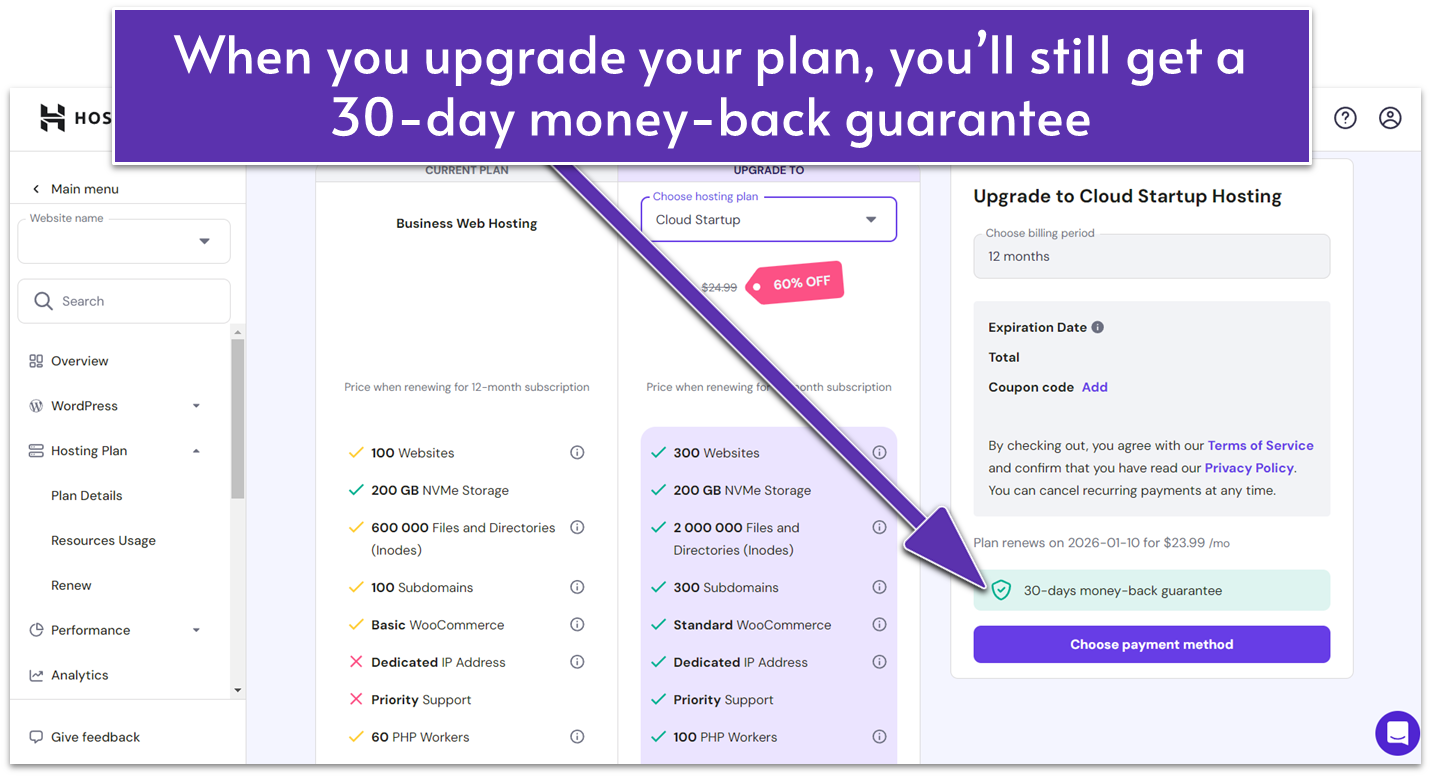
If you want to upgrade your existing plan, find your current hosting plan in the Home menu and click Manage. There’s an Upgrade plan button in the top right corner of the Overview screen, or you can navigate to the Hosting Plan > Renew section.
In this example, Hostinger will recommend Business or cloud hosting plans. Select the plan you want to upgrade to and click on Choose payment method to continue. Even though your billing method is saved, you can choose another way to pay.
Upgraded plans are subject to a 30-day money-back guarantee so you can always ask for a refund if you want to revert to your original plan.
How to Create Hostinger Email Accounts From hPanel
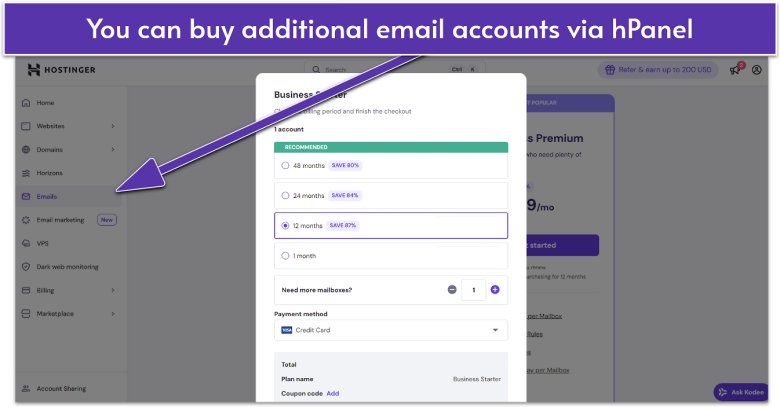
Hostinger offers free email accounts with all its plans but you might want to purchase additional business hosting, especially if you have a team that needs multiple email addresses with larger storage limits. You can do this via hPanel in two ways: going to the Marketplace or straight to the Emails section in the right-hand menu.
From here, you can choose the plan you want and the length of your subscription. (For Business email, you’ll save more with a 1-year plan – but at $0.39/month, this is a pretty good deal.) You can also add additional email addresses and choose a payment method before checking out. Your new email addresses are automatically linked to your domain.
Pay Attention to the Fine Print When Signing Up
There are a couple of things you should keep in mind before you sign up for any plan. First, keep in mind that domain hosting will only be free for the first year. After that, you’ll have to pay a yearly fee to keep your domain like you would with any other registrar. Some top-level domains (TLDs) are cheaper than others. The .com TLD might be the most famous one, but it’s also amongst the most expensive, while .xyz will probably cost very little. Either way, don’t worry about this too much, “most expensive” in terms of TLDs is maybe the cost of four large coffees per year.
You should also keep in mind that if you go with Hostinger’s cheapest plan, Premium, you’ll need to install a free Cloudflare CDN yourself to boost your website’s performance worldwide. For any other plan, Hostinger’s in-house CDN comes pre-installed for you.
Finally, I highly recommend signing up for a Hostinger plan on your local site. Paying in your local currency will protect you against steep exchange rate fluctuations between renewal terms and even against losing money if you want to claim your 30-day money-back guarantee.
How to Transfer a Domain to Hostinger
If you already have a website, one of your first orders of business might be to transfer your domain to Hostinger. The process is simple and quick. Keep in mind that you need to have all the authorization credentials of your own domain, and at least 60 days must have passed since you first registered it.
On your old registrar, make sure to turn the transfer lock off so you can move forward with the process.
Then, go to Domains on your hPanel in your Hostinger account, followed by Transfers, enter your domain, and click Transfer.
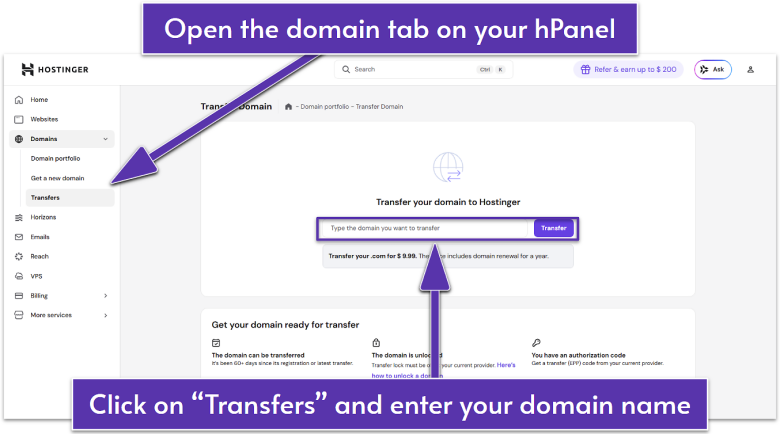
Hostinger will charge a fee for transferring your domain. Once you’ve processed your payment, Hostinger will ask you for your Extensible Provisioning Protocol (EPP) code (it can also be under “auth code” depending on your registrar). You should have received your EPP code directly at sign up, but if you don’t have it on hand, there should be an option on your registrar to see the code directly or have it sent to you through email.
Once that’s added, simply select whether you want to use Hostinger’s nameservers or keep your old nameservers for your domain, as well as whether you want to transfer your records over if you switch to Hostinger’s nameservers.
If you’re unsure which option to take, here’s a quick comparison of the pros and cons of switching your domain over to Hostinger:
| Keep Old Nameservers | Switch to Hostinger |
|---|---|
| ✔ No propagation period | ✘ You’ll have to wait 24-48 hours for DNS propagation. During this time, your domain will be down |
| ✔ If you host a professional email on old nameservers, you won’t have to alter your Mail Exchange (MX) records | ✘ You will also have to copy your MX records to Hostinger’s DNS for your email to keep working |
| ✘ You will have to manage two different portals for billing and domain settings | ✔ You can make all changes directly from the Hostinger dashboard |
| ✘ You will have to go back and forth to your old registrar every time you want to add a subdomain or edit a record | ✔ You can manage all subdomains and records directly from your hPanel |
That’s it! Once that’s done, you’ll just have to wait for about 6 business days for the migration process to complete.
Hostinger Makes It Easy to Sign Up for Web Hosting
One of the top features of Hostinger is its user-friendliness, which you can experience straight from the sign-up process. Making my account and picking my plan was extremely quick and straightforward, and I genuinely value that Hostinger doesn’t upsell or request any unnecessary information.
Thanks to its intuitive and dynamic signup process and affordable rates, Hostinger is an excellent option if you’re looking to get started with web hosting. However, you do need to pay close attention to the terms of the plan you’re signing up for. If you want a free domain, then you’ll have to sign up for at least a year’s worth of service, and you should be sure that Hostinger’s terms of service don’t clash with your vision for your website.
If you want to learn more, feel free to check out our expert Hostinger review.