

2.1 The Header

We’ll start by creating the first sections visitors will see when they visit your site: the Header and the Hero. First impressions matter, so these should immediately convey your site’s purpose, style, and tone.
We wanted the marketing agency website to be inviting and easy to read, so we went for a text-only logo. But since we’re not going too minimalistic here, we used a horizontal menu and added a call to action (CTA) button for the header.
Adding the Logo to Your Header
Since we used a simple, text-based logo, we made it directly in the Wix Studio editor with the following steps:
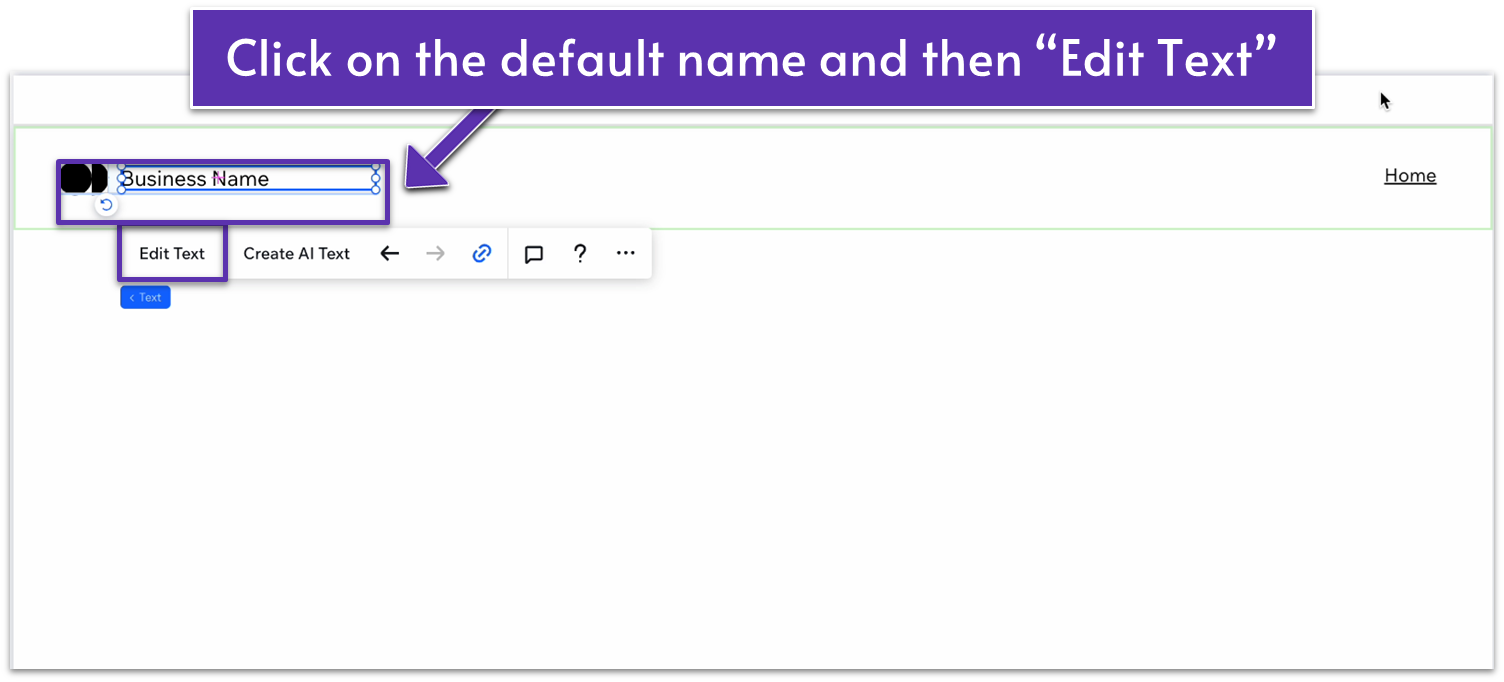
Step 1: Change the name on your header.
- Double-click on your header.
- Double-click again on the default “Business Name” text.
- Select “Edit Text” and change the name there to your own.
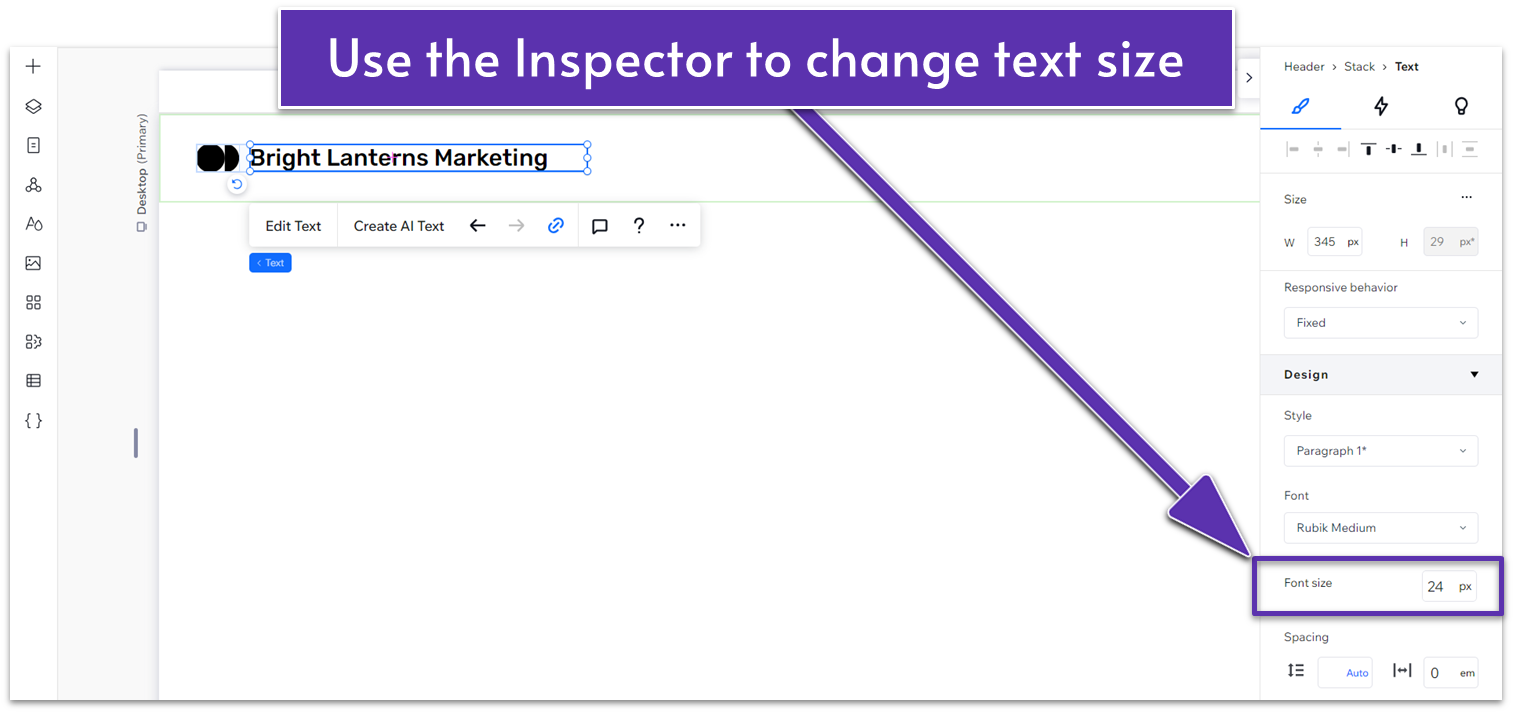
Step 2: Customize the font.
- Click the arrow on the right side of the screen to open the pop-out menu (the Inspector menu ( ).)
- Change the font size to 24px.
- Change the font to Rubik Medium.
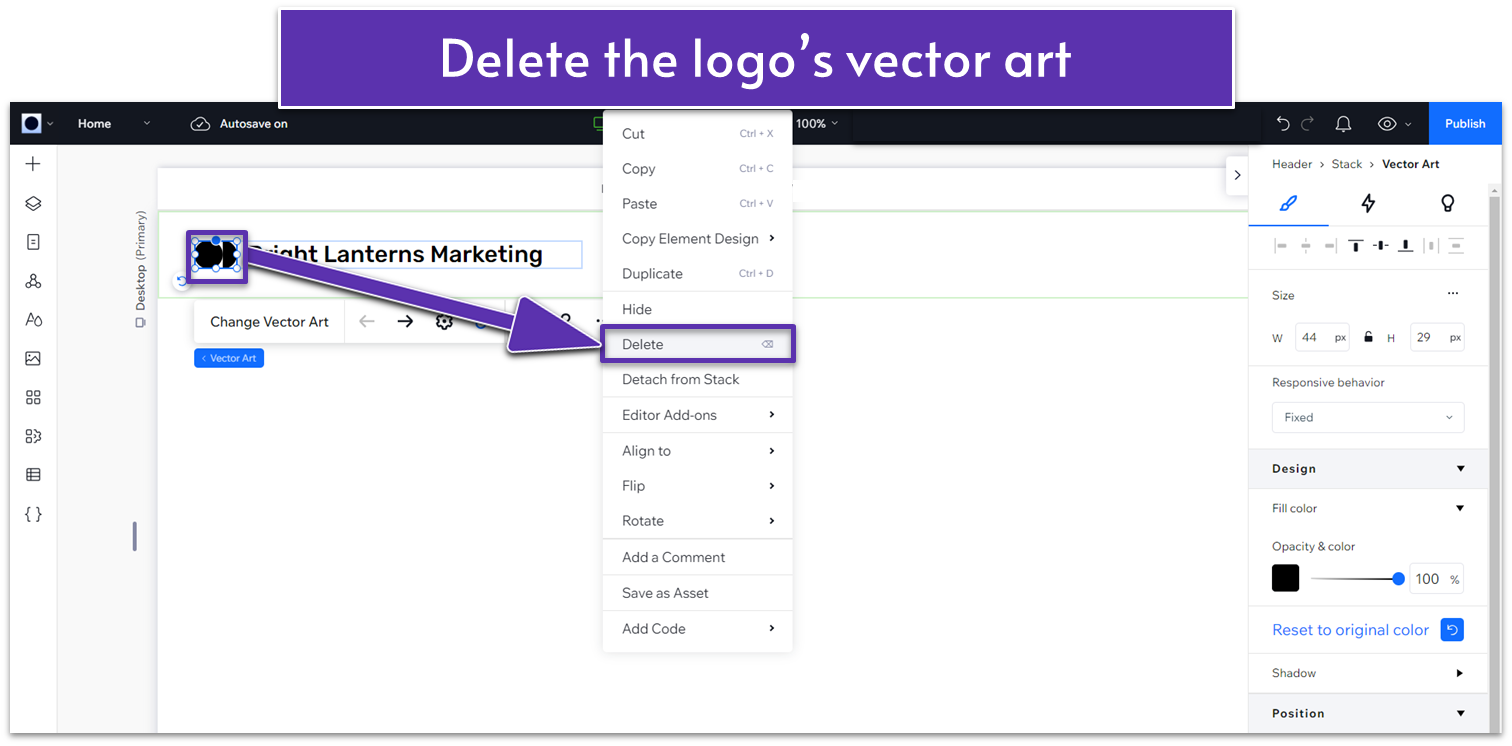
Step 3: Delete the vector art next to your name.
- Double-click the symbol next to your business name ( ), use the backspace button, or click the 3 dots ( ) and choose delete.
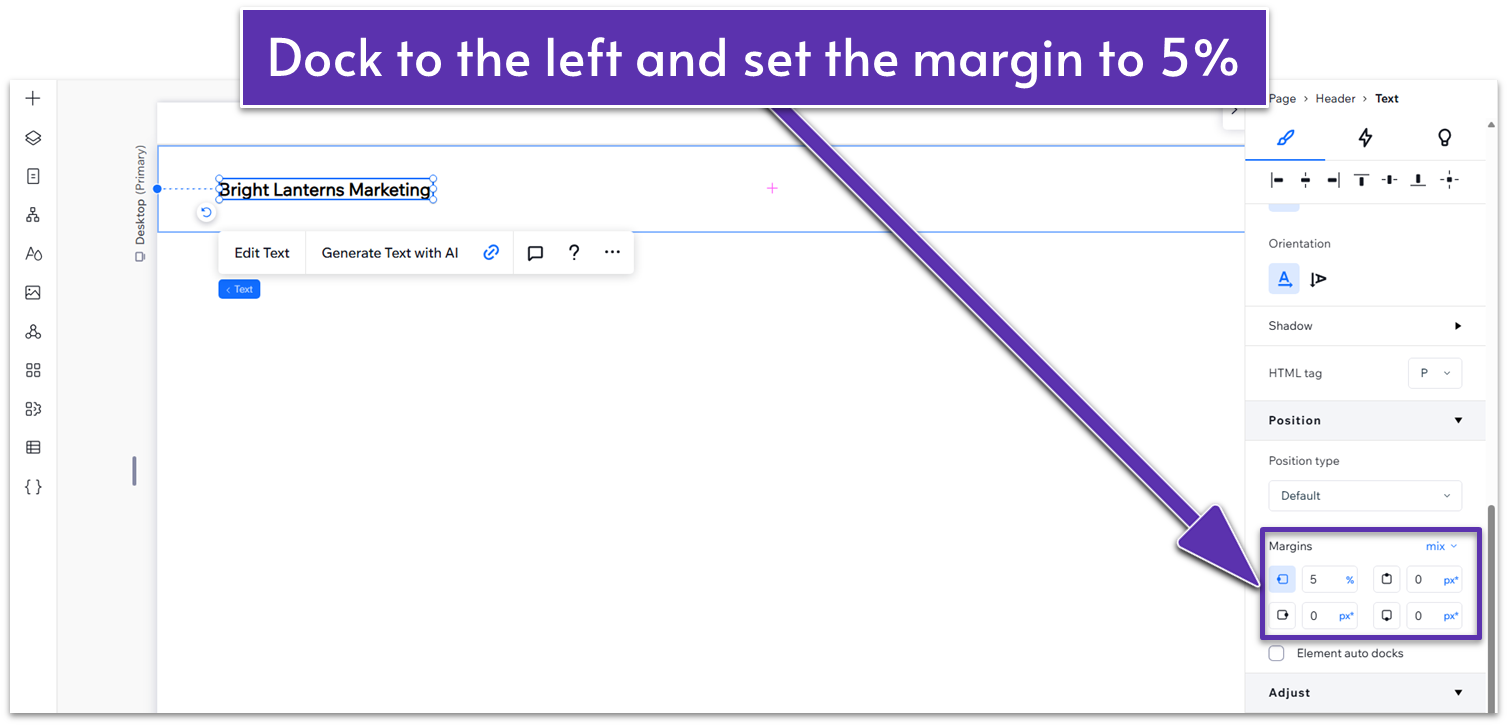
Step 4: Set the position of your logo.
- In the Inspector menu, scroll to the “Position” submenu and find “Docking, margins and padding.”
- Click on where it says “0px” on the left side of the diagram to set the left margin ( ) to 5 and then set all other margins to 0.
- Click the dot next to “5px” on the left side of the diagram to dock the logo to the left ( ).
Adding the Menu to Your Header
Step 1: Move the menu to the center of the header.
- Open the Inspector menu for the menu.
- Go to “Docking, margins and padding” and do the following:
- Click the dot on the top of the diagram to dock the menu to the top ( ).
- Set the right margin ( ) to 10.
- Set the other margins to 0.
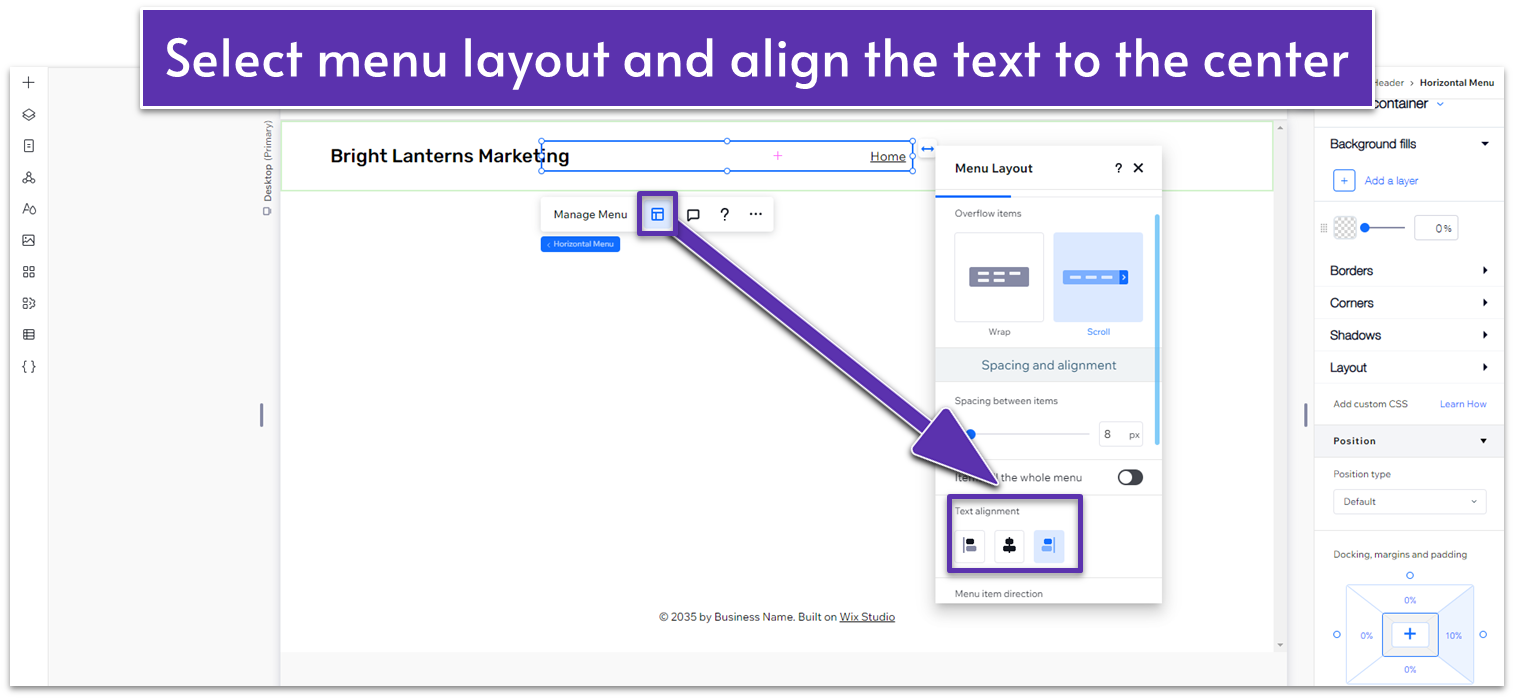
- Then, click on the icon that looks like a sectioned page ( ) to open the “layout” menu.
- Scroll down until you see the “Text alignment” option.
- Set the menu alignment to the center ( ).
Step 2: Design a Hover Effect.
This hover effect will change the color of the menu text when a visitor hovers over a menu item. We’ll also set it to change the color of the menu item based on which page the user is on.
- Go back to the inspector.
- Select “Menu Items” under the “What do you want to design?” prompt.
- Choose “Hover” on the pop-up menu immediately under the “What do you want to design?” option.
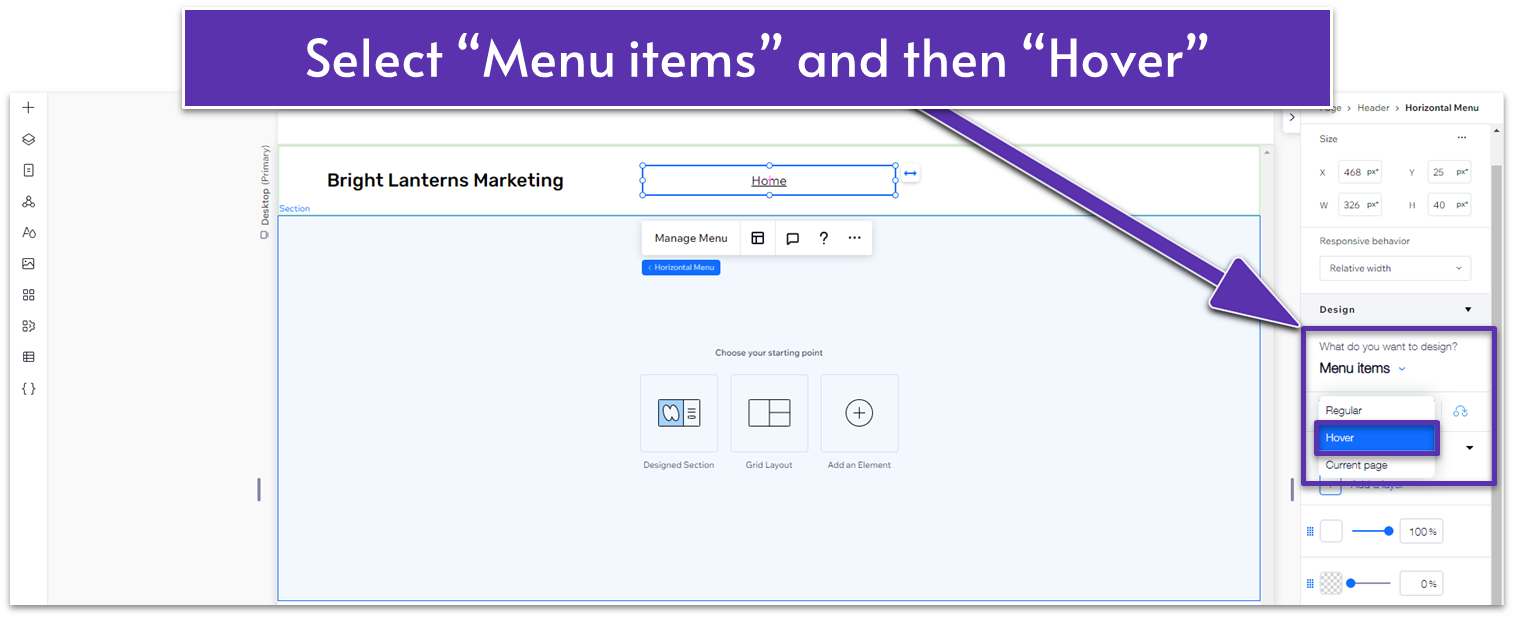
- Change the font color to (HEX): #FD6788.
- Go back to the menu and change the behavior from “Hover” to “Current page.”
- Select the same color as the “Hover” option.
- Drag the edges of the menu box so it’s properly centered. The grid lines will let you know when the box is centered.
You’re done with the menu for now. You don’t have to worry about adding the titles of other pages – they’ll be added automatically as you create them.
Adding the Button to Your Header:
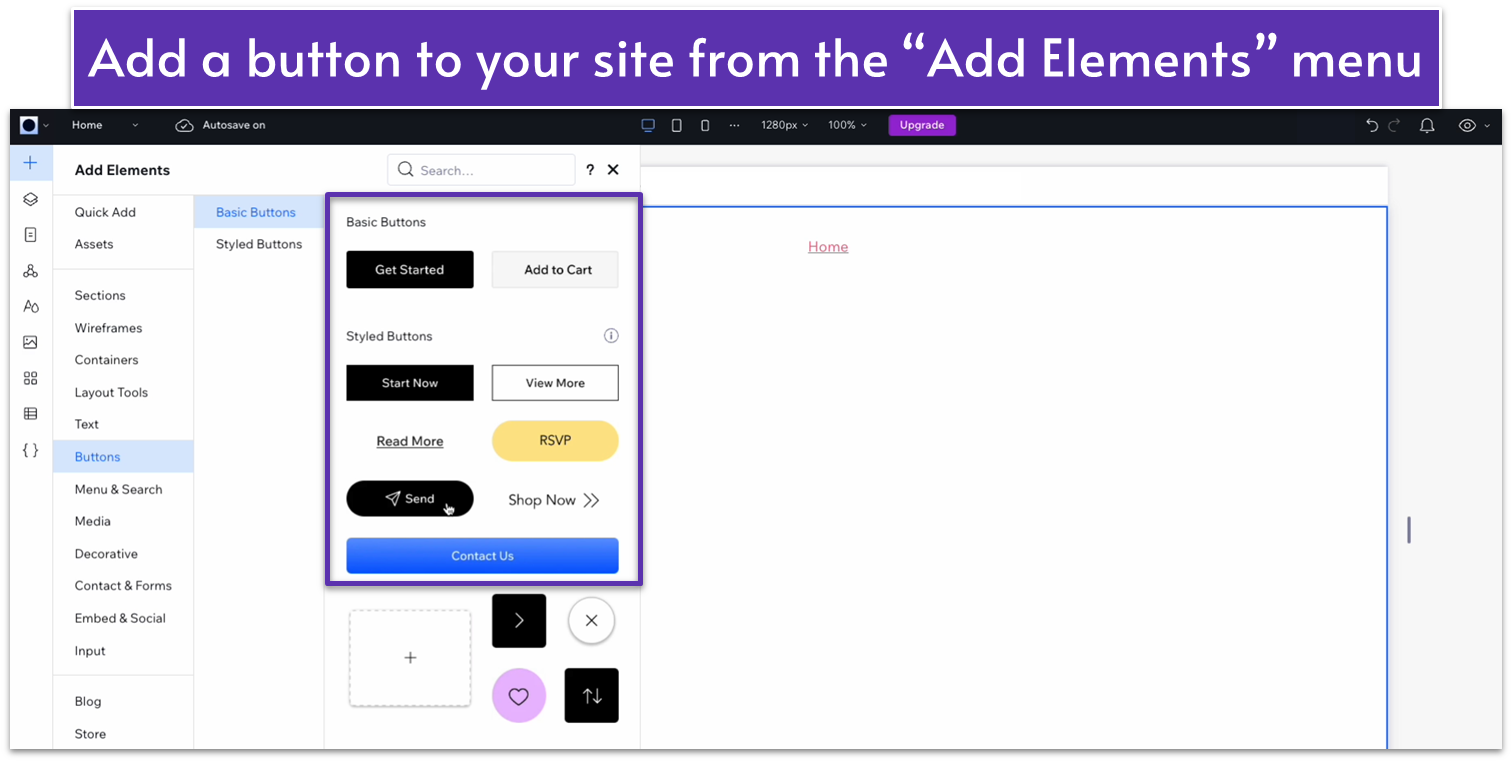
Step 1: Choose and add your button.
- Go to the “Add Elements” menu ( ), then “Buttons,” and select a button design you like. We used the default “Send” button.
- Change the button width to 170 and the height to 45 by dragging the edges of the icon.
Step 2: Change your button colors.
- In the inspector:
- Use (HEX): #FFD1DB for the button background and outline colors
- Use (HEX): #FD6788 for the text and arrow icon.
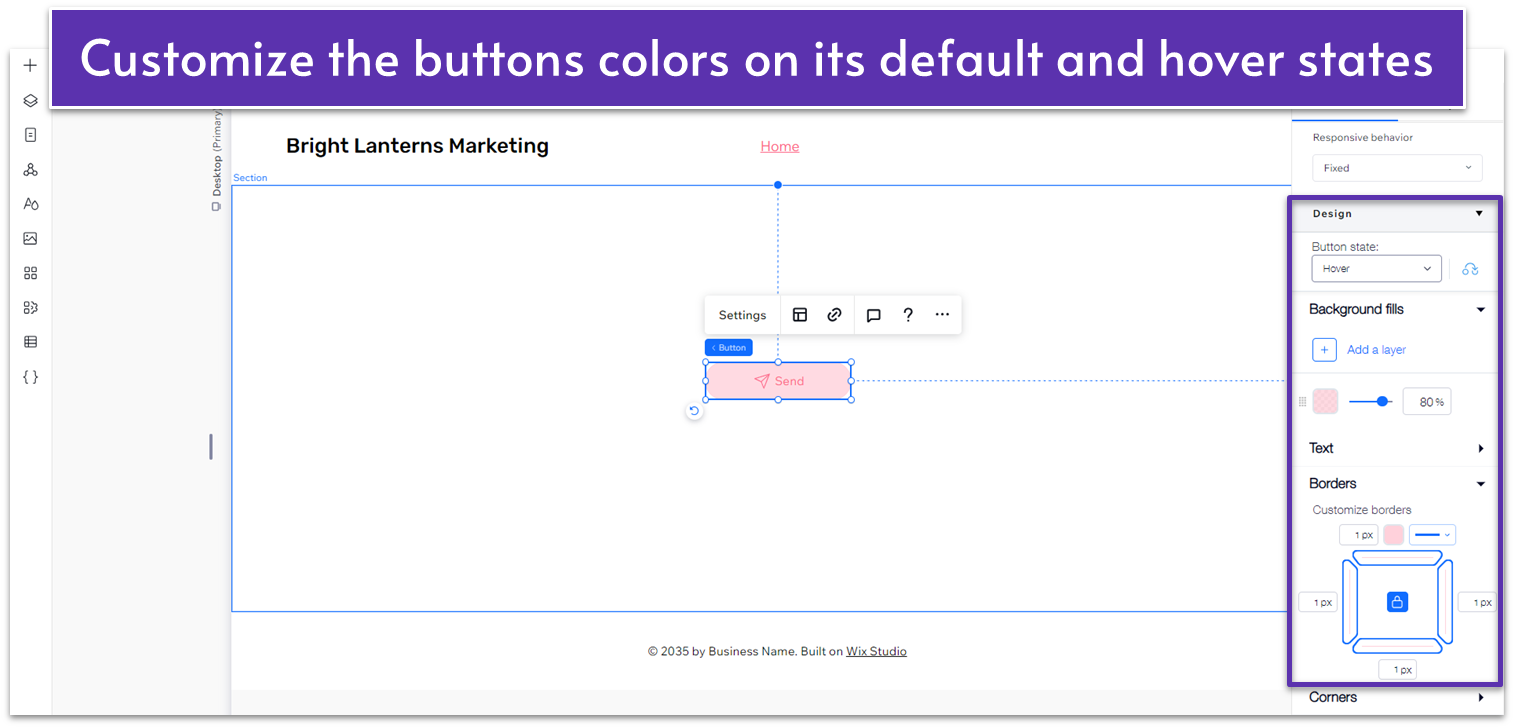
Step 3: Design the hover effect.
- In the design sub-menu, go to the “Hover” option under “Button state.”
- For the button background and outline colors, use (HEX): #FFD1DB.
- Change the background’s opacity to 80% (that’s the number value next to the color).
- For the text and arrow icon, use (HEX): #FD6788.
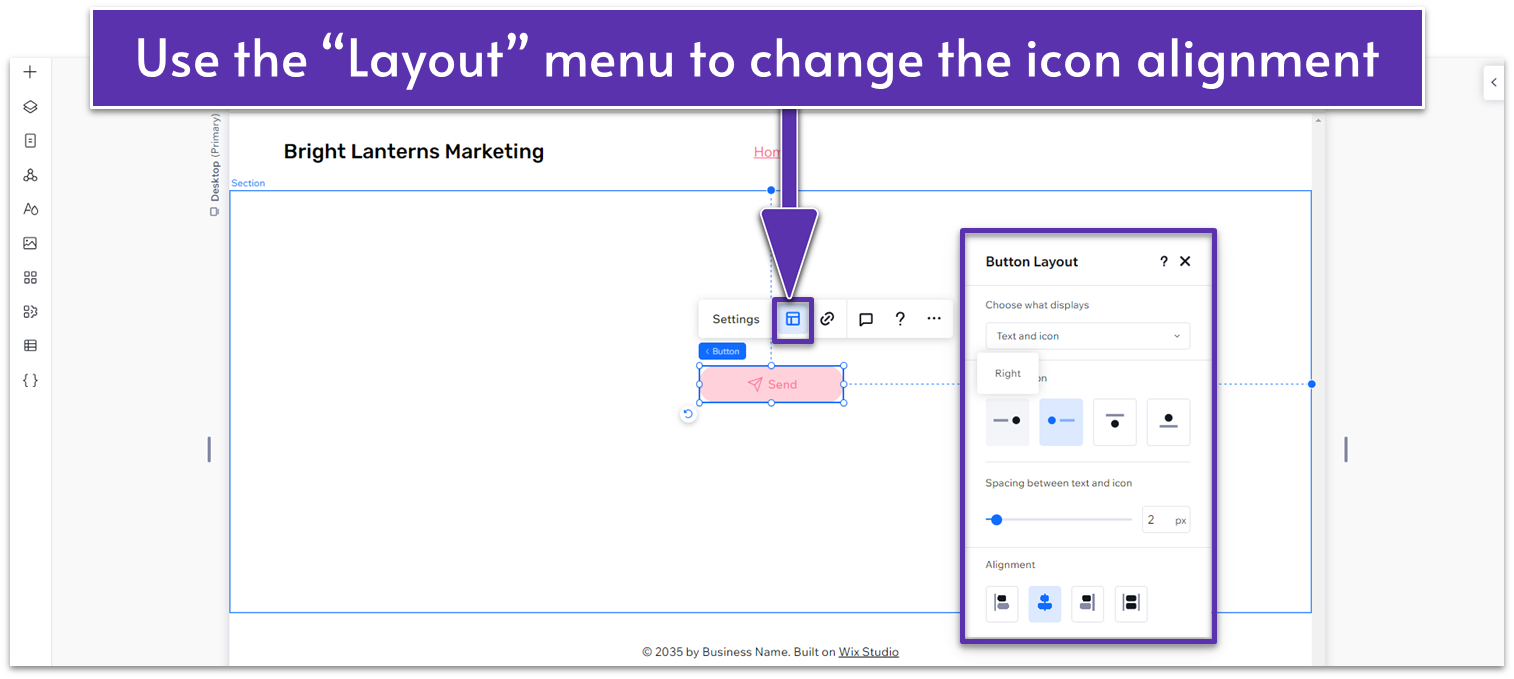
Step 4: Change the alignment and text.
- Double-click the button to open the “Settings” menu.
- Change the text to “Contact Us.”
- In the “Layout” menu, set the icon to the right of the button and the overall alignment to the center ( ).
- Drag the button into the header bar and set the right margin ( ) to 5%.
- We’ll link this button to the contact page after we’ve created it.

Adapting the Header for Tablets and Phones
Because we’ve added a button to the header, we’ll need to make some changes so everything still looks pretty on tablets and mobile devices. The good news is that Wix automatically swaps out a horizontal menu for a hamburger on smaller screens, so you don’t need to worry about those extra steps.
Step 1: Move the button slightly to the left in tablet view.
- Click the icon on the top of the screen ( ) to switch to tablet view.
- Drag the button a little to the left so the spacing looks nicer.
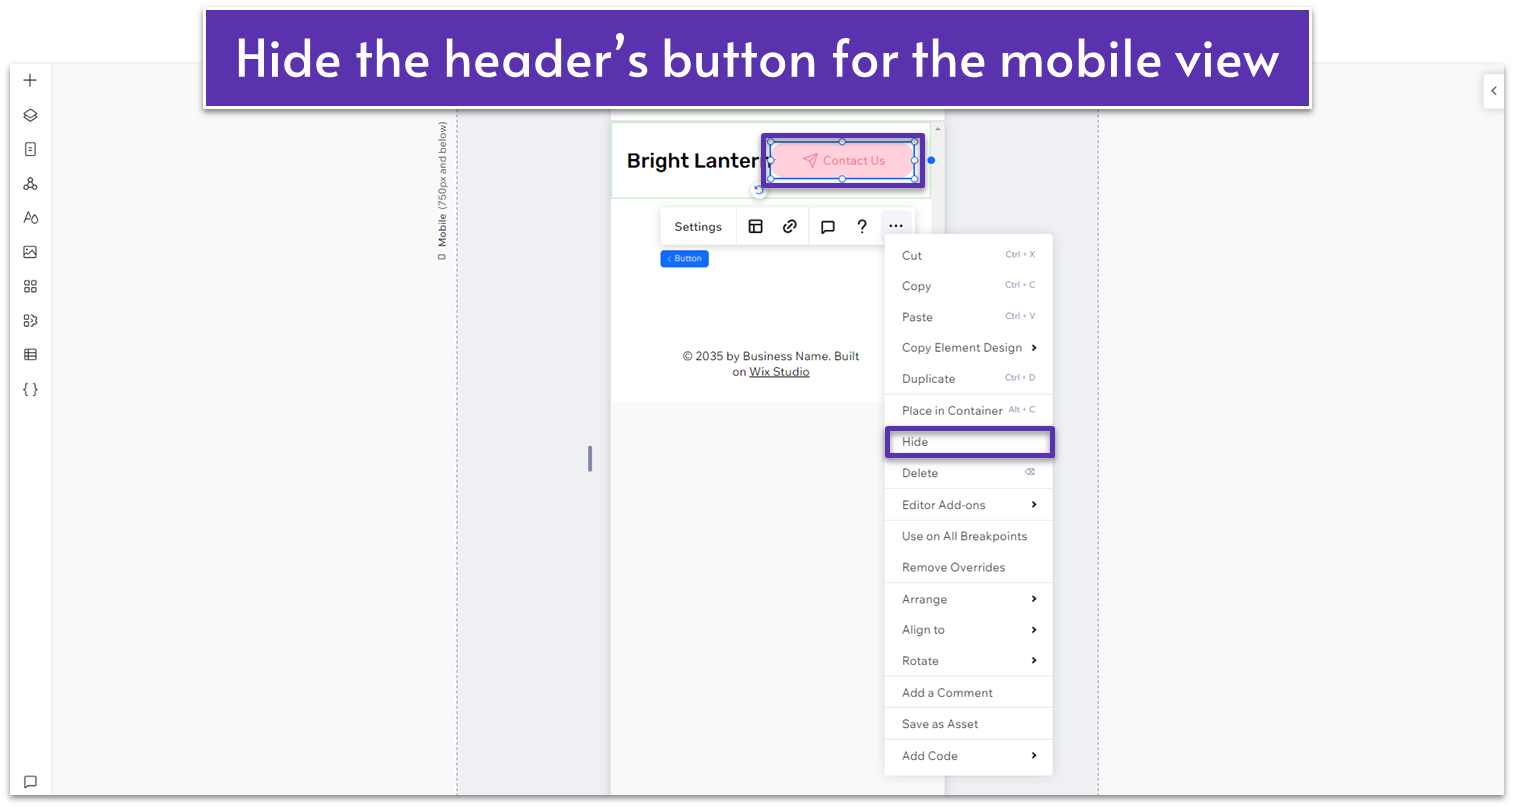
Step 2: Hide the button in mobile view.
- Click the icon on the top of the screen ( ) to switch to mobile view.
- Double-click on the button and then on the three dots symbol ( ) (or right-click on the button).
- Select “Hide.”
2.2 The Hero Section

The tone we’re going for with our marketing agency is a little more professional and subdued, so we won’t be doing anything flashy. Instead, this hero section will comprise a single header, an attractive photo, and a clear CTA.
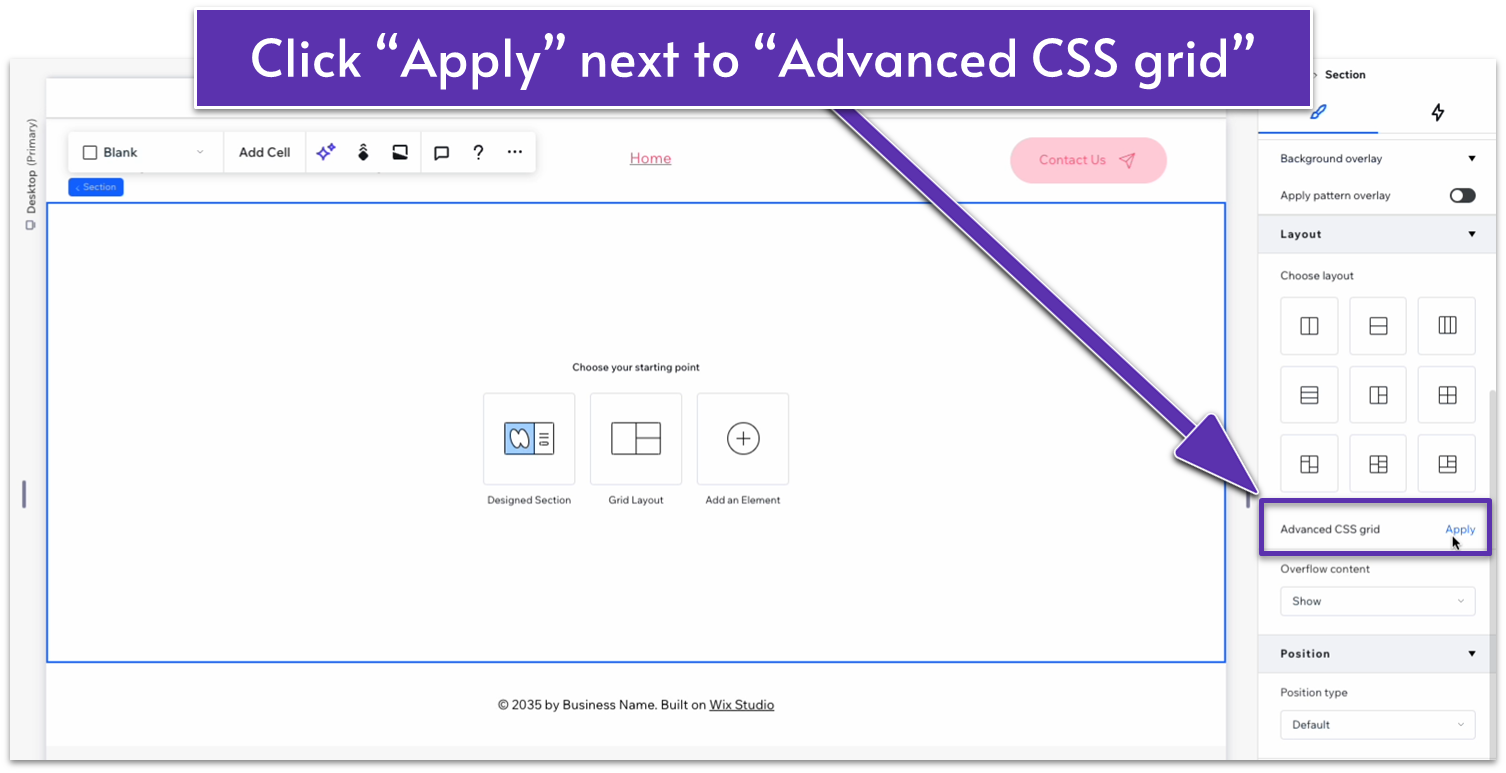
Step 1: Divide the container into two parts.
- Click on the blank section and open the Inspector.
- Toggle “Apply max width” off and scroll down to “Layout.”
- Next to “Advanced CSS grid,” select “Apply.”
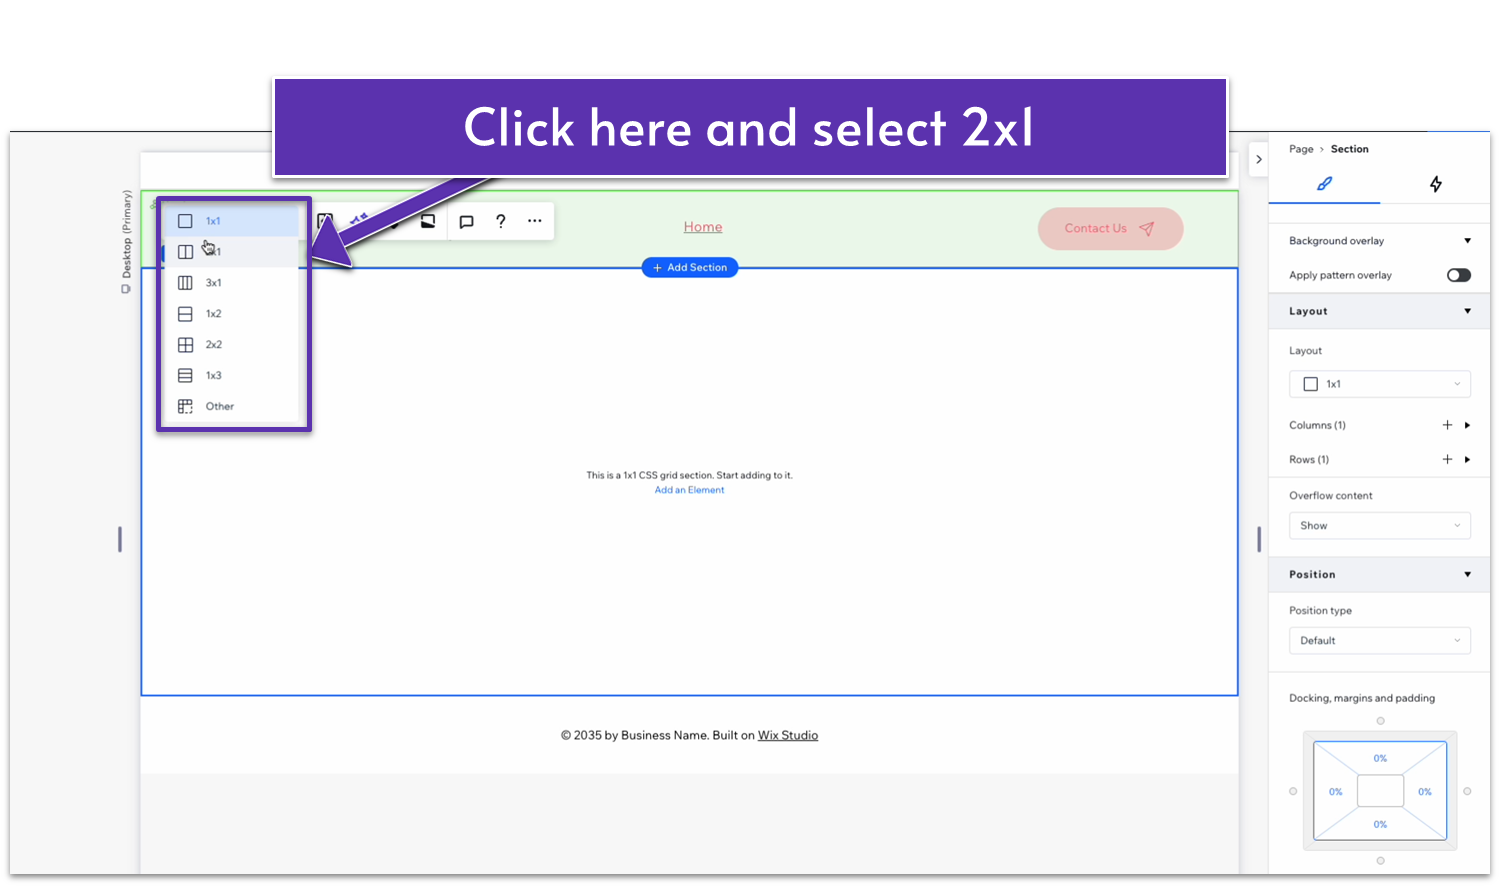
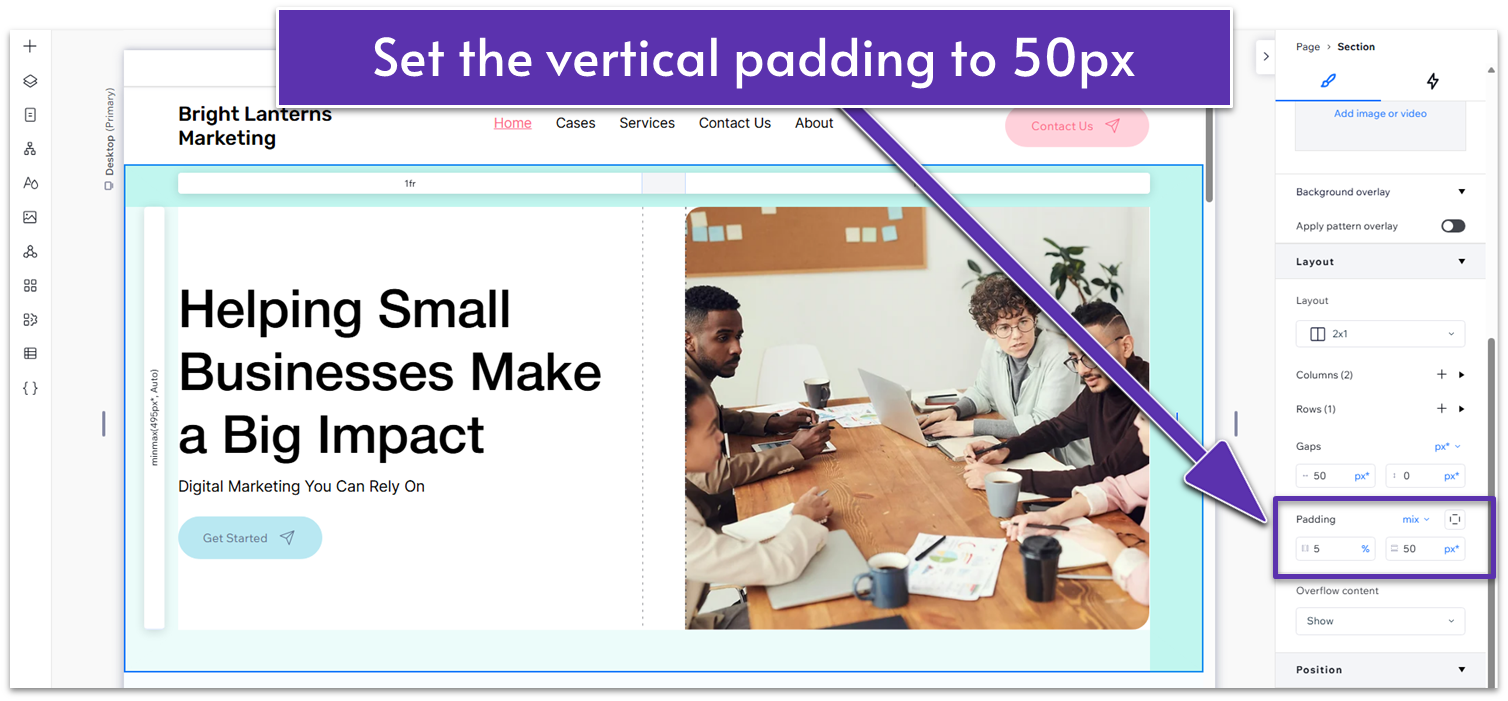
- Then, in the upper left corner of the section, change the grid from 1×1 ( ) to 2×1 ( ).
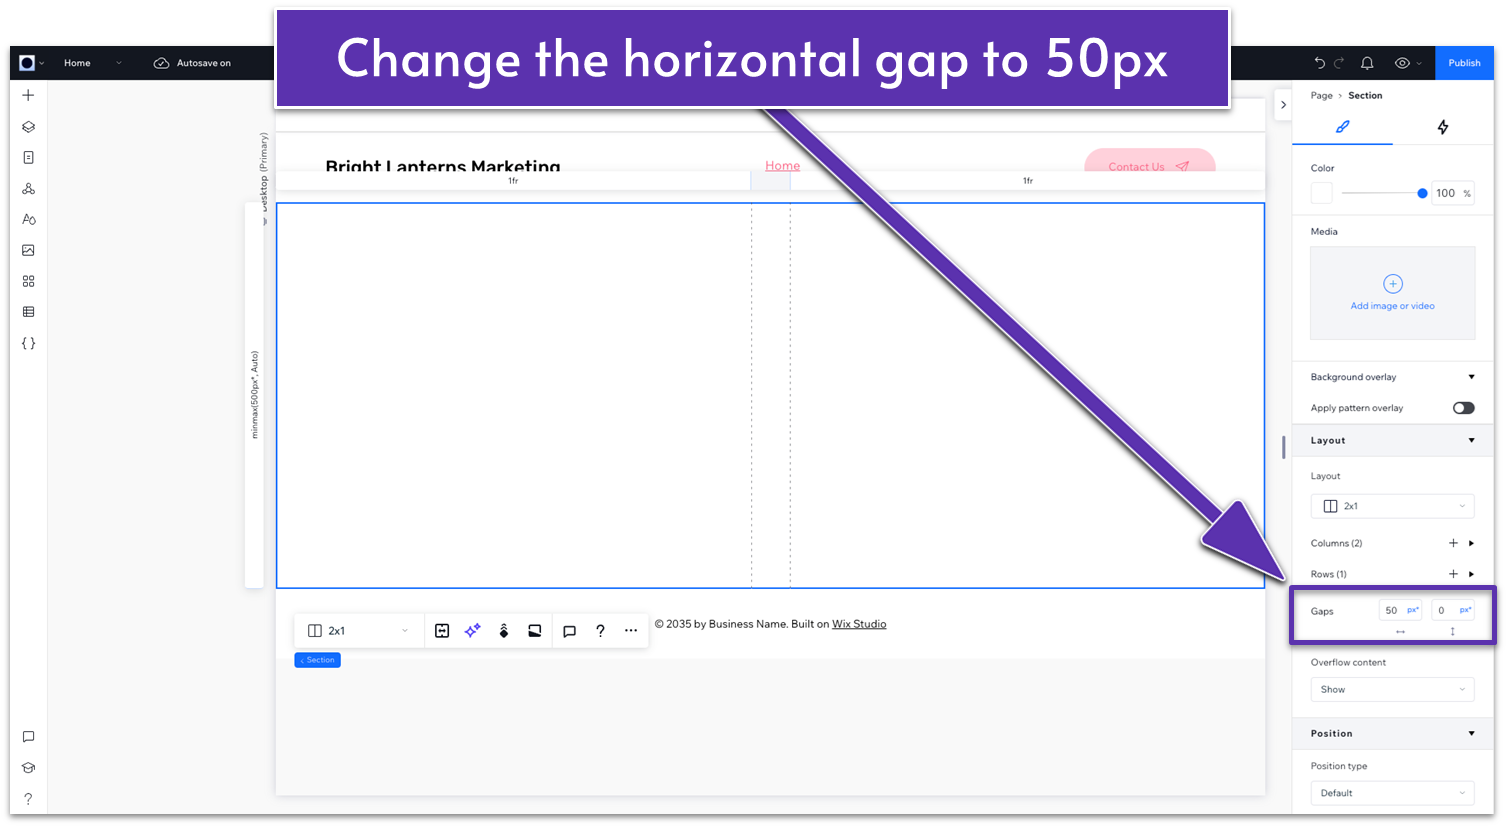
Step 2: Set a 50px spacing between containers.
- In the Inspector, scroll down to “Layout.”
- Set “Gaps” to 50px horizontally ( ).
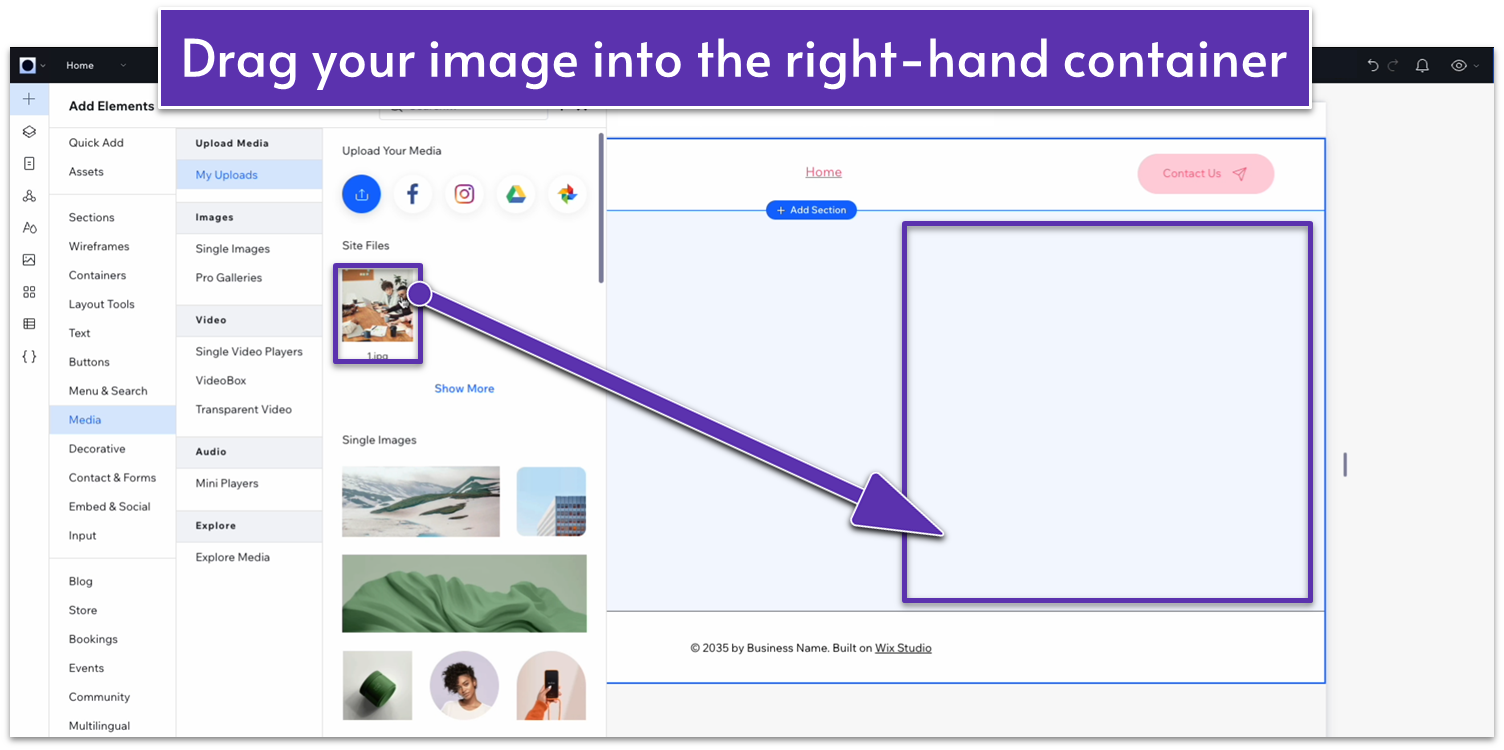
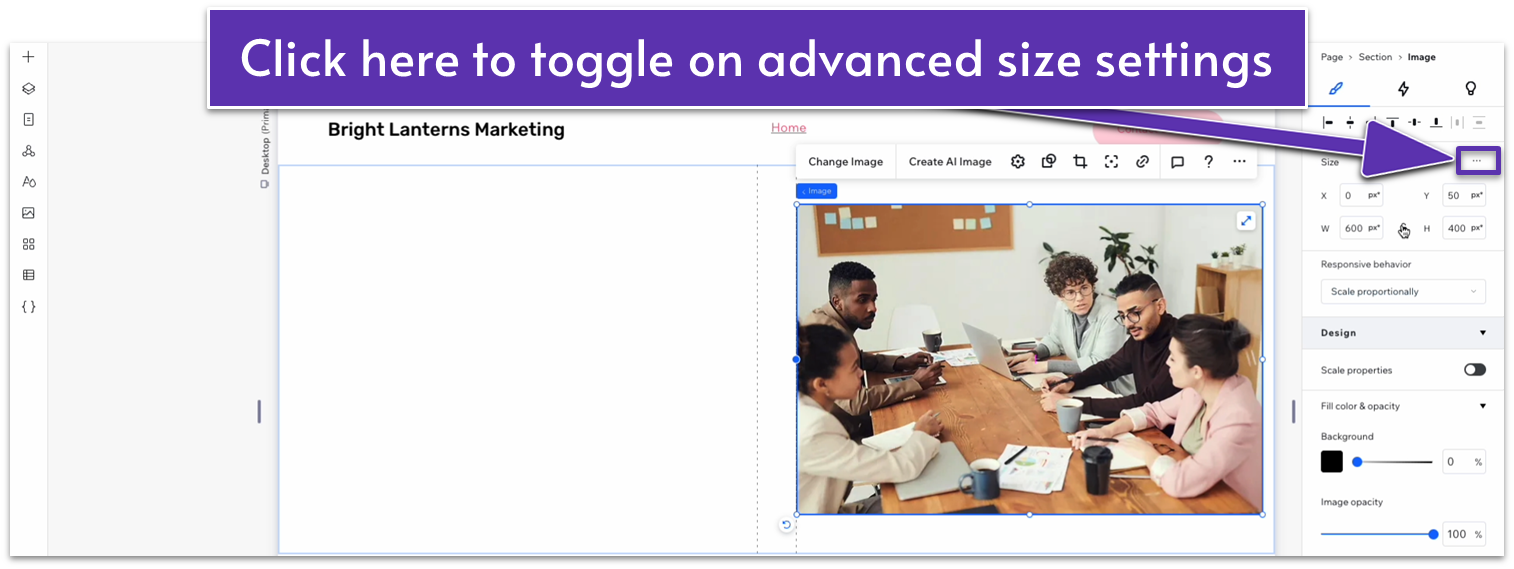
Step 3: Add the hero image to the right side.
- Upload your hero image to Wix.
- On the “Media” tab, drag the image into the right-side container and center it.
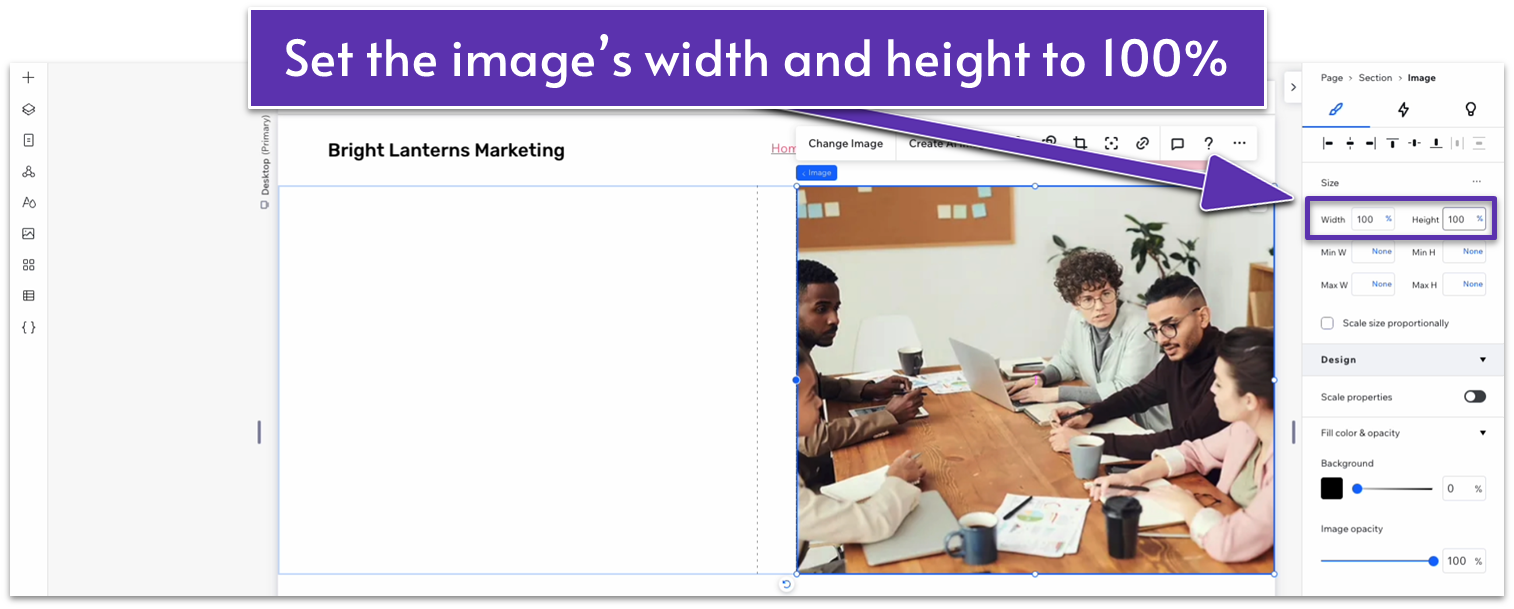
- Turn on Advanced Settings for size on the Inspector.
- Change both width and height to 100%.
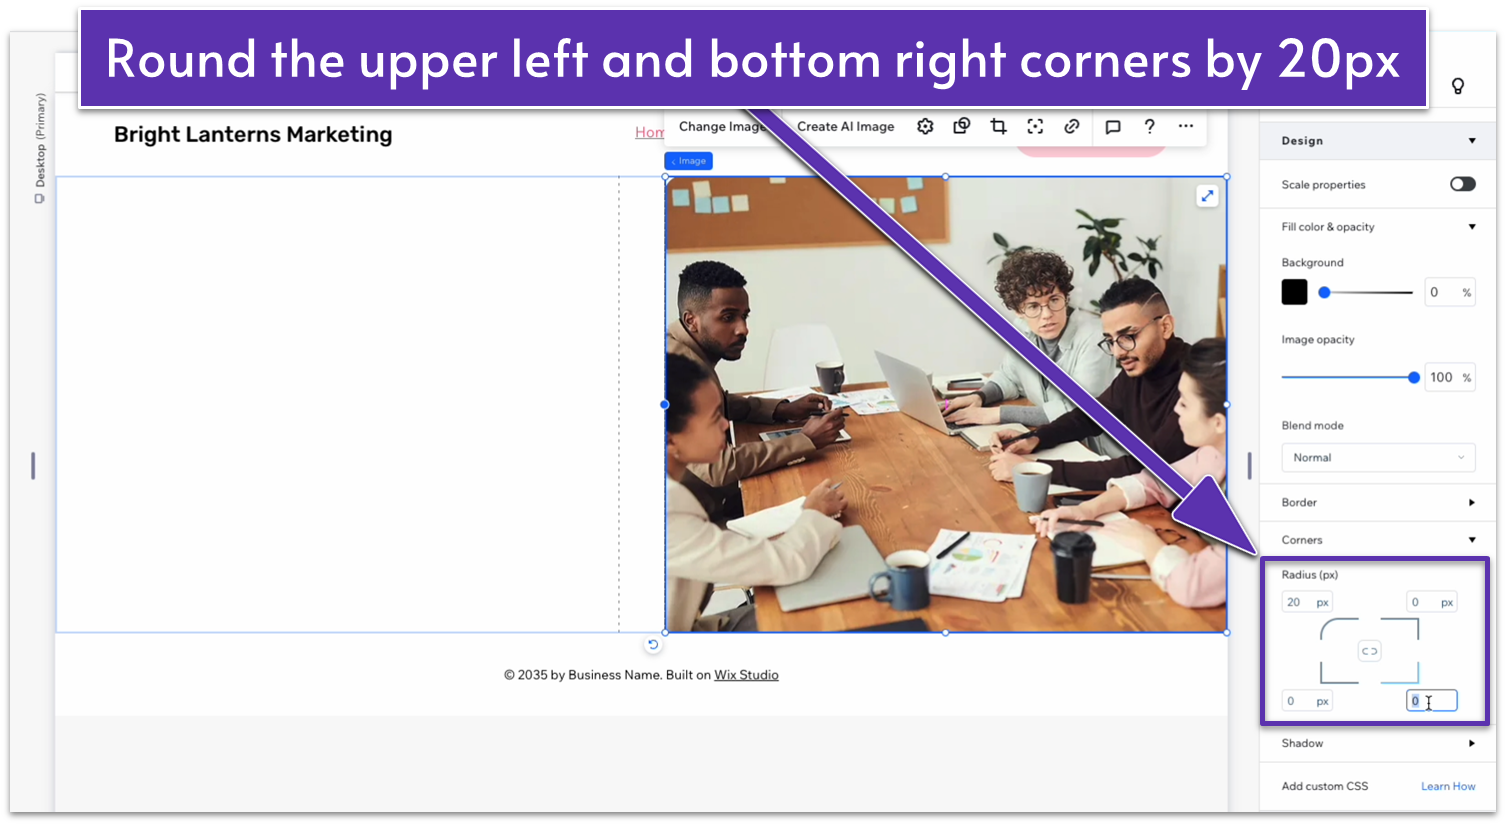
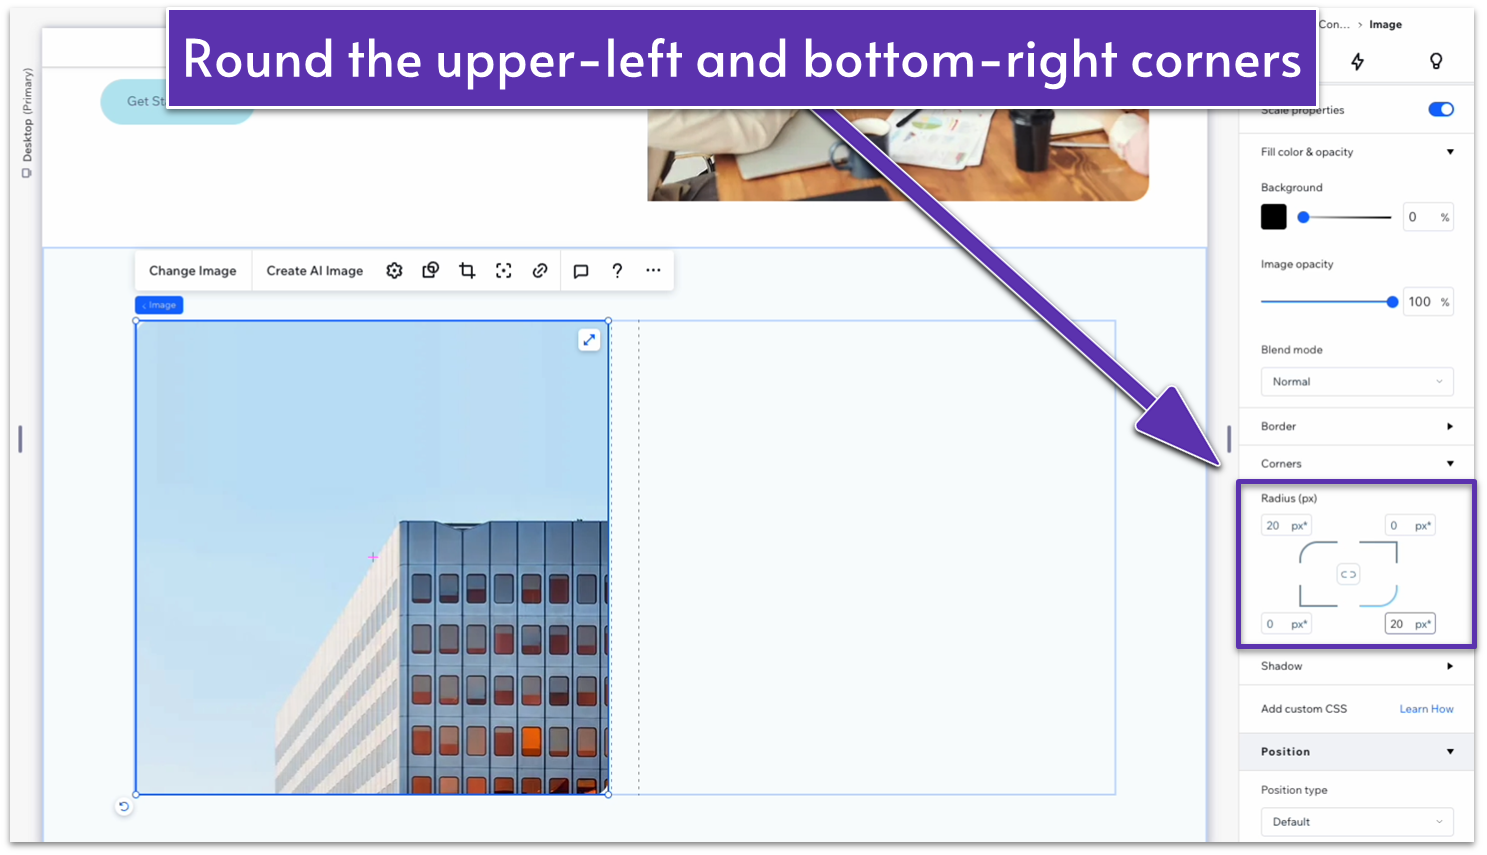
Step 4: Round the corners of the image.
- Still in the Inspector, scroll down to “Corners.”
- Set the corner radius to 20px for the upper left and bottom right corners.
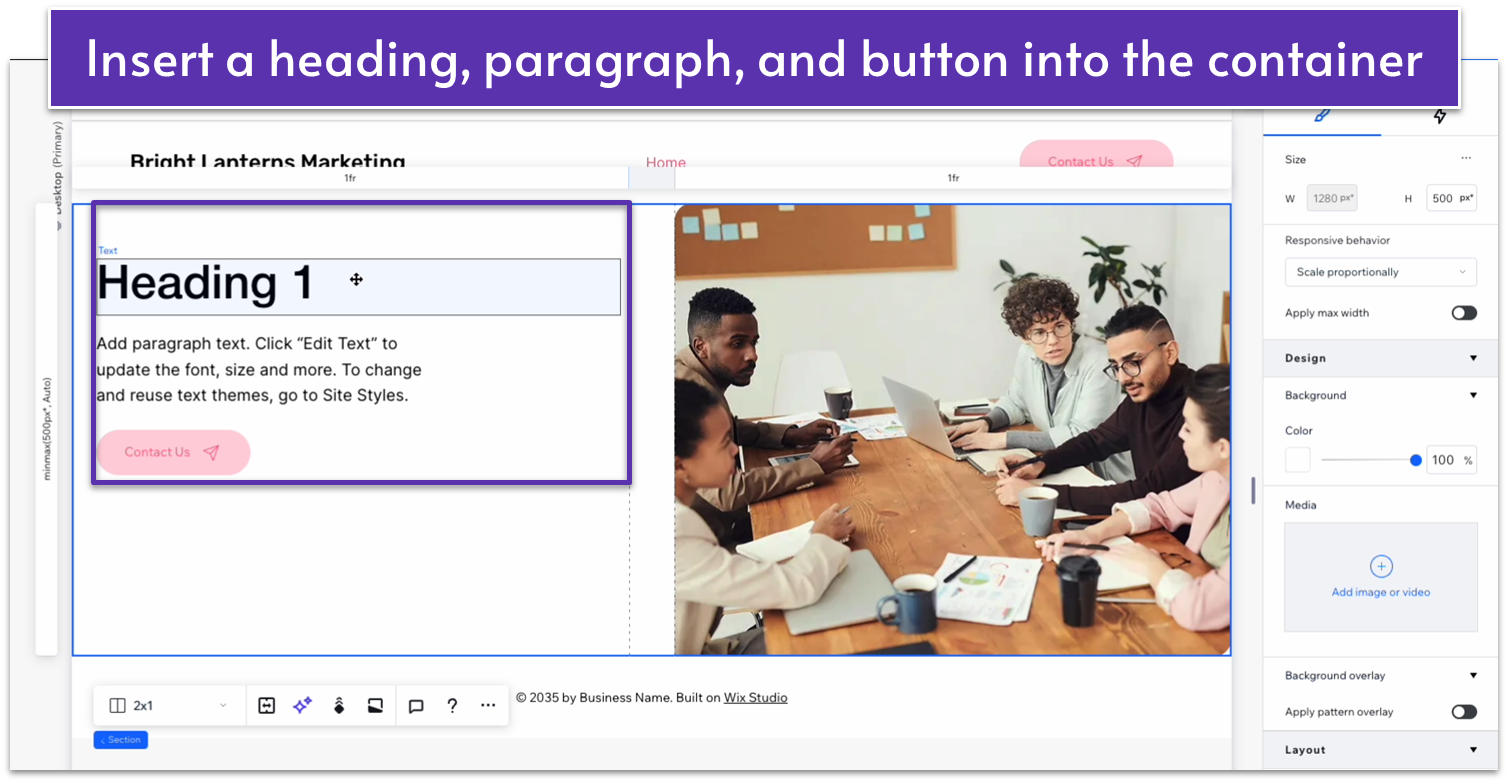
Step 5: Add content to the left side container.
- Using the “Add Elements” menu ( ), drag a Heading 1 and a paragraph into the left-side container.
- We’ll also add a button.
- You can just copy and paste the same button from the header. To do this:
- Click on the button in the header.
- Click the three dots ( ) on the right side of the menu.
- Choose “copy.”
- Click the container again, right-click, and paste.
- You can just copy and paste the same button from the header. To do this:
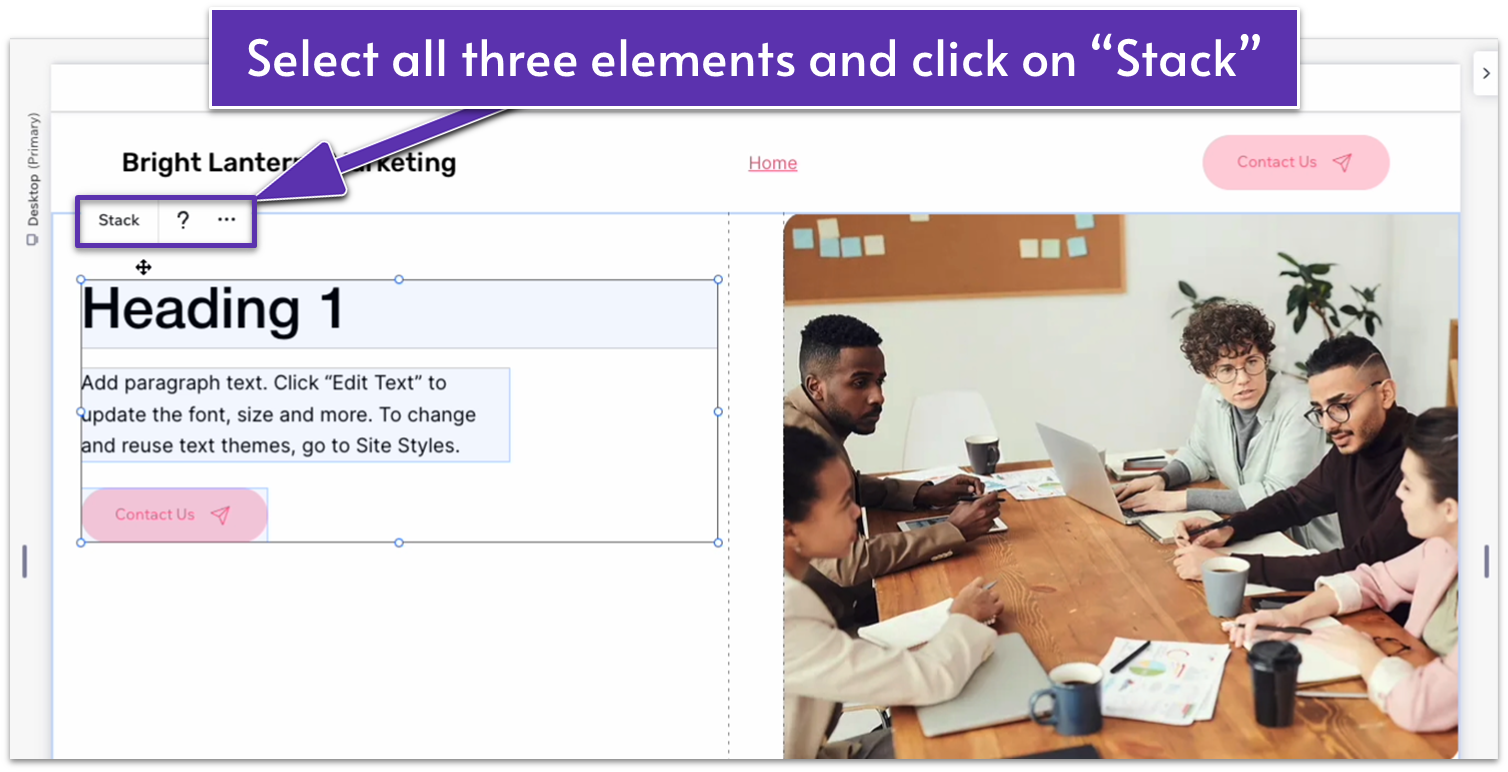
Step 6: Stack the elements.
- Move the three elements until the spacing seems right between all of them.
- Grid lines will appear as you move elements so you can see how the elements are aligned.
- Shift+click all three elements to select them all and click on the “Stack” option.
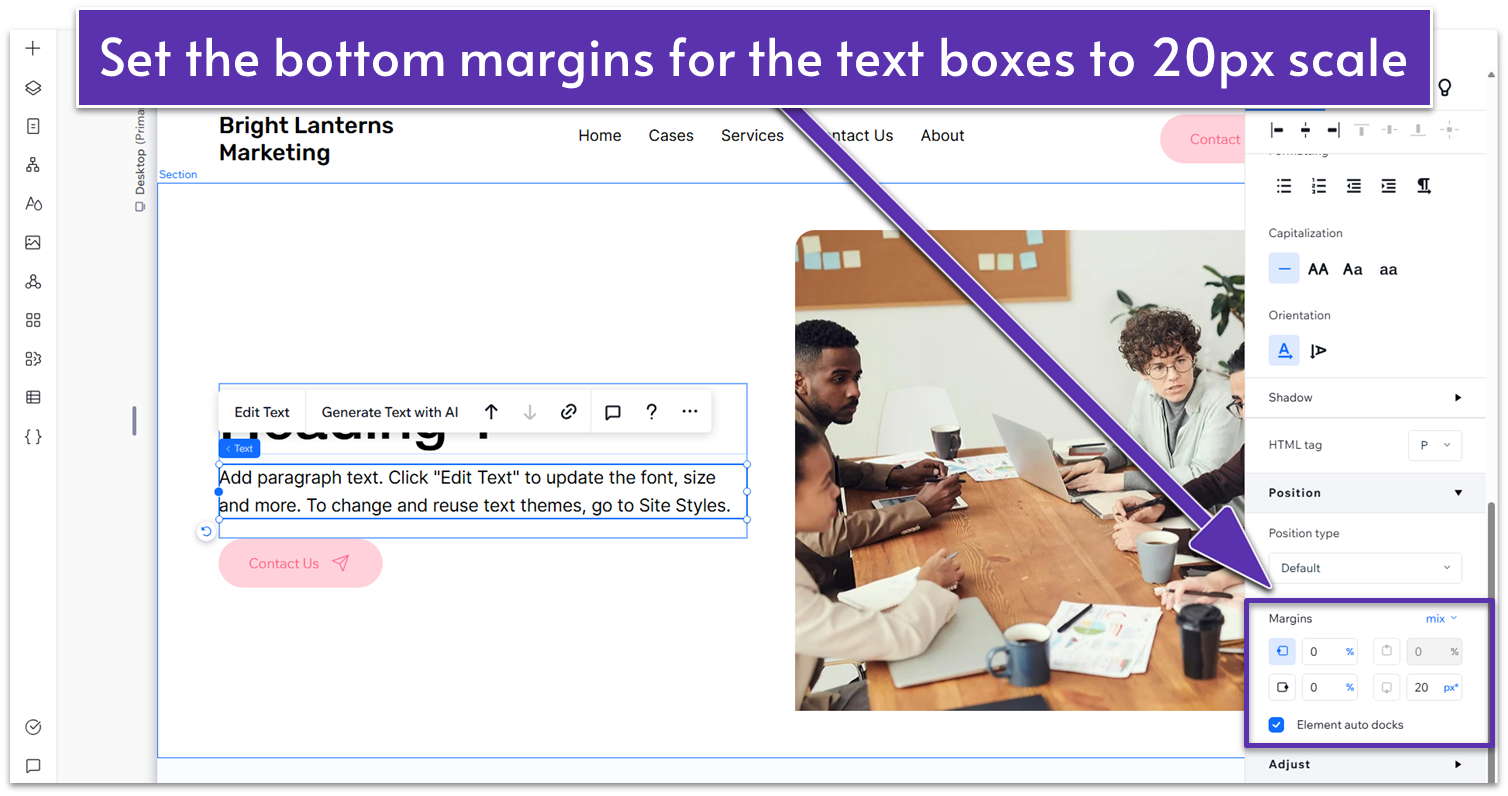
- Change the margins below both the heading and the paragraph ( ) to 20px scale.
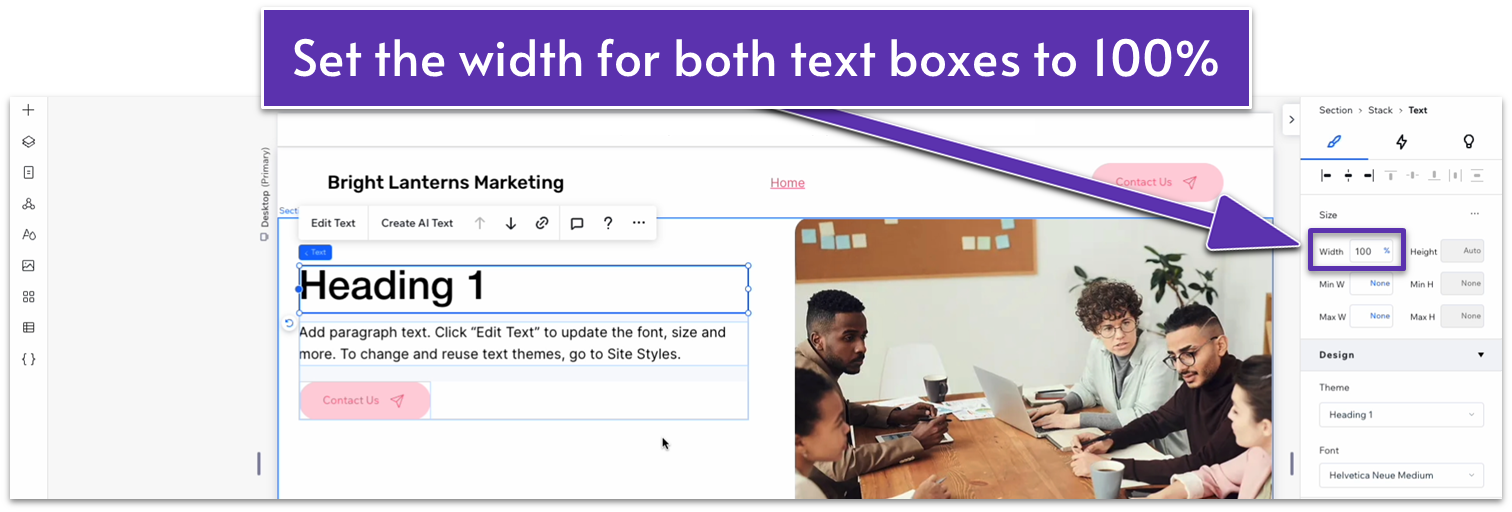
- Using the advanced size settings, change the paragraph’s width to 100%.
- Undock the entire stack from all corners and set all margins to 0% to center it.
Step 7: Change the button colors.
- Click the button and open the inspector.
- Change the default colors to:
- Background color (HEX): #B9E8F2
- Text and icon color (HEX): #5E718D
- Button border color (HEX): #B9E8F2
- Switch to the hover effect and change the colors to:
- Hover button background color (HEX): #B9E8F2 (80% opacity)
- Hover button text and icon color (HEX): #5E718D
- Hover button border color (HEX): #B9E8F2
Step 8: Adjust the positioning of the text and button.
- Set the stack width to 100%.
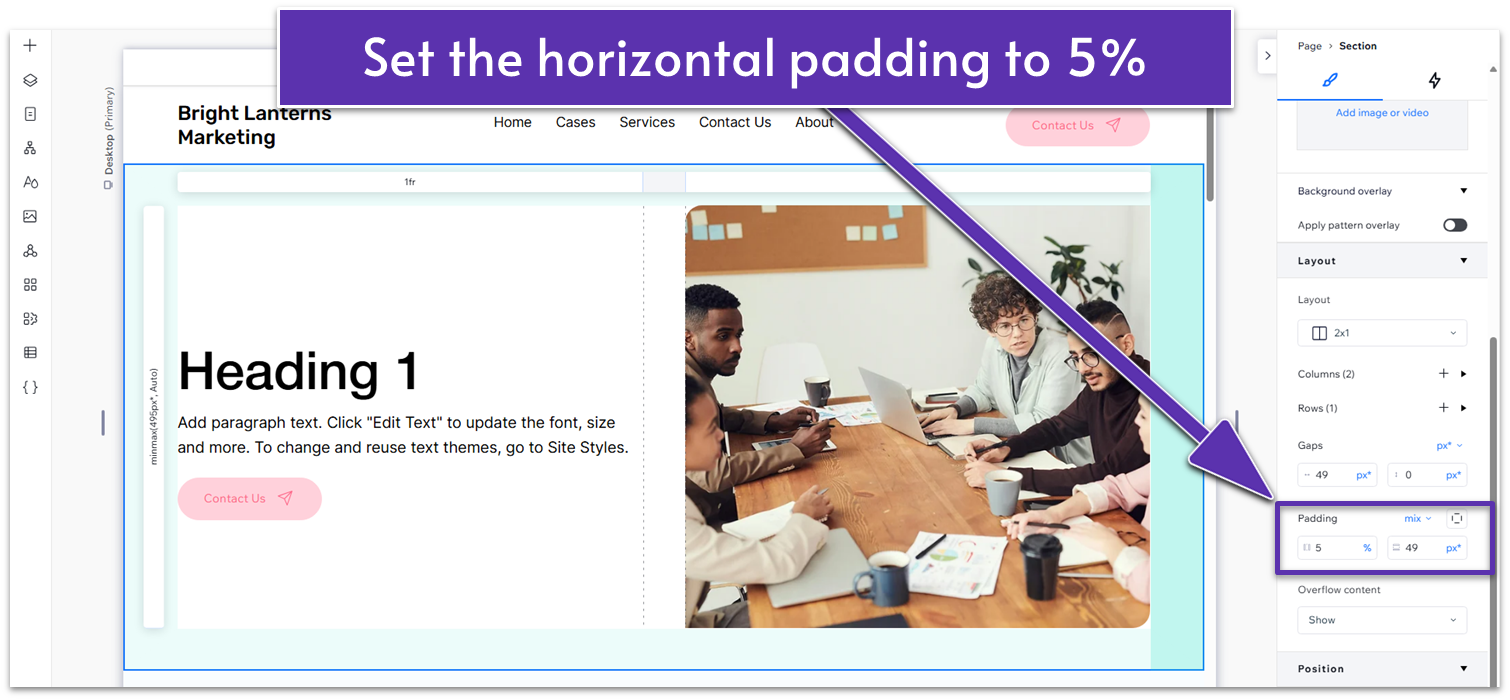
- Add a 5% padding to both sides of the section ( ).
Step 9: Change the text to your own copy.
- Click the text you want to change.
- Click “Edit Text.”
Adapting the Hero for Tablets and Phones
Step 1: Adjust the spacing and size of the text elements in tablet view.
- Click the tablet icon ( ) at the top of the screen.
- Click the heading.
- In the “Docking, margins and padding” diagram, change the bottom margin ( ) to 10px.
- Change the font size to 32.
- Click the paragraph section.
- Change the bottom margin ( ) to 20px
- Change the font size to 14.
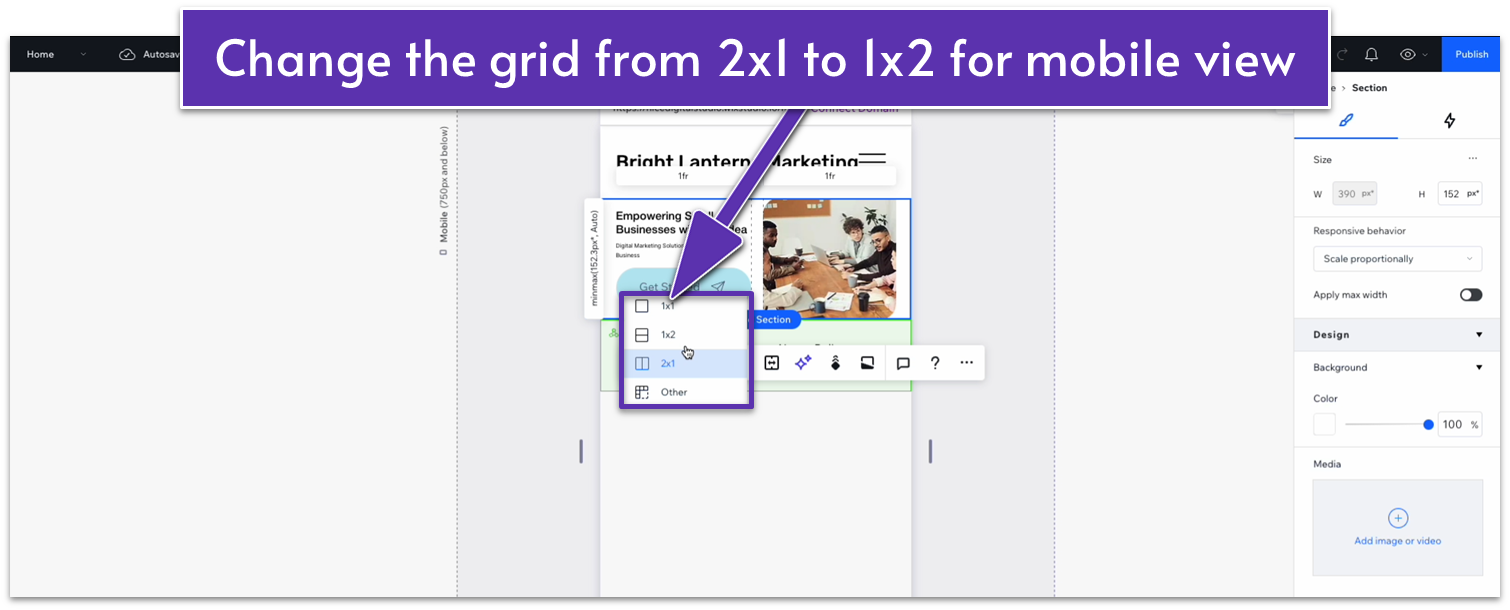
Step 2: Change to mobile view.
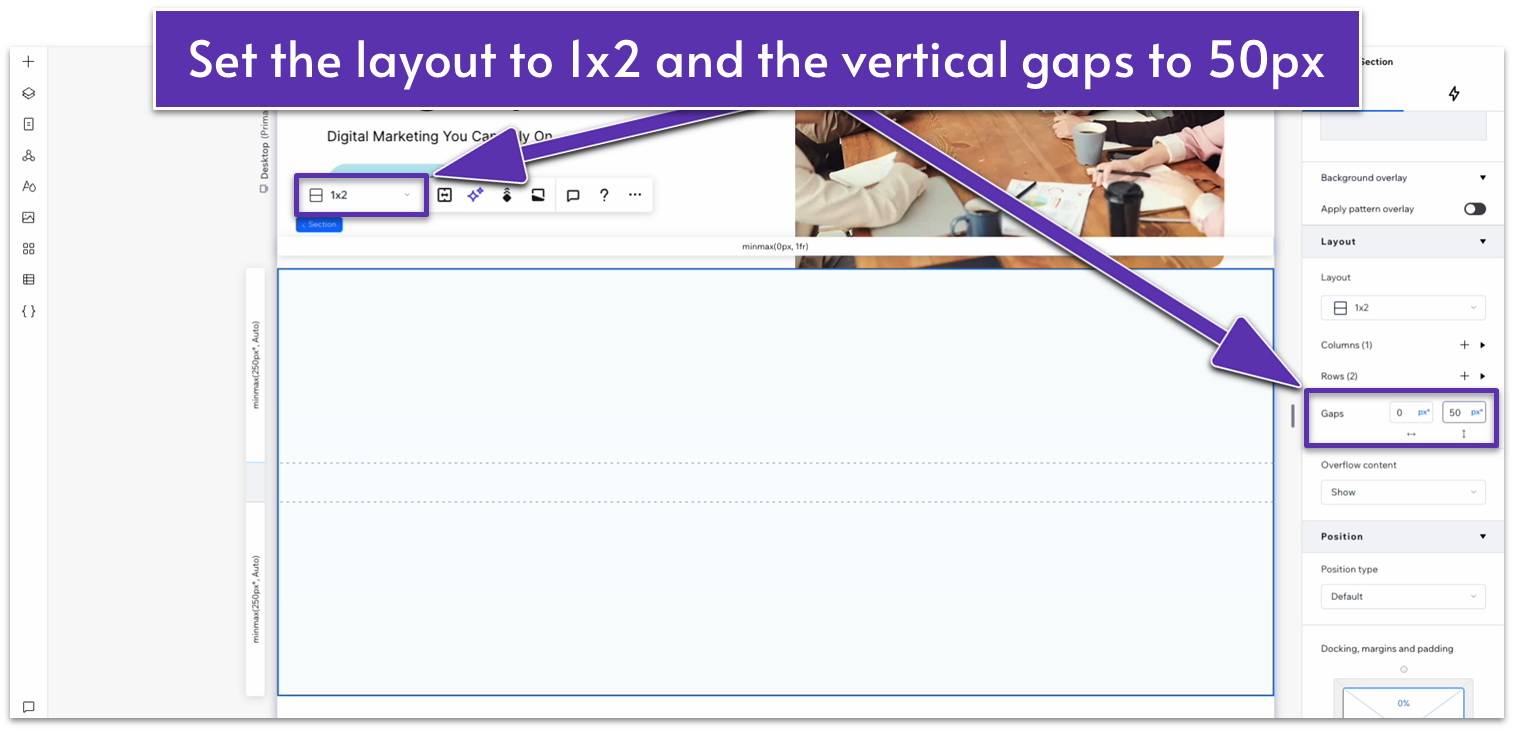
Step 3: Change the grid layout.
- In the upper left corner of the section, change the grid layout from 2×1 ( ) to 1×2 ( ).
Step 4: Change the grid order so the image is on top.
- Select the grid that contains your text and button.
- Open the Inspector.
- Scroll down to “Position” and select the bottom button under “location in grid cells”
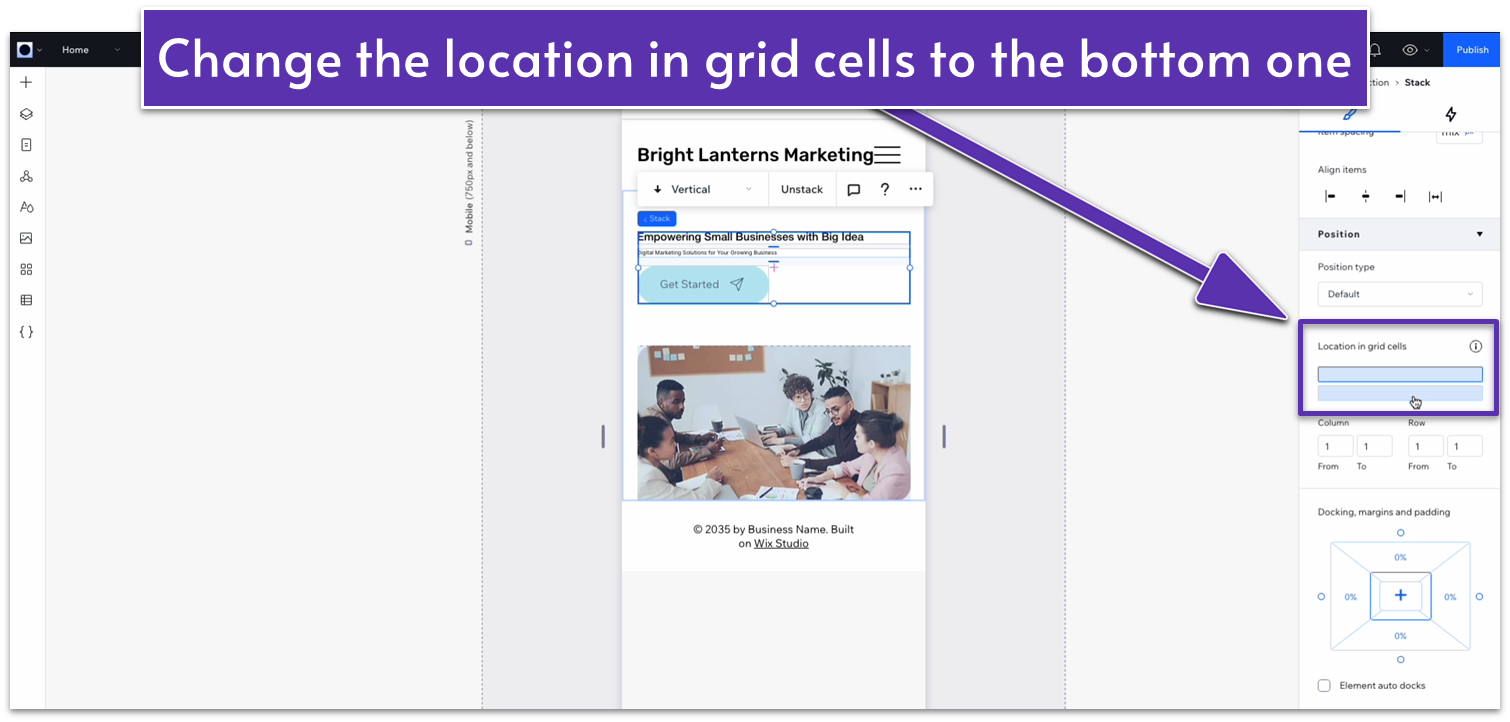
- Then select the grid with the image and select the top button.
Step 5: Change the gaps between grids.
- In the Inspector for the whole section, scroll down to “Layout.”
- Change the vertical gap ( ) to 30px.
Step 6: Enlarge the picture container.
- Open the Inspector for the section.
- Scroll down to “Layout.”
- Under “Rows,” change the value next to “Min/max” ( ) for the first row from 200px to 250px.
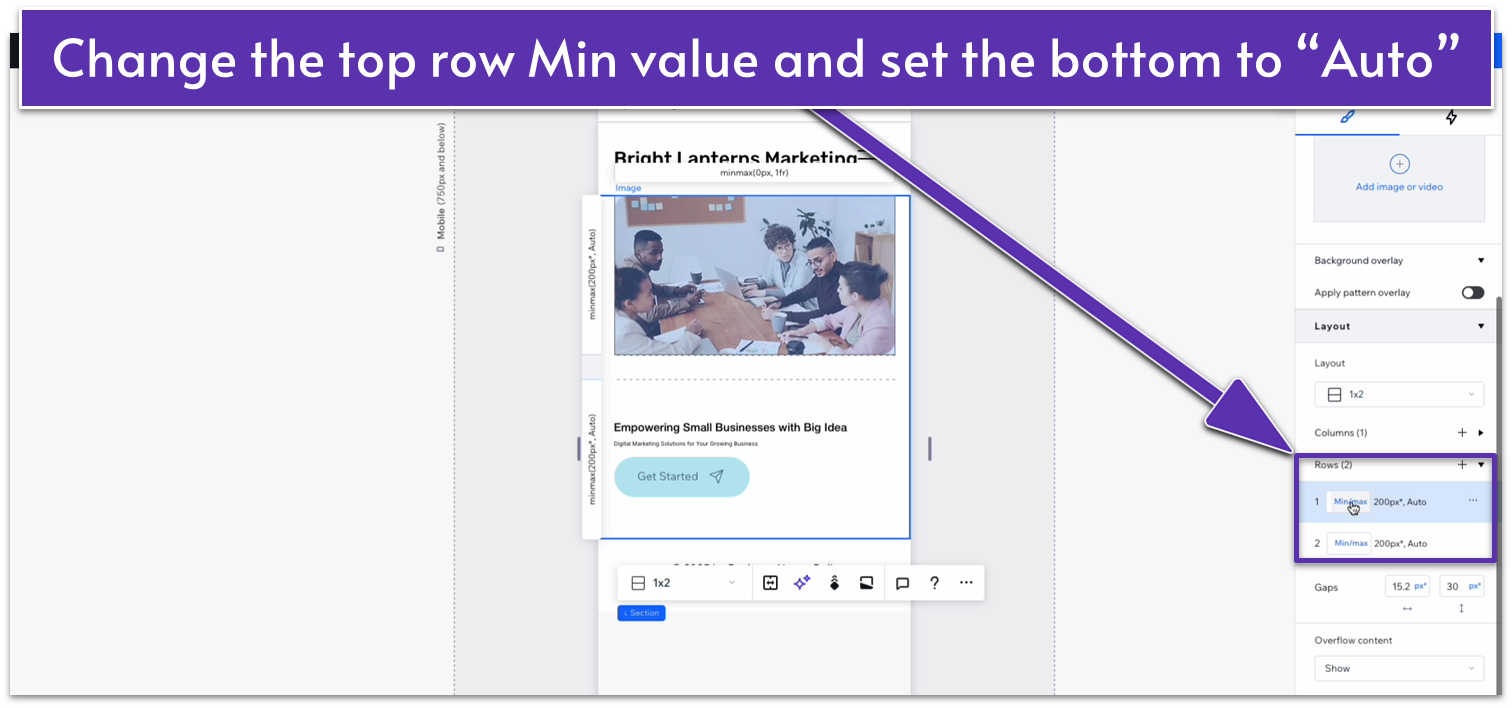
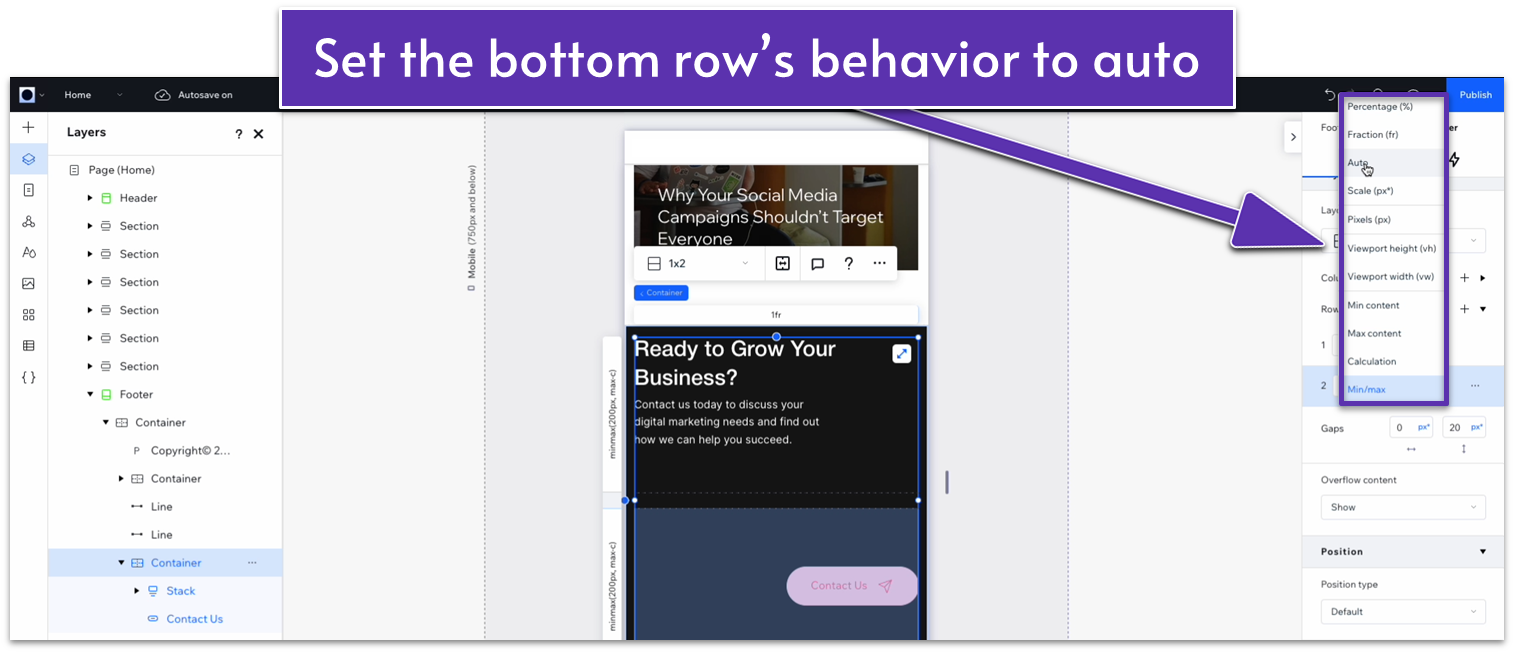
Step 7: Scale the text container.
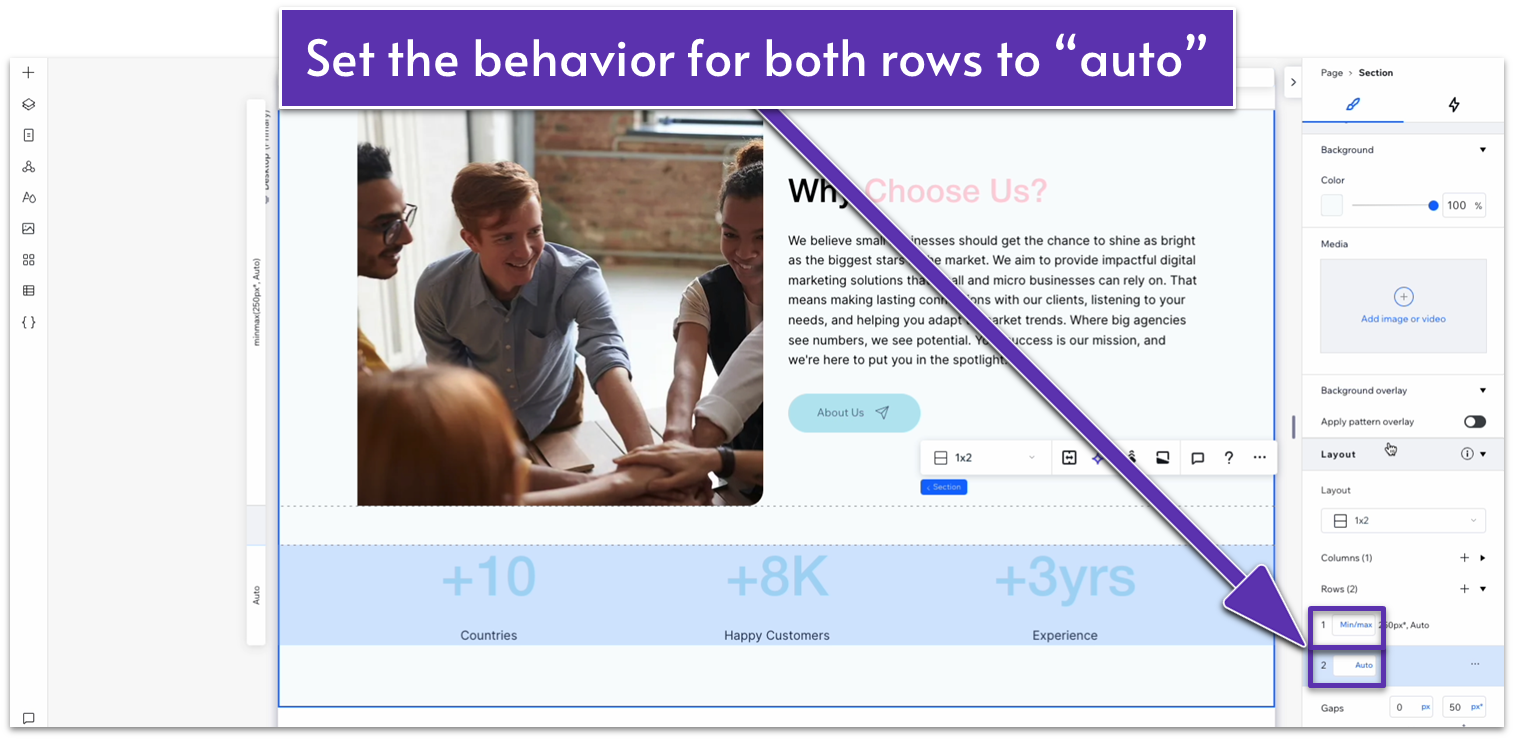
- Still under “Rows,” go to the second row and change the behavior from “Min/max” ( ) to “Auto ( ).”
- Change the text size for the header from 14px to 28px and the text size for the paragraph from 7px to 14px.
- Change the bottom margin ( ) under the header to 10px and the bottom margin under the paragraph to 20px.
2.3 “Why Choose Us?” Section
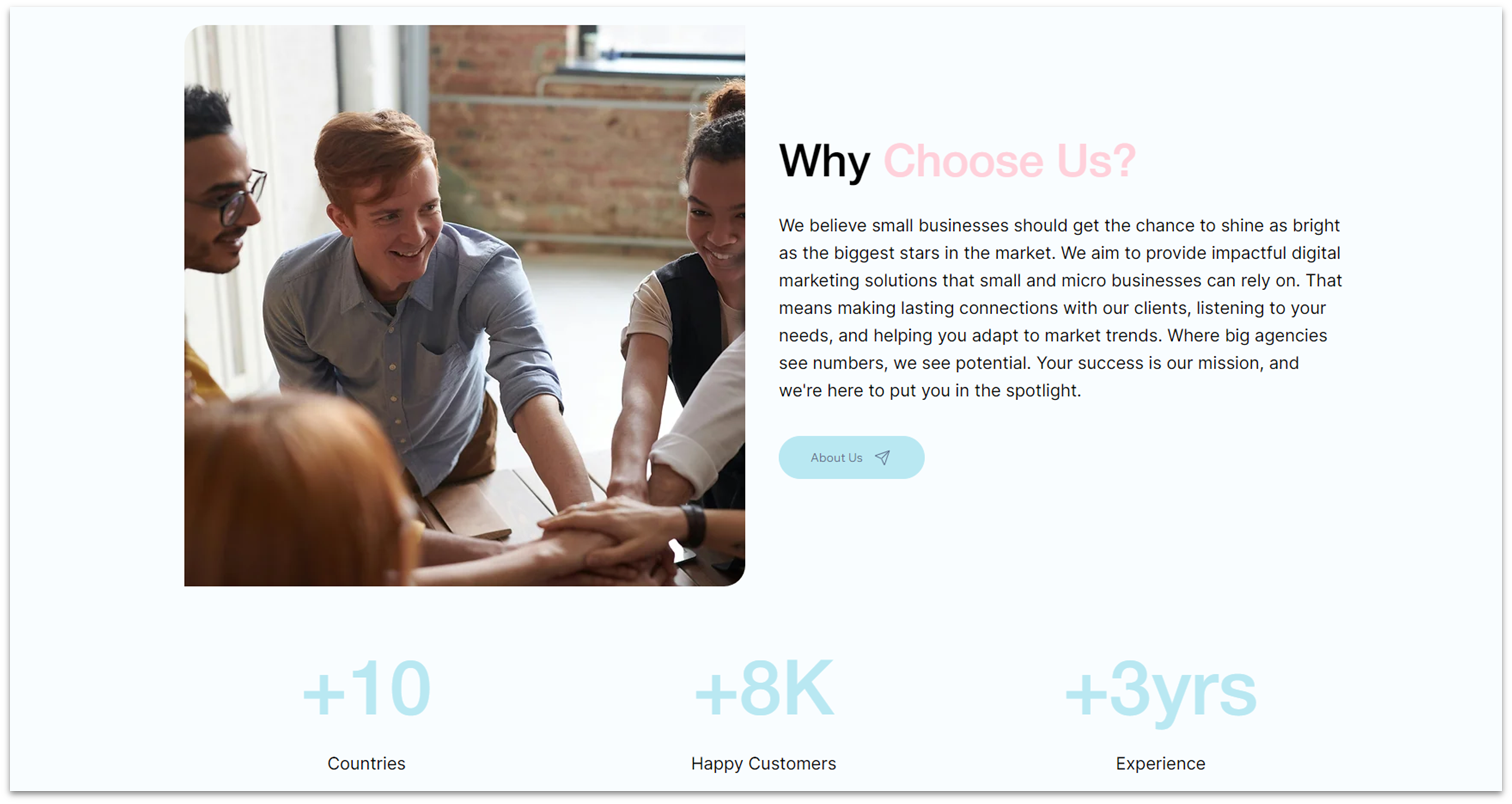
We want this website to make our marketing agency feel reliable and professional, so we’ll include a small section about why it’s a good idea to choose this business over other options. We’ll also include some information about the company here, so this section will double as our “about us” section.
Step 1: Change the padding of the hero section.
- Select the whole hero section.
- Open the Inspector.
- Scroll down to the “Docking, margins and padding” diagram and add a bottom and top padding ( ) of 50px.
Step 2: Create a new section below and divide it into two parts.
- Add a new section using the “Add Section” button ( ) at the bottom of the hero section.
- In the Inspector, change the background color to #F9FDFF (HEX).
- Apply an advanced CSS grid.
- Choose a 1×2 ( ) grid.
- Set the vertical gap ( ) to 50px.
Change the top and bottom padding for the section to an 80px scale.
Step 3: Add a container to the top row and divide it into two horizontal parts.
- Drag a container from the Add Elements ( ) menu into the top row.
- Set the container’s background to 0% opacity, width to 1080px, and all margins to 0.
- Apply an Advanced CSS grid.
- Turn the container into a 2×1 grid ( ), and set the horizontal gap ( ) to 30px.
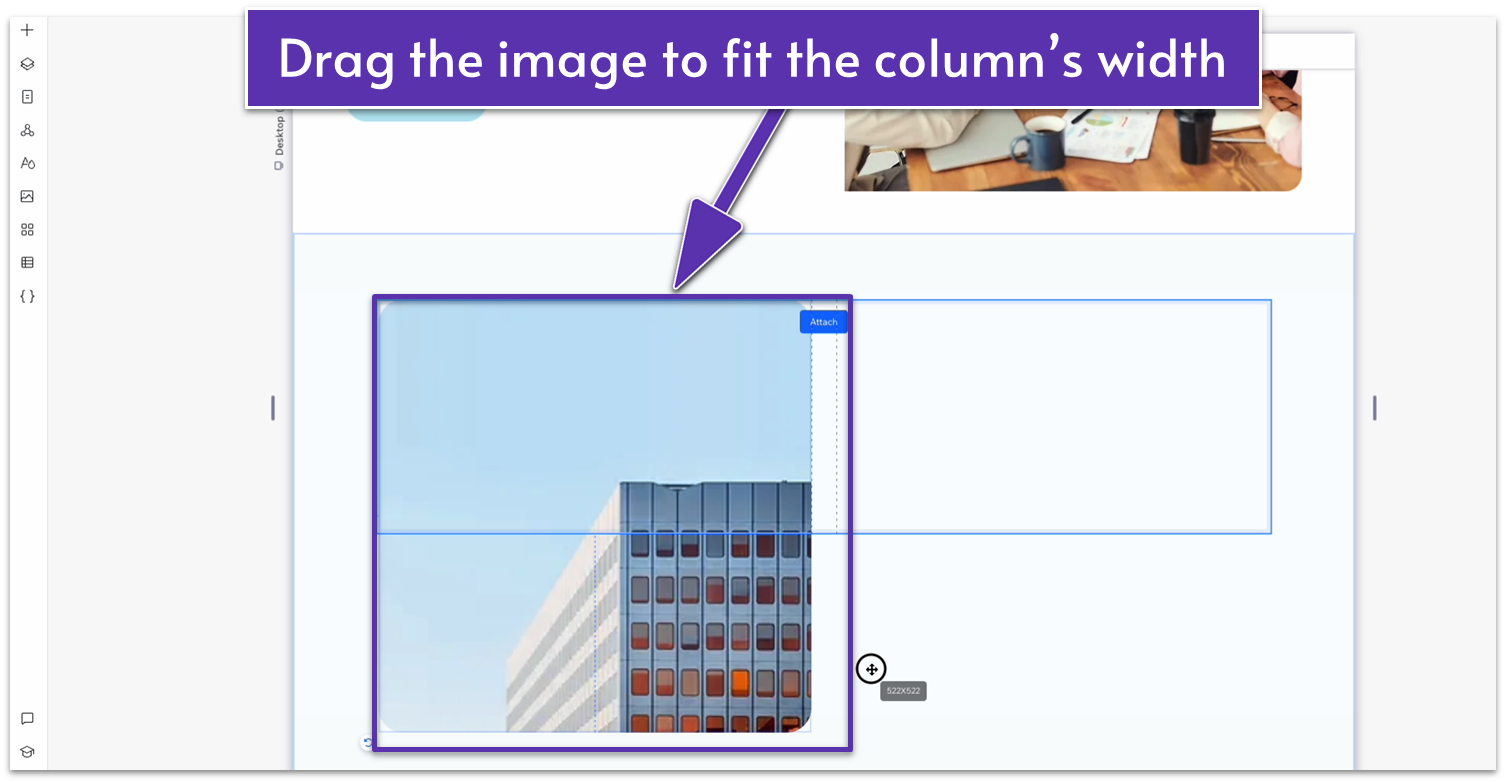
Step 4: Add an image to the left-side column.
- Drag and drop an image box into the left side.
- Drag the image box to scale it until it aligns with the edges of the column.
- Set all margins to 0 so the container is the same size as your image.
- Set the top left and bottom right corner radius to 20px and the remaining corners to 0px.
- Replace the default image with one from your gallery.
Step 5: Add text to the right-side column.
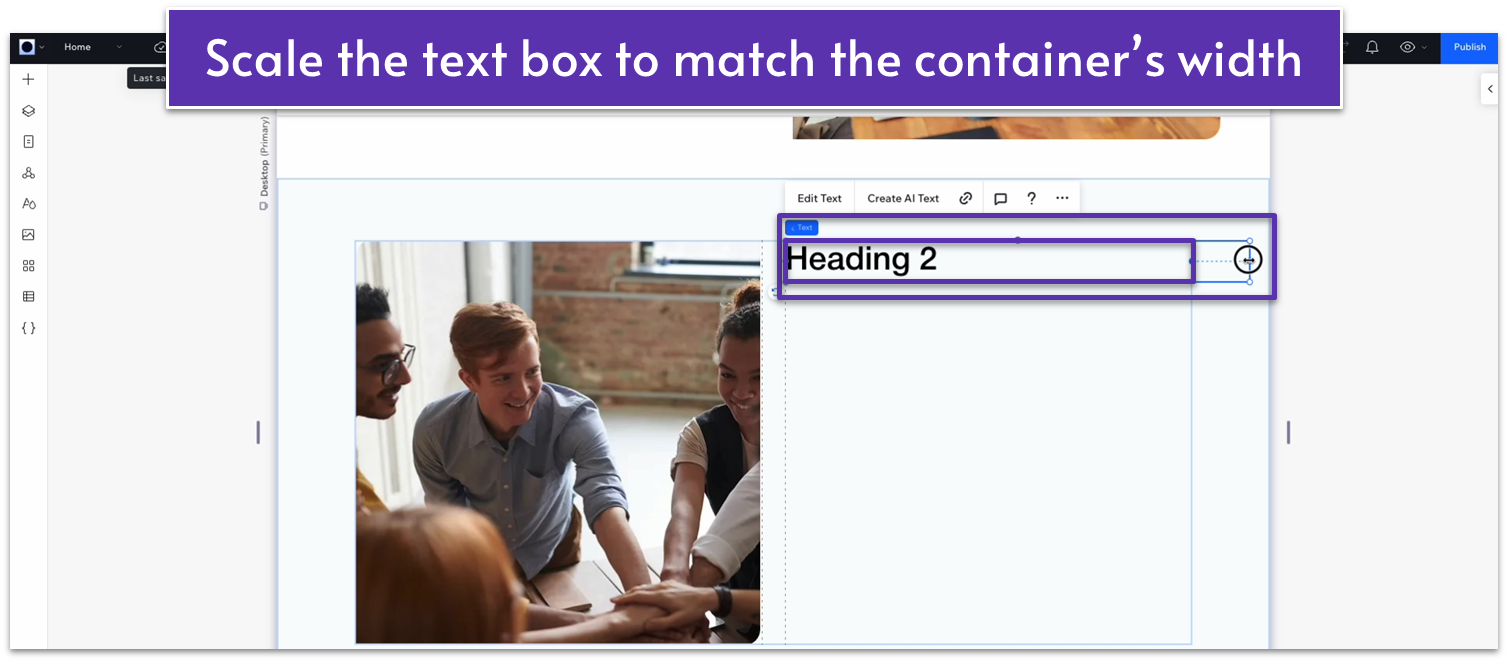
- Drag a heading 2 and a paragraph from the Add Elements menu ( ) into the right-side column. Scale the text boxes so they match the container’s width.
- Copy and paste the button from the hero section into the right-side column.
- Change the default text for your own.
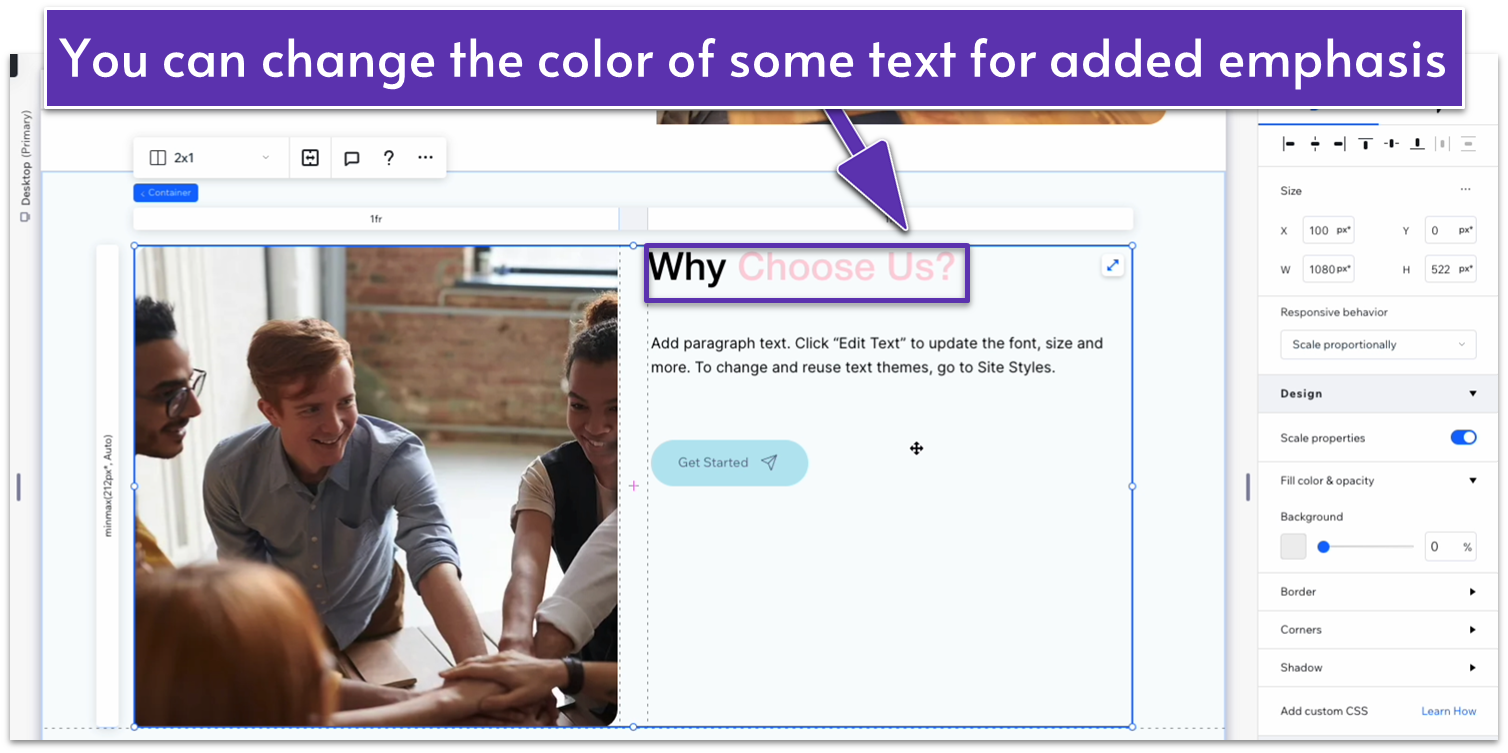
- You can change the color of some of the heading text to make it “pop” more.
- Here, we used HEX #FFD1D8 as an accent color.
Step 6: Group the text elements into a stack.
- Select the heading, paragraph text, and button, and stack the elements together.
- Activate advanced sizing options for the paragraph element and make sure its width is set to 100% and all margins except the bottom one ( ) to 0.
- Set the bottom margin ( ) for the paragraph to a scale of 30px.
- Set all margins for the button to 0.
- Set the bottom padding ( ) below the heading to a scale of 20px.
- Set the margins for the stack as a whole to 0.
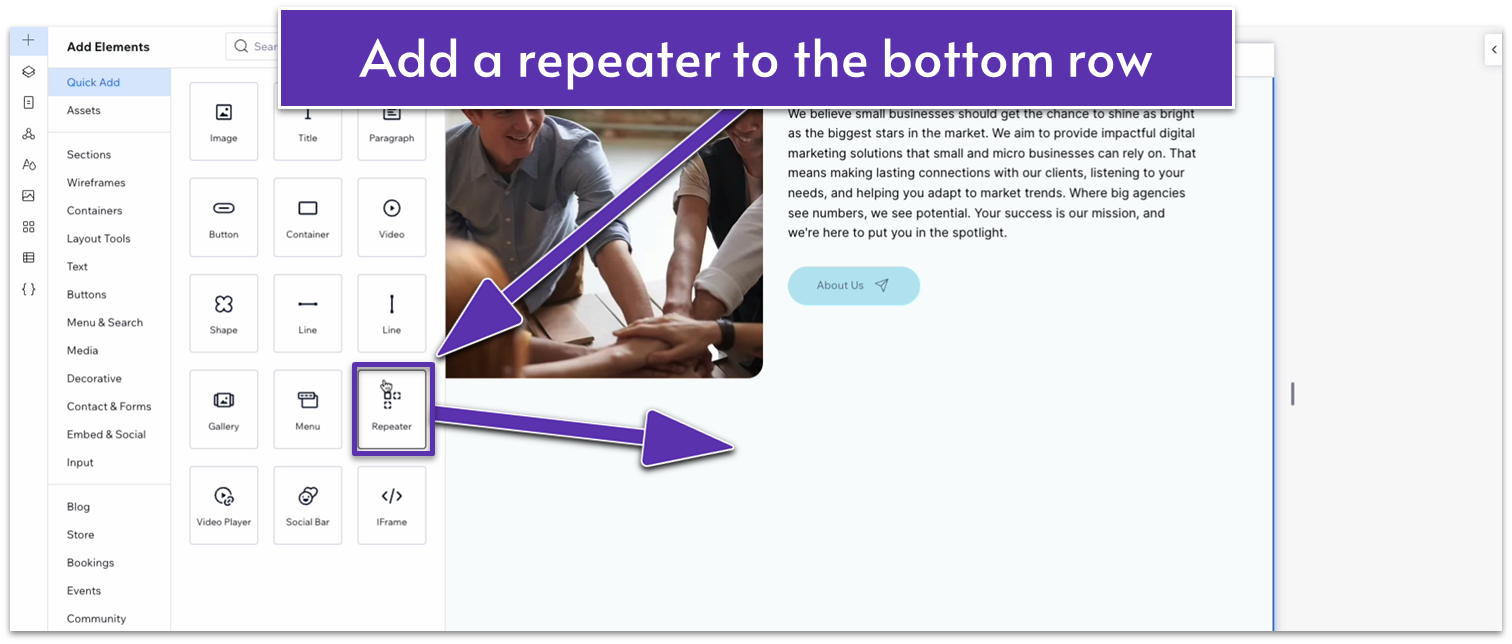
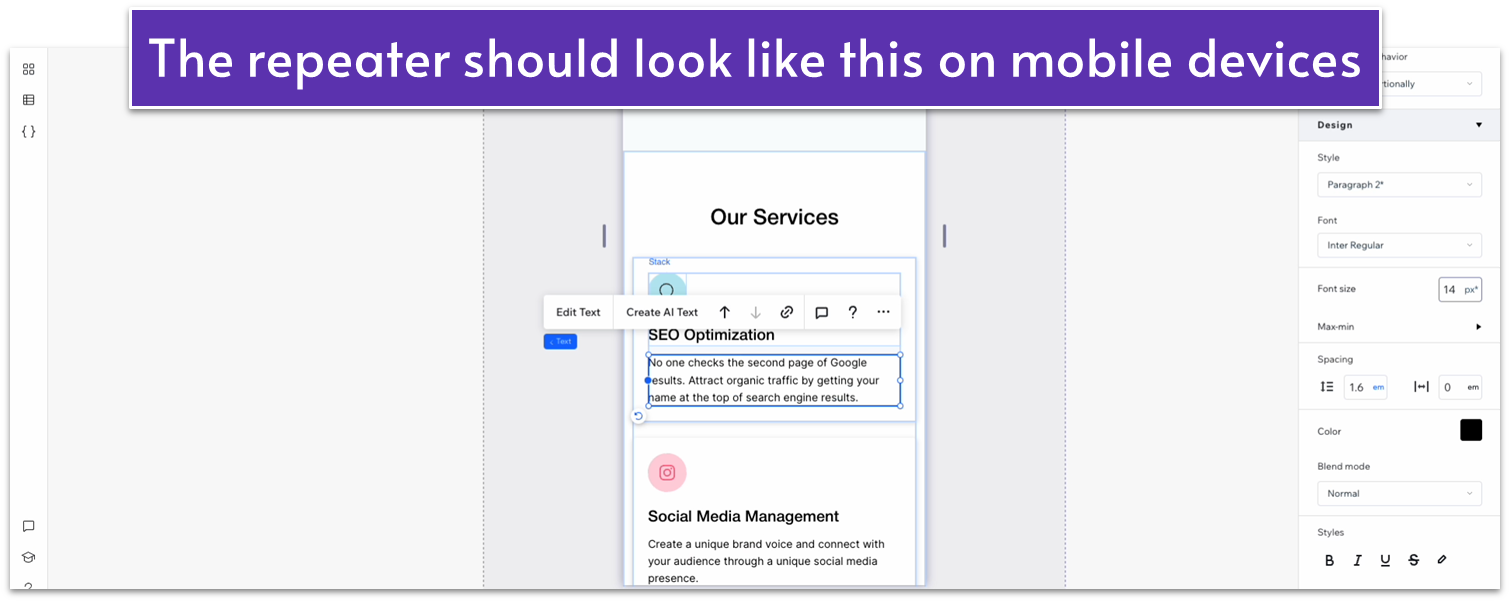
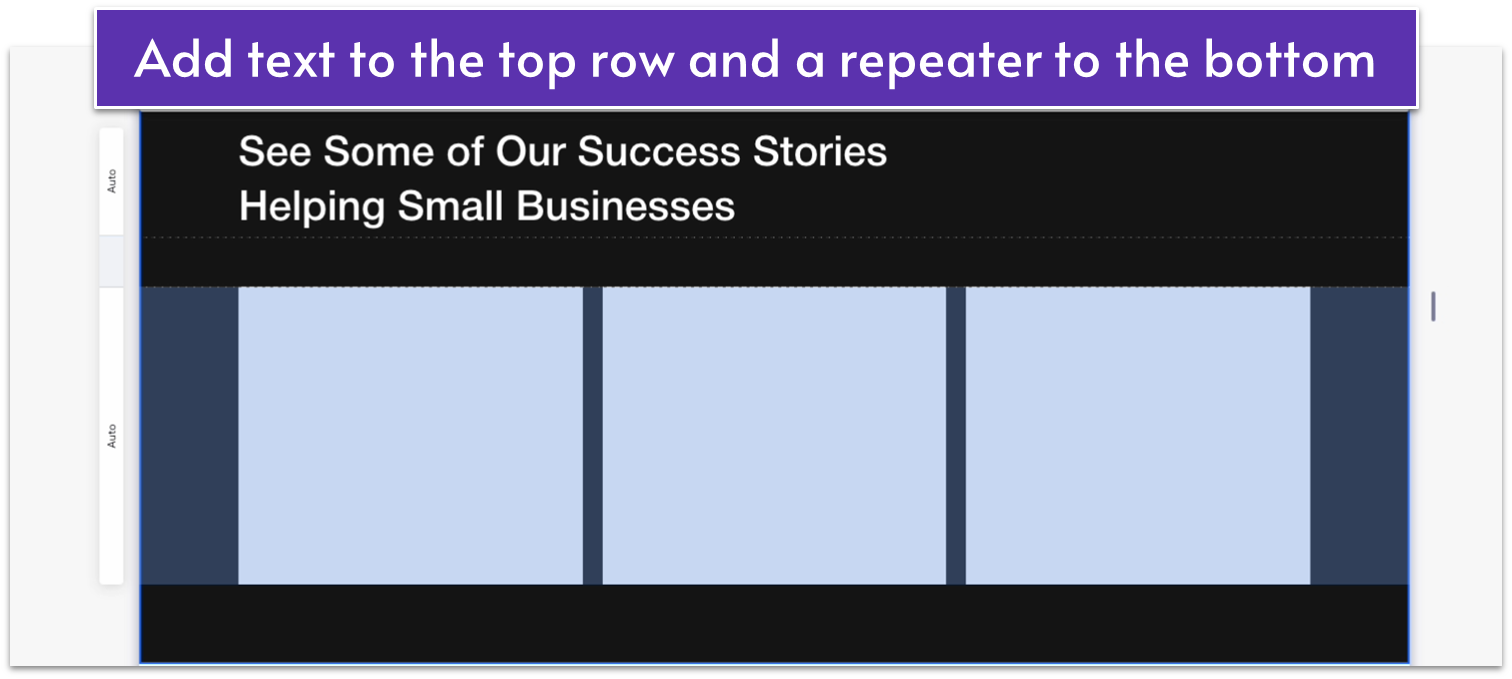
Step 7: Add a repeater to the bottom row.
Repeater elements help you create multiple elements with consistent design but different content, and we’ll be using them a lot in the sections below. Since repeaters apply the same design consistently, they’ll also allow us to make style changes to the whole section instead of one element at a time.
Unless otherwise specified, you’ll only need to make changes to one element inside the repeater.
- In the “Add Elements” menu ( ), select “repeater” from the “Quick Add” options and drag it into the bottom row.
- Set all margins to 0, width to 1080px, and horizontal gaps ( ) between elements to 30px.
- Remove the item’s background and apply an advanced CSS grid.
Step 8: Add and format text into the repeater.
- Add a heading 3 and a paragraph to the repeater, and drag the text box so it aligns with the borders.
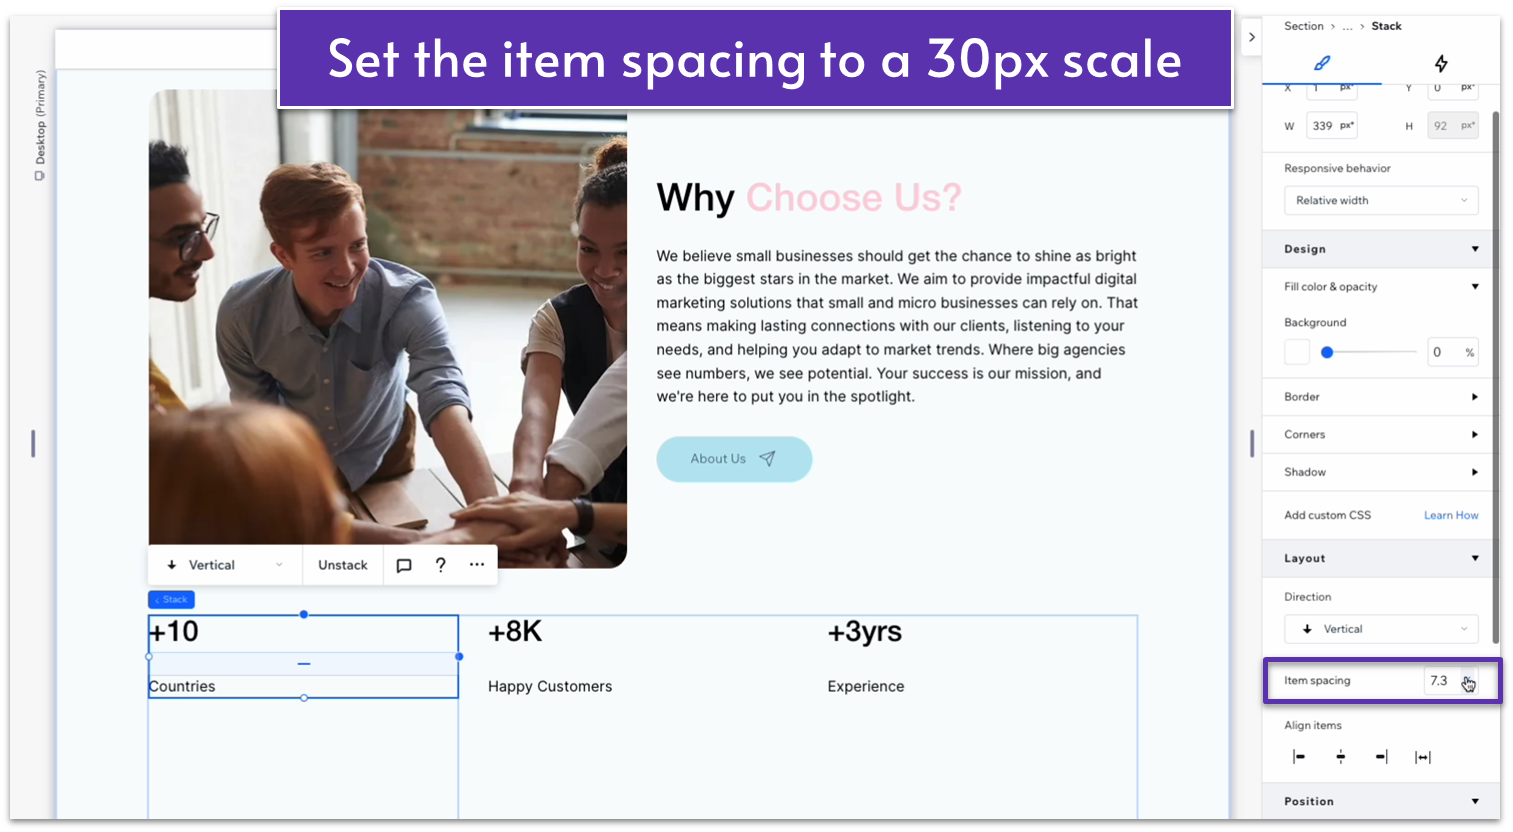
- Stack the elements together and set the spacing to a scale of 30px.
- Replace the default text with short descriptions of the business’s achievements.
- Change the heading color to #B9E8F2 (HEX).
- Change the heading font size to 72px.
- Align both text elements to the center ( ) and set the behavior of all rows to auto ( ).
Adapt for Tablet and Mobile Views
Step 1: Adapt for tablet view.
On tablet ( ) view:
- Change the font size for the “Why Choose Us?” to 28px.
- Change the paragraph text font size to 14px.
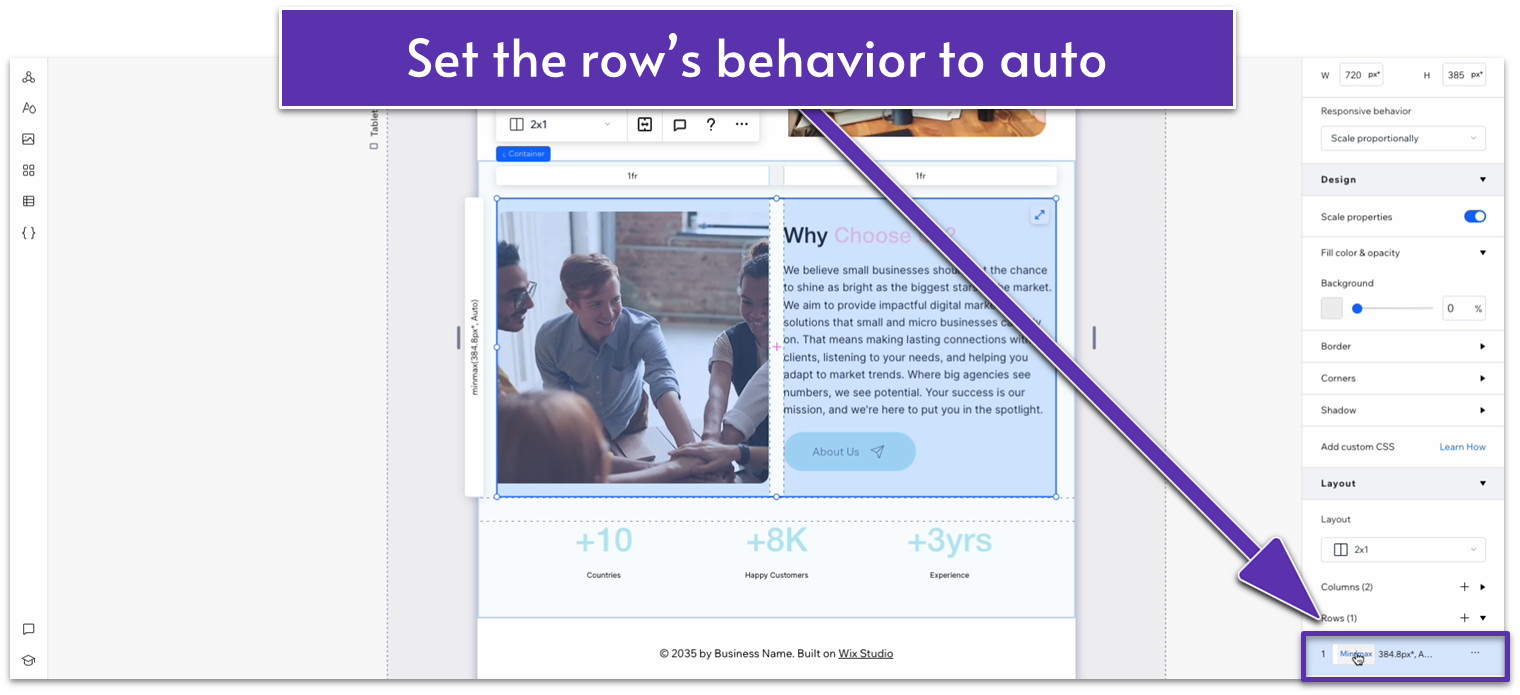
- Set the row behavior for the container on top to auto ( ).
- Change the font size for the numbers on the bottom section to 52px.
- Change the font size for the text below to 16px.
- Set the top and bottom padding ( ) to 70px.
Step 2: Adapt for mobile view.
On mobile ( ) view:
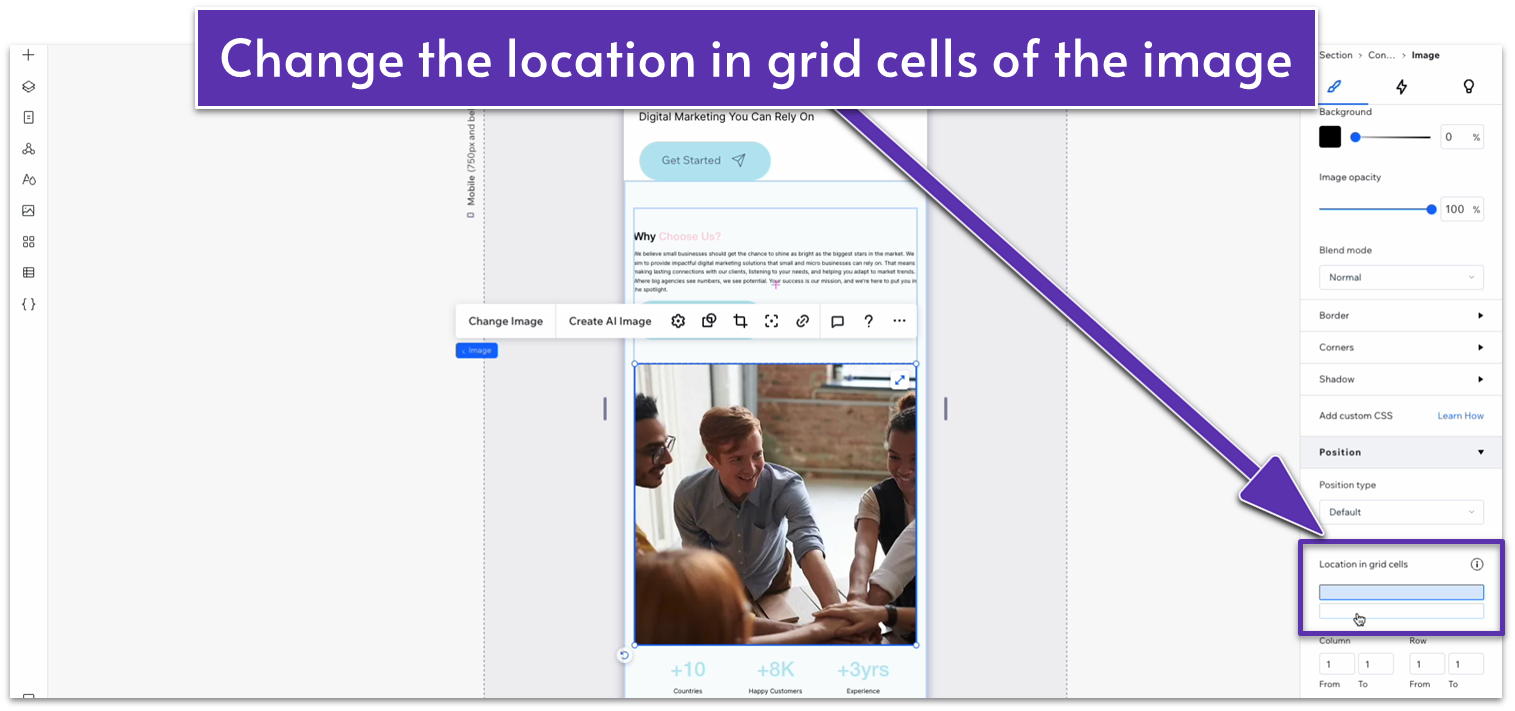
- Change the inner container layout from 2×1 ( ) to 1×2 ( ). The image should now sit above the text.
- Set the location in grid cells of the text to the top row and the image to the bottom row.
- Set the vertical gap ( ) between rows to a 30px scale.
- Select the “Why Choose Us?” heading at the top and change the font size to 28px.
- Change the font size for the paragraph below to 14px.
- Set the bottom margin ( ) for the “Why Choose Us?” heading to 10px scale.
- Set the bottom margin ( ) for the paragraph to 20px scale.
- Set the behavior of both rows to auto ( ).
- Set the gap between the image and the numbers below to 30px.
- Change the font size for the numbers to 40px.
- Change the font size for the text below the numbers to 14px.
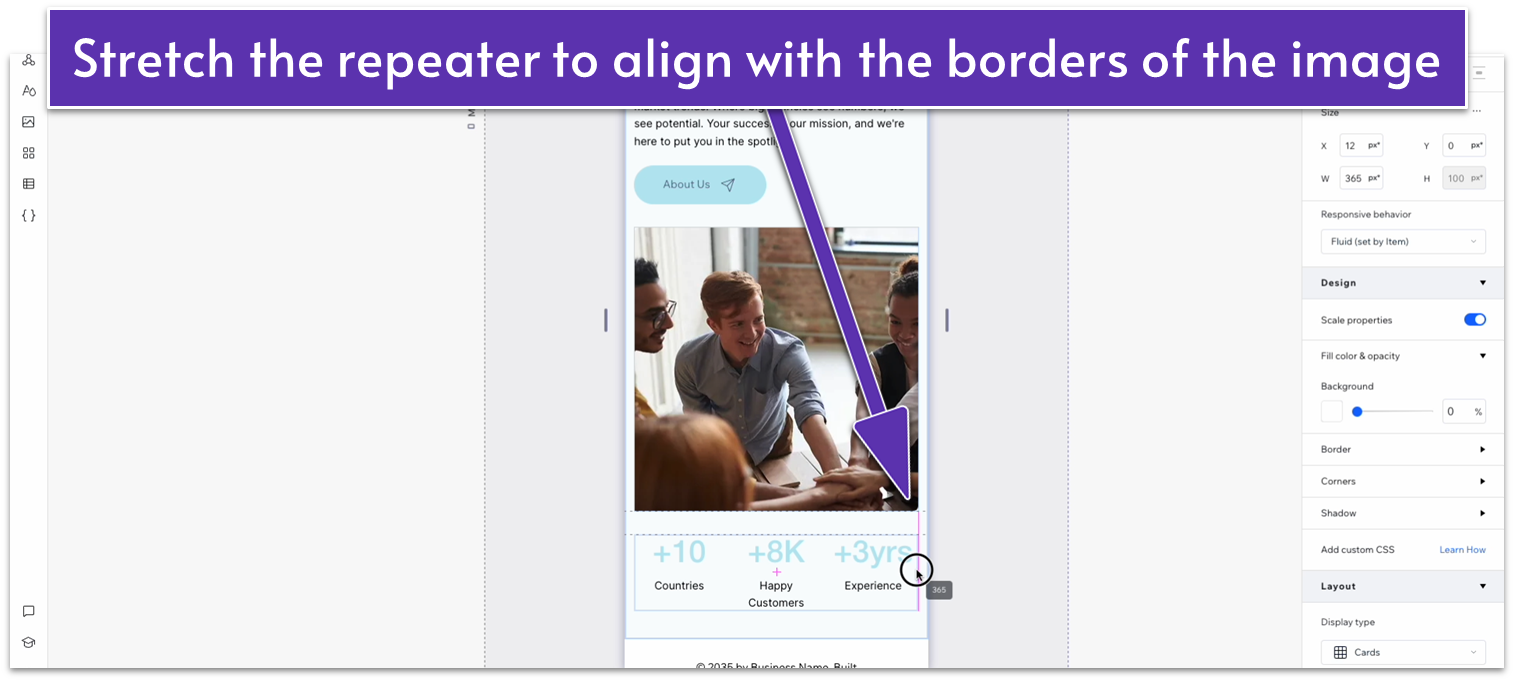
- Stretch the repeater to align with the borders of the image.
- Set the top and bottom padding ( ) for the whole section to 70px scale.
2.4 Services Section
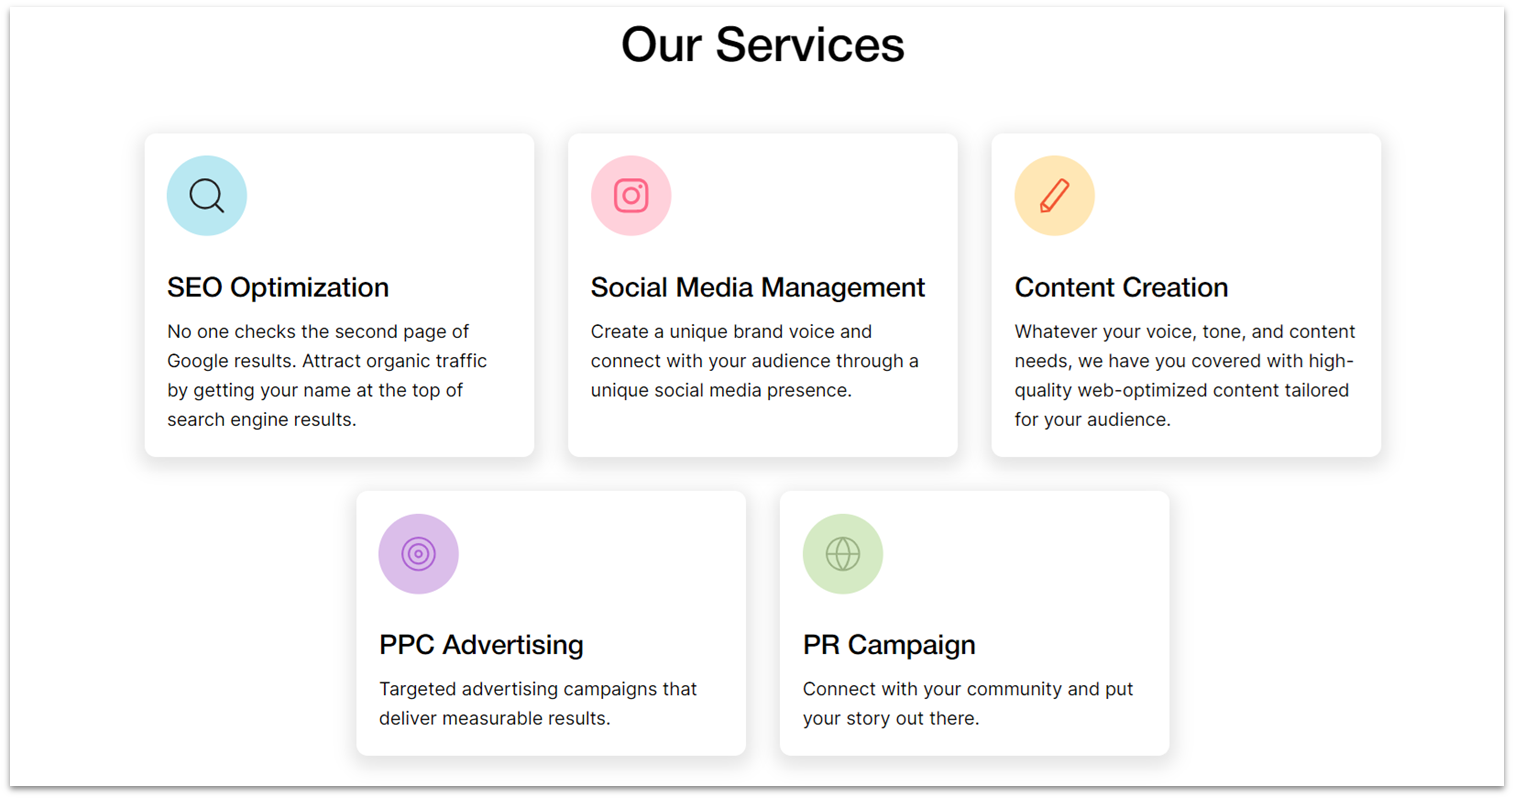
As the name implies, we’ll add a simple section describing the services offered by this business.
Step 1: Set up the section.
- Add a new section.
- Apply an advanced CSS grid.
- Set the grid to 1×2 ( ) and the vertical gaps between rows ( ) to 50px.
Step 2: Add a heading to the top row.
- Add a heading 2 into the top row and set all margins to 0.
- Align the text to the center ( ).
- Replace the default text with your own.
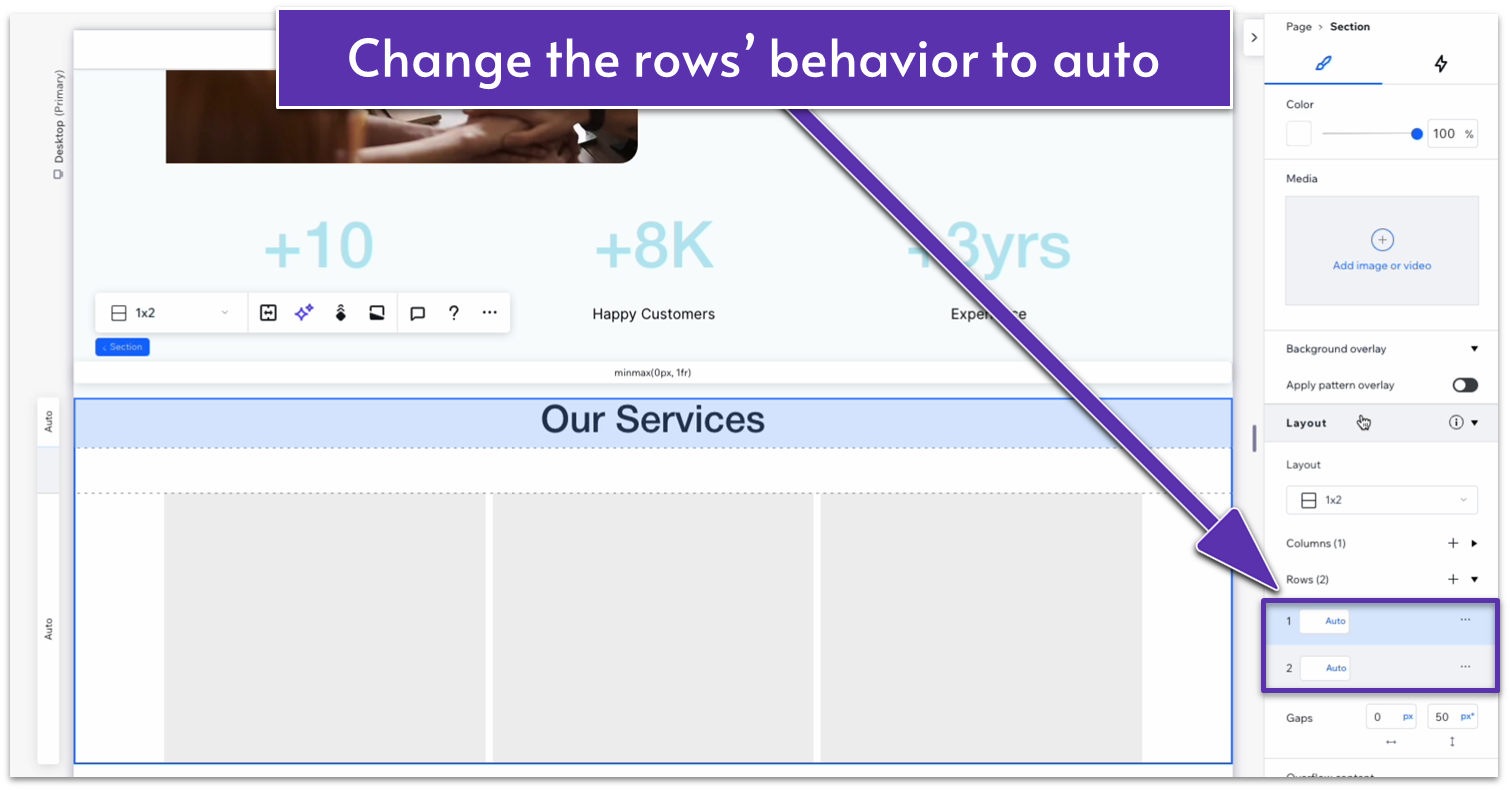
Step 3: Add a repeater to the bottom row.
- Set padding to 0.
- Change the repeater’s width to 1080px.
- Set both rows’ behavior to auto ( ).
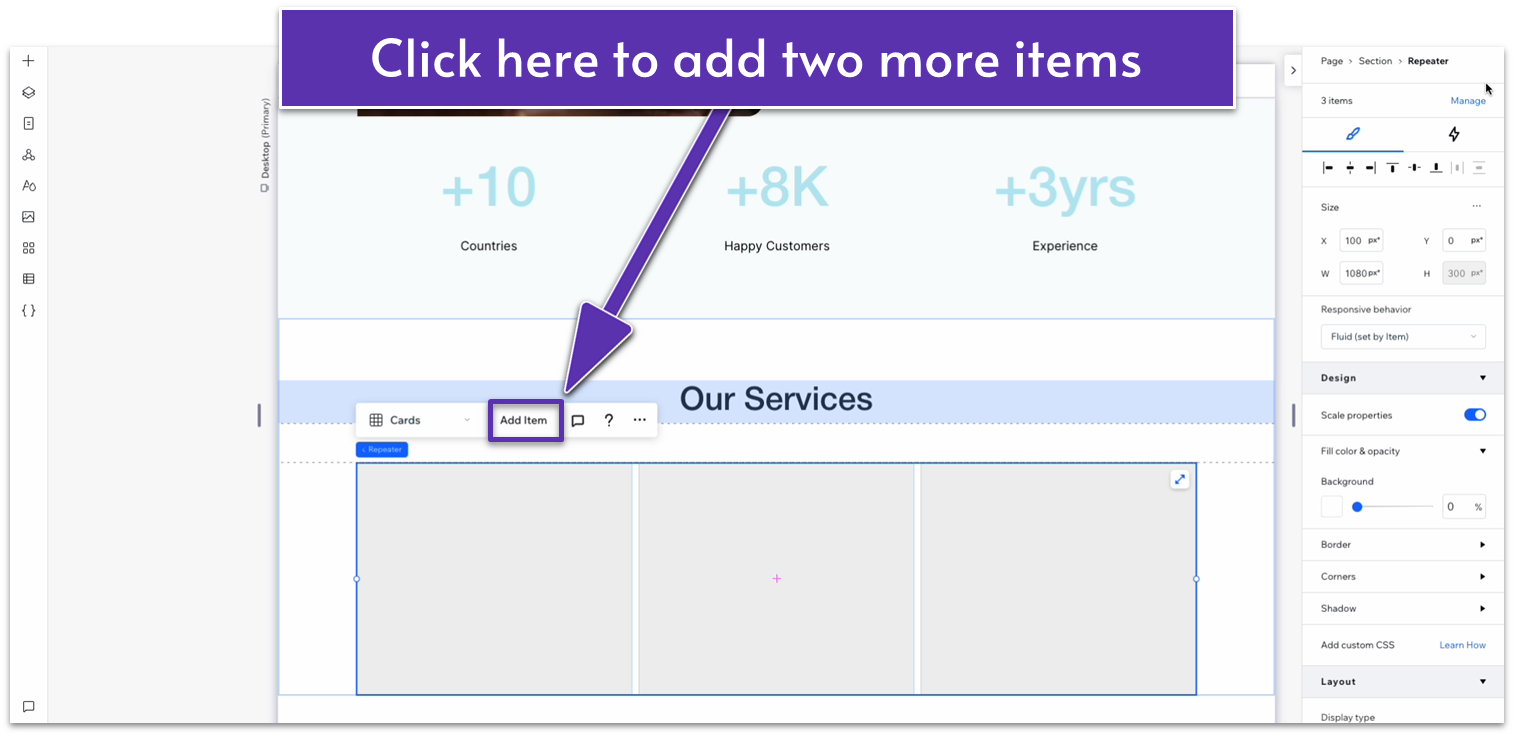
Step 4: Style the repeater’s elements.
We’ll use this bottom repeater to add a short list of the different services offered. In this case, we’ll use a repeater with 5 items.
- Set the horizontal ( ) and vertical gaps ( ) between the repeater’s elements to 30px.
- Add elements to the repeater until there are 5 total.
- Set the background color for the repeater’s items to white, and the corner radius to 10px for all corners.
- Apply an advanced CSS grid within the repeater’s items.
- In the inspector, scroll down to “Design,” then “Shadow,” and add a shadow.
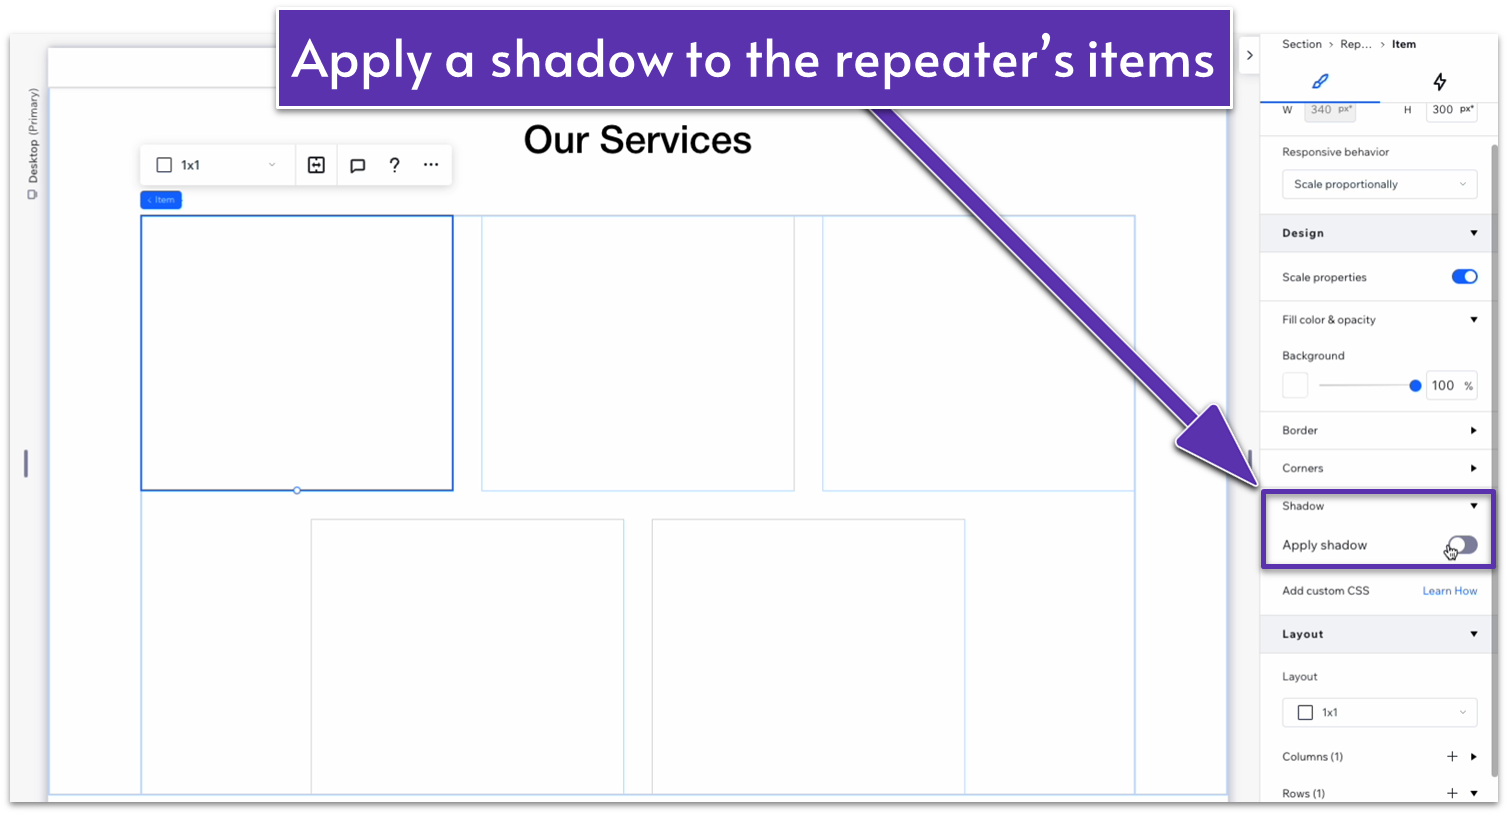
- Set the shadow’s angle to 357 degrees, its distance to 5px, size to 5px, and blur to 15px.
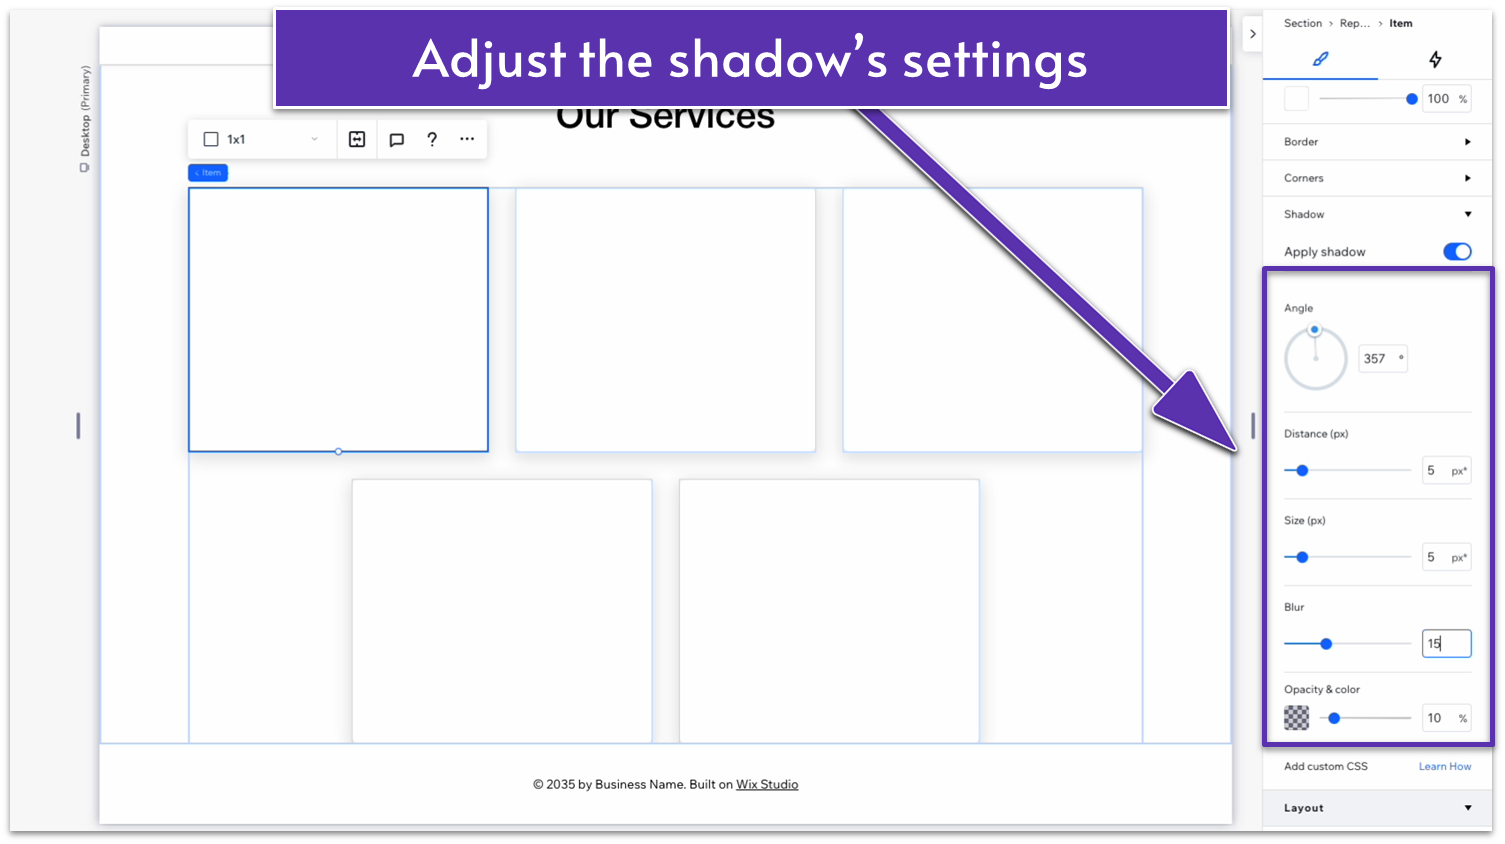
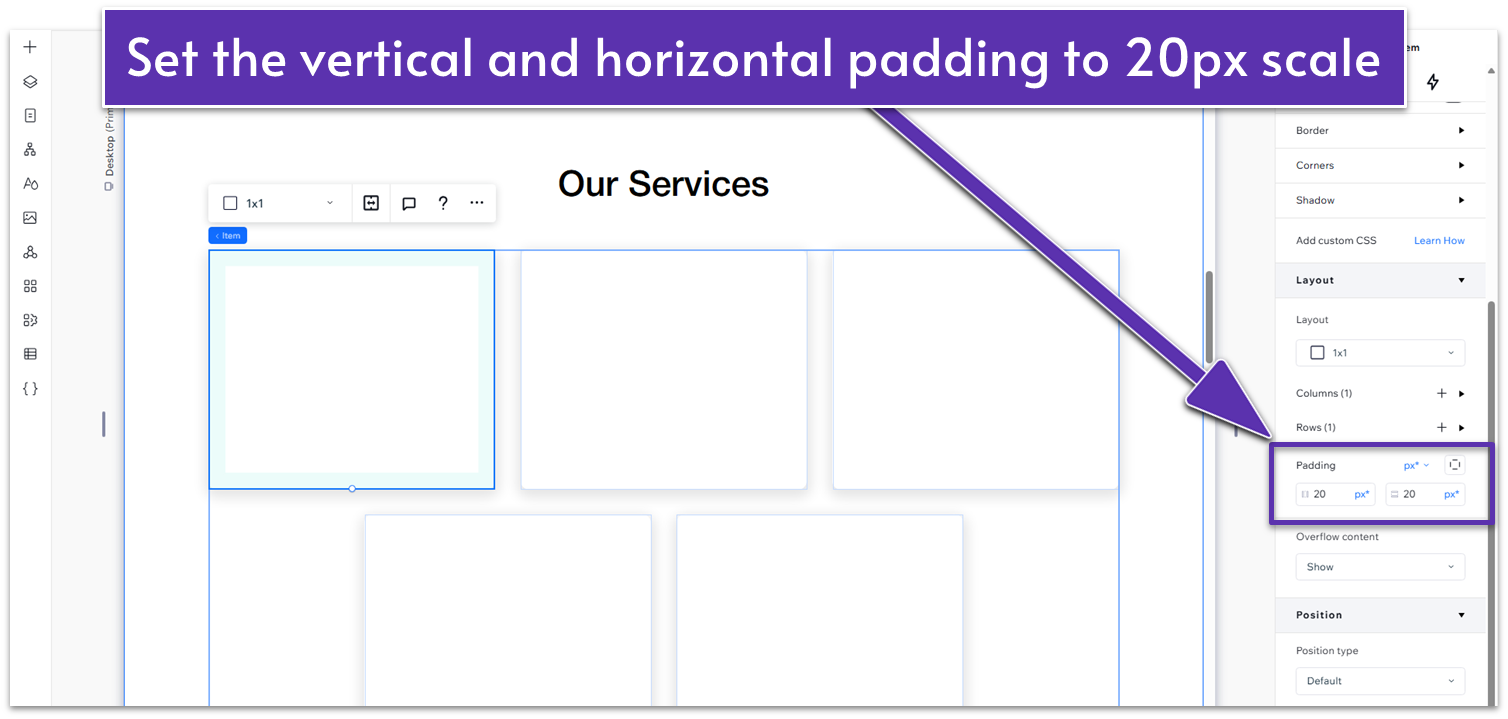
- Apply a vertical ( ) and horizontal ( ) padding of 20px scale.
Step 5: Add content to the repeater’s items.
- Add a container into one of the repeater’s items.
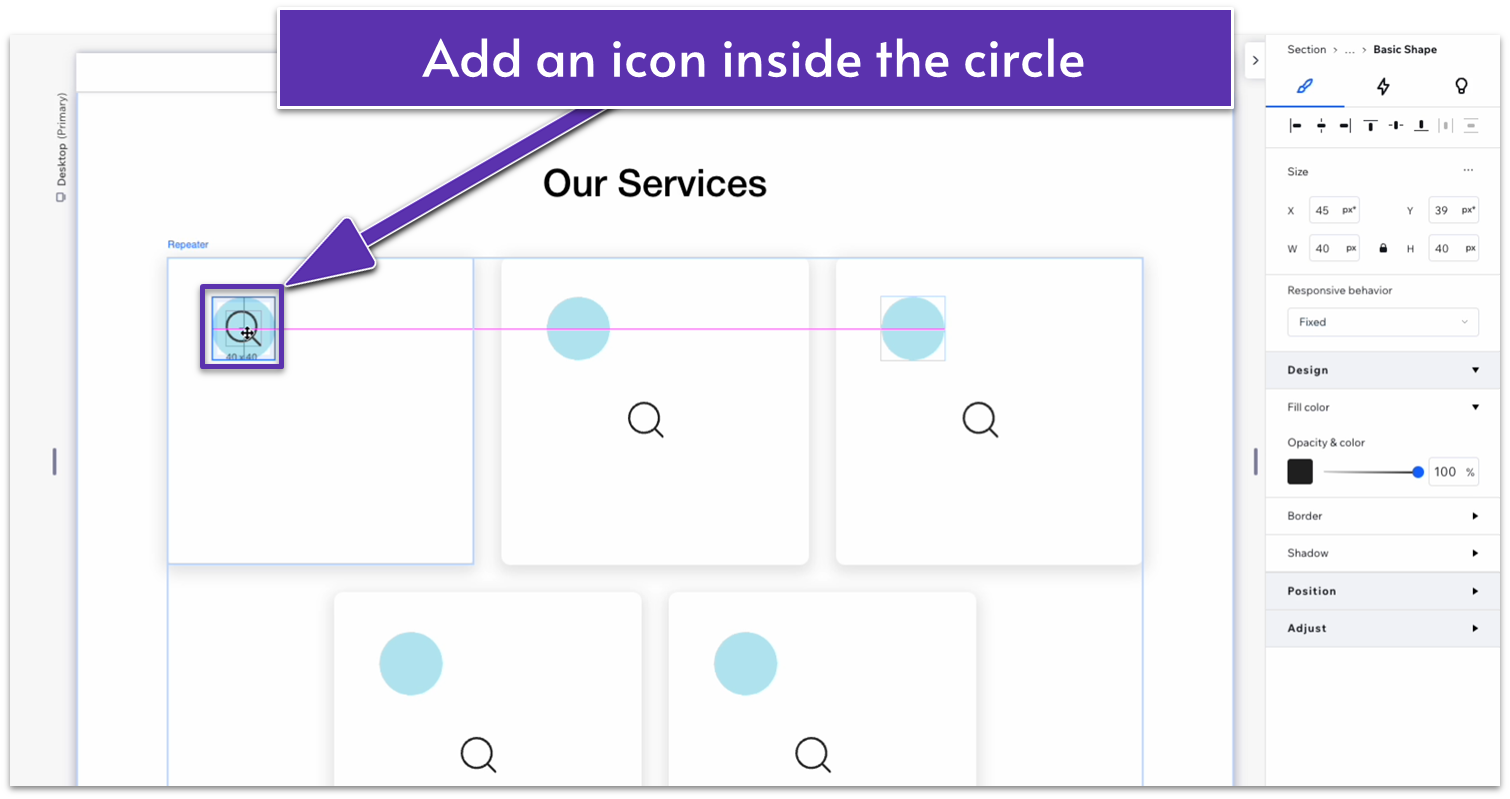
- Add a circle to the container.
- Change the circle’s color to #B9E8F2 (HEX).
- Scale the circle to a width and height of 70px and change its responsive behavior to “relative width.”
- Align the circle to the upper left corner of the container.

- Set the container’s width to 70px and set its background opacity to 0.
- Apply an advanced CSS grid and change the container’s behavior to auto ( ).
- Insert the shape of a magnifying glass inside the circle, change its size to 30px, and change its responsive behavior to “Scale proportionally”.
- Use the grid lines to align the circle with the upper-left corner of the repeater’s item.
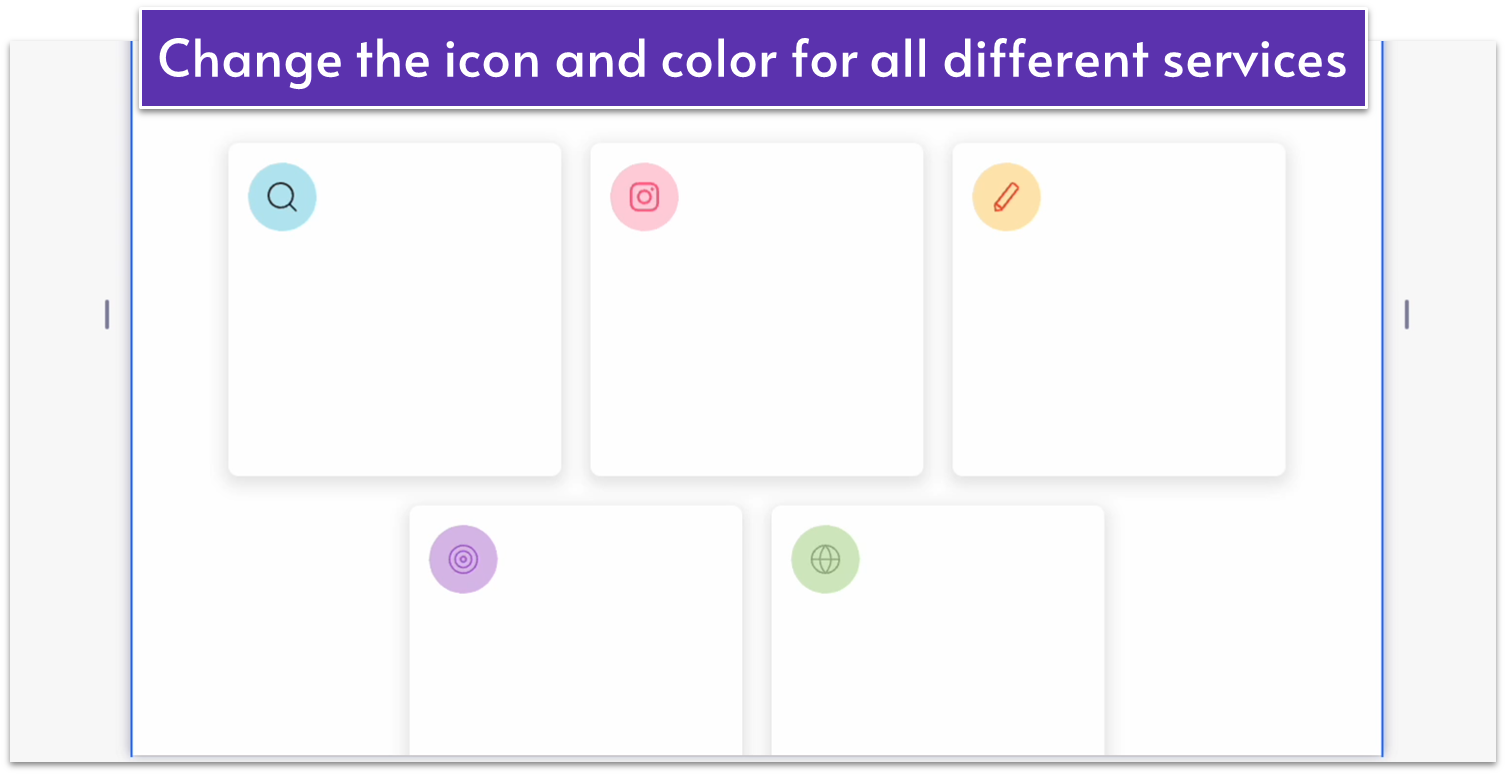
Step 6: Change the background colors and icons.
- For our site, we’ll change each circle to a different background color and icon to make each service stand out more.
- Change the background color for one of the circles.
- Click on the shape and select “Change Basic Shape.”
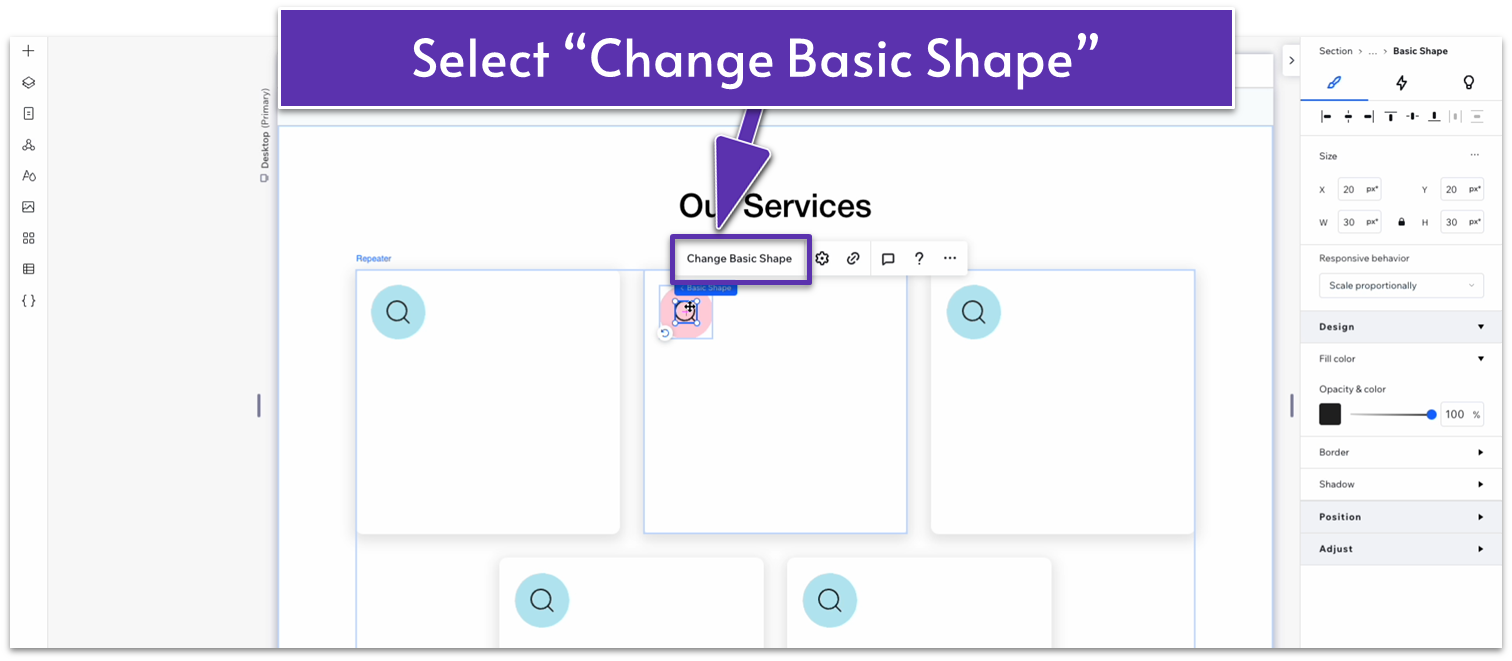
- Select the best shape to symbolize the service you’ll describe.
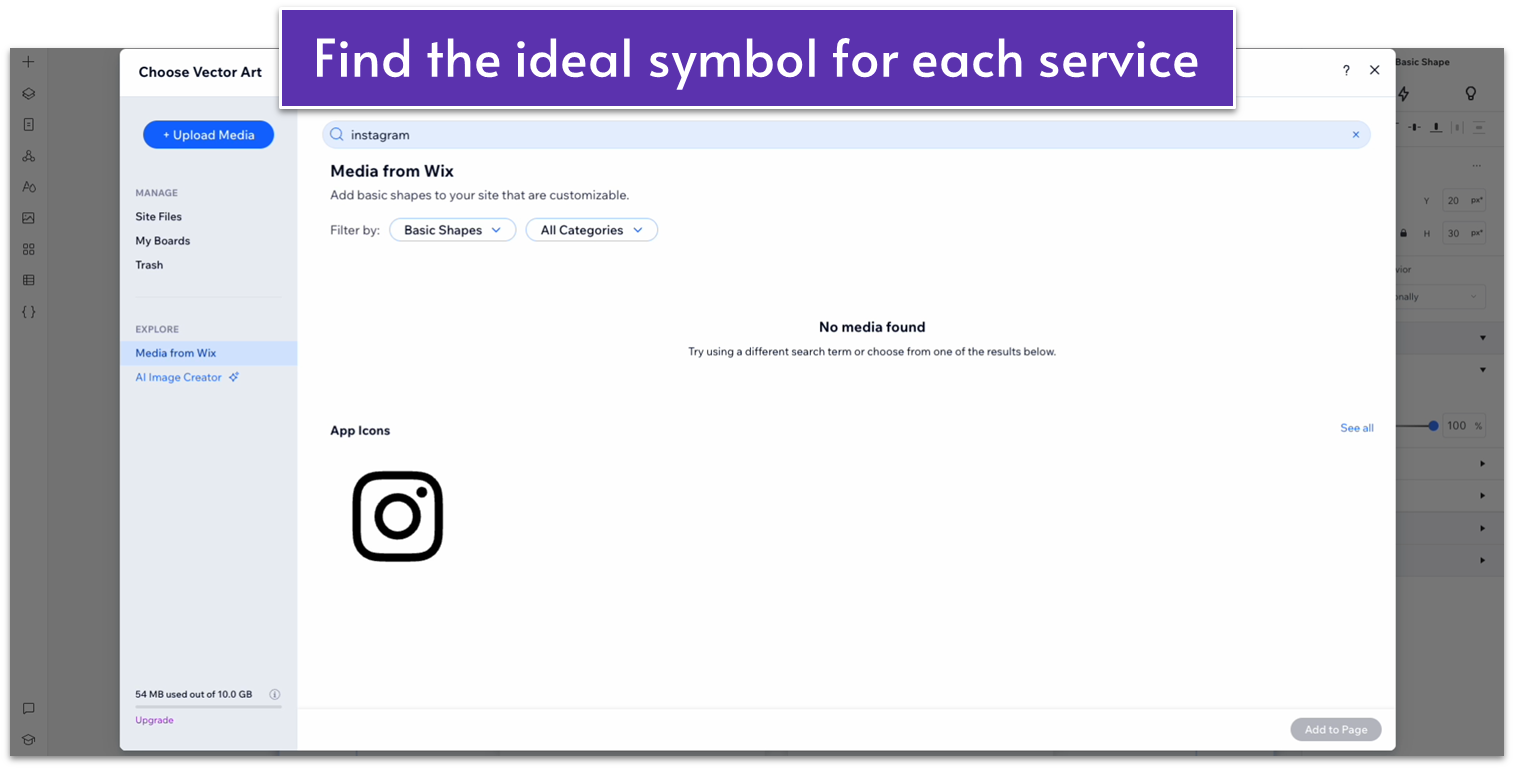
- Repeat this process for each item in the repeater.
Step 7: Add text and stack the different elements.
- Add a heading 3 into the repeater’s item and set its width to match the inner container.
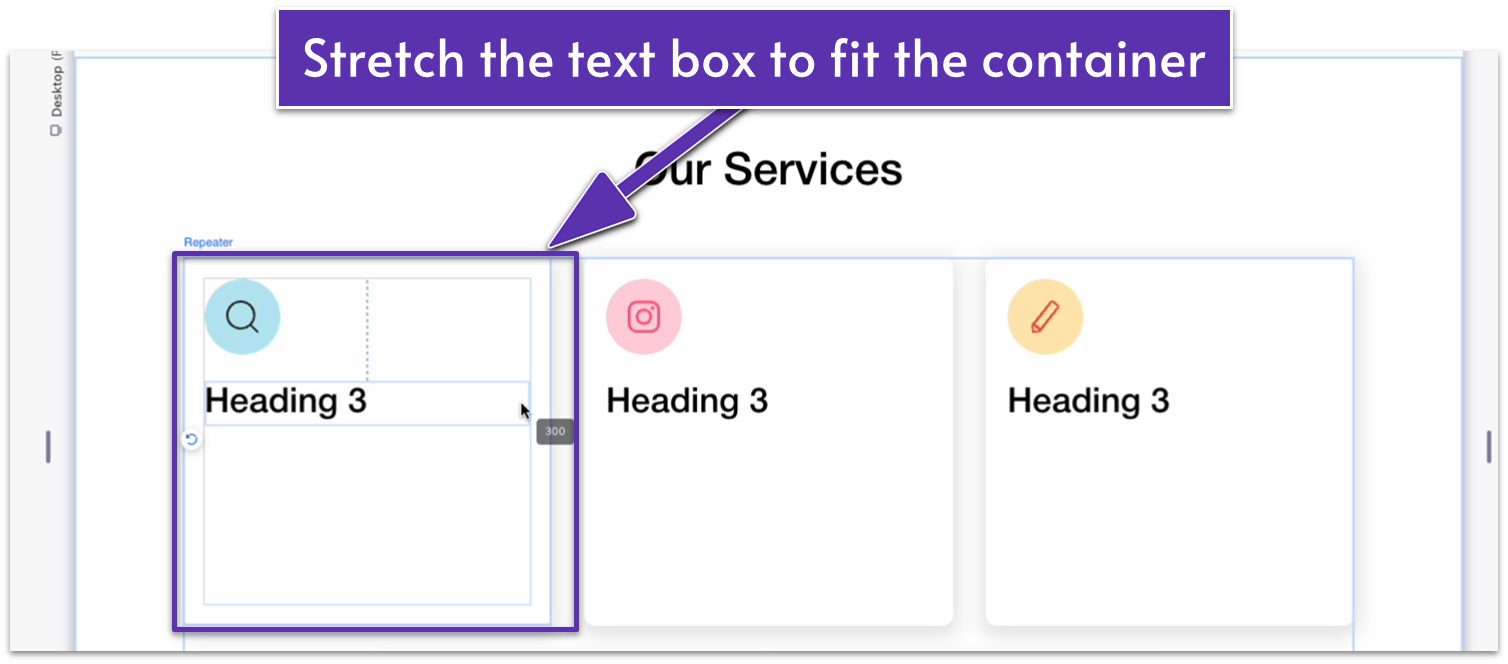
- Add a paragraph below and change its width as well.
- Use the grid lines to line everything up, replace the default text with your own, and stack the icon, heading, and paragraph together.
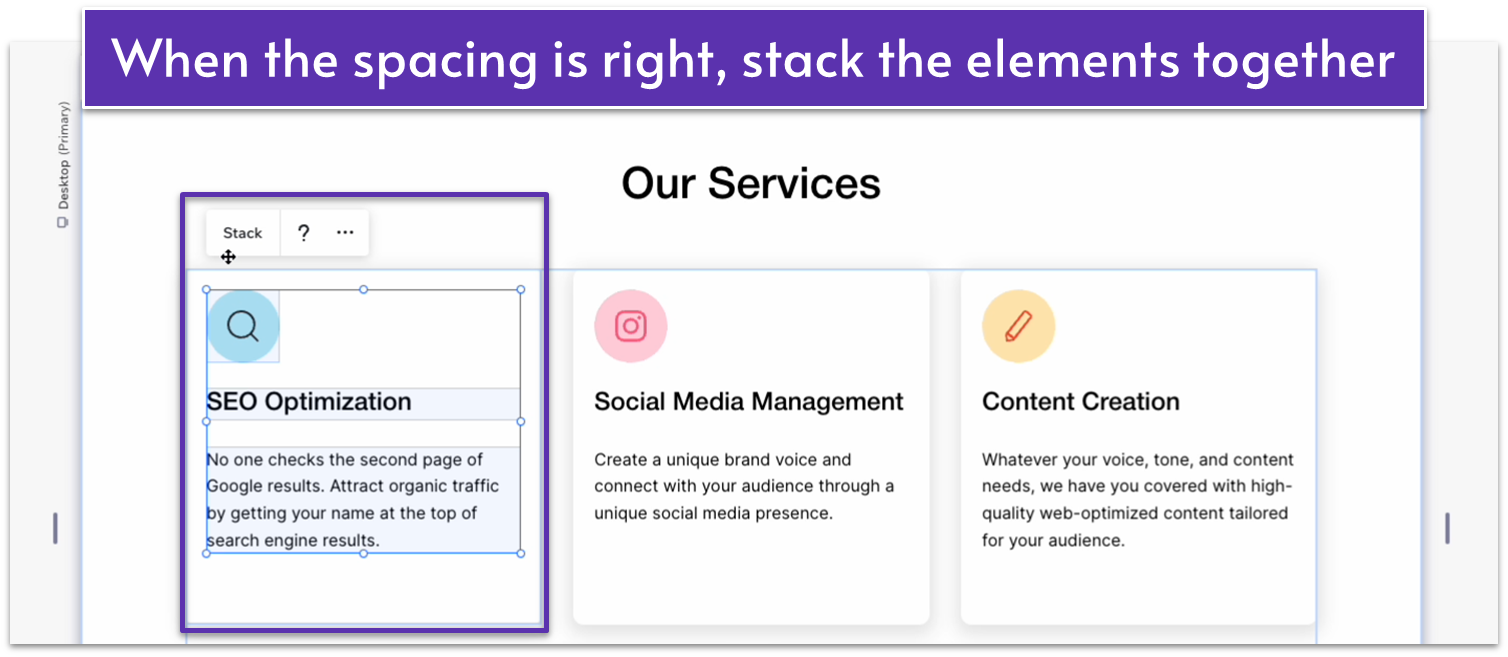
- Apply advanced size settings to the stack.
- Change the bottom margin ( ) for the icon to 30px scale.
- Change the bottom margin ( ) for the heading to 10px scale.
- Set the row behavior for the element to auto ( ).
Adapt for Tablet and Mobile Views
Step 1: Adapt for tablet view.
On tablet ( ) view:
- Change the font size of “Our Services” to 28px.
- Change the text box width to 720px.
- Stretch the repeater’s container to align with the edges of the text box.
- Set the horizontal ( ) and vertical ( ) gaps to 20px within the repeater.
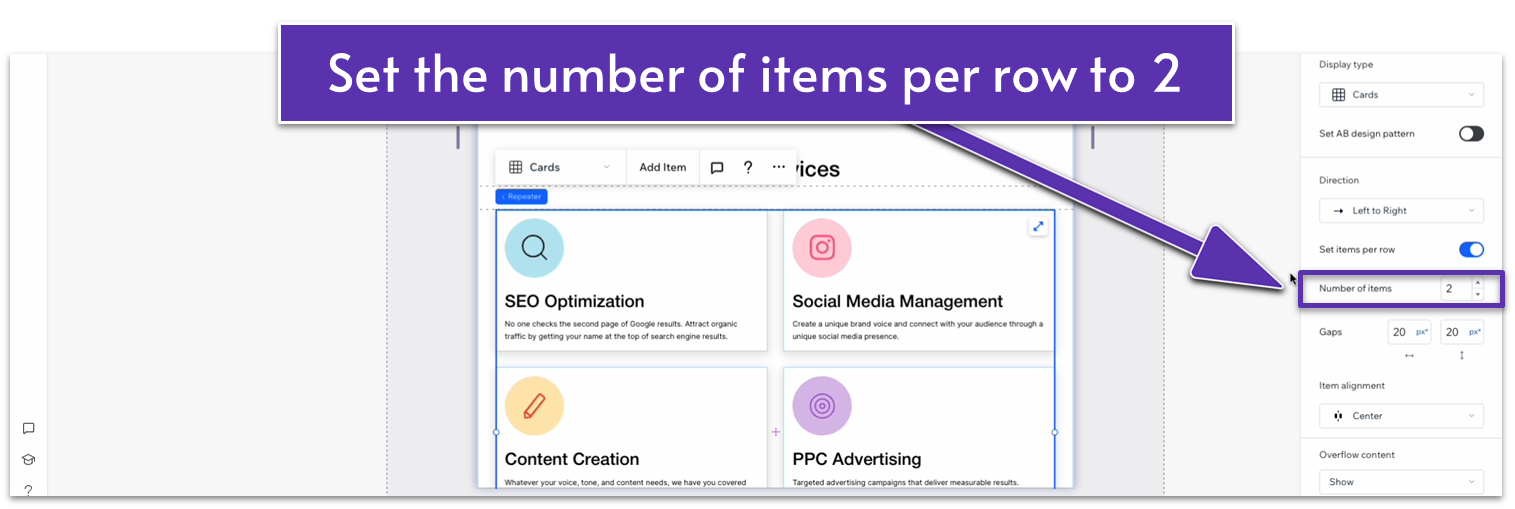
- Select one of the headings underneath the icons in the repeater and change its font size to 22px. This will change the font size for the heading in all the other repeater items.
- Set the number of items per row in the repeater to 2.
- Set the corners for the repeater items to 10px.
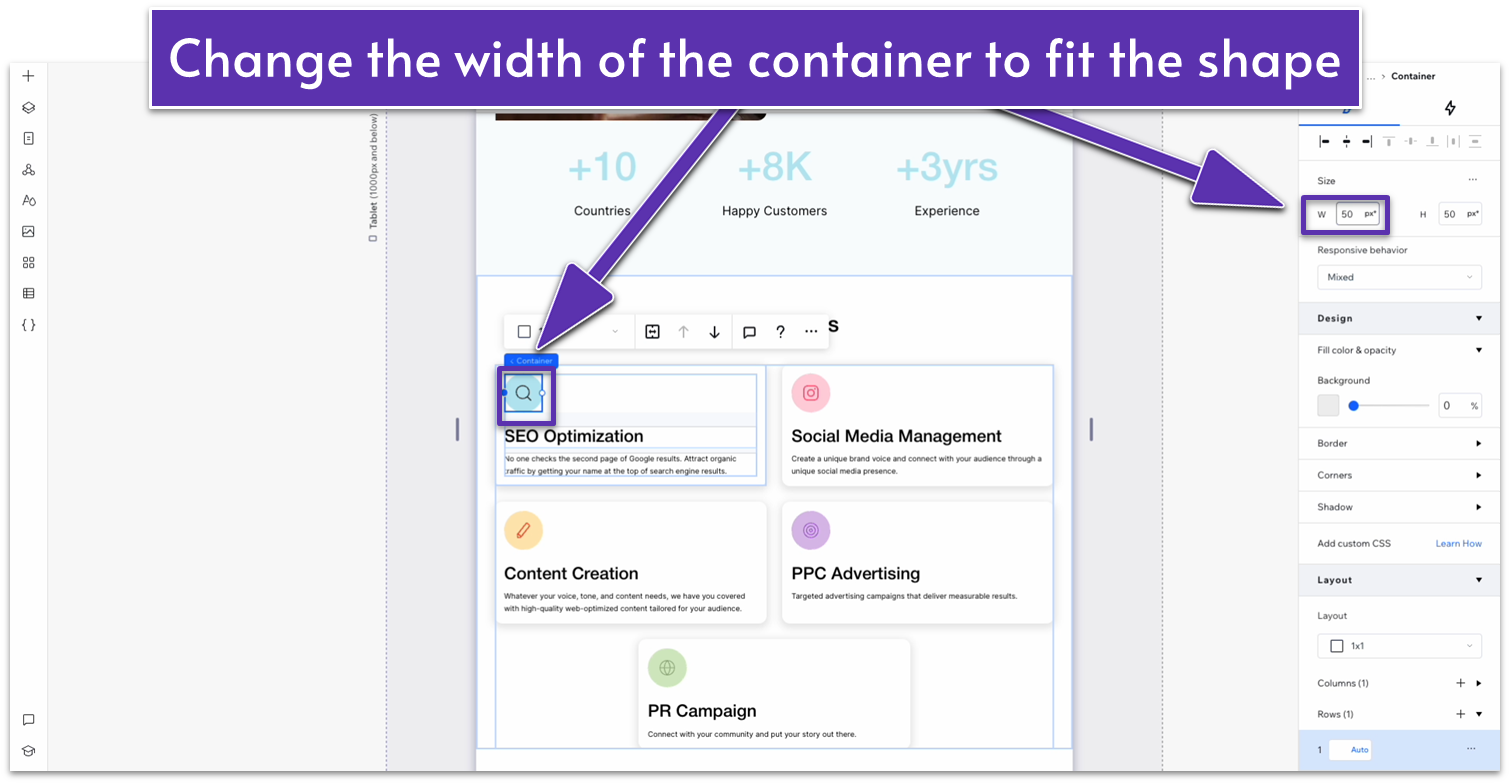
- Change the width of the circle shape to 50px.
- Change the width of the icon inside the circle to 20px.
- Change the width of the container underneath to 50px.
- Set the bottom margin ( ) for that same container to 20px.
- Set the bottom margin ( ) for the heading to 10px.
- Change the font size for the paragraph below to 14px.
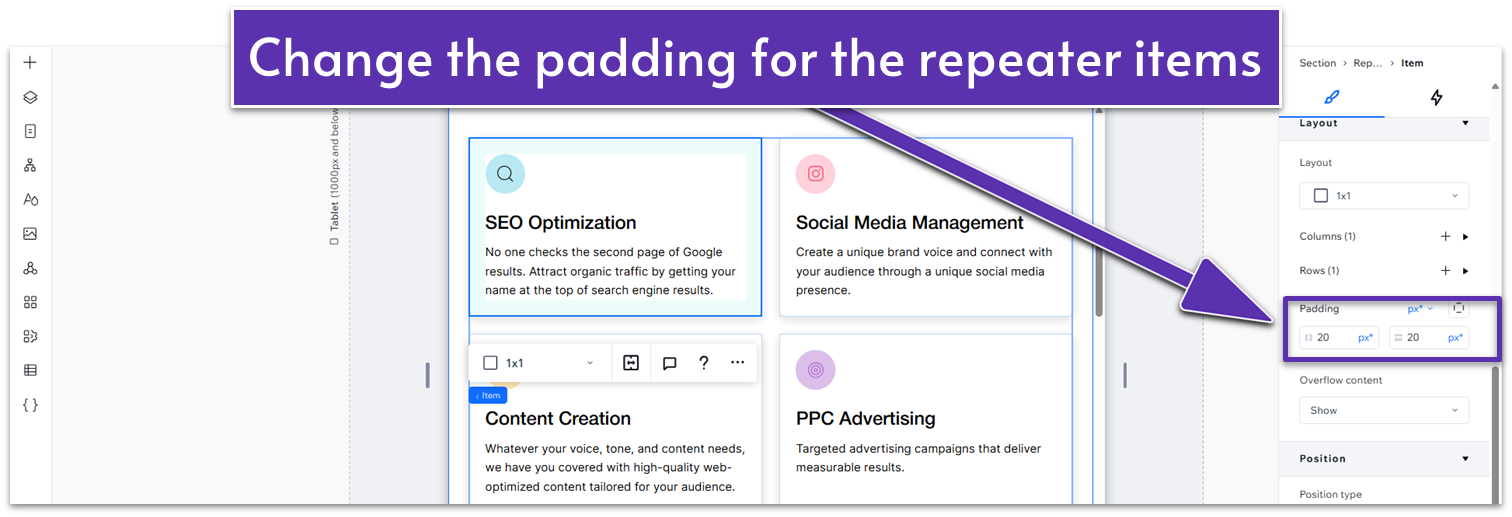
- Change the padding for the repeater item ( , ) to 20px.
- Set the top margin ( ) for the entire section to 70px.
Step 2: Adapt for mobile view.
On mobile view ( ):
- Change the font size for the “Our Services” header to 28px.
- Set the top padding ( ) for the entire section to 70px.
- Change the vertical gap ( ) between rows to 30px.
- Set the number of items per row on the repeater to 1.
- Set the vertical gap ( ) in the repeater to 20px.
- Change the padding ( , ) of the repeater’s items to 20px.
- Set the bottom margin ( ) for the shape container to 20px.
- Change the font size for the repeater’s heading to 20px.
- Set the bottom margin ( ) to 10px.
- Change the font size of the paragraph text to 14px.
- Change the corner radius of the repeater’s items to 10px.
2.5 “Our Works” Section

To inspire visitors even more, we’ll include a section that showcases selected examples of our previous work. These will be brief success stories describing the service we provided and how it helped customers.
Step 1: Create a new section and divide it into two vertical containers.
- Set the vertical gap ( ) between rows to 50px.
- Set the top padding ( ) to 70px scale.
Step 2: Add a container to the top row.
- Set all margins to 0 and width to 1080px.
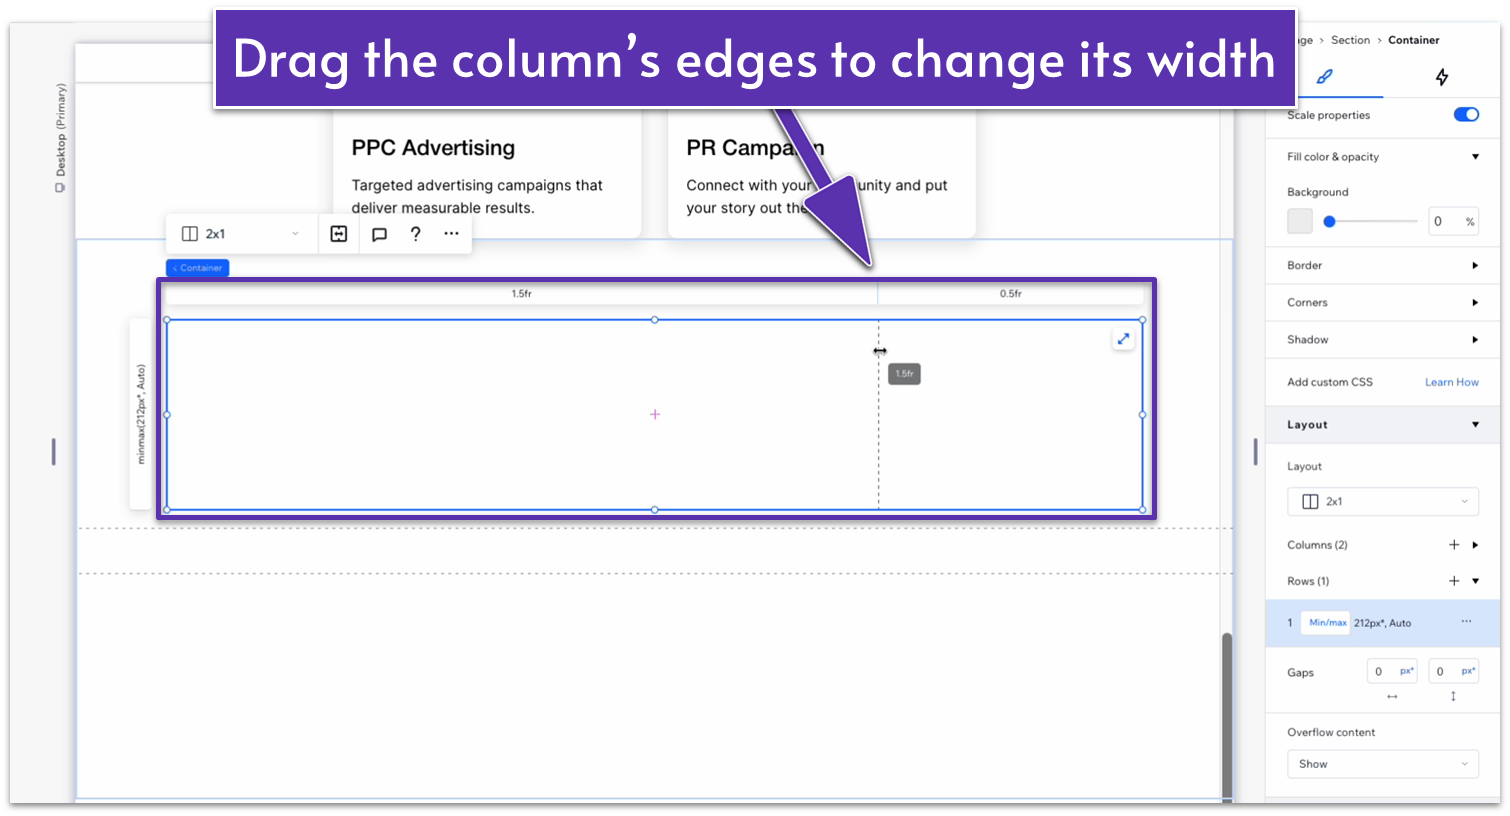
- Apply CSS grid and set the layout to 2×1 ( ).
- Remove the background.
- Drag the edge of the left-side column to the right so its width is set to 1.5fr and the width of the other to 0.5fr.
- Copy the “My Services” text from the section above and paste it into the left-side column.
- Set all margins to 0 and stretch the text box to fit the entire left column.
- Change the text so it fits this section.
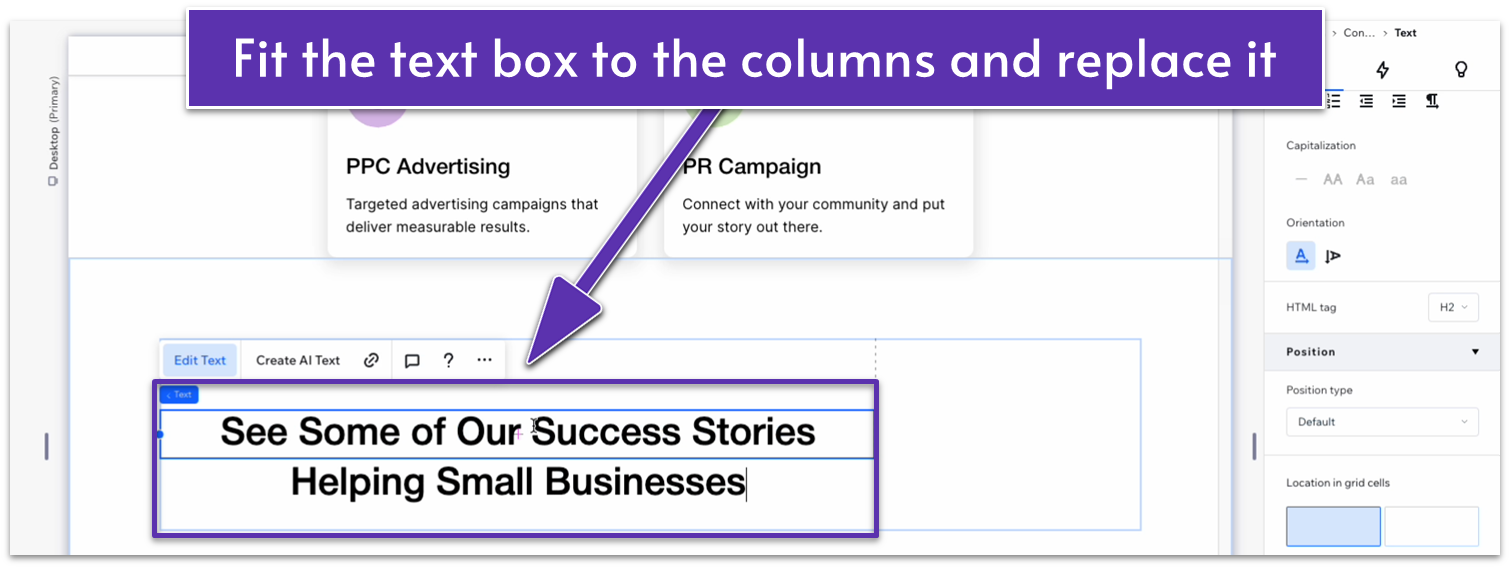
- Align the text to the left ( ).
- Copy and paste the “about us” button from above into the right-side column.
- Align it horizontally with the text and set all margins to 0.
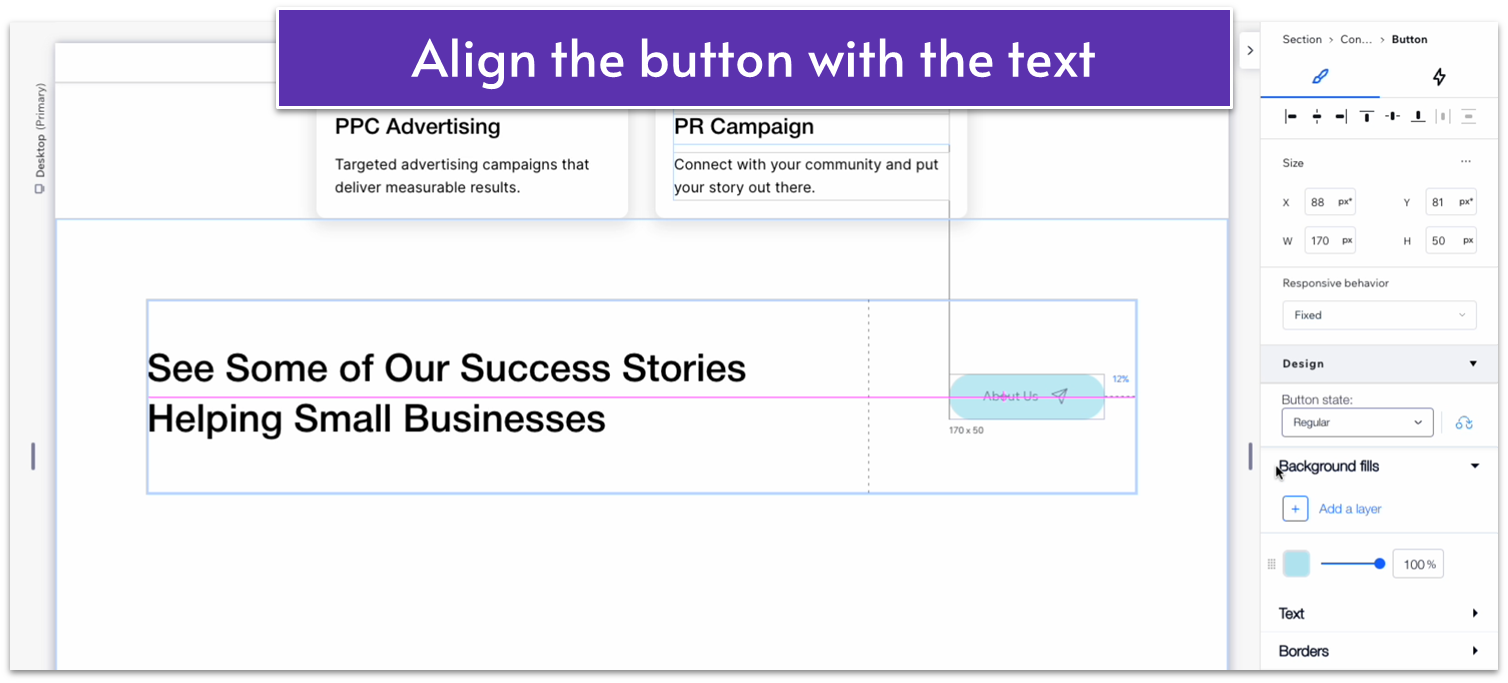
- Change the button text.
- Set the container’s and top row’s behavior to auto ( ).
Step 3: Add a repeater to the bottom row.
- Set all margins to 0.
- Stretch the repeater to align with the text and button.
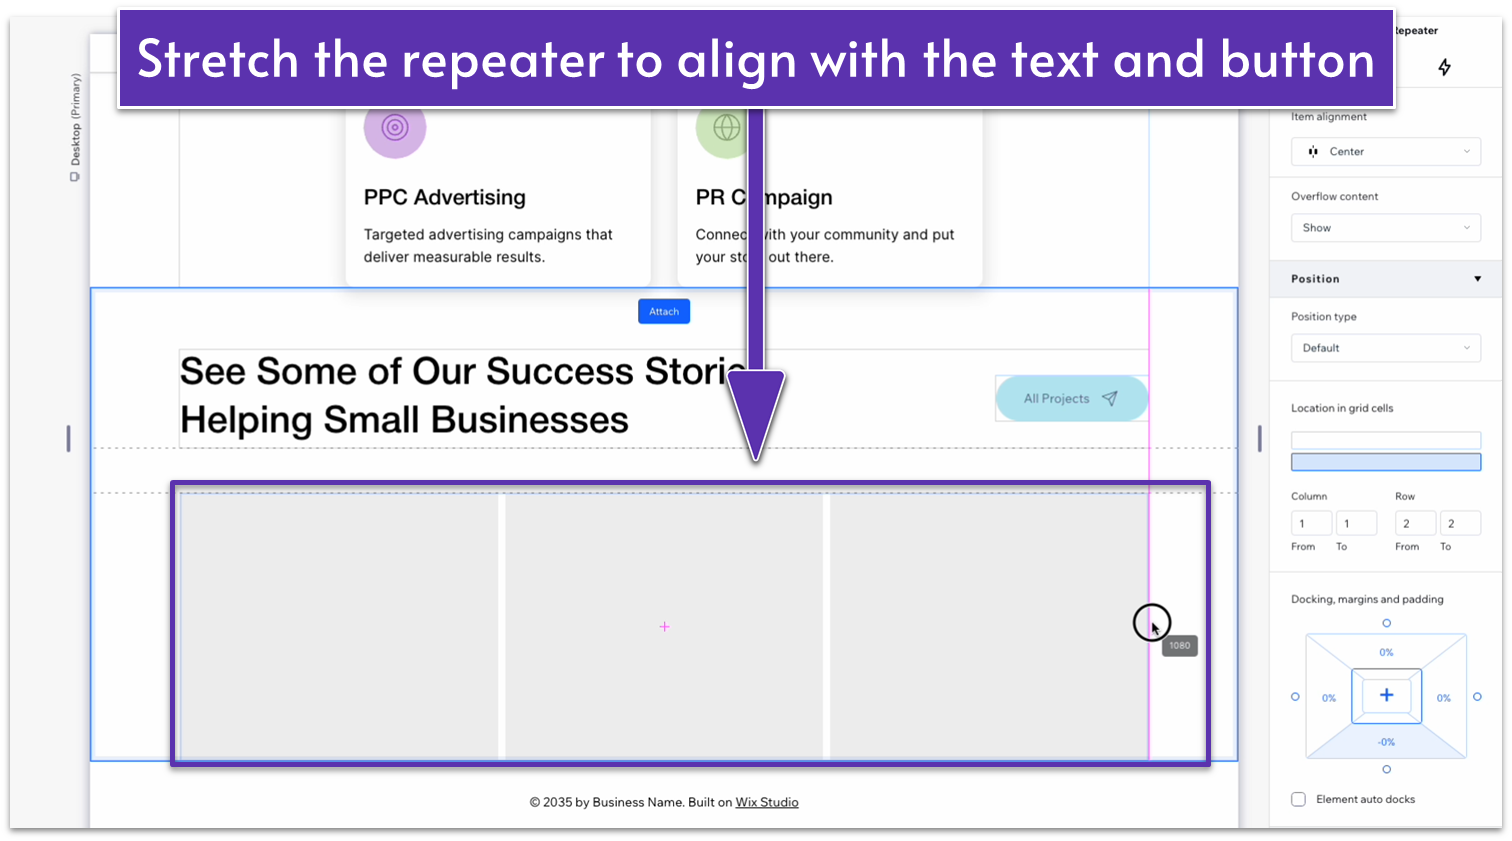
- Set the horizontal ( ) and vertical ( ) gaps to 30px.
- Change the number of items per row to 2 and add another item so there are 4.
- Apply a CSS grid to the repeater’s items.
Step 4: Add an image to the repeater.
- Stretch the image width to fit the container.
- Change the item’s height to 447px.
- Set the image corner radius to 20px.
Step 5: Add text below the image.
- Copy the heading 3 from above and paste it below the image.
- Copy and paste the paragraph below the heading.
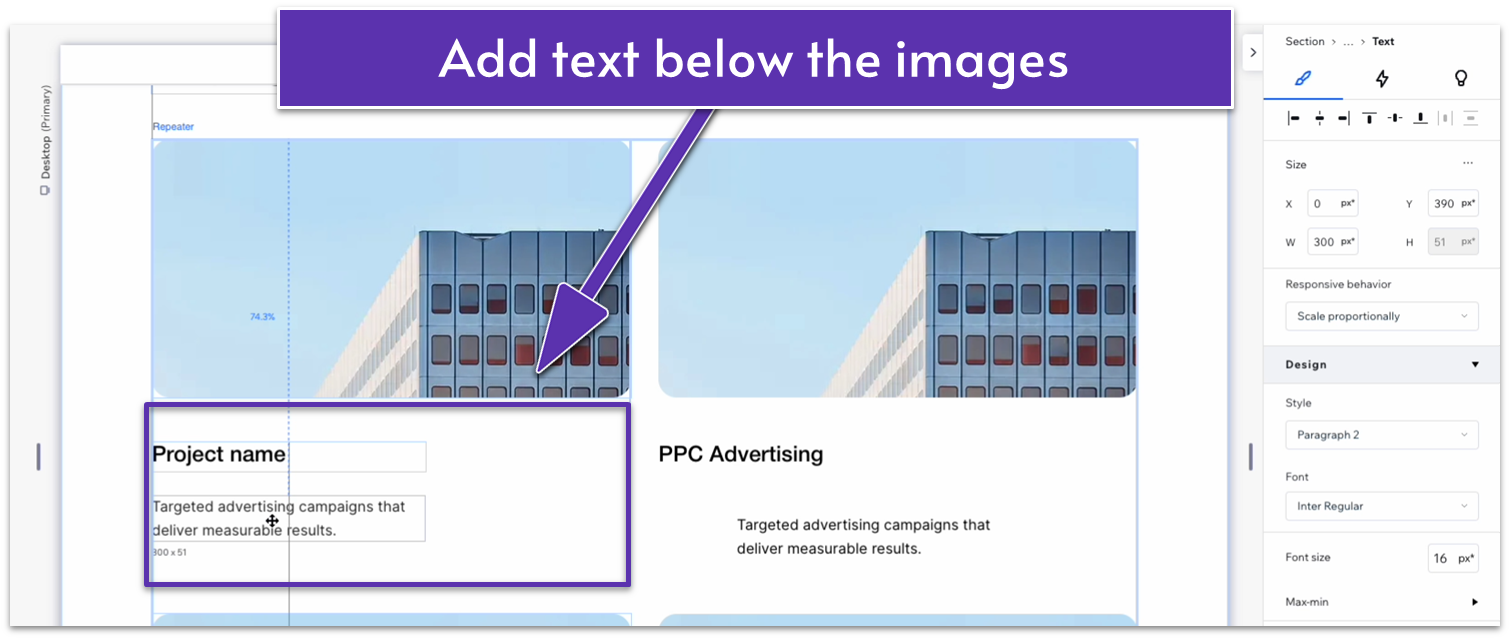
- Stack the items together.
- Set the image’s bottom margin ( ) to a 30px scale.
- Set the width for both text boxes to 100%.
- Set the bottom margin for the heading ( ) to 10px scale.
- Select the entire repeater item, and change the row’s behavior to auto ( ).
Step 6: Add your own text and images.
Adapt for Tablet and Mobile Views
Step 1: Adapt for tablet view.
On tablet view ( ):
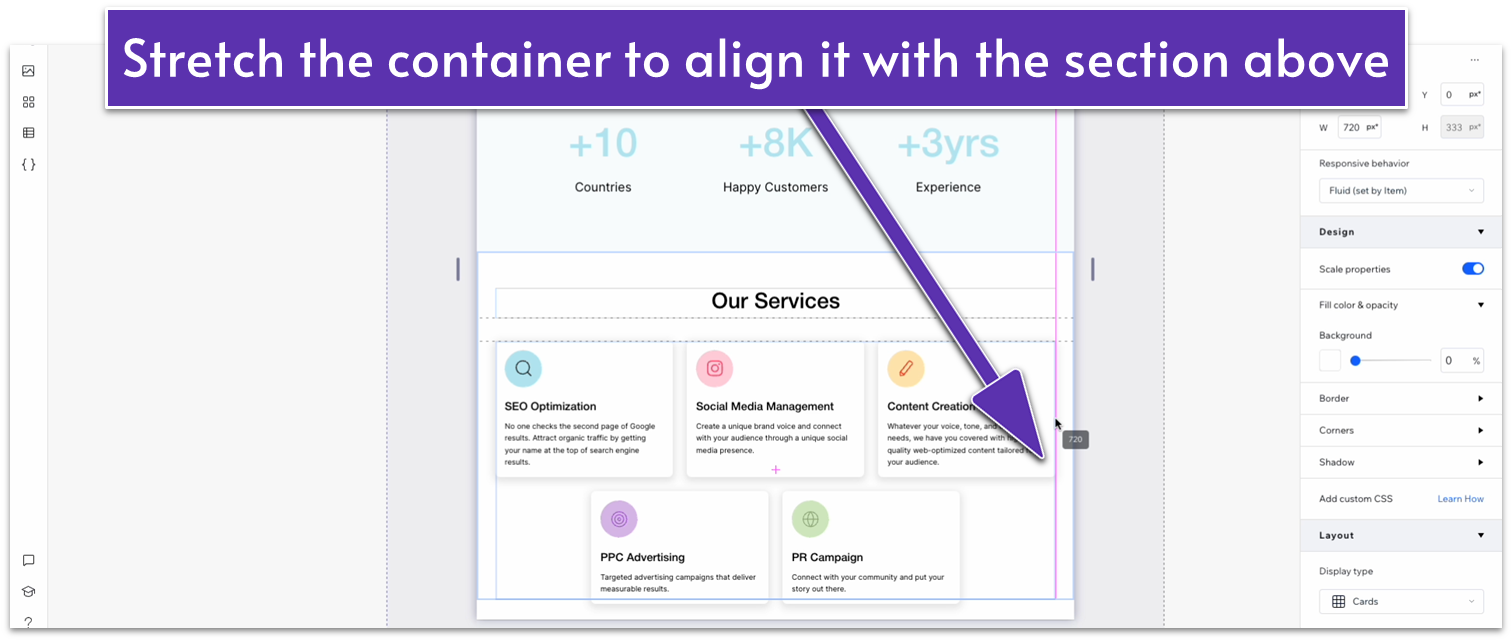
- Stretch the container in the top row to match the width of the section above.
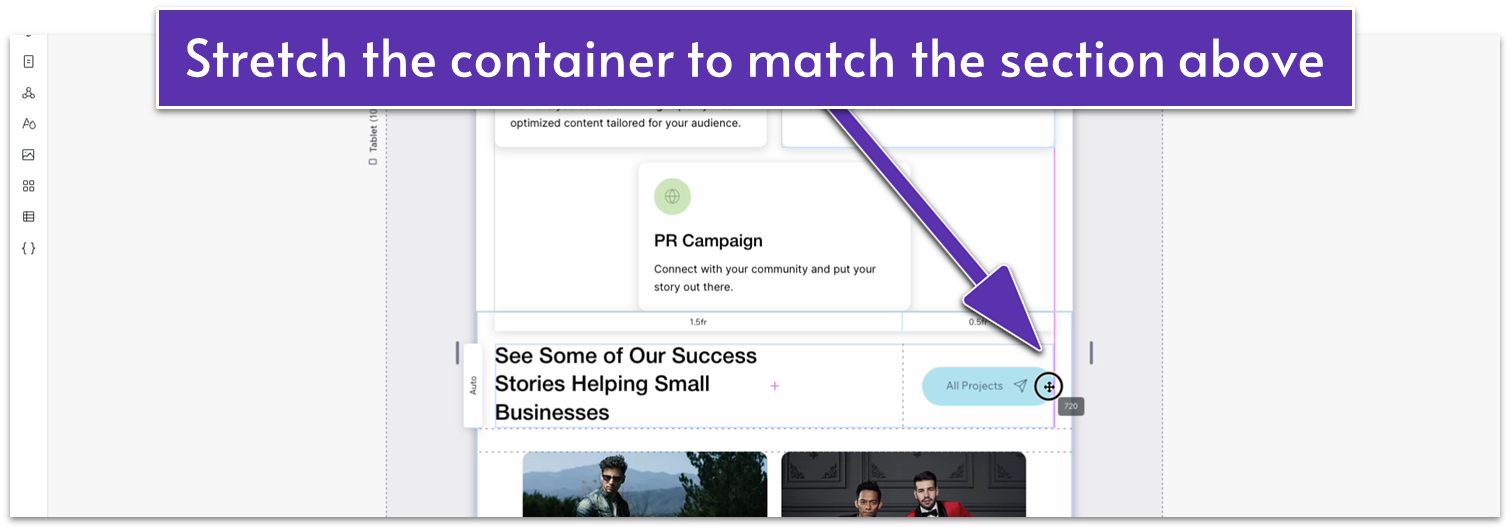
- Stretch the text box to match the entire column.
- Set the top padding ( ) for the entire section to 70px.
- Stretch the width of the repeater below to align with the container above.
- Set the horizontal gaps ( ) within the repeater to 20px and the vertical gaps ( ) to 40px.
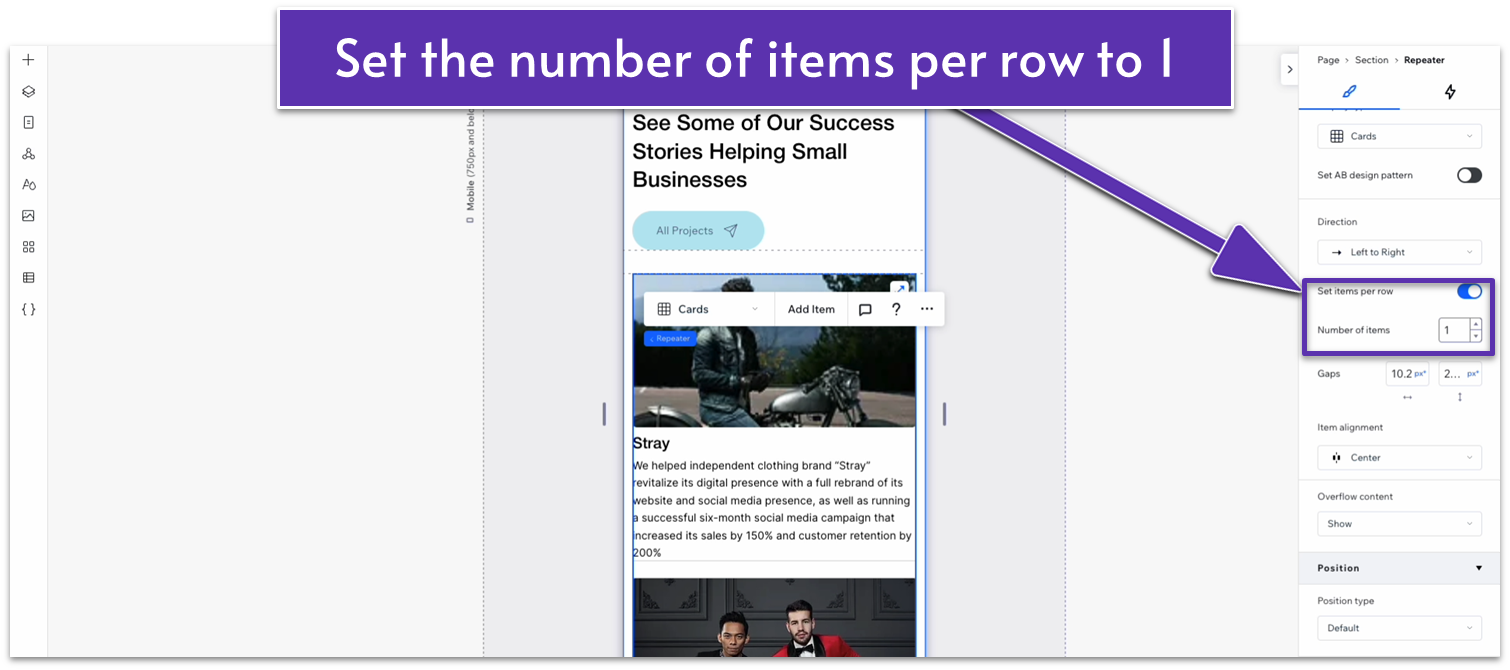
Step 2: Adapt for mobile view.
On mobile view ( ):
- Change the layout for the top container from 2×1 ( ) to 1×2 ( ).
- Dock the button to the left ( ) and set the left margin to 0.

- Set the vertical gap ( ) to a 20px scale.
- Set the behavior of both rows to auto ( ).
- Set the top padding ( ) for the entire section to 70px.
- Set the vertical gaps ( ) for the section to 30px scale.
- Change the number of items per row on the repeater to 1.
- Set the vertical gaps ( ) within the repeater to 30px.
- Set the bottom margin ( ) for the image items to 20px.
- Set the bottom margin ( ) for the heading below the image to 10px.
- Set the corner radius for the image to 20px.
2.6 Testimonials Section

We’ll use a darker background for our testimonials section and include three testimonials, using a repeater element in case you want to add more later.
Step 1: Create a new section and apply a 1×2 layout.
- Set the background color to a dark gray (#161616 HEX).
- Set the vertical gap ( ) between rows to 50px.
- Set the vertical padding ( ) to an 80px scale.
Step 2: Add a title to the top row.
- We can just copy-paste the title from the section above into the top row.
- Change the color of the text to white (HEX #FFFFFF).
- Center the title by setting all margins to 0 except for the left-side margin ( ).
- Set the left-side margin ( ) to 100px scale.
Step 3: Add a repeater element to the bottom row.
- Set all margins to 0 and the repeater width to 1080px.
- Change the horizontal gap between elements ( ) to 20px.
- Set the behavior of both rows to auto ( ).
Step 4: Change the text heading to reflect this section.
Step 5: Change the repeater’s items’ style.
- Set the background for the repeater’s items to black (#000000 HEX).
- Set a corner radius of 10px.
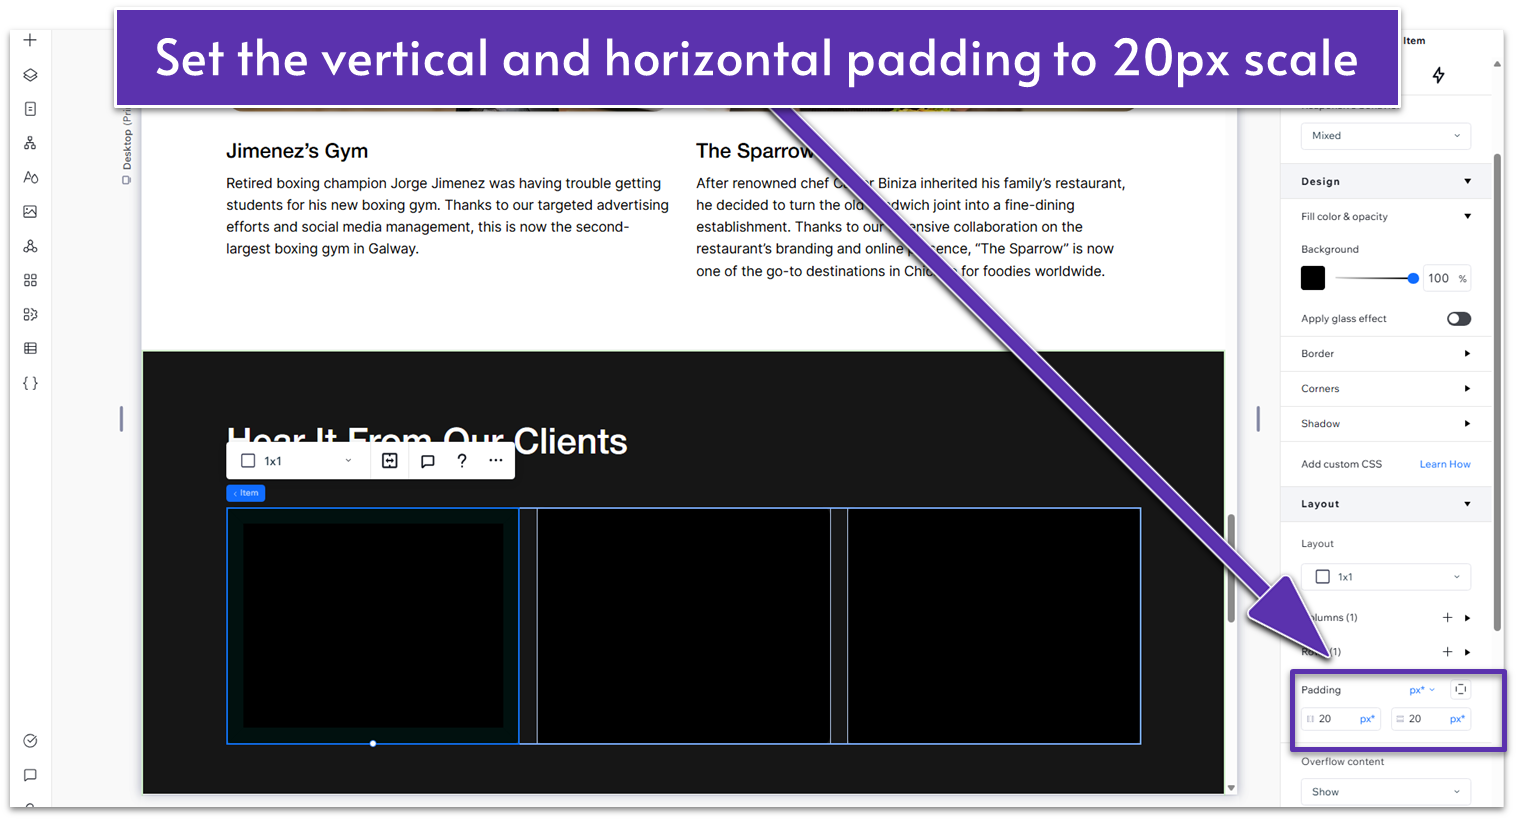
- Apply an advanced CSS grid and set all inner padding to 20px scale.
Step 6: Add the testimonial’s content.
- Add a paragraph element and stretch it to fit the inner margin.
- Change the color to white (#FFFFFF HEX).
- Change the text to the author’s name.
- Repeat the process below the author’s name to add the author’s title.
- Repeat the process below the title to add the testimonial’s content.
- Change the font color for the author’s title into a dark gray (#323232 HEX).
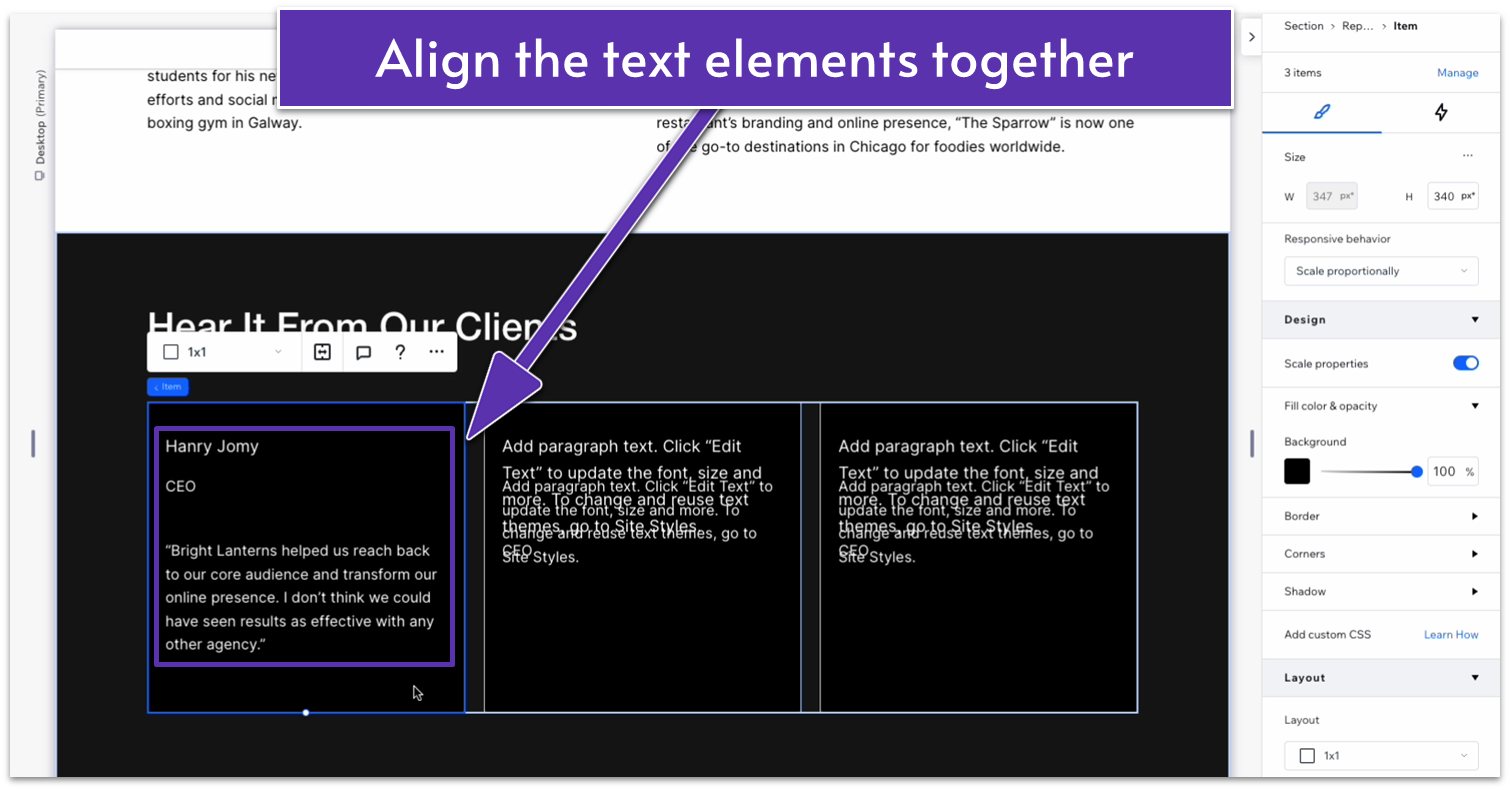
- Stack the elements together.
Step 7: Change the stack’s spacing.
- Set all margins to 0.
- Toggle advanced size settings for the entire stack and for all individual elements.
- Make sure the width is set to 100% for all.
- Change the row behavior of the repeater’s item to auto ( ).
- Change the margin at the bottom ( ) of the author’s name to 10px scale.
- Change the margin at the bottom ( ) of the author’s title to 20px scale.
Step 8: Add content for the remaining testimonials.
Adapt for Tablet and Mobile Views
Step 1: Adapt for tablet view.
On tablet view ( ):
- Set the vertical padding ( ) for the whole section to 70px.
- Set the width of the heading’s text box to 720px.
- Stretch the repeater below to match the width of the text box.
- Set the corner radius for the repeater’s items to 10px.
- Set the padding ( , ) for the repeater’s items to 20px.
- Change the font size for the author’s name to 16px.
- Change the font size for the author’s title to 14px.
- Change the font size for the testimonial text to 14px.
- Set the bottom margin ( ) for the author’s name text box to 10px.
- Set the bottom margin ( ) for the author’s title text box to 20px.
- Set the horizontal gap( ) inside the repeater to 20px.
Step 2: Adapt for mobile view.
On mobile view ( ):
- Set the vertical gap ( ) for the entire section to 30px.
- Set the number of items per row on the repeater to 1.
- Set the vertical gap ( ) inside the repeater to 20px.
- Set the corner radius for the repeater items to 10px.
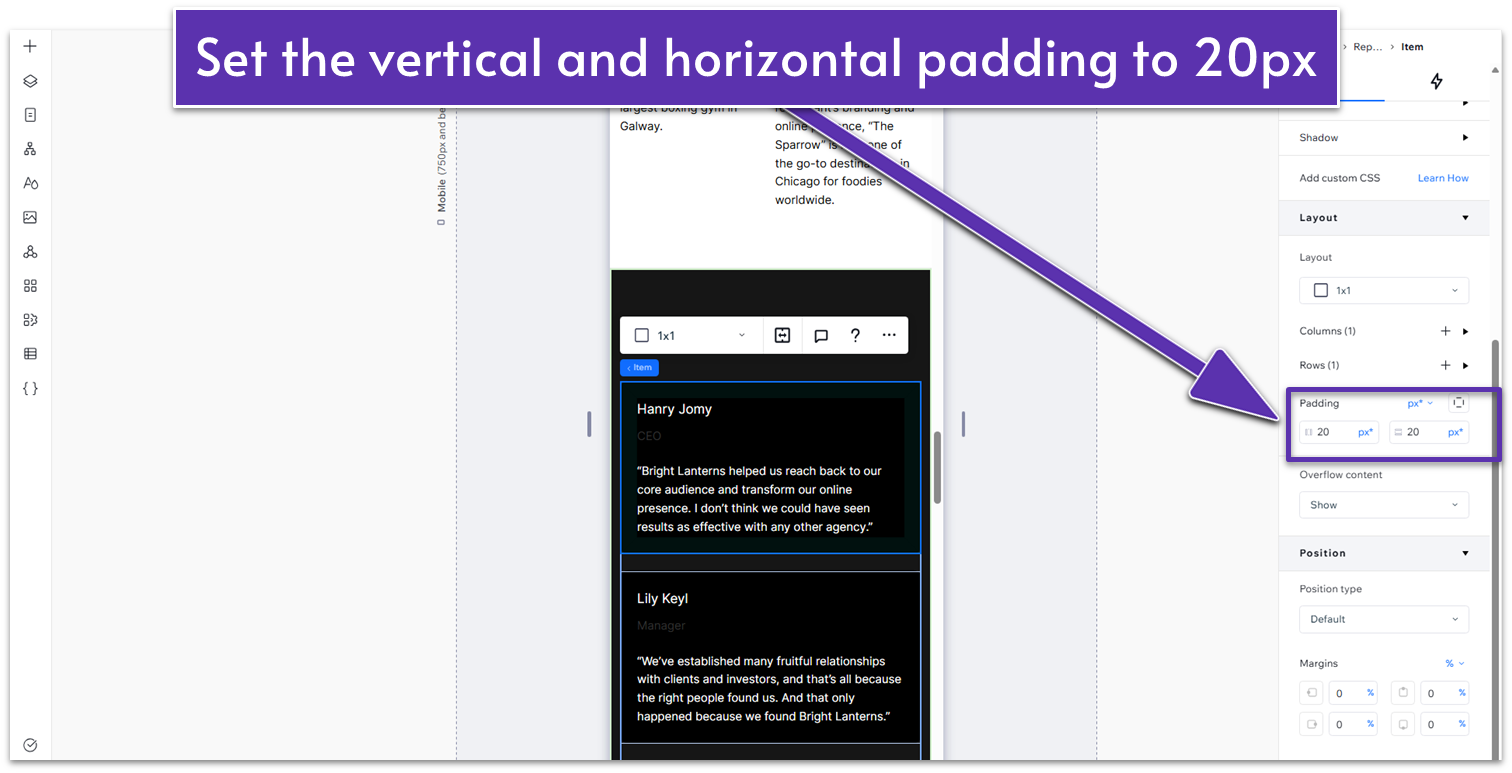
- Set the padding ( , ) for the repeater’s items to 20px.
- Set the font size for the author’s name to 16px.
- Set the font size for the author’s title to 14px.
- Set the font size for the testimonial’s text to 14px.
- Set the bottom padding for the author’s name to 10px.
- Set the bottom padding for the author’s title to 20px.
- Set the top and bottom padding ( , ) for the entire section to 70px.
2.7 Blog Section
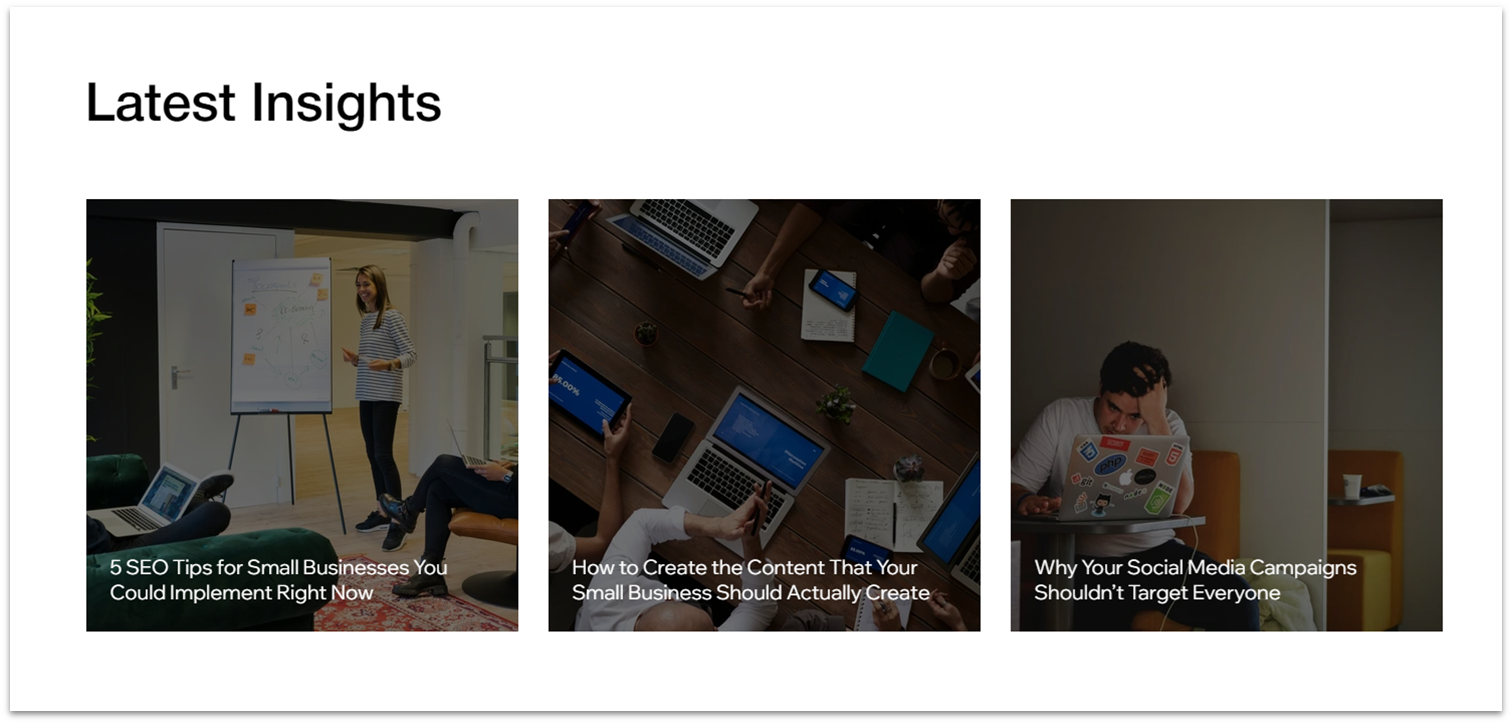
Our marketing agency site would benefit from a regularly updated blog. We’ll go over the simplest way to add a blog, but we won’t populate the blog yet.
Step 1: Create a new section and apply a 1×2 layout.
- Set the vertical gap to ( ) 50px.
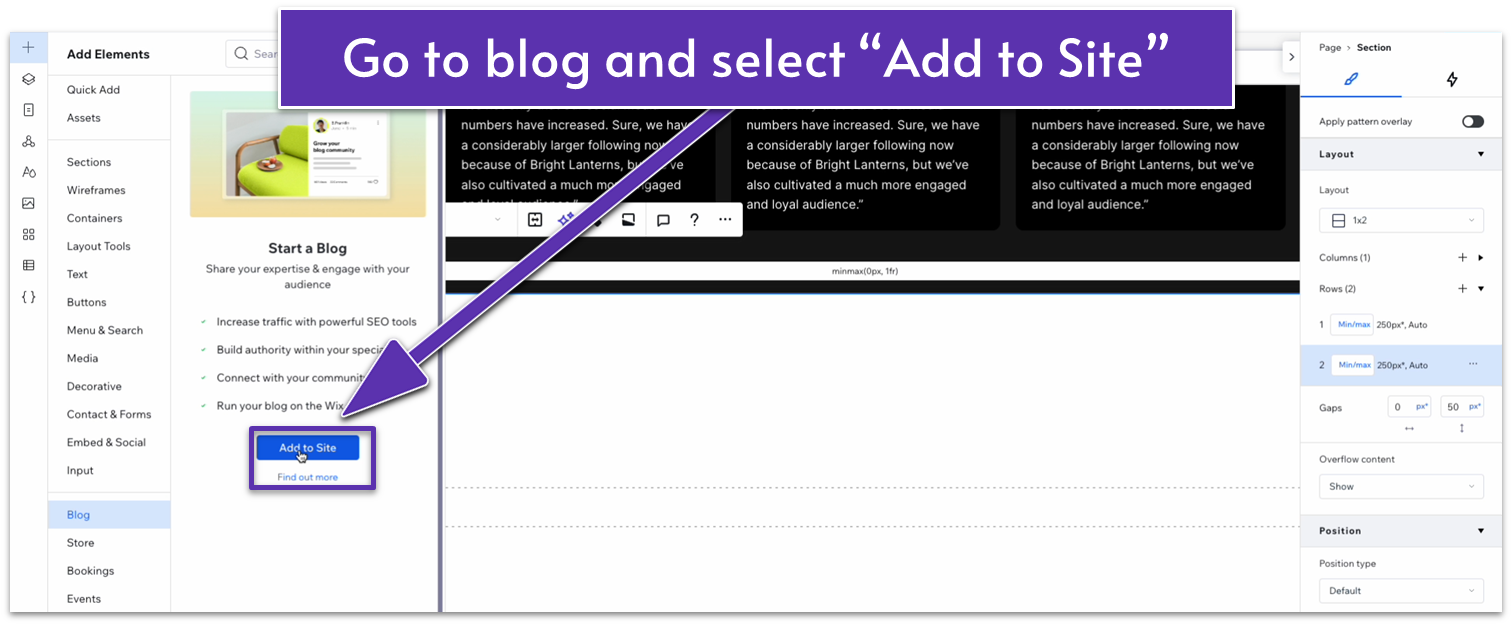
Step 2: Add a blog to your site.
- Head to the “Add Element” ( ) menu and add a blog.
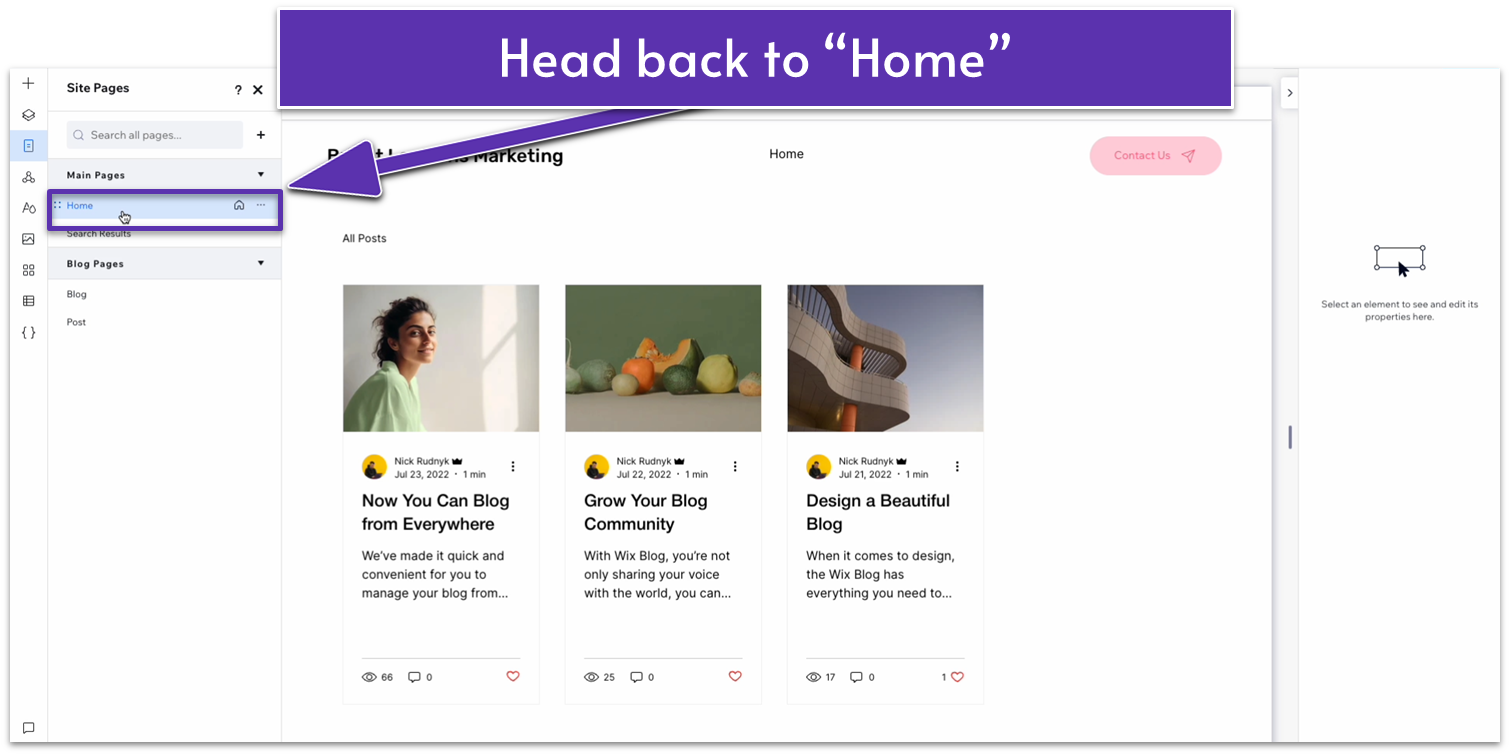
- Wix will take you to the “blog” page automatically. Go to the “site pages” menu to return to the home page.
- Go back to your homepage, select “Add Element,” ( ) and then drag a blog layout into the bottom row.
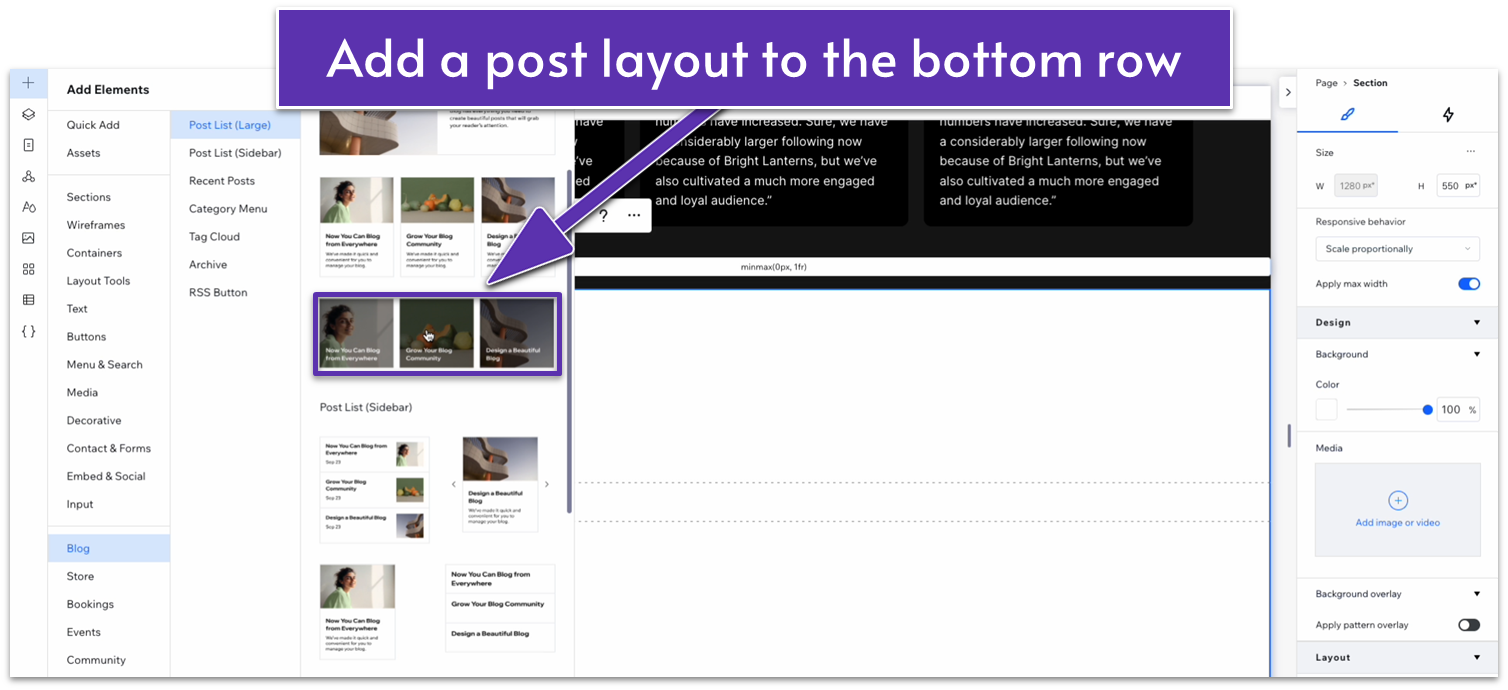
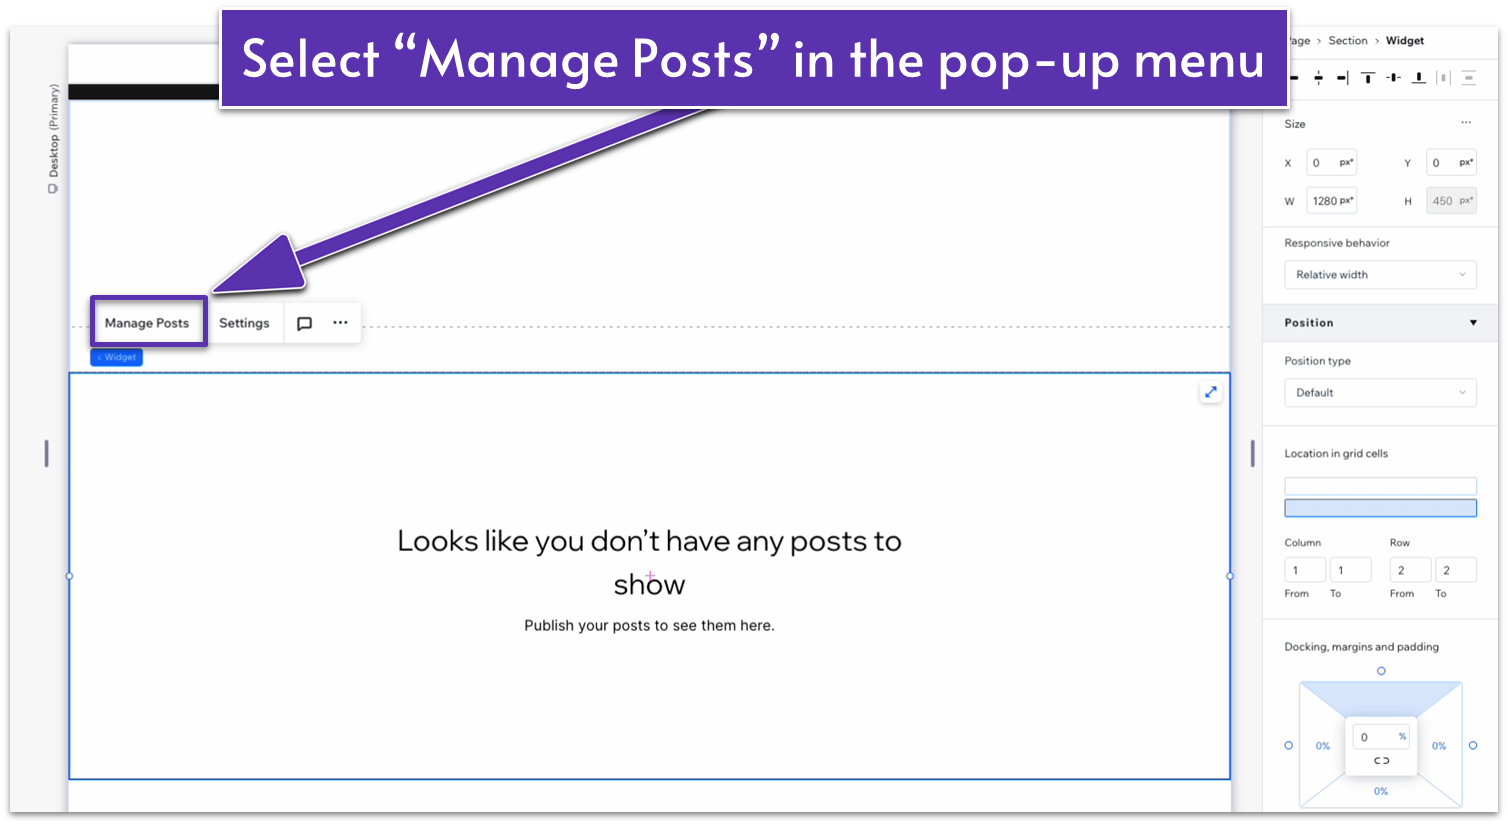
- After you add it, the element will read: “Looks like you don’t have any posts to show.”
- Click on that element and set all margins to 0.
- Make sure it’s positioned in the bottom row.
- Change the element’s width to 1080px.
Step 3: Add a placeholder post to your blog.
We’ll add an empty article to our blog so we can use it as a placeholder for the design of this section.
- Select “Manage Posts” on the pop-up menu above the blog element.
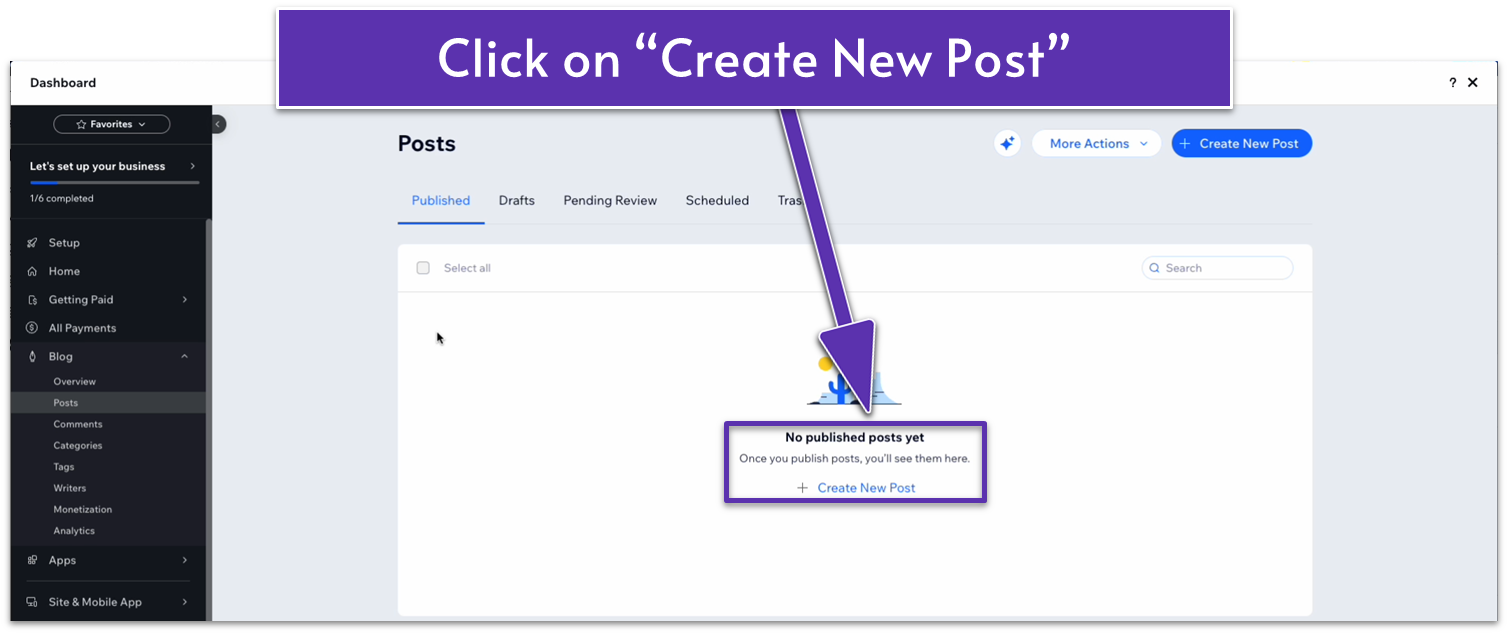
- You’ll get redirected to the blog dashboard. There, click on the “Create New Post” button.
- In the blog editor, simply add a title, some text below, and an image. Don’t worry about content at the moment.
- Click on the “publish” button in the upper-right corner. Then close the blog dashboard.
Step 4: Add a title to the section.
- We’ll just copy-paste the title text from the “Our Works” section and center it in the top row.
- Set the left margin ( ) to 100px scale and all other margins to 0.
- Replace the title text for this section.
- Set the top padding ( ) for the entire section to an 80px scale.
- Set the top row’s behavior to auto ( ).
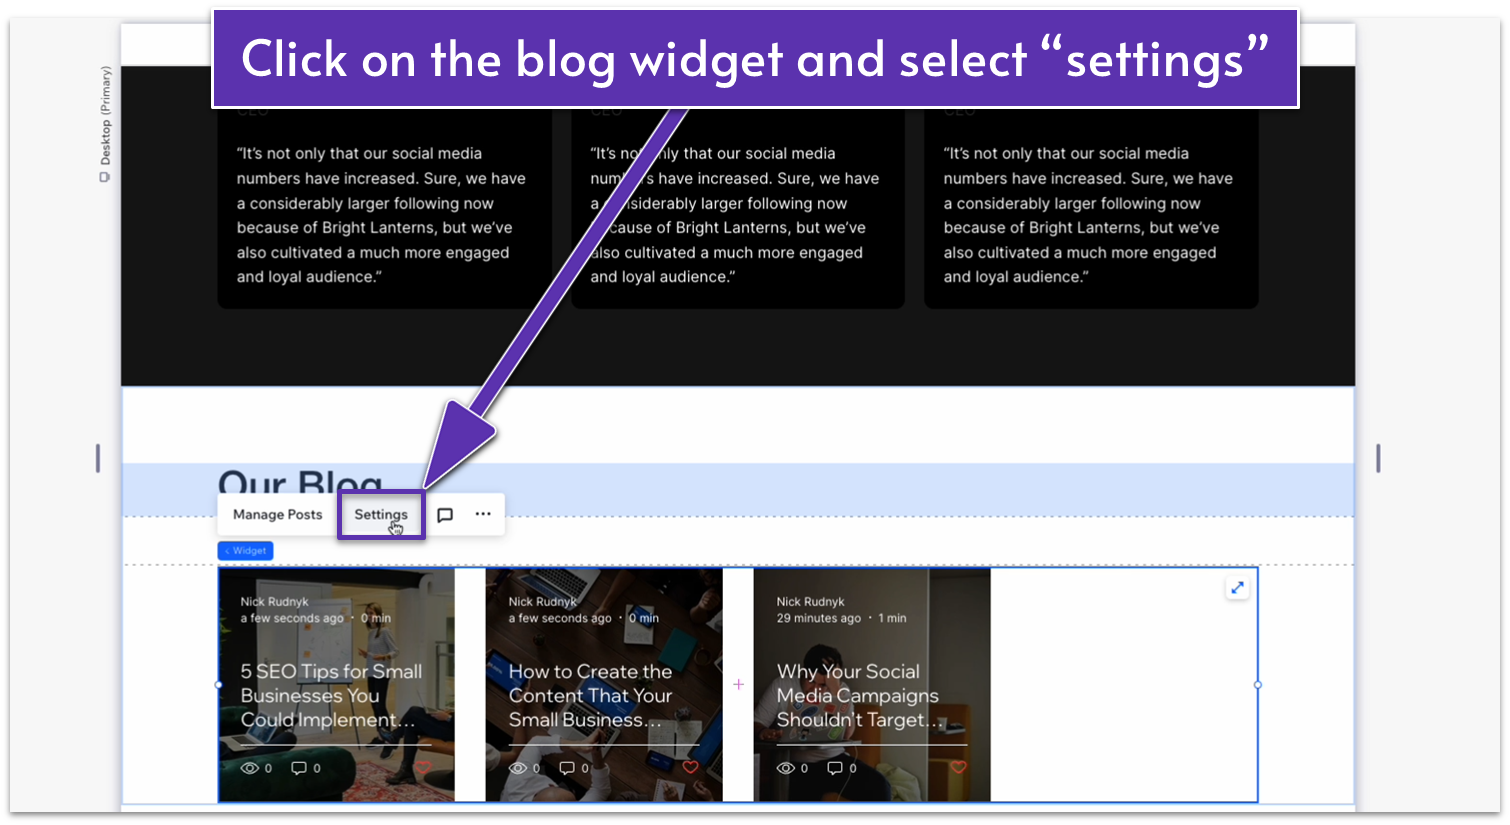
Step 5: Style your blog’s elements.
- Click on the blog posts and then on the “settings” option on the pop-up menu.
- Go to “display” and then toggle the information per article you’d like displayed. In our case, we’ll toggle everything off but the cover image.
- Go to “layout,” scroll down, and select “set posts per row.” Change the spacing between posts to 30.
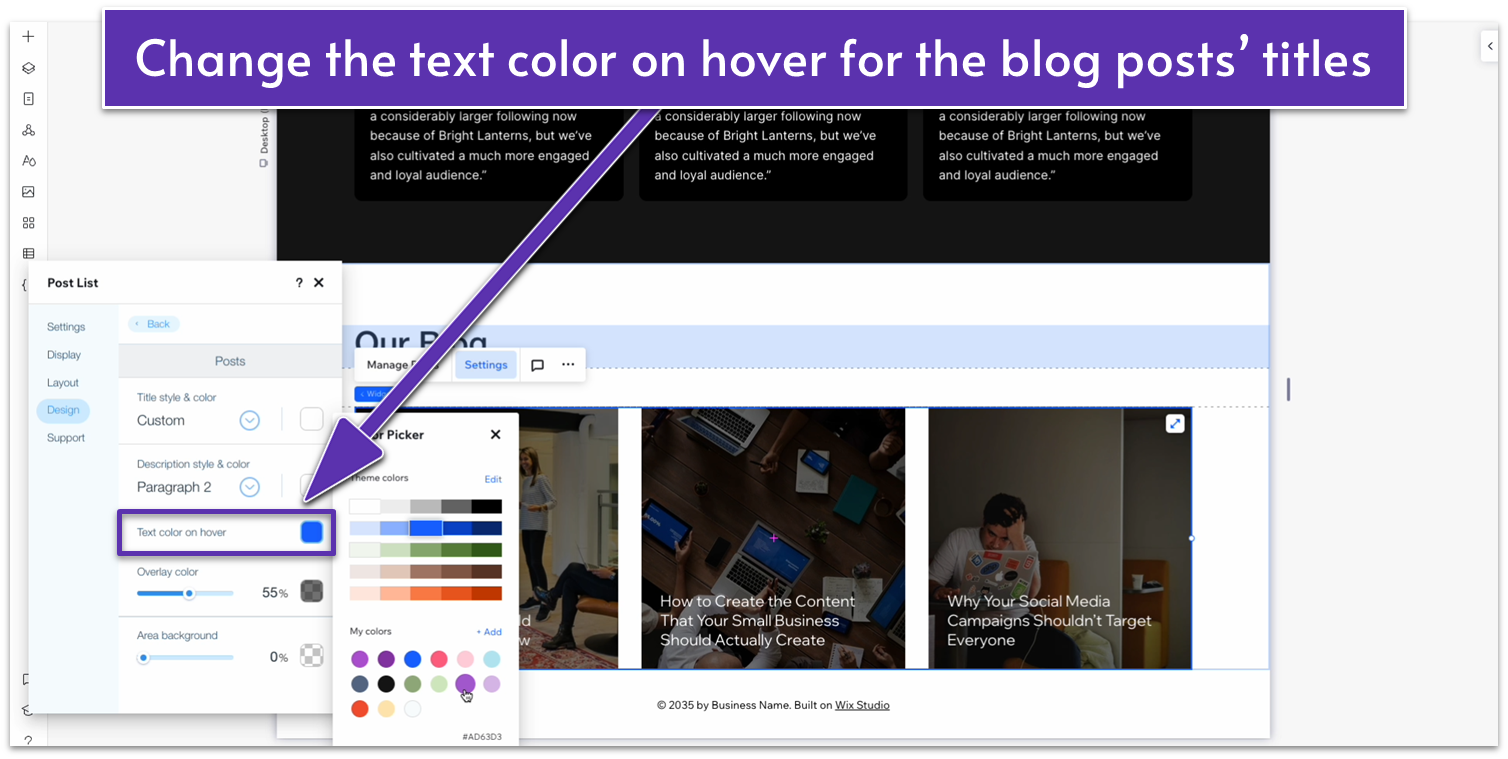
- Go to “design” there, change the “text color on hover” to a pleasant purple (HEX #AD6303).
Step 6: Add spacing to the bottom of the section.
Since this is the last section before the footer, we’ll add some bottom spacing to ensure the page looks balanced.
- Set the bottom padding ( ) for the entire section to 80px scale.
Adapt for Tablet and Mobile Views
Step 1: Adapt for tablet view.
On tablet view ( ):
- Stretch the edges of the blog widget to align with the section above.
- Stretch the edges of the title text box to align with the section above.
- Set the blog row’s behavior to auto ( ).
- Set the top padding ( ) for the entire section to 70px.
Step 2: Adapt for mobile view.
On mobile view ( ):
- Set the vertical gaps ( ) for the entire section to 30px.
- Click on the blog widget and open the “settings” menu. On “Layout,” toggle on “Enable mobile settings.” The default “magazine” view works just fine for us at the moment.
- Set the top padding ( ) for the entire section to 70px.
2.8 Footer
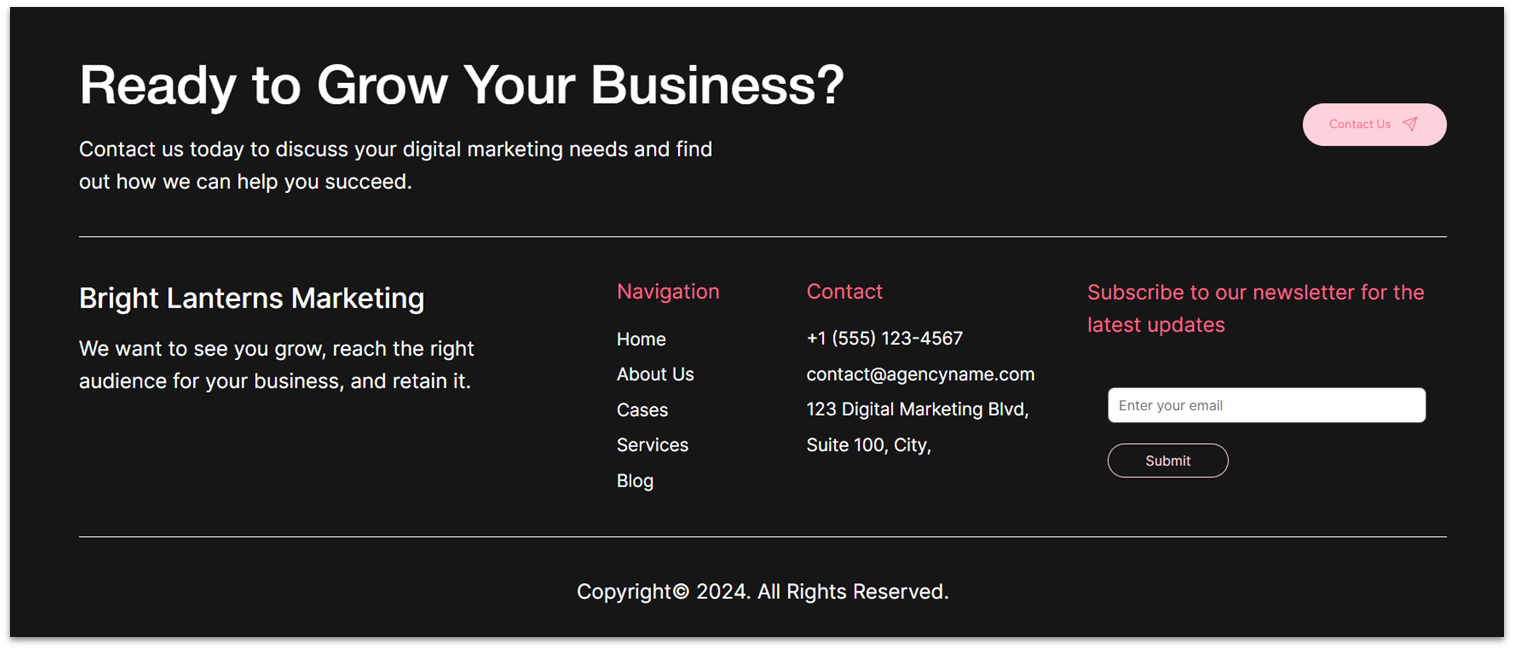
Our footer will be a little complex. Besides basic navigation, we’ll also include a contact form, a call to action, and a copyright notice at the bottom.
Adding a Call to Action Header
Step 1: Delete the default text and add a container to the footer section.
This time, you won’t have to add a new section, since your page already includes a footer at the bottom.
- Delete the placeholder text element on the footer.
- Drag a container into the footer, toggle advanced size settings on, and set the container’s width to 100%.
- Apply an advanced CSS grid and set all margins to 0. The container should now cover the entirety of the footer section.
- Set the background color to #161616 (HEX).
- Set the radius for the two top corners to 20px.
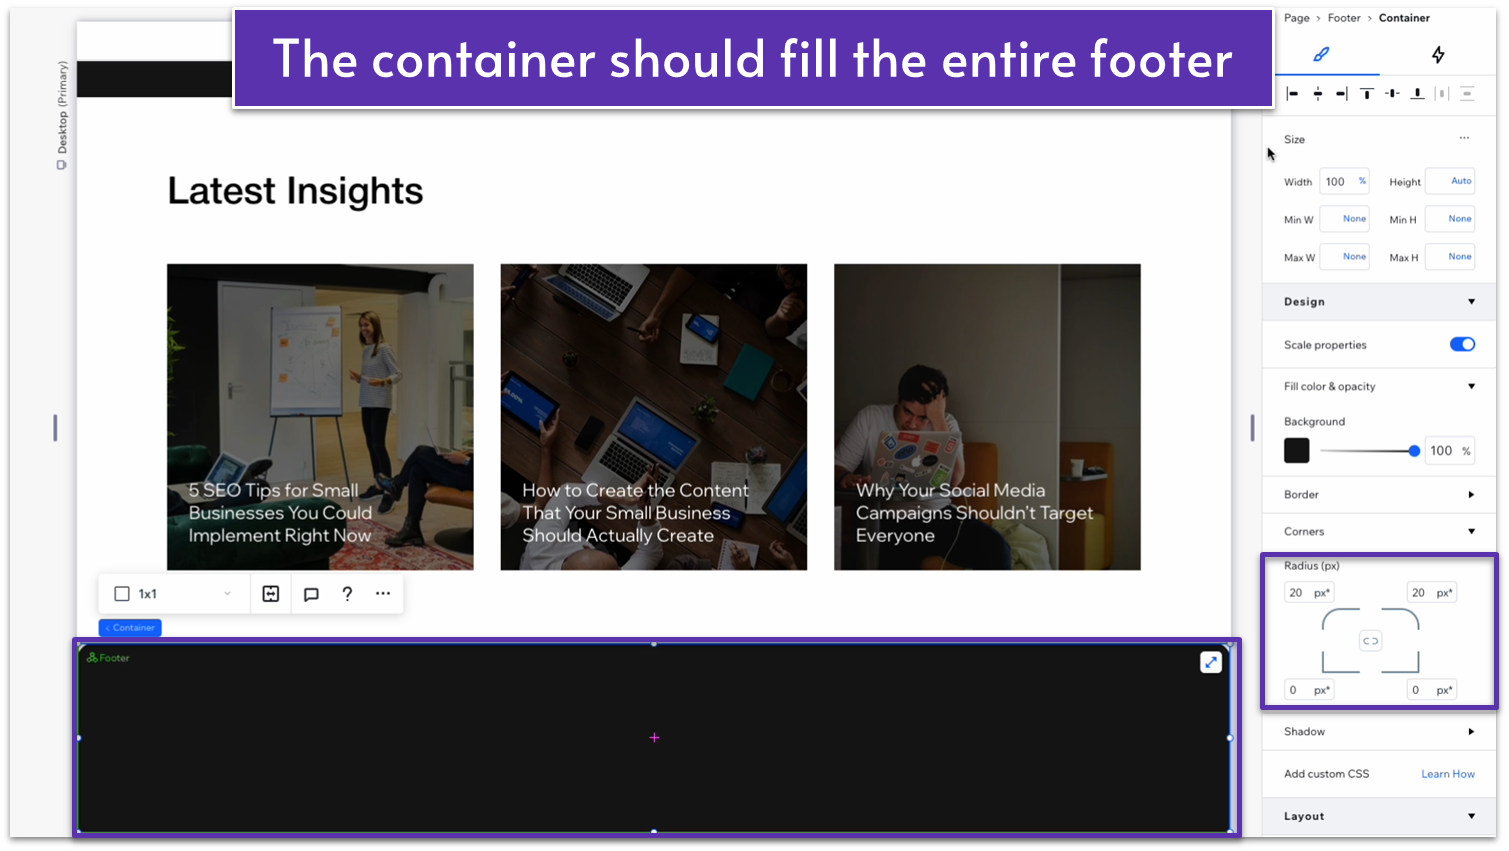
- Set the top and bottom padding ( ) to a 50px scale.
Step 2: Divide the footer into 5 vertical containers.
- Set the layout to 1×3 ( ) and add two rows more so there’s a total of 5.
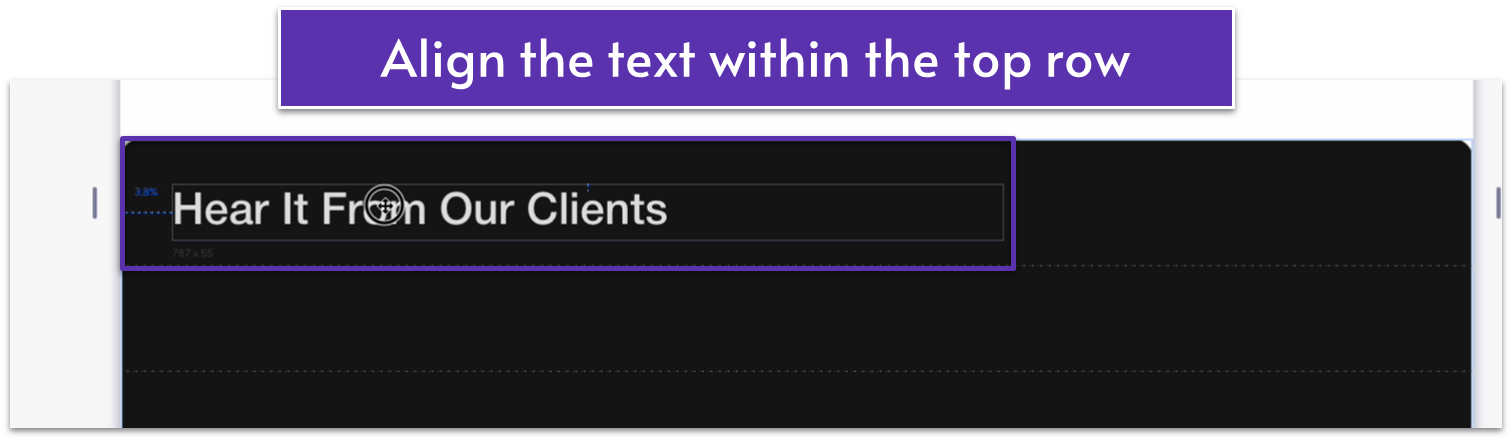
Step 3: Paste a title into the upper row.
- Since this section also has a darker background, we can copy-paste the title from the “Testimonials” section into the top row.
- Align it so it’s horizontally centered to the section and mostly to the left.
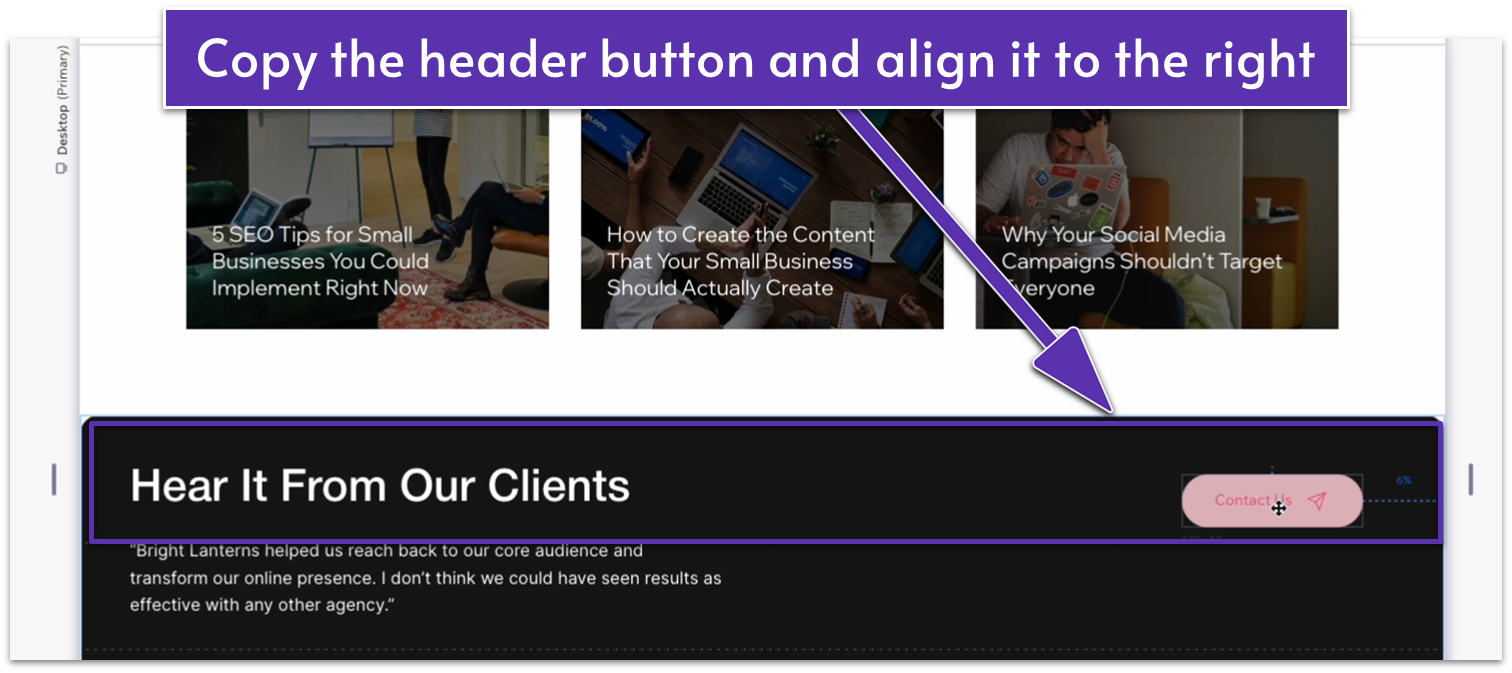
Step 4: Add a text paragraph and a button.
- Copy and paste the “testimonials” paragraph into the second row.
- Copy and paste the “contact us” from the header into the first row and align it to the right.
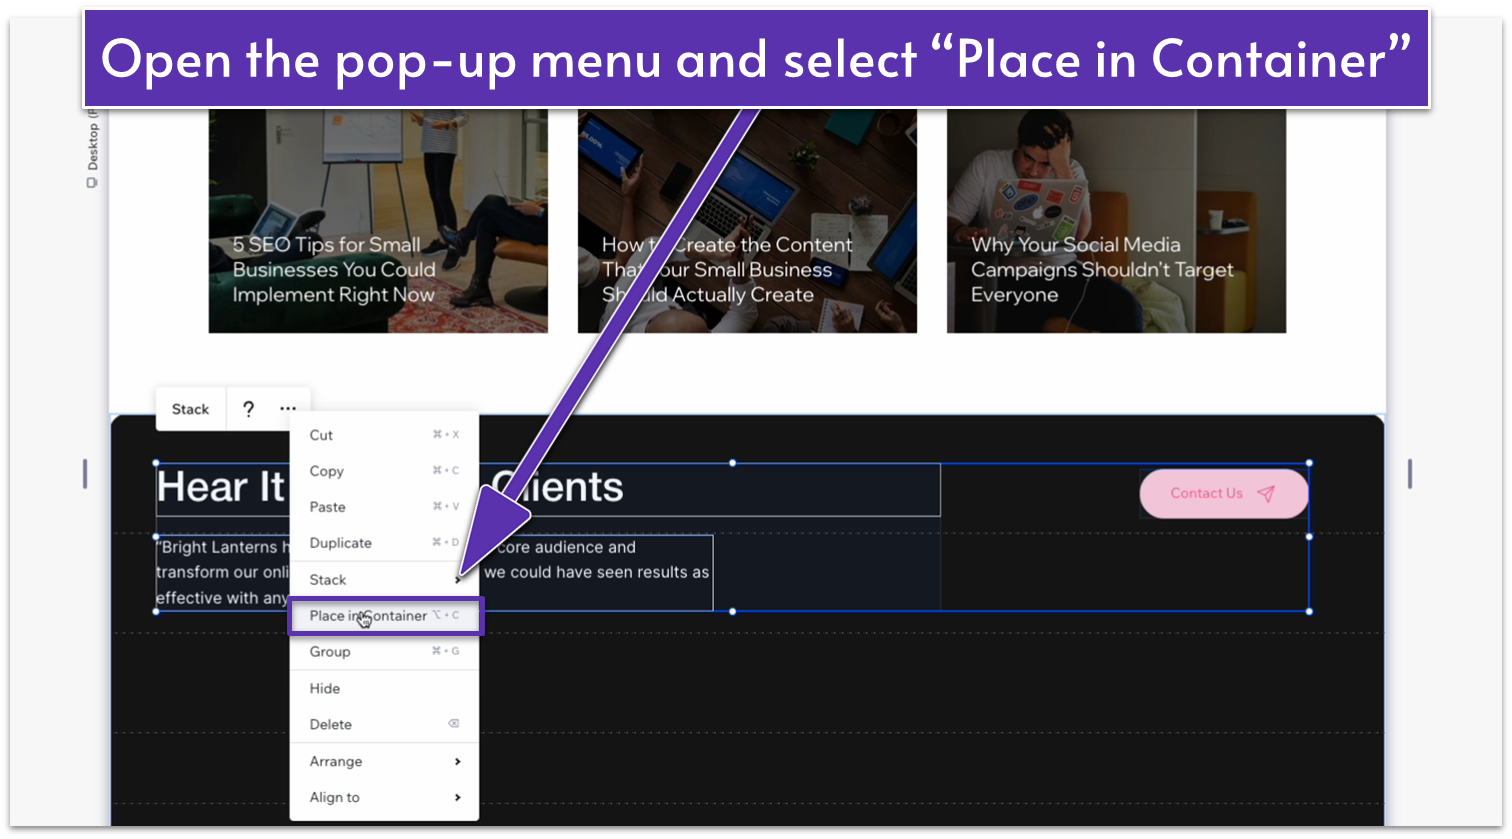
- Stack the text elements together.
- Once stacked, select the text stack and the button, click on the three dots on top of the pop-up menu, and select “Place in Container.”
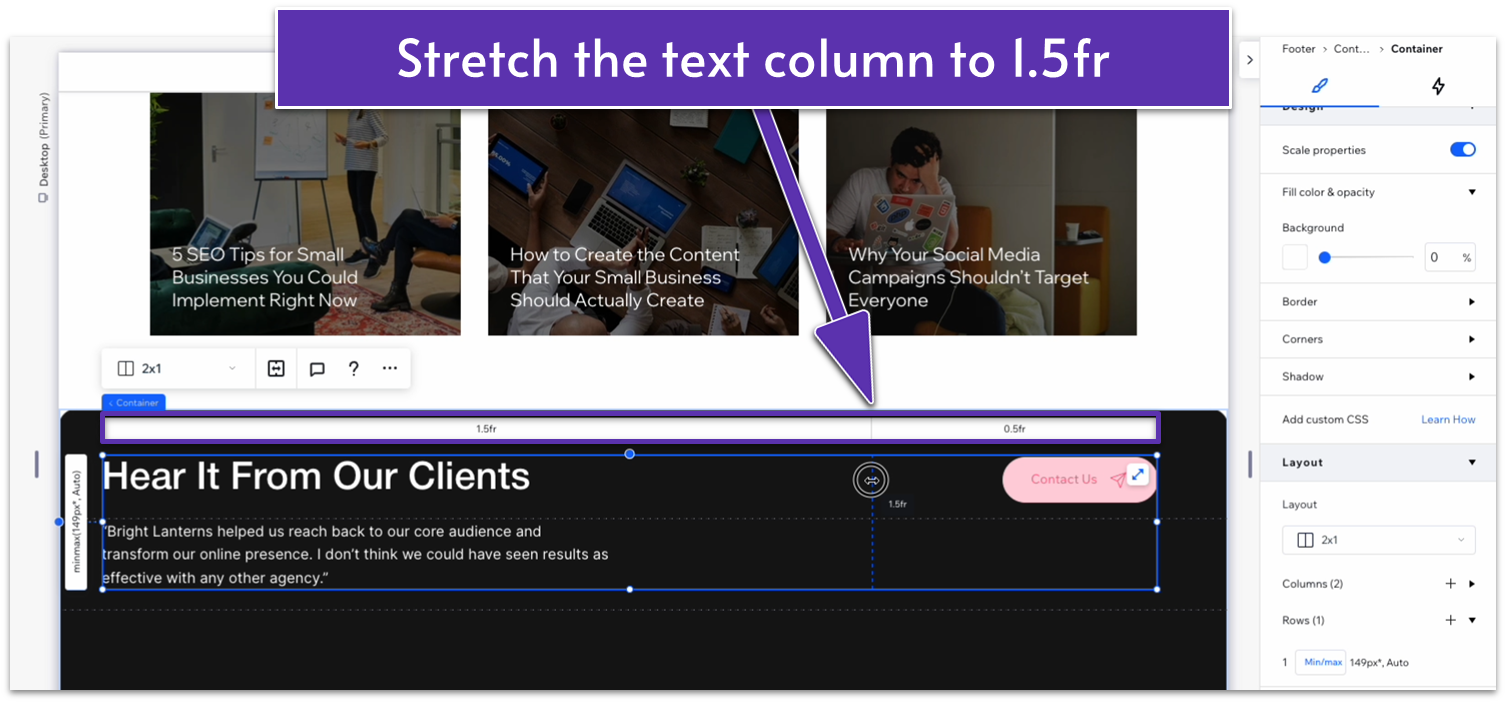
- With the three elements still selected (the text stack and the button), go to the inspector and apply an advanced CSS grid.
- Change the layout to 2×1 ( ) and expand the size of the text column to 1.5fr.
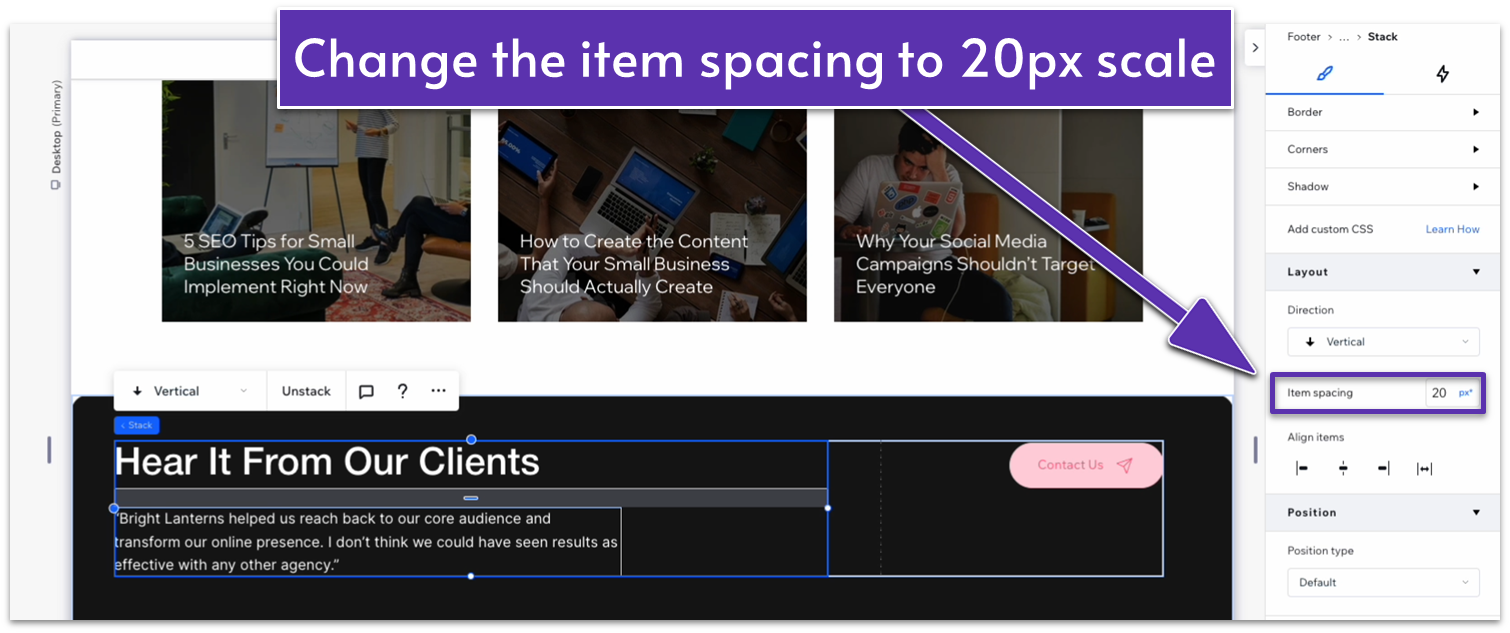
- Change the item spacing to a 20px scale.
- Set all margins for the button to 0.
- Change the text to a call to action for your business.
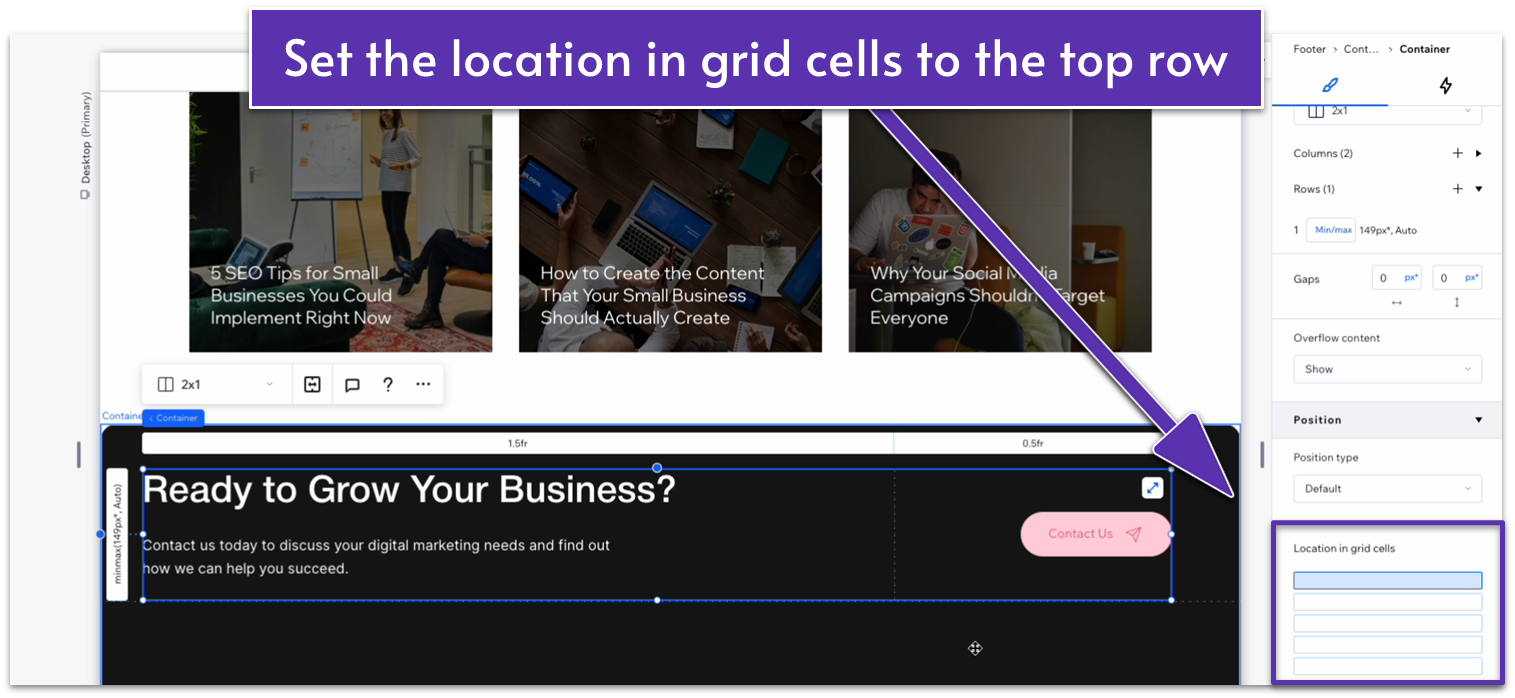
- Change the location in grid cells for the text stack to the top row.
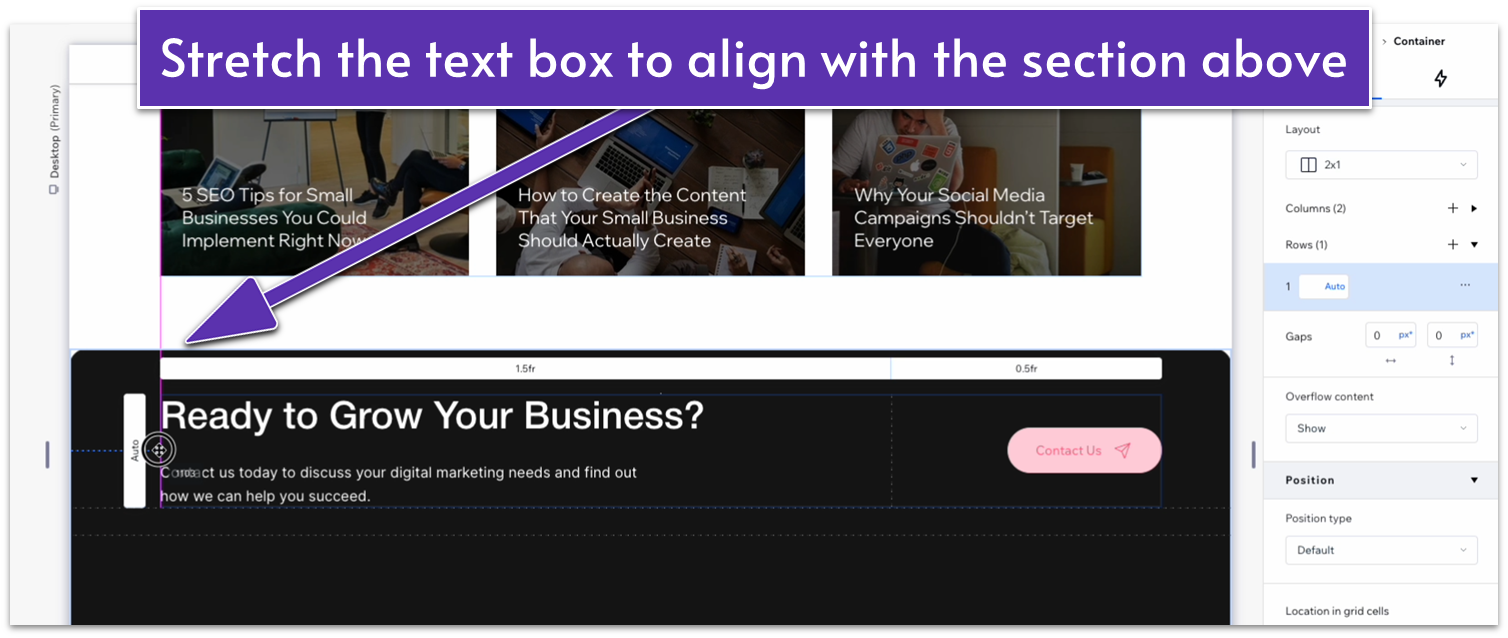
- Set the top row’s behavior to Auto ( ).
- Click on the text stack and set the row’s behavior to Auto ( ).
- Change the vertical gap ( ) between rows to 30px.
- Stretch the text grid to align with the section above.
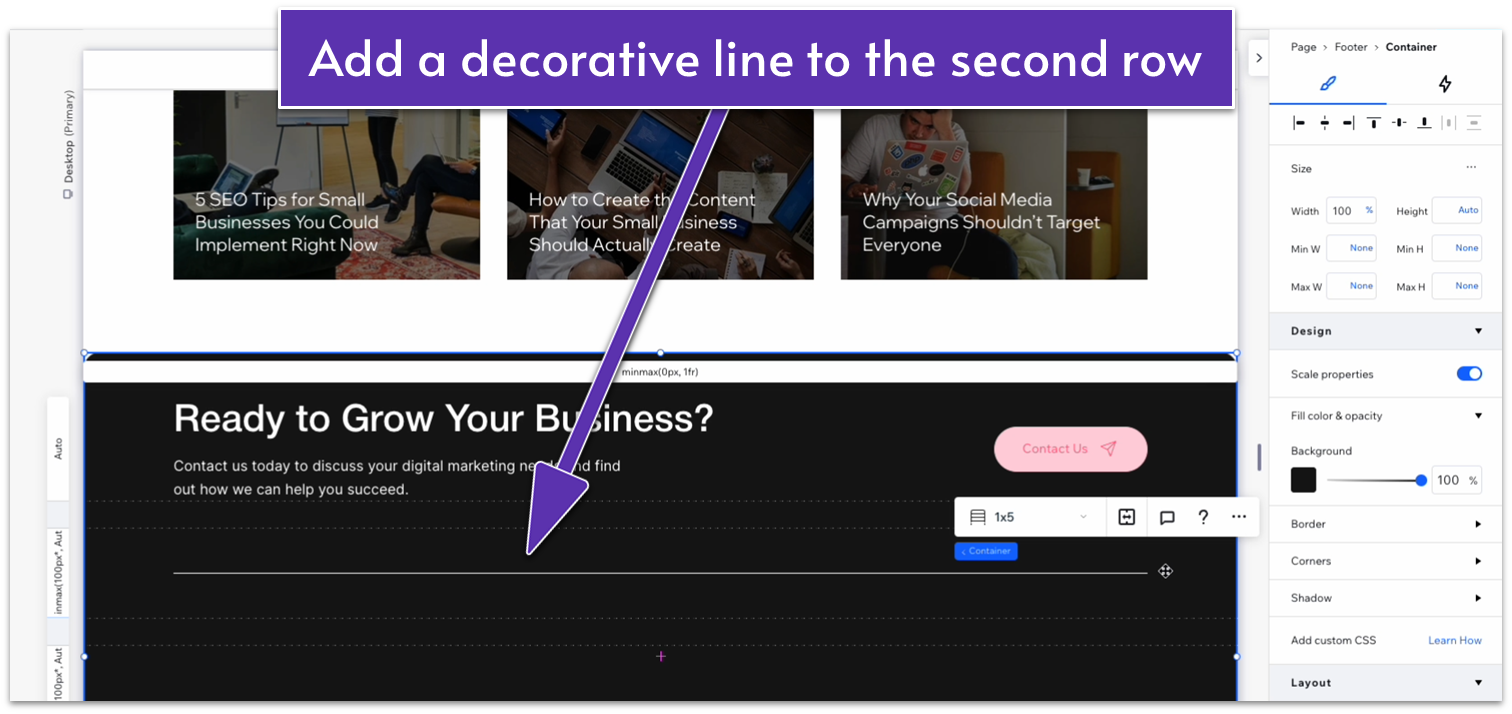
Step 5: Add a line divider to the second and fourth rows.
- Drag a horizontal line into the second row.
- Change the line width to 1px and its color to white (#FFFFFF HEX).
- Set all margins to 0.
- Change the line’s width to 1080px.
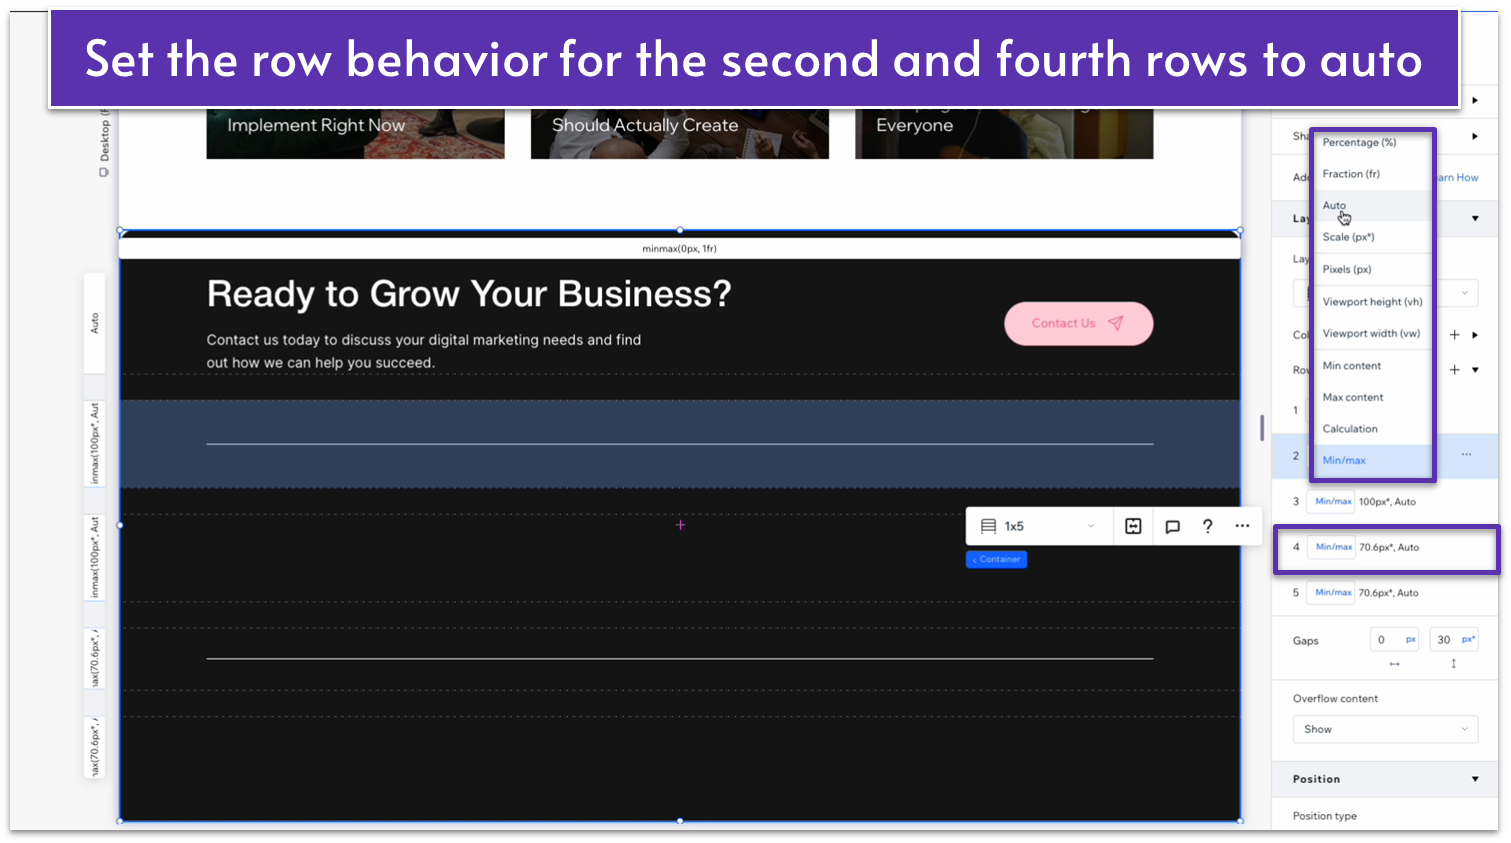
- Duplicate the line and select the location in grid cells for the duplicated line to the fourth row.
- Make sure the second line also has all margins set to 0.
- Set the row behavior for the rows containing the lines to Auto ( ).
Adding Contact Information & Navigation
Step 1: Add a container to the third row and divide it into three columns.
- Add a container to the third row.
- Stretch it vertically to fit the row without spilling and set its width to 1080px.
- Apply an advanced CSS grid and remove the background.
- Set all margins to 0.
- Set its layout to 3×1 ( ) and the horizontal gaps ( ) to 30px.
Step 2: Add text to the left-side column
- Copy and paste text from the “testimonials” section into the left-side column.
- Change the text to your business name and a brief description.
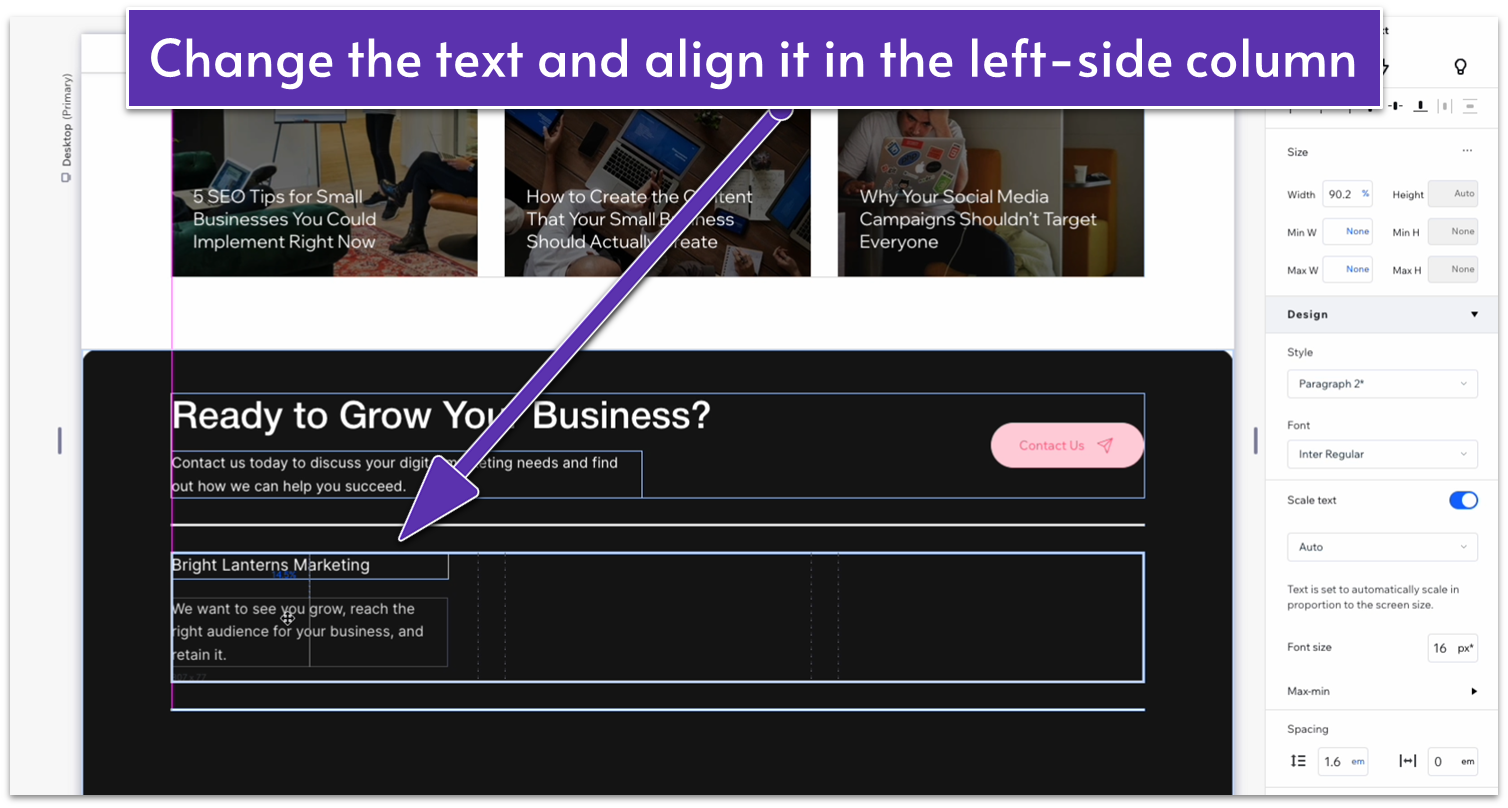
- Stack the elements together and stretch the text stack to fit the left-side column.
- Change the font size of the top text to 22px.
- We’ll change the text font to Inter Medium to add some variance.
- Change the item spacing to a 10px scale.
Step 3: Add navigation to the middle column
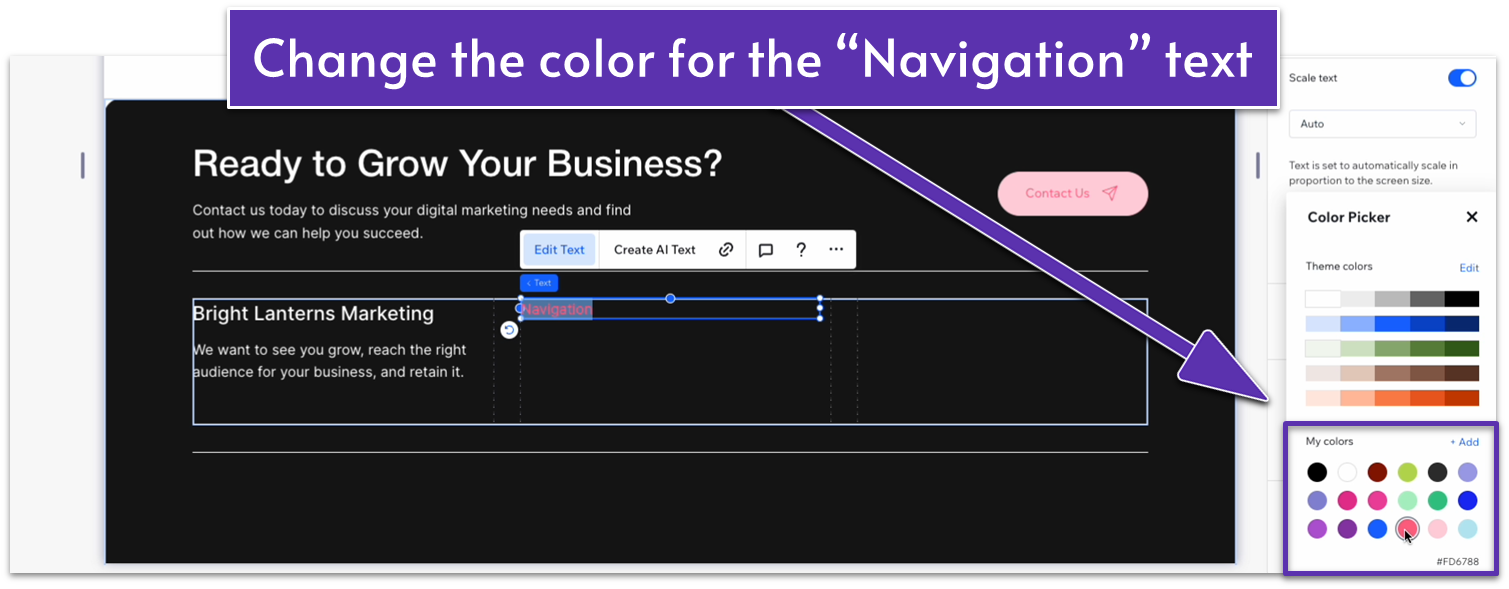
- Copy the text from the left-side column into the middle column and change it to “navigation.”
- Change the font color to #FD6788 (HEX).
- Duplicate the text and move it below the navigation text.
- Change the font color to white (#FFFFFF HEX).
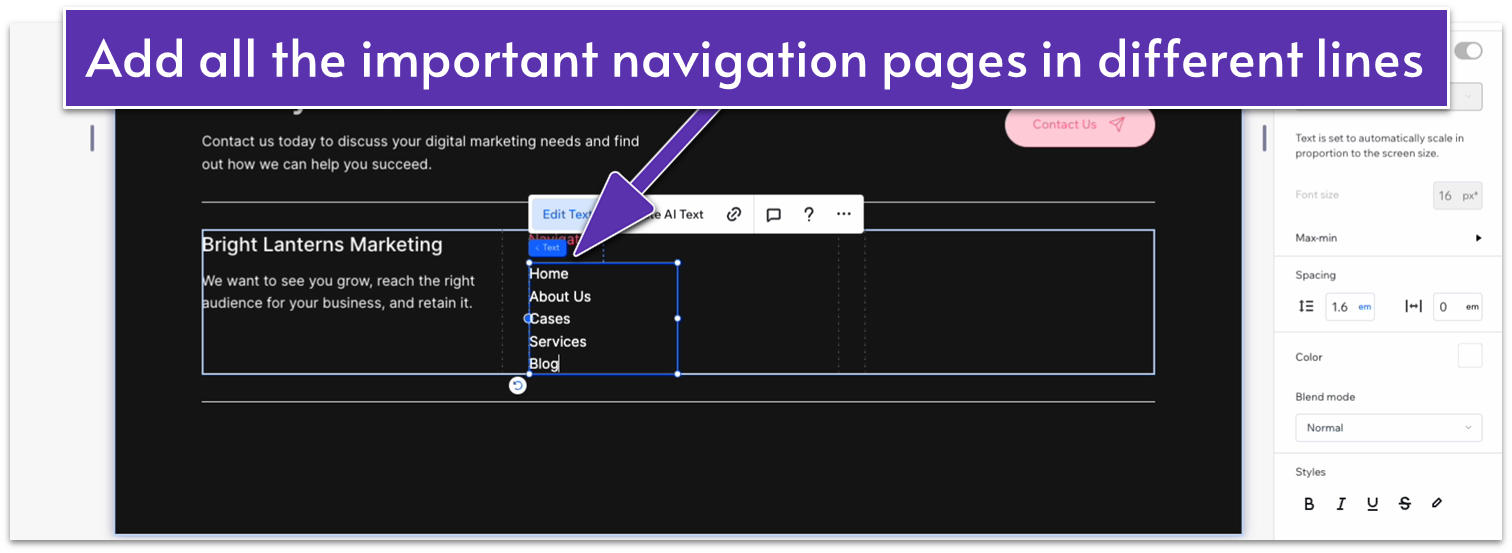
- Replace the text for the name of the page you want it to lead to.
- In the same text box, add each important page in a new paragraph.
- Set the spacing between lines to 2 em.
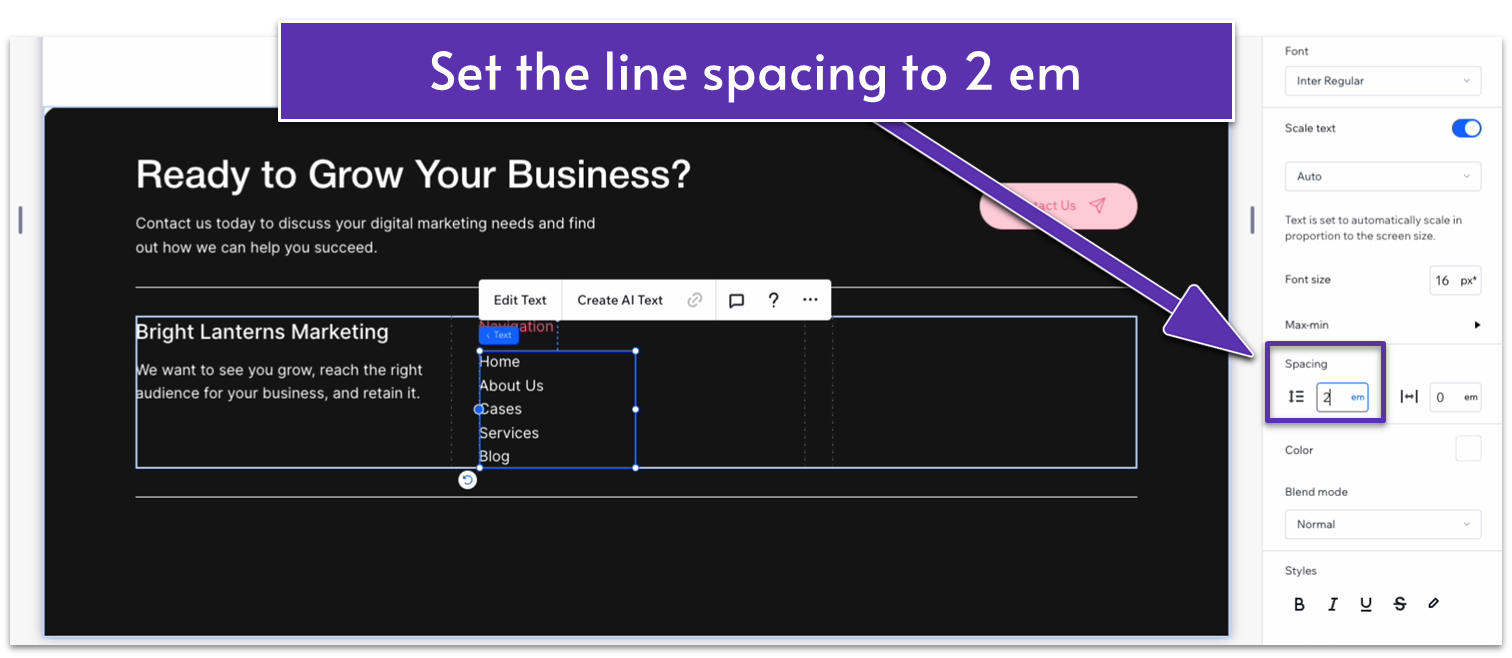
- Change the font size of the bottom text to 14px.
- Stack the text elements together.
- Set the item spacing to 10px scale.
Step 4: Add contact details to the middle column
- Duplicate the navigation text and move it to the right of the original.
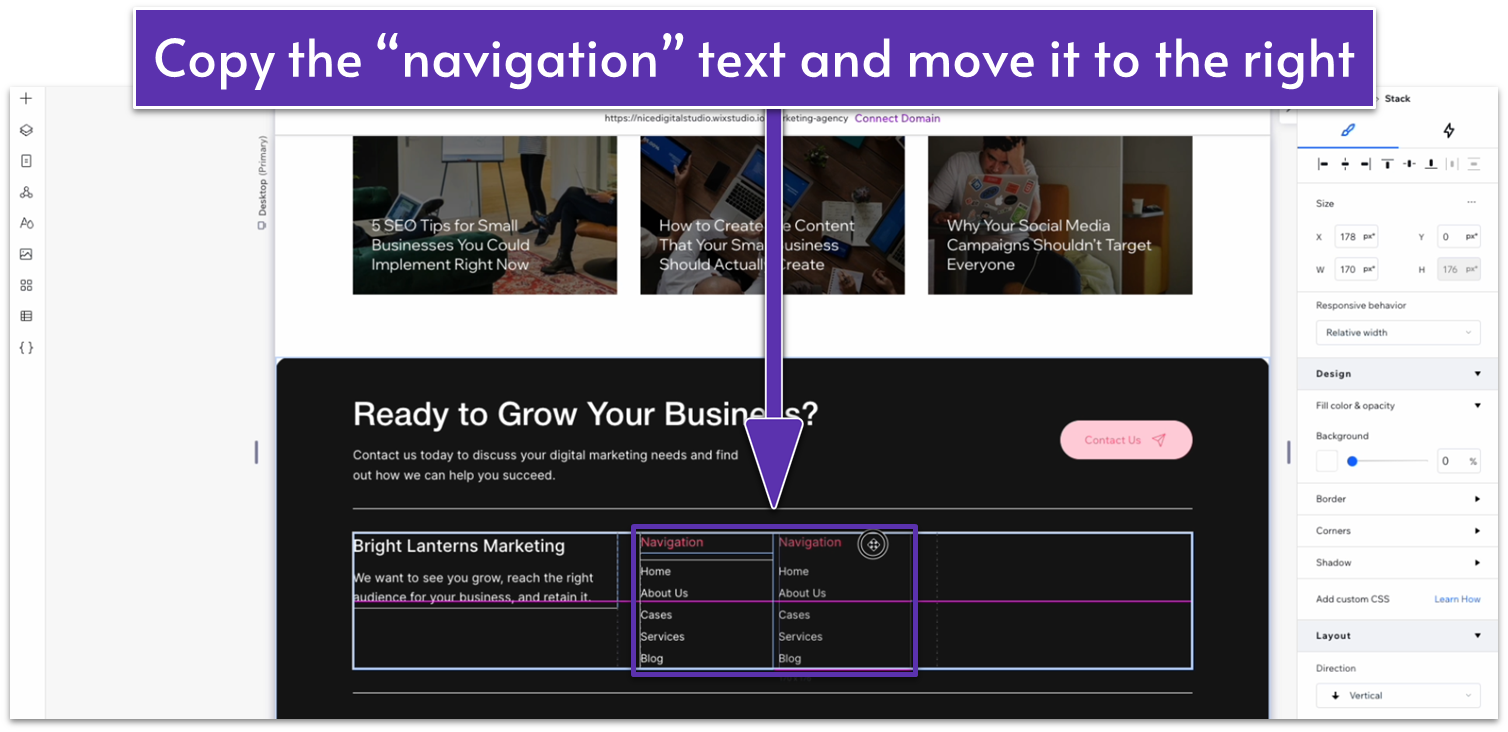
- Stretch the middle column to the right until its width is 1.2fr.
- Change the “Navigation” text to “Contact.”
- Replace the navigation list with relevant contact information.
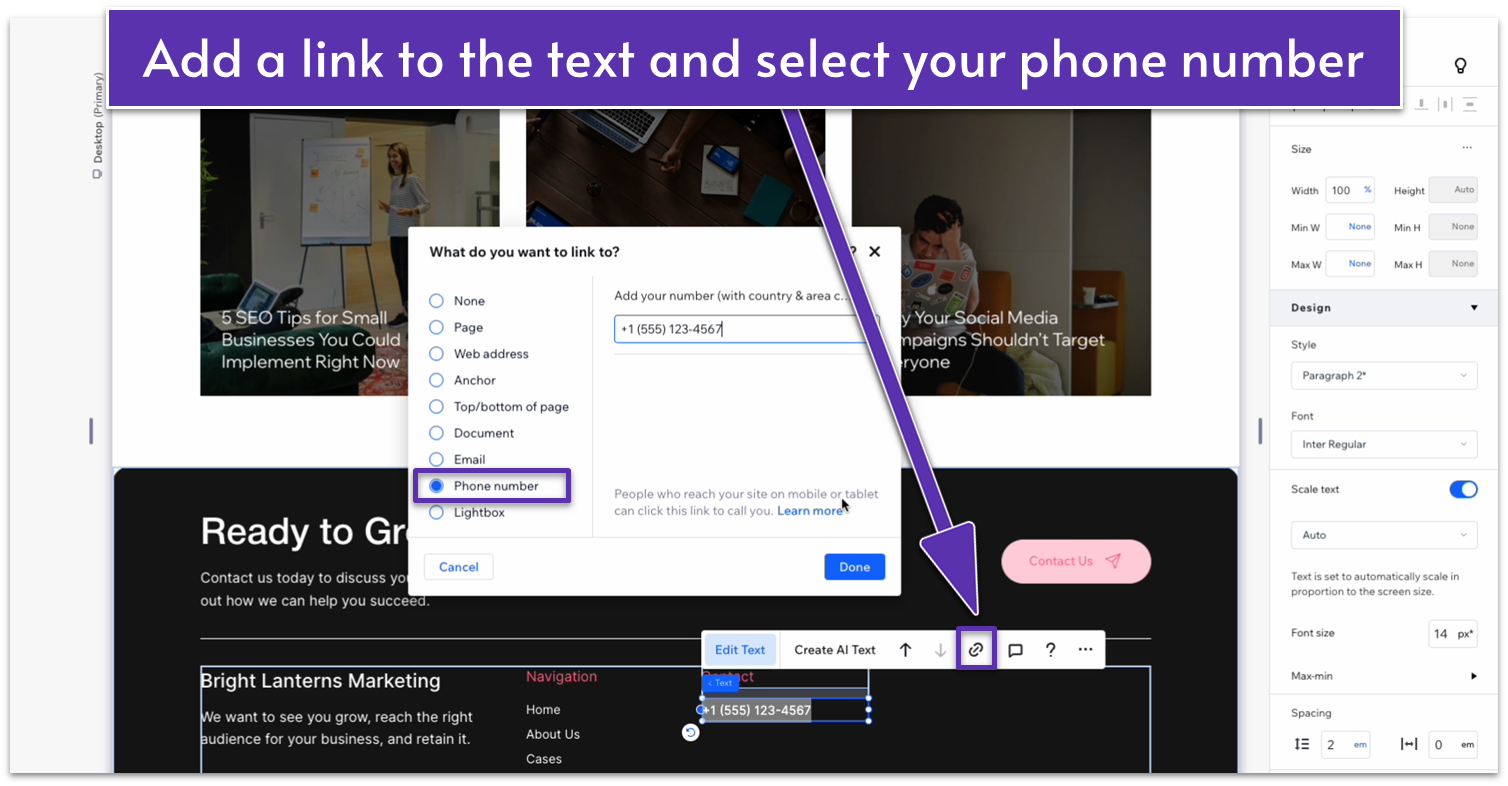
- Write down your business’ phone number.
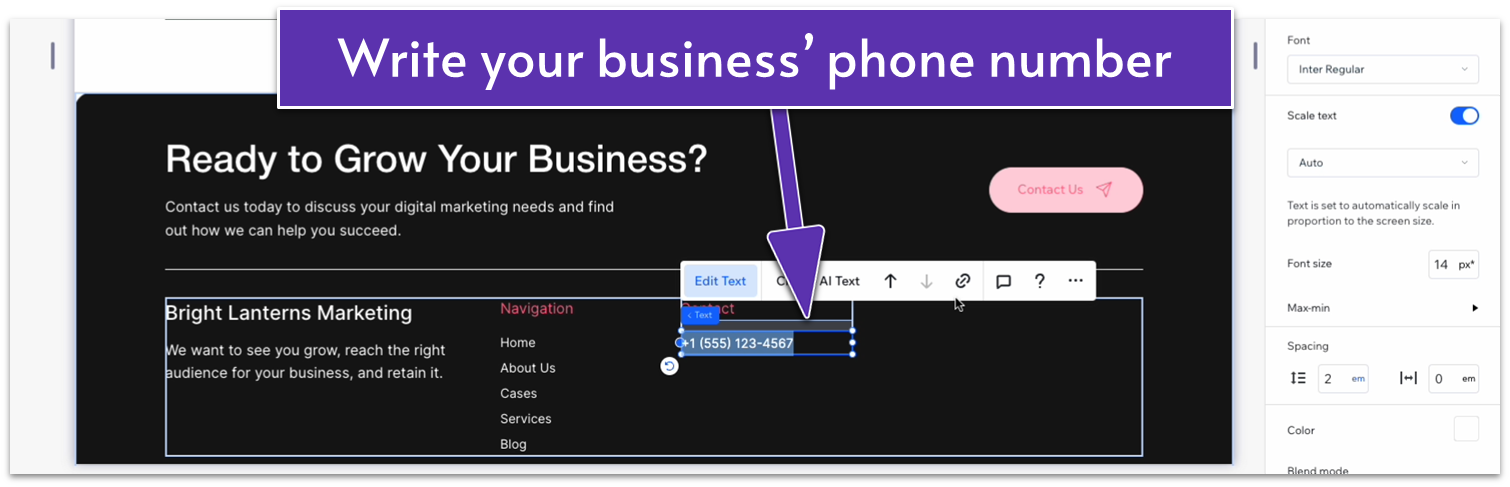
- Click on the chain icon ( ) in the pop-up menu to add a link to that text.
- Select “Phone number.”
- Add your phone number to the link.
- Remove the underline from the phone number.
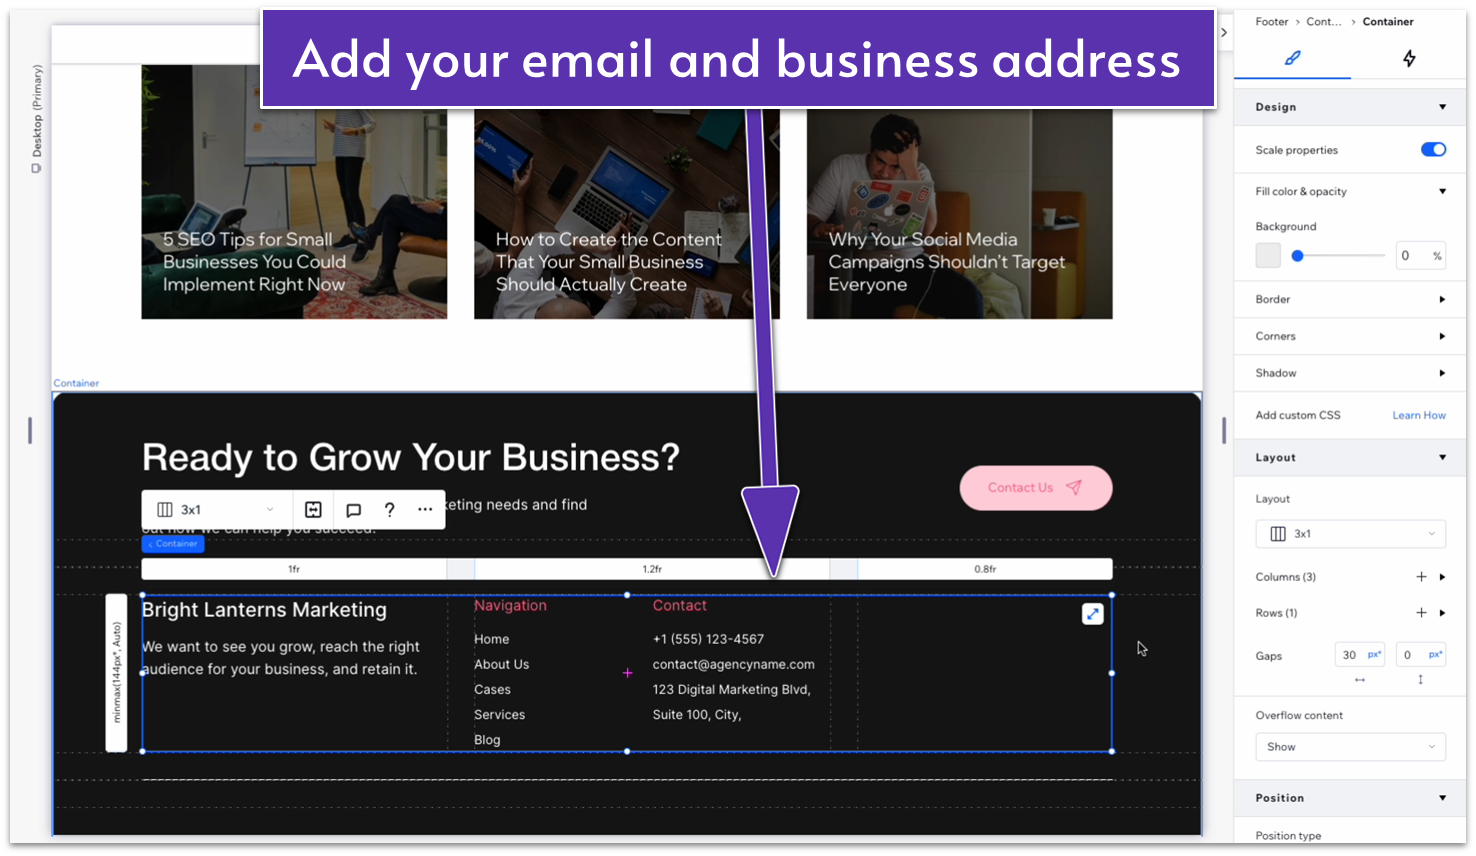
- In another line, enter your email account and follow the same steps to link it to your email.
- Enter your business address below that.
Step 5: Stack the navigation and contact text together
- Make sure the stack is set to horizontal and set the item spacing to 30px.
- Set all margins to 0.
Adding a Subscription Form
Step 1: Add a title to the right-side column.
- Copy the “Contact” text into the right-side column and align it with the other texts.
- Set the text box’s width to 100%
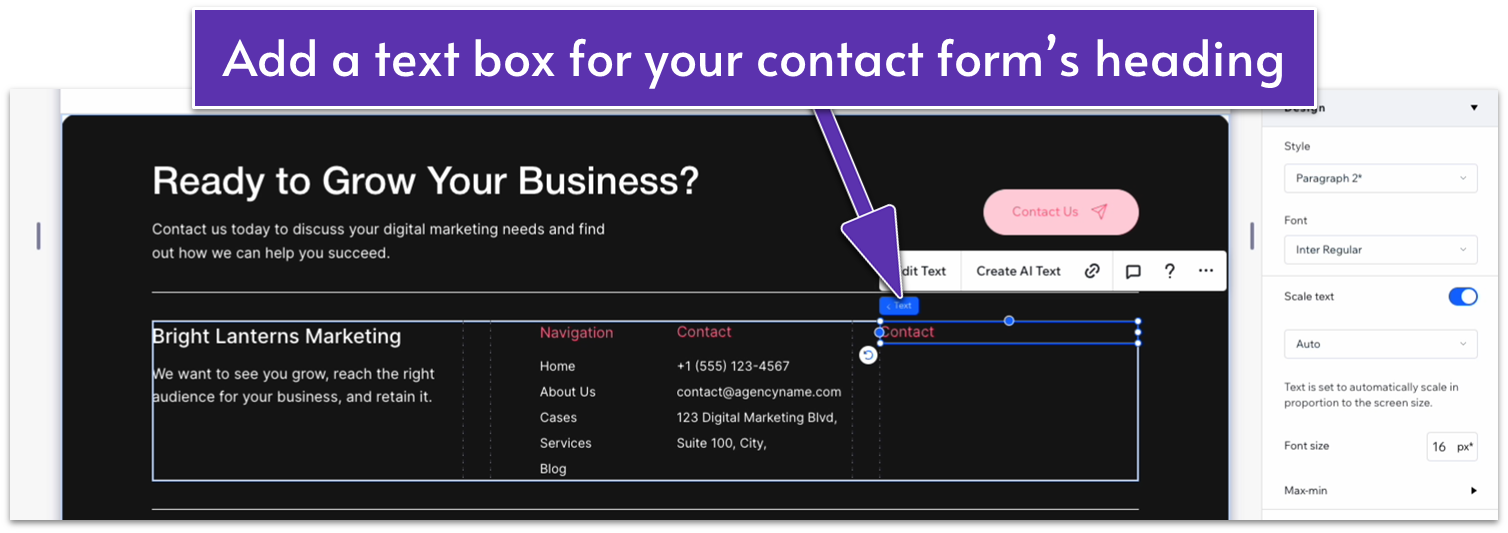
- Replace the text with a call to action to subscribe to the newsletter.
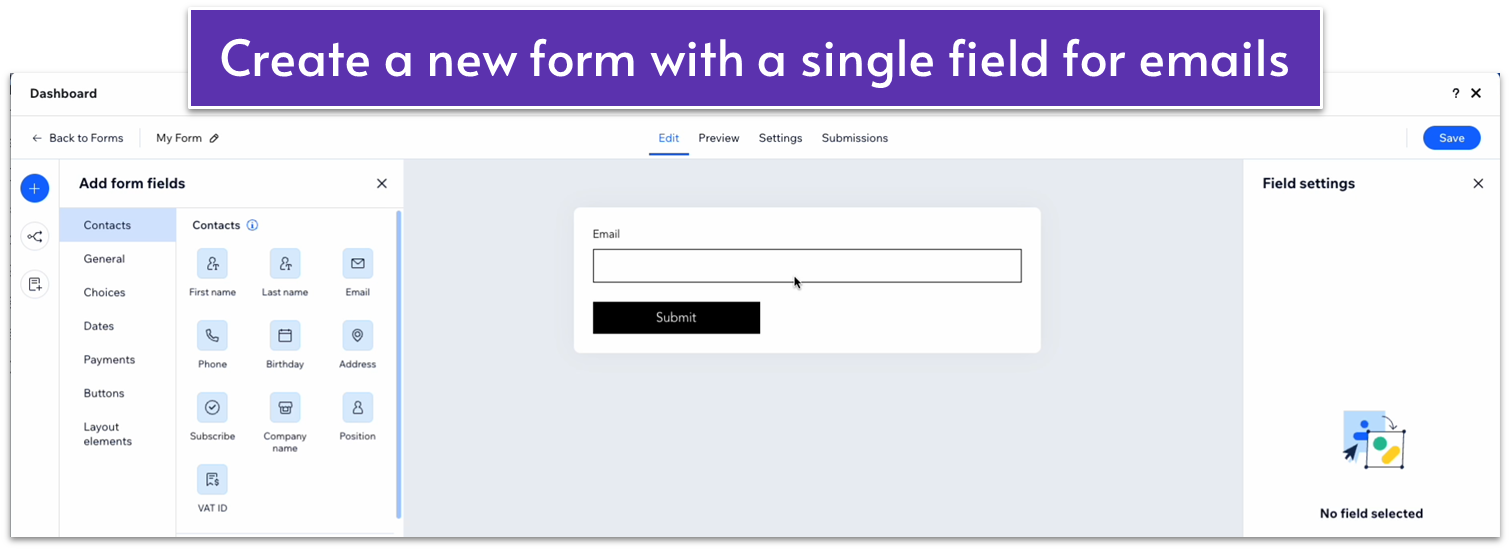
Step 2: Create the form.
- Go to “Add Element” ( ), then “Contact & Forms,” and select “Create New Form.”
- Create a form with a single field for submitting email.
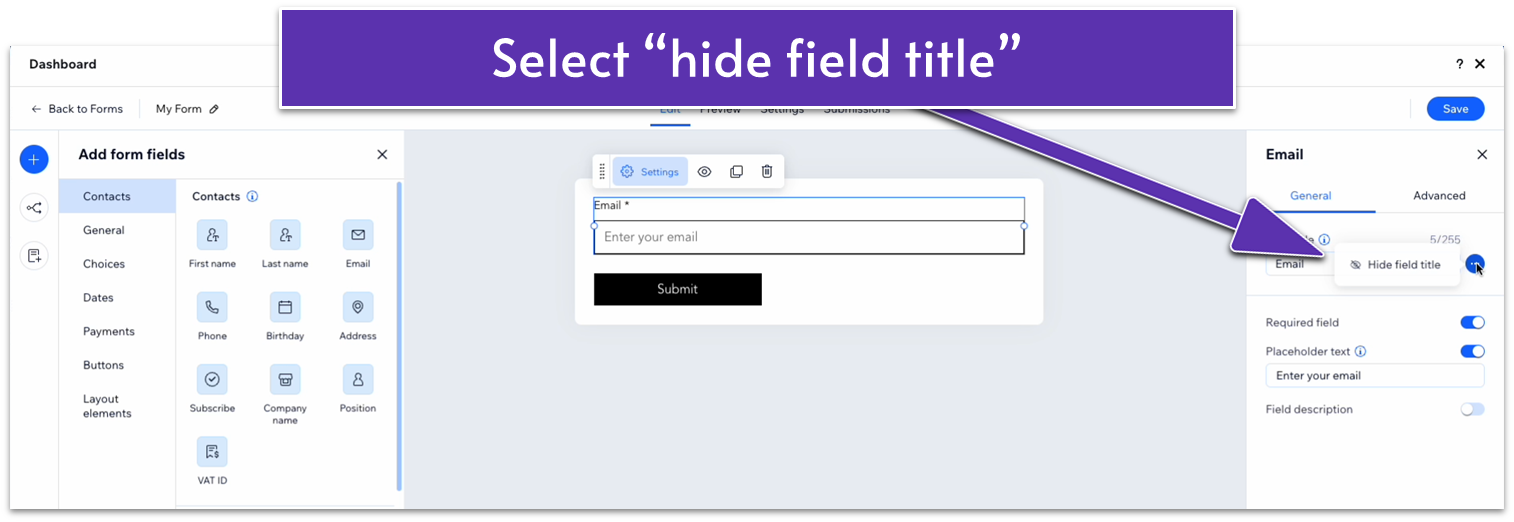
- Select “hide field title” on the “General” settings.
- Change the form name to “Subscribe.”
- Save settings and exit the form creation menu.
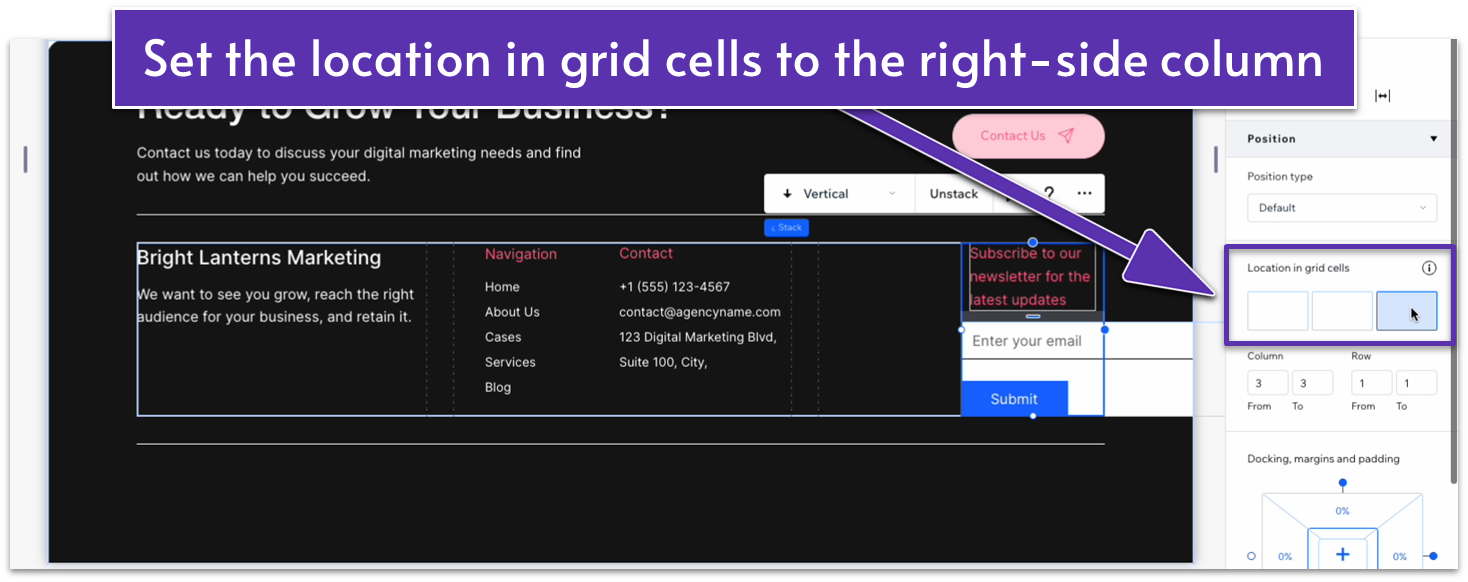
Step 3: Format and design the form.
- Stack the form and text together.
- Select the last column in “location in grid cells.”
- Set all margins to 0.
- On advanced size settings, set the width to 100% for both the complete stack and the individual elements.
- Set item spacing to 20px.
- On the pop-up menu above the form, select “settings,” then go to “design,” and then “form background.” Set the background opacity to 0%.
- Head back to “design” and then “form fields.” Set the corner radius to 8px.
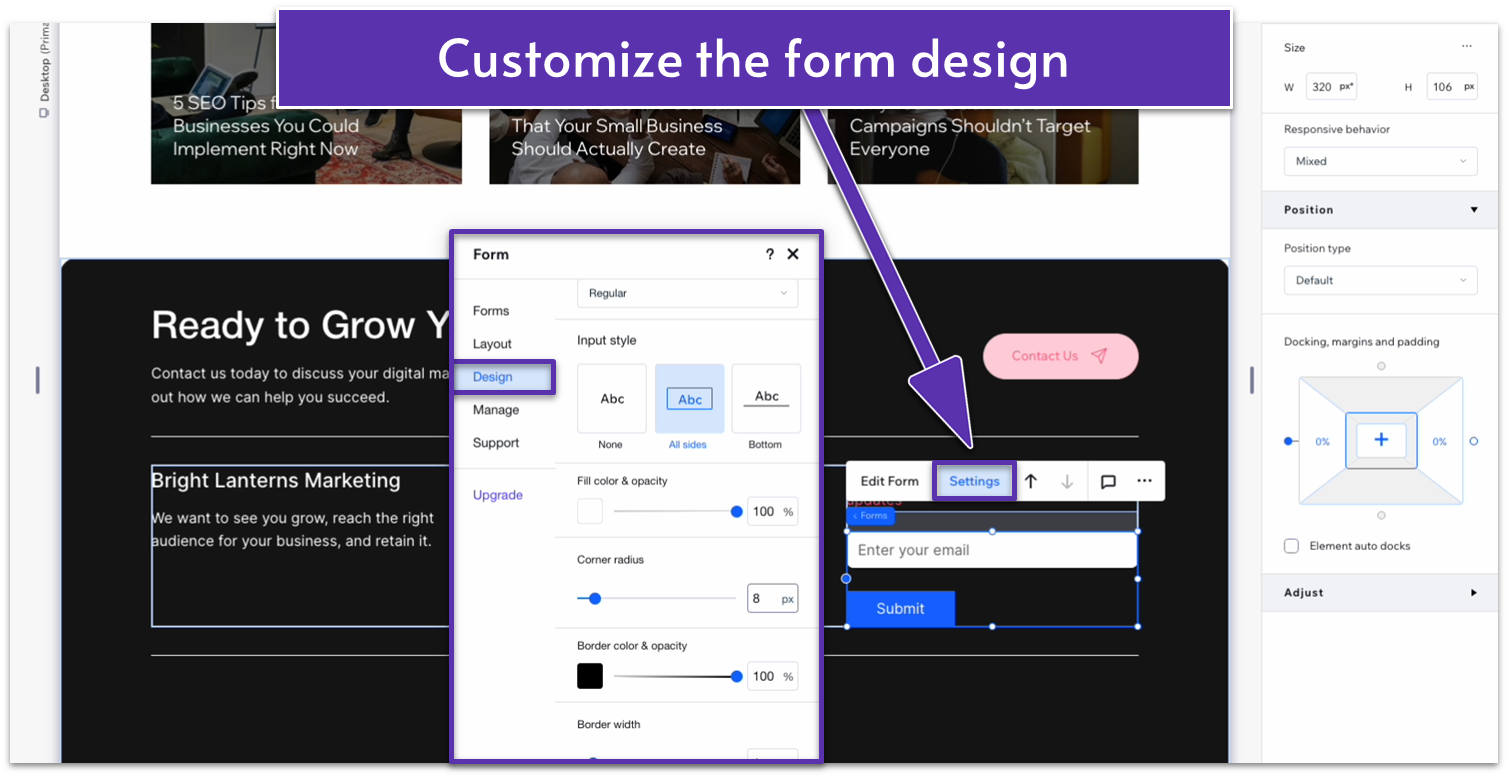
Step 4: Style the submit button.
- Go back to “design,” then go to “buttons” and “submit button.” Change the button style to the rounded, empty button.
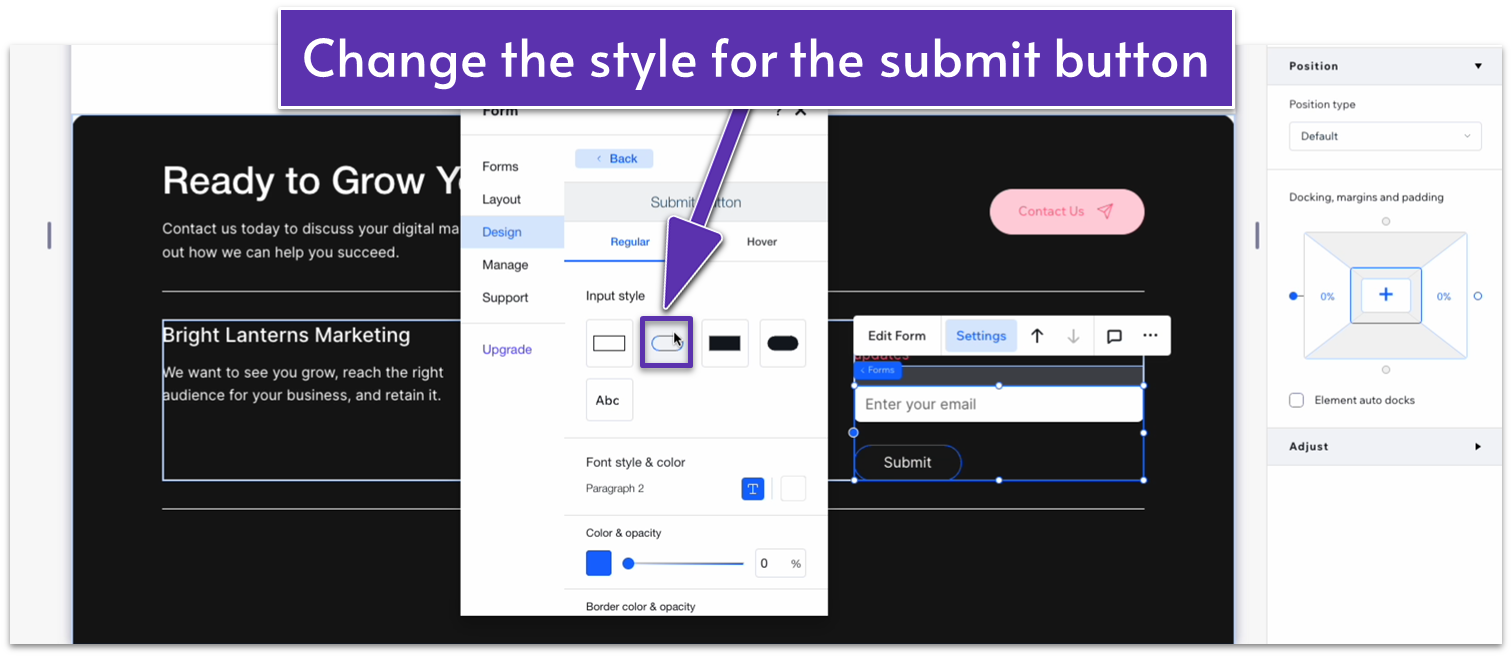
- Change the button’s border color to a slight pink (#FFD1D8 HEX).
- Change the font color to the same color.
- Select the “Hover” option for the button. Leave everything as-is, but change the background color to the same pink as before.
- Change the font color on hover to black (#000000 HEX).
Step 5: Remove the minimum height from the form.
- Click on the form and toggle “advanced settings” for size on.
- Change the unit in “Min W” to “none.”
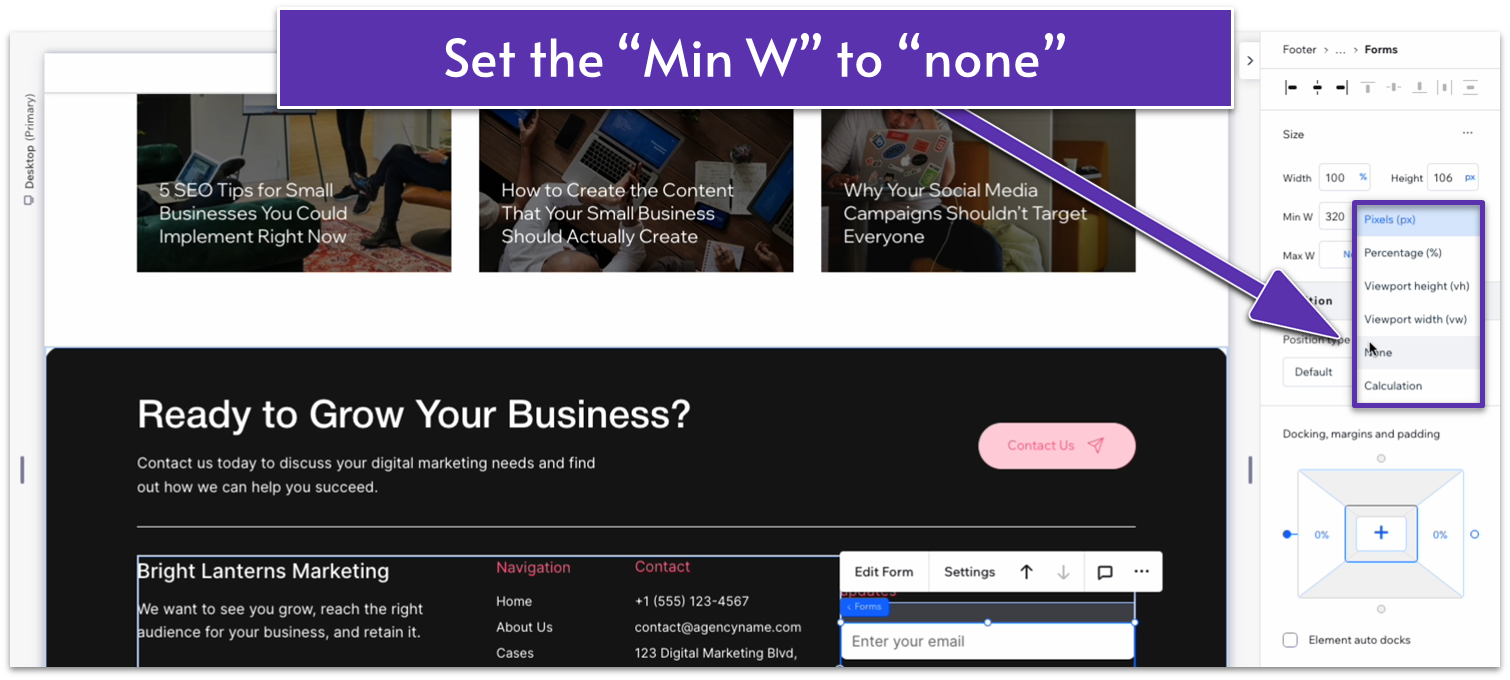
- Change the height to auto ( ).
Step 6: Adjust the sizing for the three columns.
- Stretch the left-side column to 1.1fr.
- Change the row behavior to auto ( ).
Adding Copyright Information
Step 1: Add a copyright notice at the bottom.
- Copy the text from the left-side column in the middle row and paste it into the bottom row.
- Align the text to the center ( ) and change all margins to 0.
- Replace the text with your copyright notice.
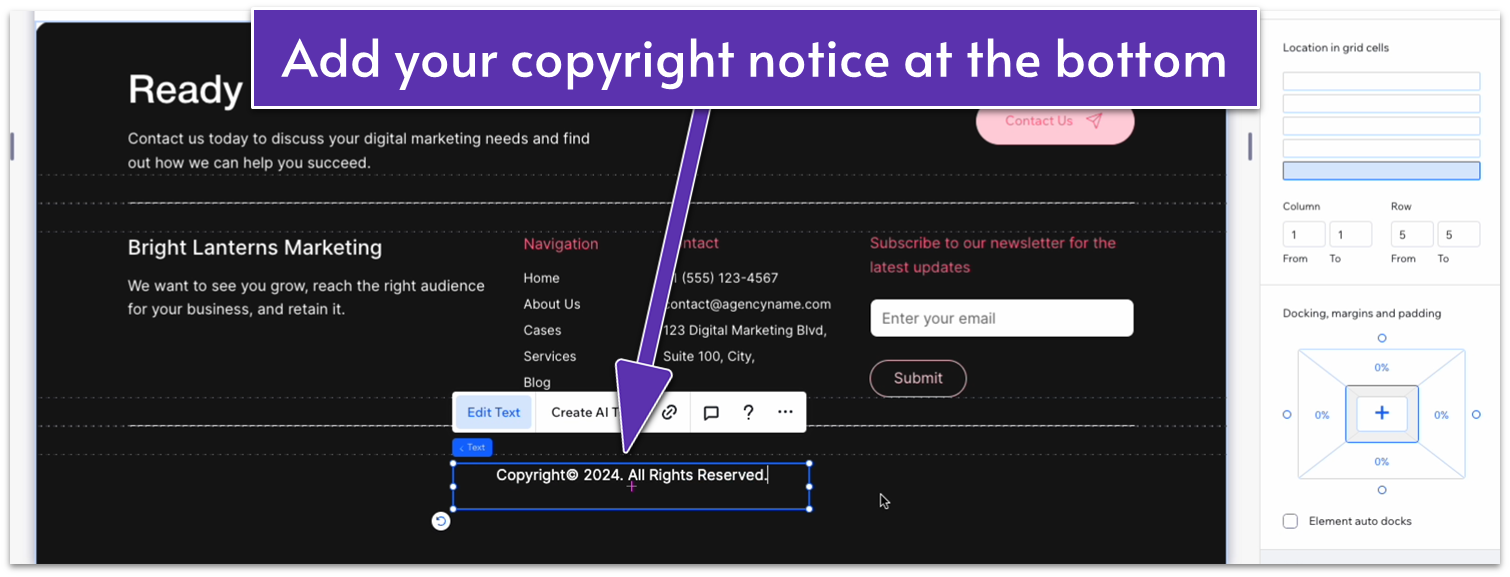
- Set all rows’ behavior to auto ( ).
Adapt for Tablet and Mobile Views
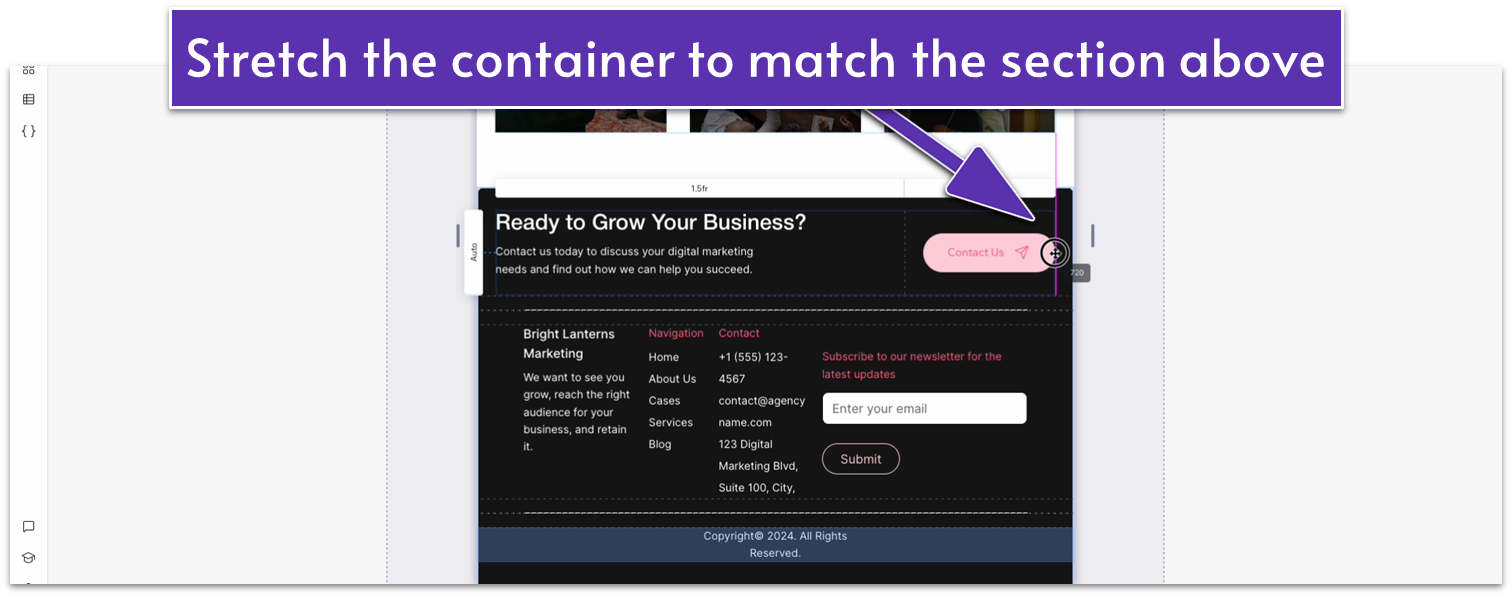
Step 1: Adapt for tablet view.
On tablet view ( ):
- Stretch the top container’s width to match the section above.
- Set the vertical gaps for the entire section to 30px.
- Set the width for both lines to 720px.
- Stretch the container’s width in the middle to match the section above.
- Stretch the copyright notice text box to match the section above.
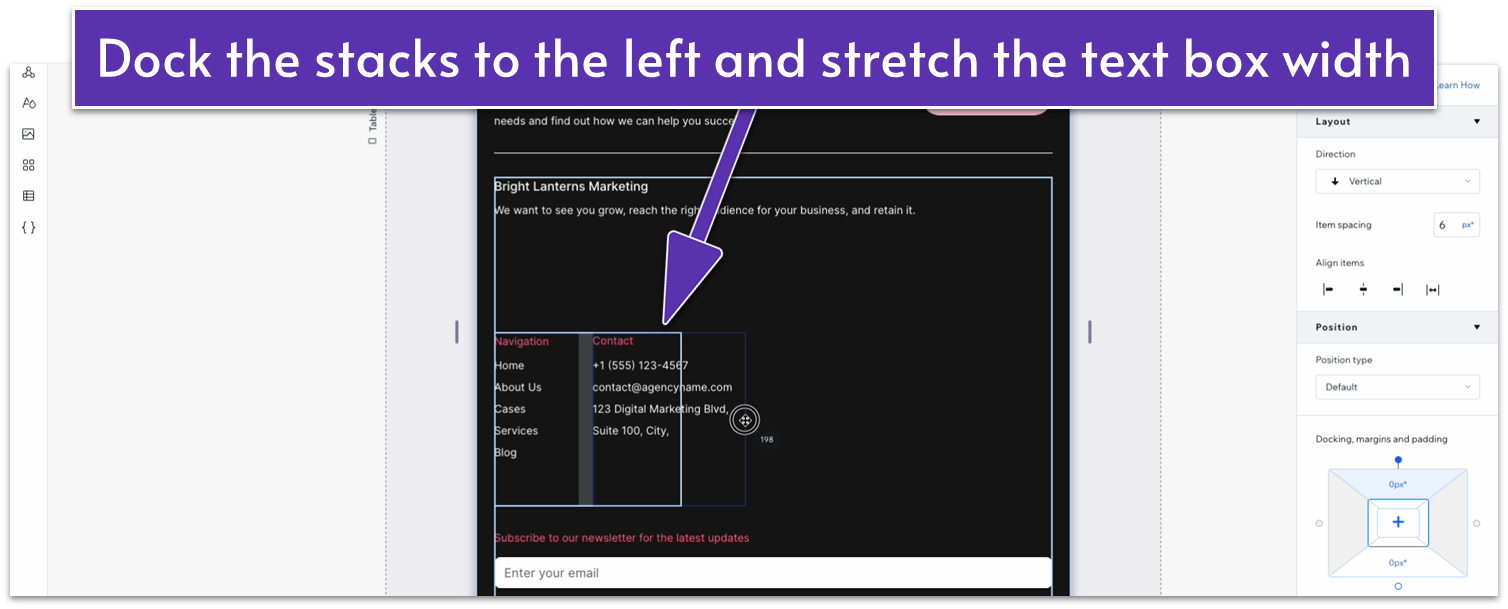
- Change the middle container’s layout from 3×1 ( ) to 1×3 ( ).
- Select the text stack with your navigation menu and contact info, and set all margins to 0.
- Change the width for both stacks to 200px.
- Set the behavior for all newly added rows to auto ( ).
- Set the vertical gap ( ) between rows to 30px.
- Set the item spacing for the stack on the top row to 10px.
- Set the item spacing for the “contact” text stack to 10px.
- Set the font size for the “Navigation” and “Contact” headings to 16px.
- Set the font size for the text above the email submission form to 16px.
- Set the font size for the business title to 20px.
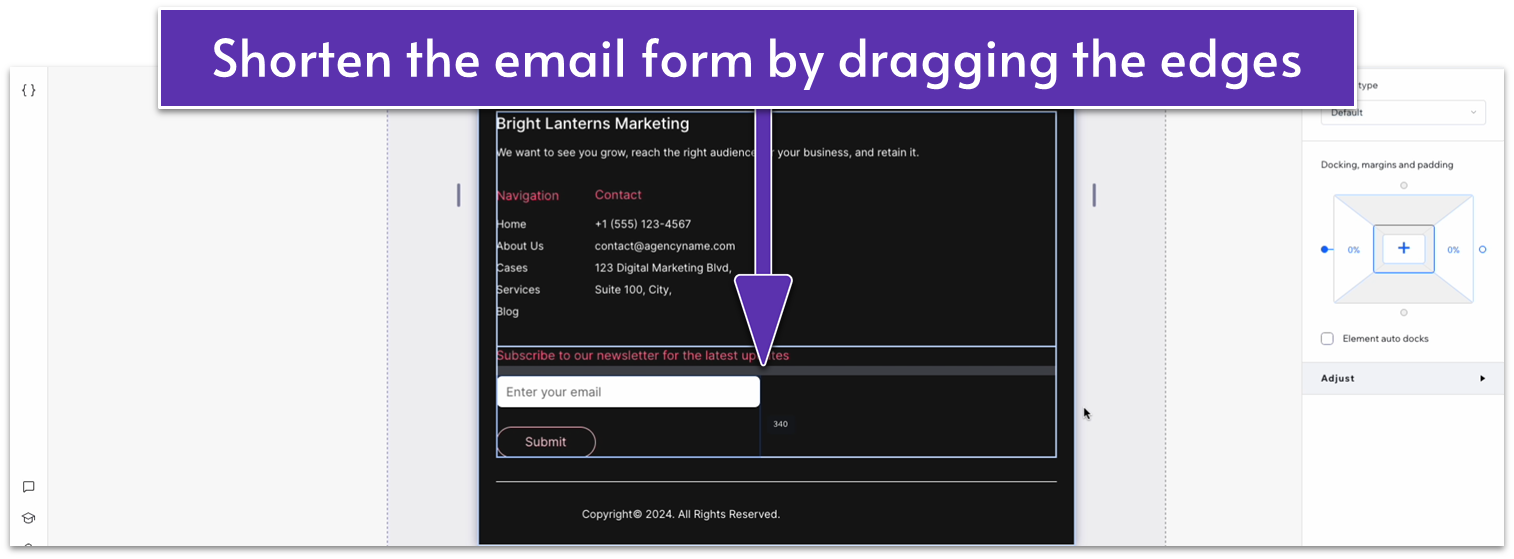
- Shorten the email submission form to a width of 340px.
- Set the item spacing for the stack with the email submission form to 20px.
- Set all margins to 0 for the copyright notice text.
Step 2: Adapt for mobile view
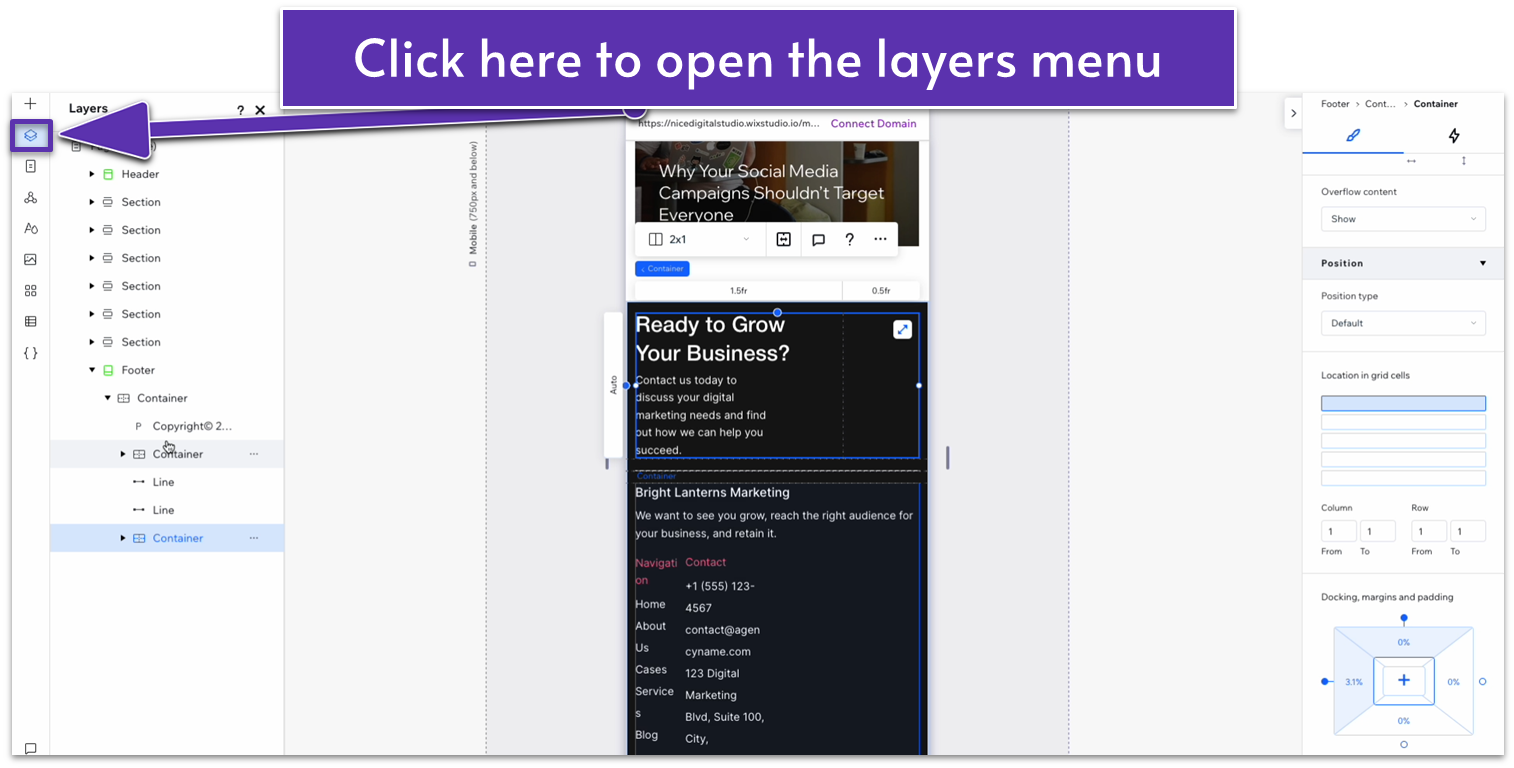
On mobile view ( ):
- On the left-side menu, select the icon that looks like a square on top of the other ( ) just below the plus icon ( ). This is the layers menu, which shows you how items are arranged from front to back.
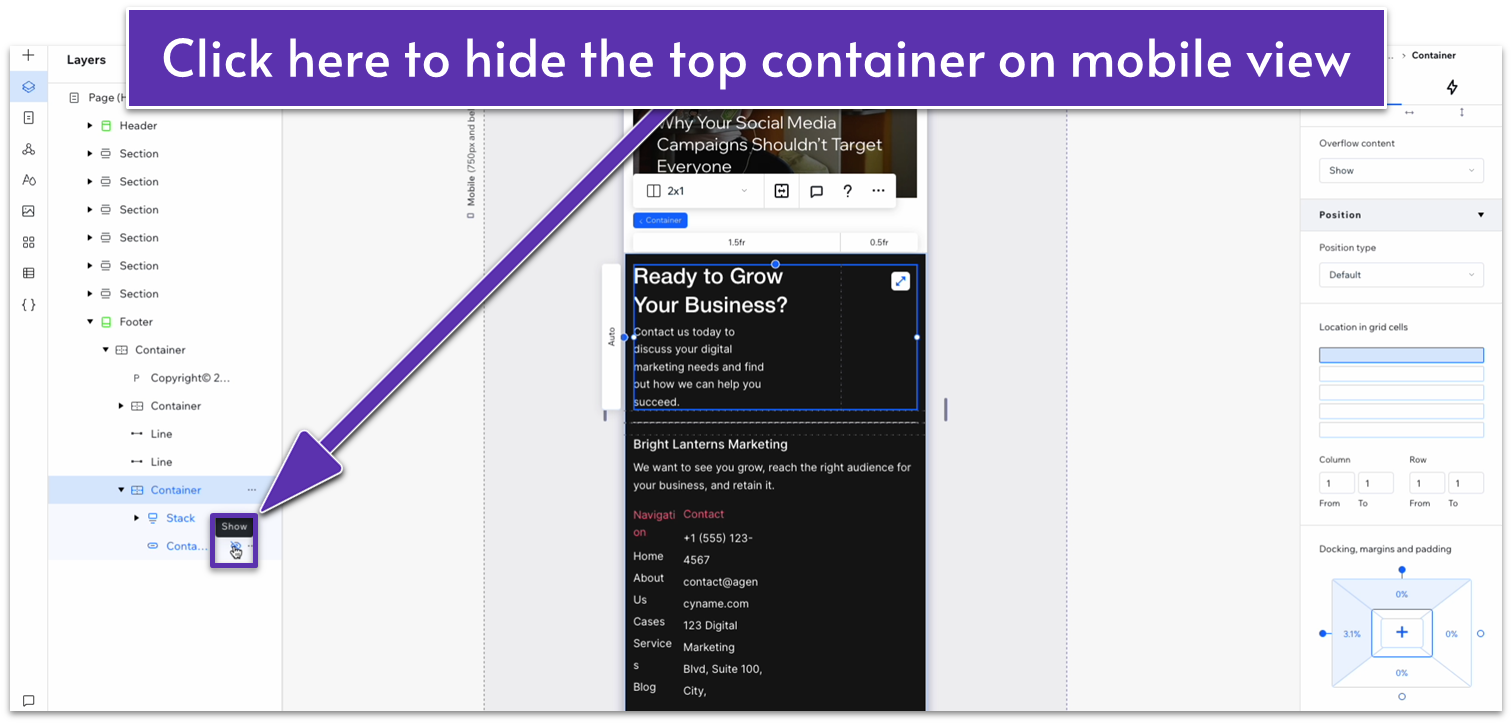
- Select the top container of your footer, then the container within the stack, and click on the eye icon to hide on mobile view.
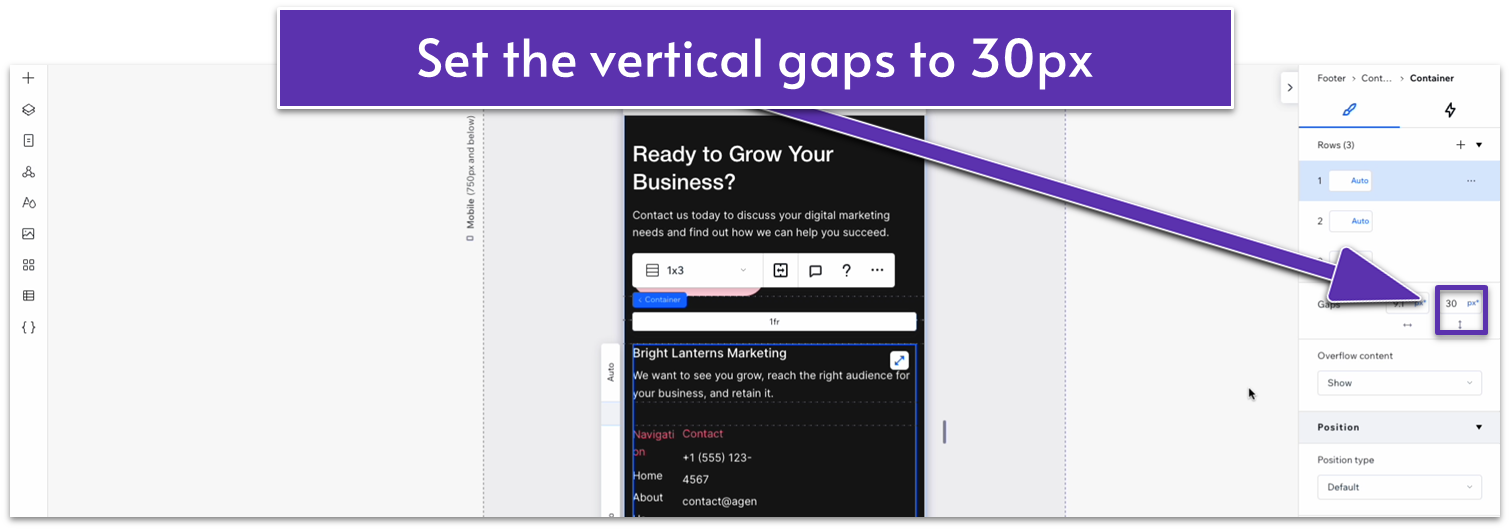
- Change the layout of the top row from 2×1 ( ) to 1×2 ( ).
- Set the vertical gap ( ) between rows to 20px.
- Set the behavior of the bottom row (the one containing the button) to auto ( ).
- Set the behavior of the top row to auto ( ) as well.
- Dock the button to the left ( ) and set all margins to 0.
- Apply advanced size settings to the top text stack and set its width to 100%.
- Set the item spacing for that same stack to 10px.
- Set the width for both text boxes within the stack to 100%.
- Set the top and bottom padding ( ) for the entire section to 50px.
- Set the vertical gaps ( ) for the entire section to 30px.
- Set the vertical gap ( ) for the container below to 30px.
- Set the item spacing for the text stack with your business name and description to 10px.
- Set the font size for the heading with your business name to 22px.
- Set the width for both the “Navigation” text stack to 115px.
- Set the width for the “Contact” text stack to 200px.
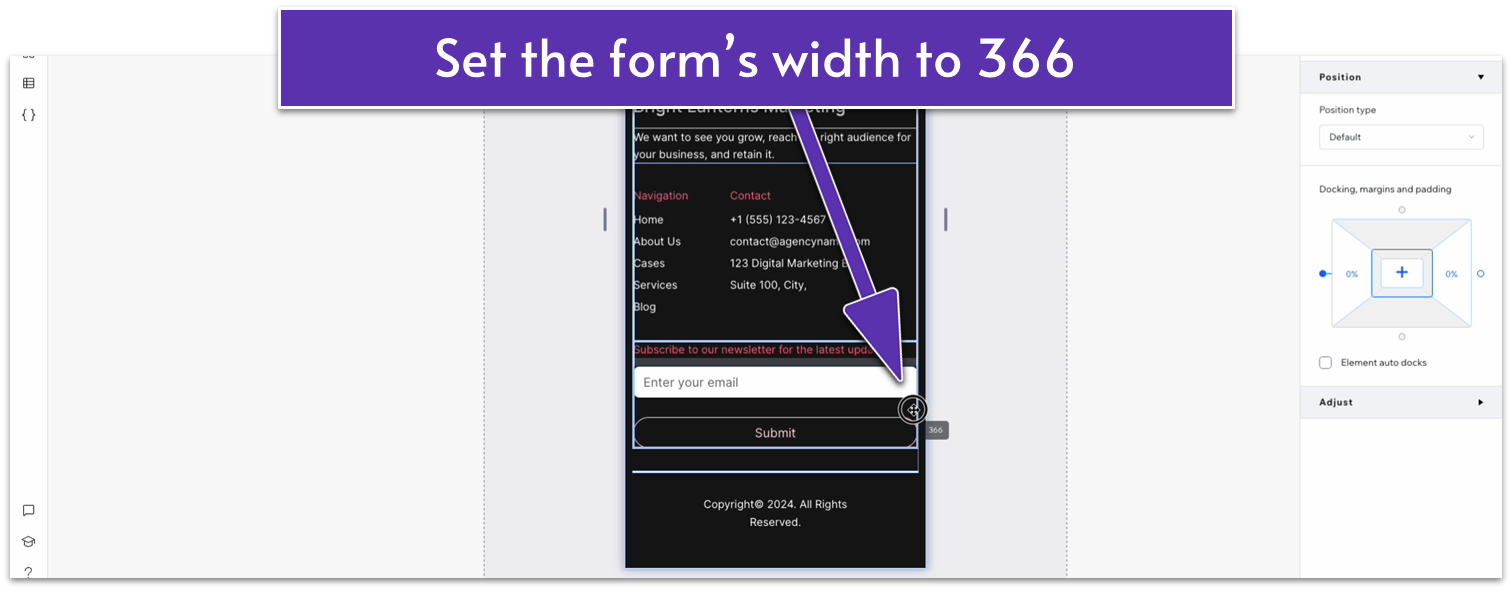
- Stretch the width of the email submission form to 366px.
- Change the font size for the text above the email submission form to 16px.
- Set the font size for both the “Navigation” and “Contact” headings to 16px.
- Set the width for the copyright notice text box to 366px.
