We rank vendors based on rigorous testing and research, but also take into account your feedback and our commercial agreements with providers. This page contains affiliate links. Advertising Disclosure
US$
We rank vendors based on rigorous testing and research, but also take into account your feedback and our commercial agreements with providers. This page contains affiliate links. Advertising Disclosure
Google Cloud Platform is a powerful cloud hosting service for enterprises and developers.
If you’ve decided to give it a try, this guide will take you step-by-step through the process to connect a domain and install WordPress. It doesn’t take very long, and it can be done without support (there’s none available unless you pay anyway).
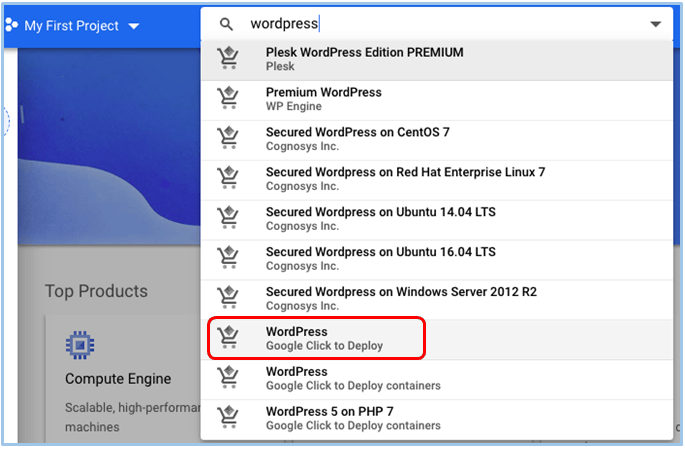
Once you’ve logged into your Google console, enter WordPress into the search bar at the top. This will bring up a long list of WordPress options. Select Google Click to Deploy.
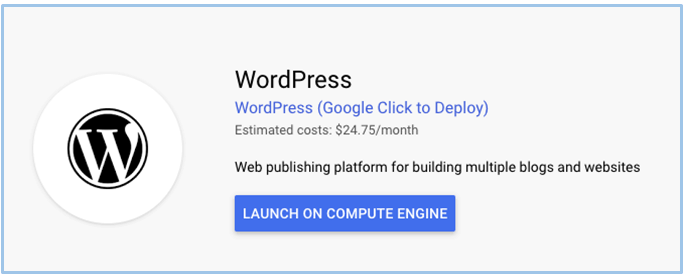
Step Two: Launch Compute Engine
On the next screen, select Launch on Compute Engine, then select which project to install it into. I opted for My First Project, which had already been created by default. You’ll have to wait a few minutes for the APIs to be configured (just a fancy way of telling you the installation is in progress).
Step Three: Enter App Information
You’ll then be prompted to enter some information about your app. This page might look a bit confusing, but you only really need to enter your email address and name, leaving everything else as is.
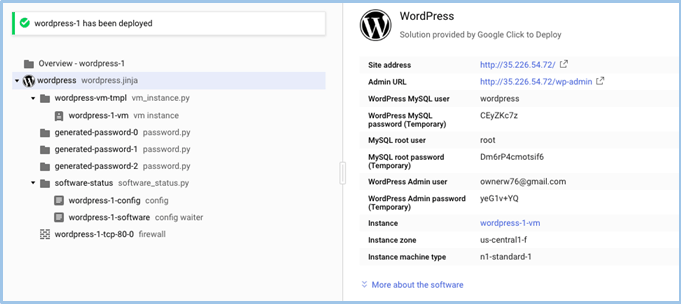
Step Four: Wait for the Installation
Again, you need to wait a minute or two for the website to be configured, and that’s it. Your brand new WordPress website is live, albeit on a temporary domain—we’ll get to that in a moment.
Step Five: Map Your Domain
Next, to map your domain to the WordPress instance, you’ll need to verify you own it via the console. To do this, follow these easy steps:
Log into your Google console.
Select VPC Network from the left-hand menu.
From the dropdown under Type, make sure Static is selected.
Go back to the hamburger menu on the left-hand side and select Virtual Machine.
When you can see your WordPress instance listed, copy the external IP address to your clipboard.
Head over to your domain registrar (e.g., GoDaddy) and create an A record pointing at the external IP. Hop onto your registrar’s live chat if you need help.
Wait for your website to propagate. This could take anywhere between 5 minutes and 48 hours.
I did try to contact customer service throughout the process, since it wasn’t immediately clear how to connect the domain. Unfortunately, as I hadn’t paid for a support plan, it wasn’t possible.
Not Intuitive, but Relatively Quick
This process took around 20 minutes in total, and while it wasn’t the simplest setup I’ve ever executed, it remains a task that didn’t require an extensive amount of time. The language used is notably technical and is distinctly crafted for advanced users and developers.
If you’re interested in learning more about GCP, I’d recommend reading my detailed review of GCP’s features, support, pricing, and so on. But if the techy language has put you off, I recommend beginner-friendly FastComet and its excellent, easy-to-use features.
Gwen is a web developer and software engineer who loves to get lost in JavaScript (and a good book). She spends her free time teaching girls how to be coders, and doing yoga on her balcony in the sunshine.
Follow our experts on
Rate this Article
4.0Voted by 3 users
You already voted! Undo
Any comments?
1 comments
Reply
View %s replies
View %s reply
anonymus
Reply
Tried that, then added Load balancer for the ssl,it didn't see the previous ip,so had to create new one. Which up should be used in the A records?
Reply
Website Planet Team
Your A record should point at the external IP you get on GCP. This IP is listed under the WordPress instance you installed on your server. If you need additional help, feel free to contact your registrar. They'll be able to guide your further.
Thank you, - your comment was submitted successfully!
We check all user comments within 48 hours to make sure they are from real people like you. We're glad you found this article useful - we would appreciate it if you let more people know about it.
Share this blog post with friends and co-workers right now:
Thank you, , your comment was submitted successfully!
We check all comments within 48 hours to make sure they're from real users like you. In the meantime, you can share your comment with others to let more people know what you think.
Thank you for signing up!
Once a month you will receive interesting, insightful tips, tricks, and advice to improve your website performance and reach your digital marketing goals!