We rank vendors based on rigorous testing and research, but also take into account your feedback and our commercial agreements with providers. This page contains affiliate links. Advertising Disclosure
Aruba.it offers a wealth of features for developers and for beginners. If you’d like to learn more about it, read my in-depth review. In this article, I’ll walk you through the process of connecting your domain and setting up WordPress.
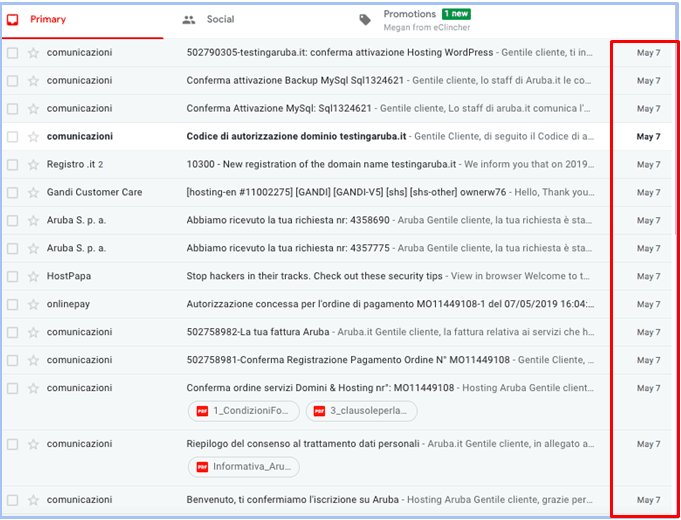
When you sign up with Aruba.it, you’ll receive a lot of welcome emails—most in Italian. Believe it or not, the screenshot below shows all of the emails I was sent the day after I signed up.
There’s some useful information in the emails if you’re an Italian speaker, but if you’re not, you have to consider whether it’s worth the time to translate them one by one.
No matter which language you speak, you will have to search through the emails to locate the one containing your control panel’s username and password. That’s exactly what I did—I searched and then attempted to log in and configure my WordPress website.
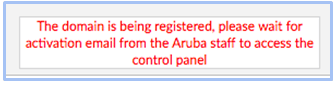
However, in website hosting, it’s rarely that simple. Since I’d purchased a domain from Aruba.it, I got this error message.
I waited for the email. Approximately six hours later it came through and I was able to visit my WordPress website live on the URL.
If you think I’ve missed a step or two, you’d be right. I didn’t have to map any Domain Name System (DNS) or manually install WordPress. The nice people at Aruba.it had done the legwork for me because I’d purchased the WordPress hosting service. Thanks, Aruba.it!
What’s more, as Aruba.it doesn’t offer a free CDN (content delivery network), I didn’t have to install that either. After receiving the activation email, my website was ready to use.
Slow, but Very Easy
It took about seven hours from start to finish, and then the relentless, confusing welcome emails were in Italian, but those issues aside, I really didn’t have to do anything other than wait.
If you want to learn more, head over to my full review of Aruba.it. Or if you’d prefer a host with instant setup, read the in-depth review on Hostinger to see how you can get started in just a couple of minutes.
Gwen is a web developer and software engineer who loves to get lost in JavaScript (and a good book). She spends her free time teaching girls how to be coders, and doing yoga on her balcony in the sunshine.
Thank you, - your comment was submitted successfully!
We check all user comments within 48 hours to make sure they are from real people like you. We're glad you found this article useful - we would appreciate it if you let more people know about it.
Share this blog post with friends and co-workers right now:
Thank you, , your comment was submitted successfully!
We check all comments within 48 hours to make sure they're from real users like you. In the meantime, you can share your comment with others to let more people know what you think.
Thank you for signing up!
Once a month you will receive interesting, insightful tips, tricks, and advice to improve your website performance and reach your digital marketing goals!
So happy you liked it!
Share it with your friends!
Or review us on
842658
50
5000
8728818
This page isn't yet translated into . If you wish to volunteer and translate it, please contact us using the contact us page